Exascale VM Cluster
Oracle Database@Azure enables you to create an Oracle Exadata Database Service on Exascale Infrastructure from the Oracle Database@Azure portal.
- These are the steps to create an Exascale VM Cluster.
- Complete the prerequisites before creating an Exascale VM Cluster. For more information, see the Prerequisites section.
- From the Microsoft Azure portal, select Oracle Database@Azure application.
- From the left menu, select Oracle Exadata Database Service on Exascale Infrastructure.
- To begin the provisioning flow, select Vm clusters, and then + Create icon.
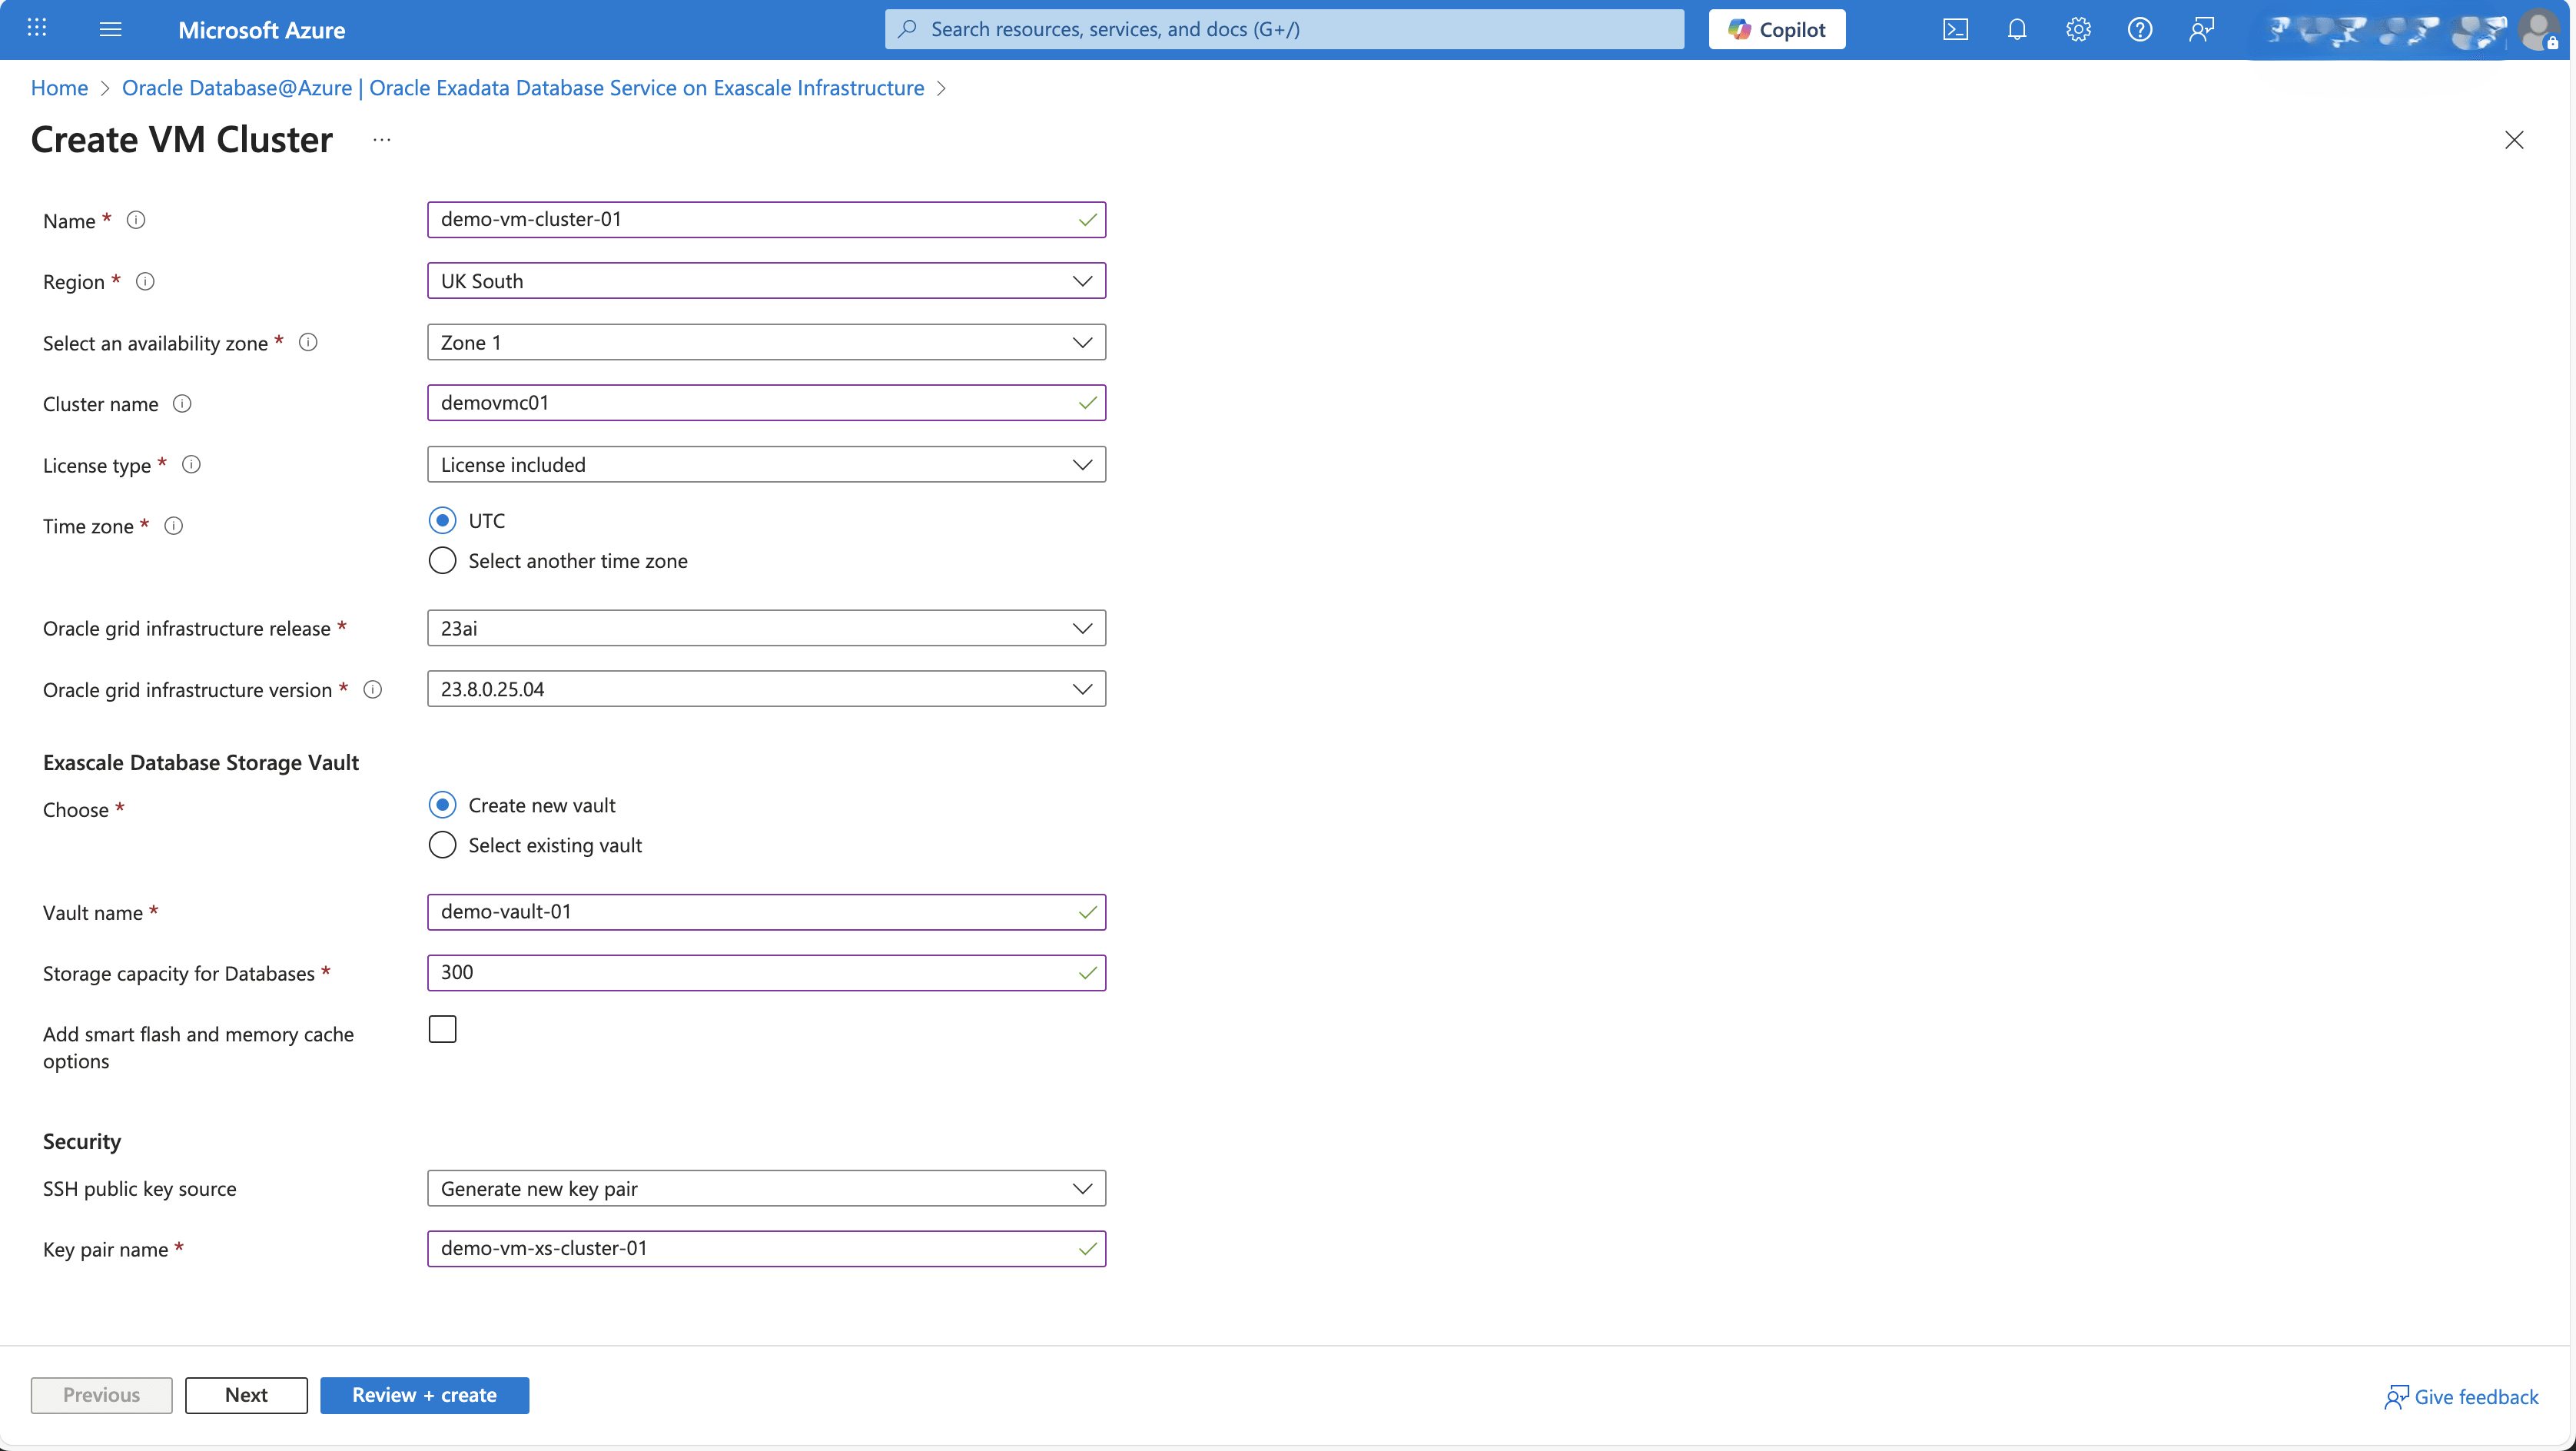
- From the Basics tab of the Oracle Exadata Database Service on Exascale Infrastructure flow, enter the following information to create a Oracle Exascale VM Cluster resource.
- Select the Microsoft Azure subscription to which the Oracle Exascale Infrastructure will be provisioned and billed.
- For resource group, you can select an existing Resource group or click the Create new link to create a new resource group. If you select the Create new option, enter Name, and then click the OK button.
- Enter a unique Name for your Oracle Exadata VM Cluster on this subscription. Display name must be 1 to 255 characters, of letters, numbers, underscores (_) and hyphens (-). Display name must start with a letter or underscore(_) and cannot contain two successive hyphens(-).
- Select the Region where this Oracle Exadata VM Cluster will be provisioned.
- Select an availability zone where this Oracle Exadata VM Cluster will be provisioned.
- Enter a Cluster name for your Exascale VM Cluster. The Cluster name must begin with an alphabetic character, and may contain hyphens (-). Underscores (_) are not permitted. The Cluster name can be no longer than 11 characters and is not case sensitive.
- You can choose your License type from the dropdown list. The License type list provides License included, and Bring your own license (BYOL) options.
- Select the Time zone. The default time zone is UTC. If you choose the Select another time option, select your Region or country. Based on your Region or country selection, Selected time zone will be populated with available options.
- From the Storage type dropdown list, select either Exascale block storage or Exascale smart storage. Exascale block storage supports both Oracle Database 19c and Oracle AI Database 26ai. Exascale smart storage supports Oracle AI Database 26ai.
- The Oracle grid infrastructure release dropdown list allows you to select the available release. The values shown here are based on the selected Storage type.
- From the dropdown list, select Oracle grid infrastructure version that you want to use for this provisioning flow.
Note
The Grid Infrastructure Version limits the Oracle Database versions that the VM Cluster supports. - Exascale Database Storage Vault: During VM cluster provisioning, choose one of the two options below for the Exascale Database storage vault.
- Create a new vault:
- Storage vault name: Enter a Vault name for your Exascale Database Storage Vault. Display name must be 1 to 255 characters, of letters, numbers, underscores (_) and hyphens (-). Display name must start with a letter or underscore(_) and cannot contain two successive hyphens(-).
- Storage capacity for Databases: Enter the storage capacity for the databases within the minimum (300 GB) and maximum (100000 GB) values displayed on the screen.
- Select existing vault: Select a vault from the available list that resides in the compartment of your choice.
- Create a new vault:
- To add smart flash and memory cache options, select the checkbox. This will automatically displays the Add smart flash cache as a percentage of storage capacity provisioned(%) field.
- In the Add smart flash cache as a percentage of storage capacity provisioned (%) field, specify a value between 34 and 300.
- In the Smart flash cache to be added (GB) field, enter a value with a minimum of (100 GB).
- The SSH public key source allows you to select Generate new key pair, Use existing key stored in Azure, or Use existing public key.
Note
If you select Generate new key pair, you must enter a Key pair name for your SSH public key. If you select Use existing key stored in Azure, you must select Stored keys from the dropdown list. If you select Use existing public key you must create and use an SSH public-private key pair. For more information, see https://learn.microsoft.com/en-us/azure/virtual-machines/linux/mac-create-ssh-keys - Select Next to continue.

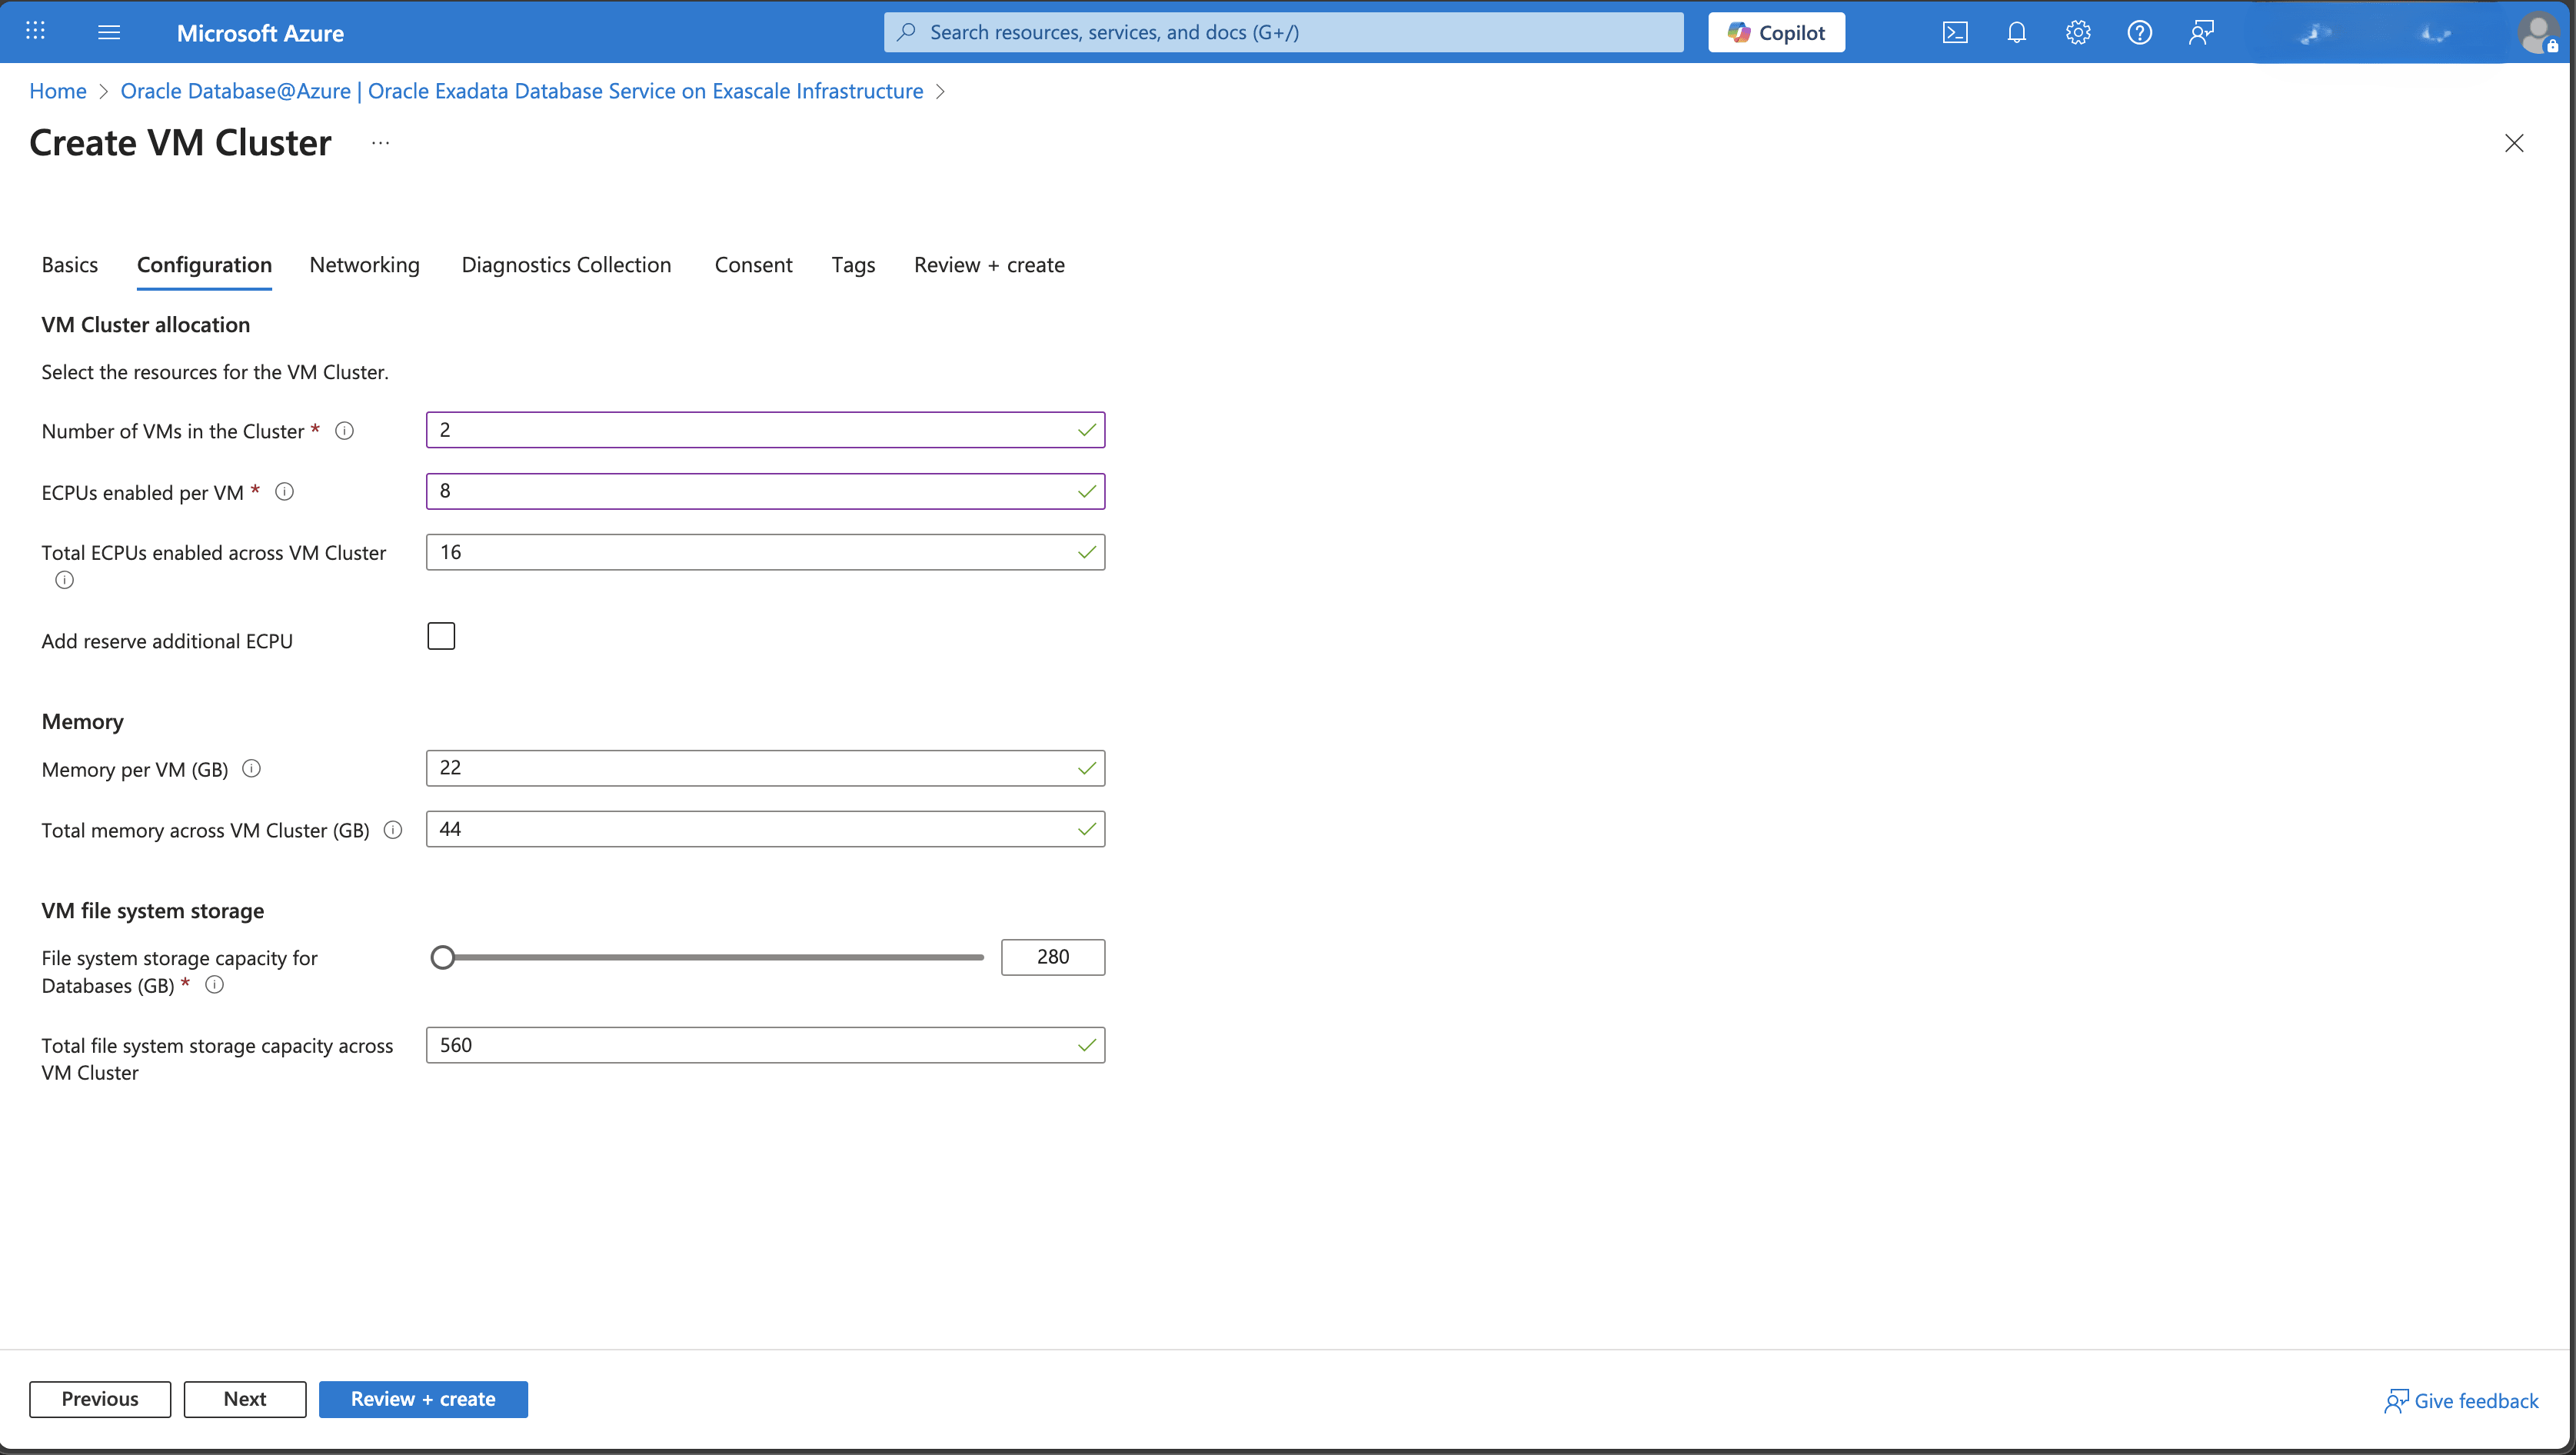
- From the Configuration tab of the Oracle Exadata Database Service on Exascale Infrastructure flow, enter the following information.
- Specify the Number of VMs in the Cluster located under the VM Cluster allocation section. Enter a number between 1 to 10.
Note
The single-node cluster is not configured for high availability (HA). - Specify your ECPUs enabled per VM. Max 200. Input needs to be multiple of 4. See reserve additional ECPU to increase.
- The default Total ECPUs enabled across VM Cluster is 16. If you want to Add reserve additional ECPU, click on the checkbox.
Note
If you select the Additional ECPUs, you must enter ECPUs additional reserved per VM, Total additional ECPUs reserved across VM Cluster, Total ECPU per VM, and Total ECPUs across VM Cluster. The Total ECPU per VM range is from 8 to 200. - Specify the Memory per VM (GB) to allocate to each VM Cluster.
- Enter the Total memory across VM Cluster(GB).
- The File system storage capacity for Databases(GB) selector can be used to select a range from 280 (GB) to 1100 (GB).
- Based on your File system storage capacity for Databases(GB) selection, the Total file system storage capacity across VM Cluster will be populated with values.
- Select Next to continue.

- Specify the Number of VMs in the Cluster located under the VM Cluster allocation section. Enter a number between 1 to 10.
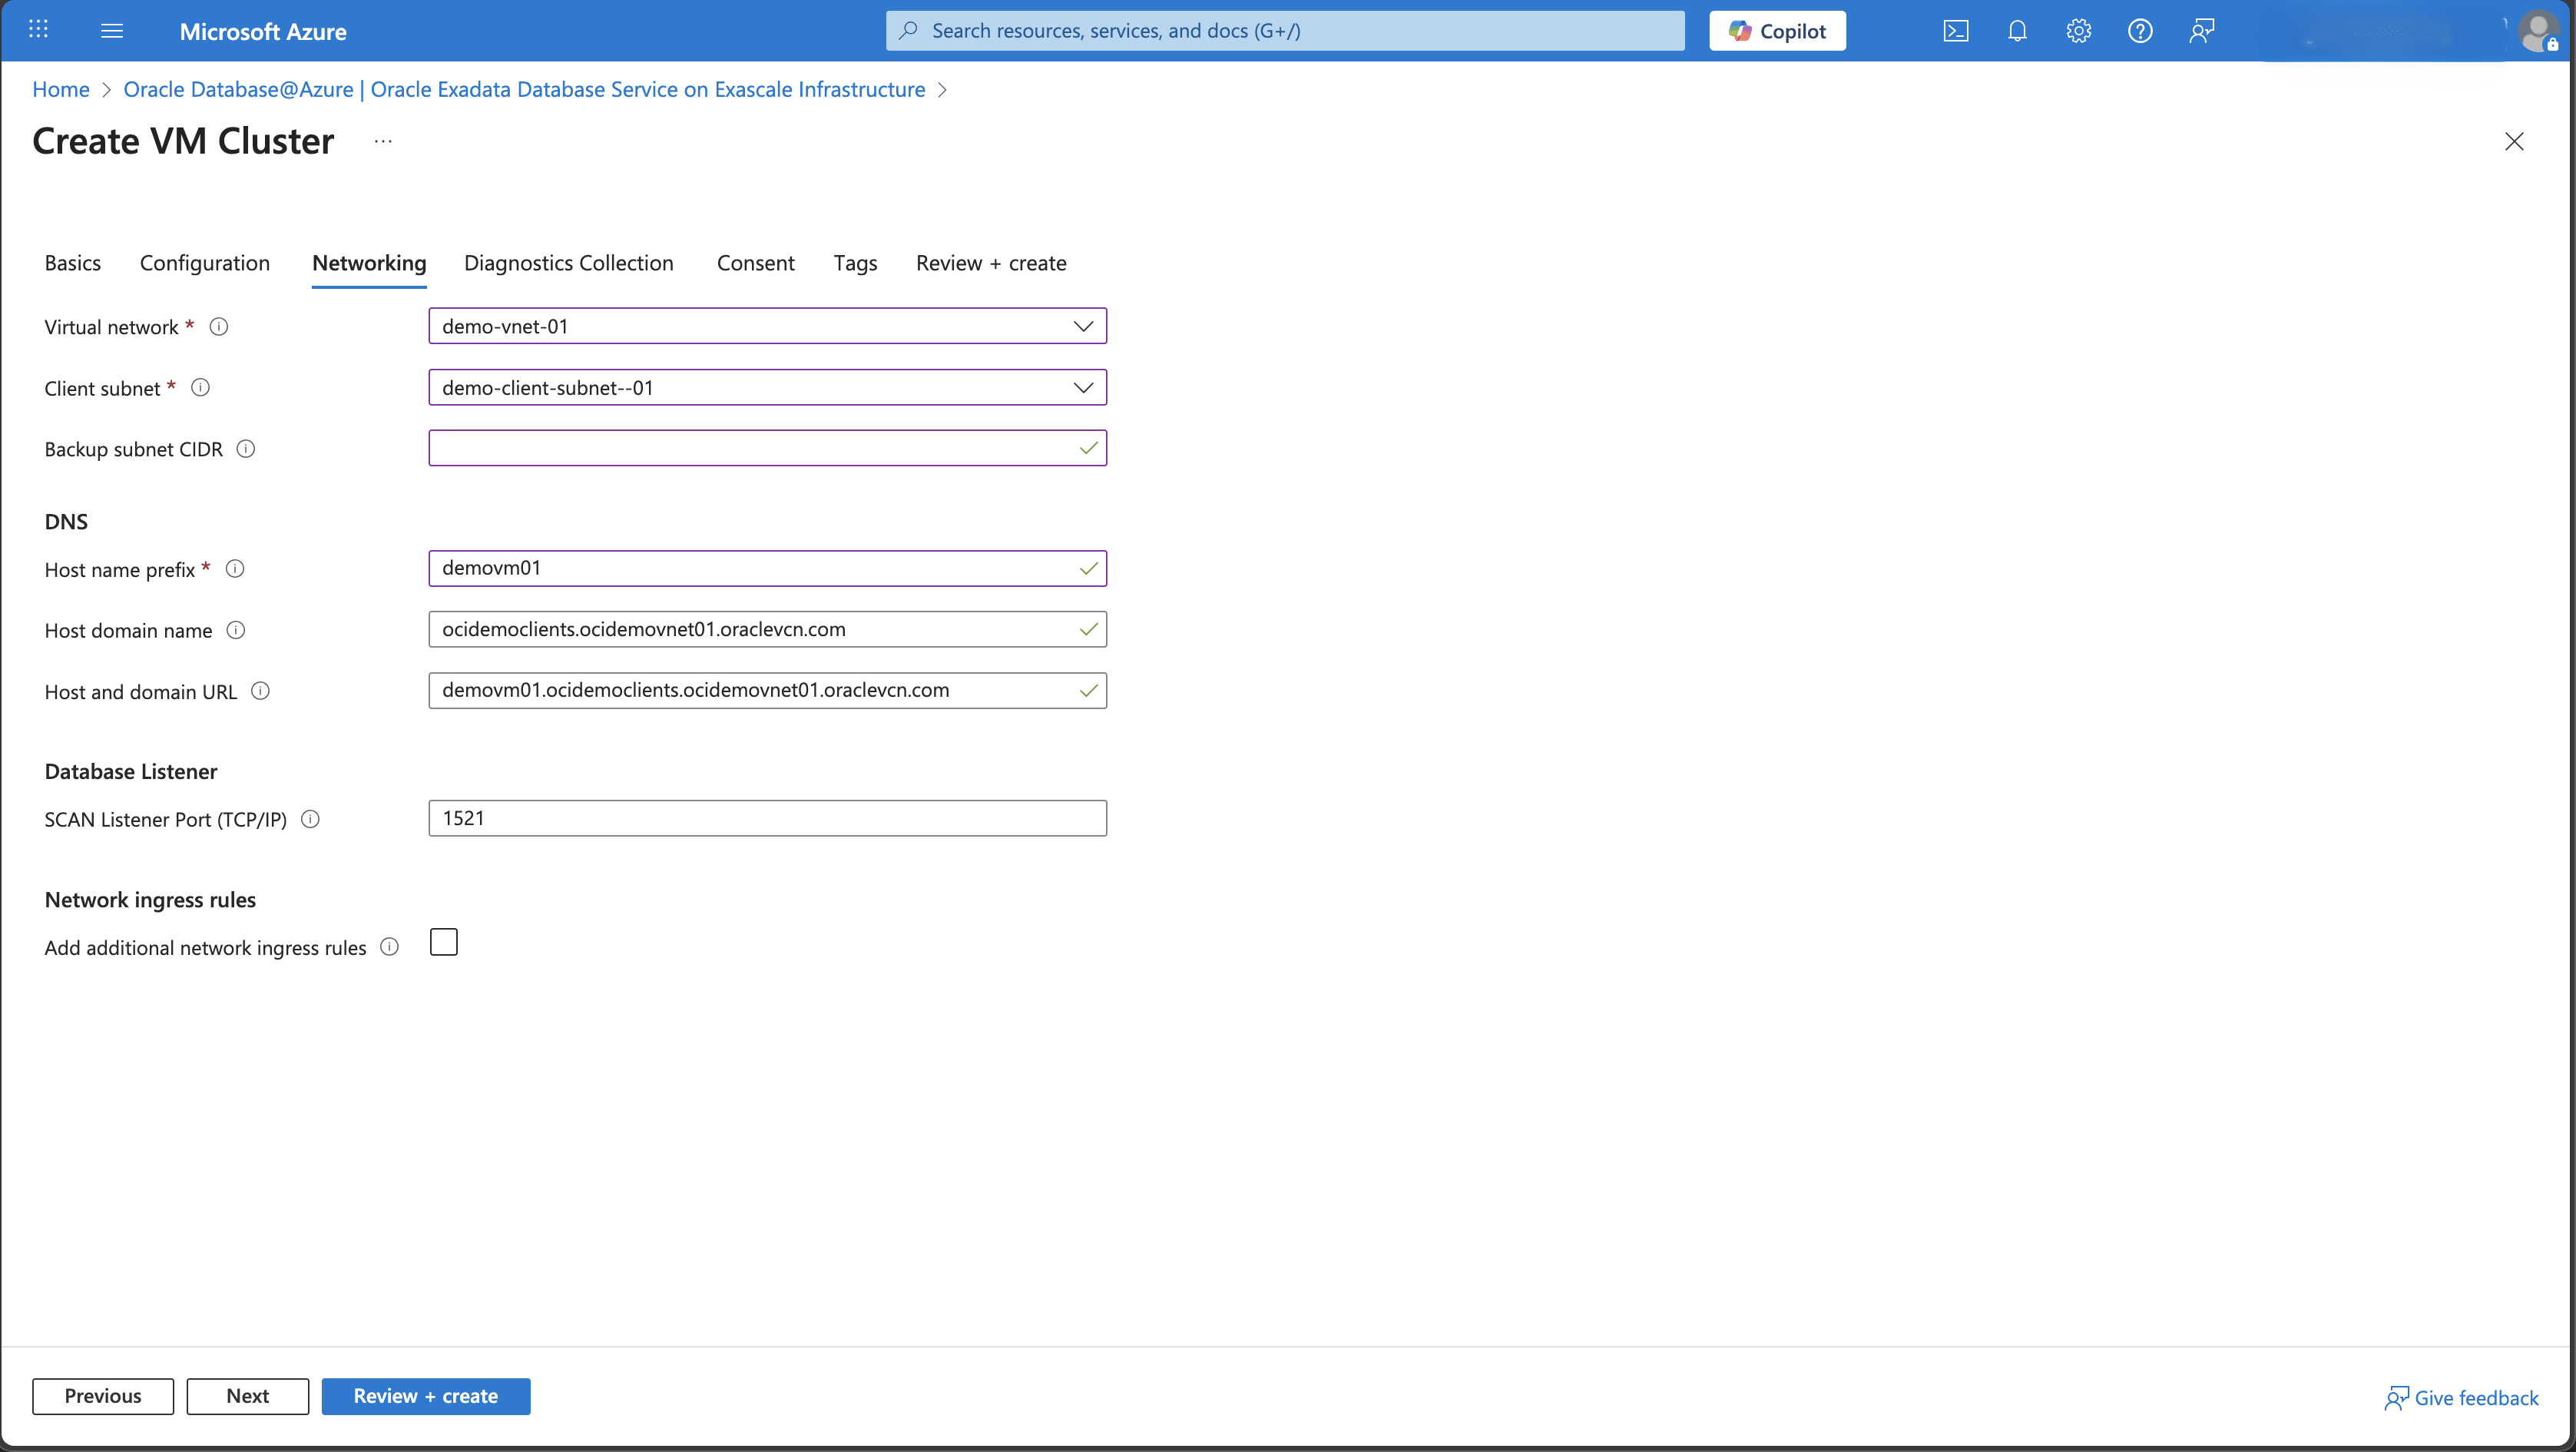
- From the Networking tab of the Oracle Exadata Database Service on Exascale Infrastructure flow, enter the following information.
- The Virtual Network list allows you to select virtual network within the subscription and resource group that you have selected in the Basics section of the provisioning flow.
- The Client subnet list allows you to select delegated subnets that are contained within the virtual network that you have selected previously.
- The Backup subnet CIDR field is an optional field. It allows you to enter the CIDR for the backup subnet of your VM Cluster.
- Enter the Host name prefix. The prefix is the first portion of the Exadata VM Cluster host name.
- The Host domain name and Host and domain URL are read-only fields and will be populated with values.
- The SCAN Listener Port ( TCP/IP) default is 1521. If you do not change this value, the Oracle Exadata VM Cluster is created with the default port.
- If you want to Add additional network igress rules, click on the checkbox.
- Select Next to continue.

- The Diagnostics Collection tab of the Oracle Exadata Database Service on Exascale Infrastructure flow allow you to specify the diagnostic events, health monitoring, and incident logs and tracing that Oracle can use to identify, track, and resolve issues. If you want to enable them, click the checkbox for each of them, and then select Next to continue.
- You must agree to the terms of the service, privacy policy, and agree to access permissions from the Consent tab of Oracle Exadata Database Service on Exascale Infrastructure flow.
- From the Tags tab of the Oracle Exadata Database Service on Exascale Infrastructure flow, you can define Microsoft Azure tags. Select Next to continue.
- From the Review + create tab of the Oracle Exadata Database Service on Exascale Infrastructure flow, you can check the values that you entered from the previous steps. If the validation fails, you must correct any errors before you can start the provisioning process.
- Select the Create button to start the provisioning flow.
- Select the Download + create button to download the keys and create the resource.
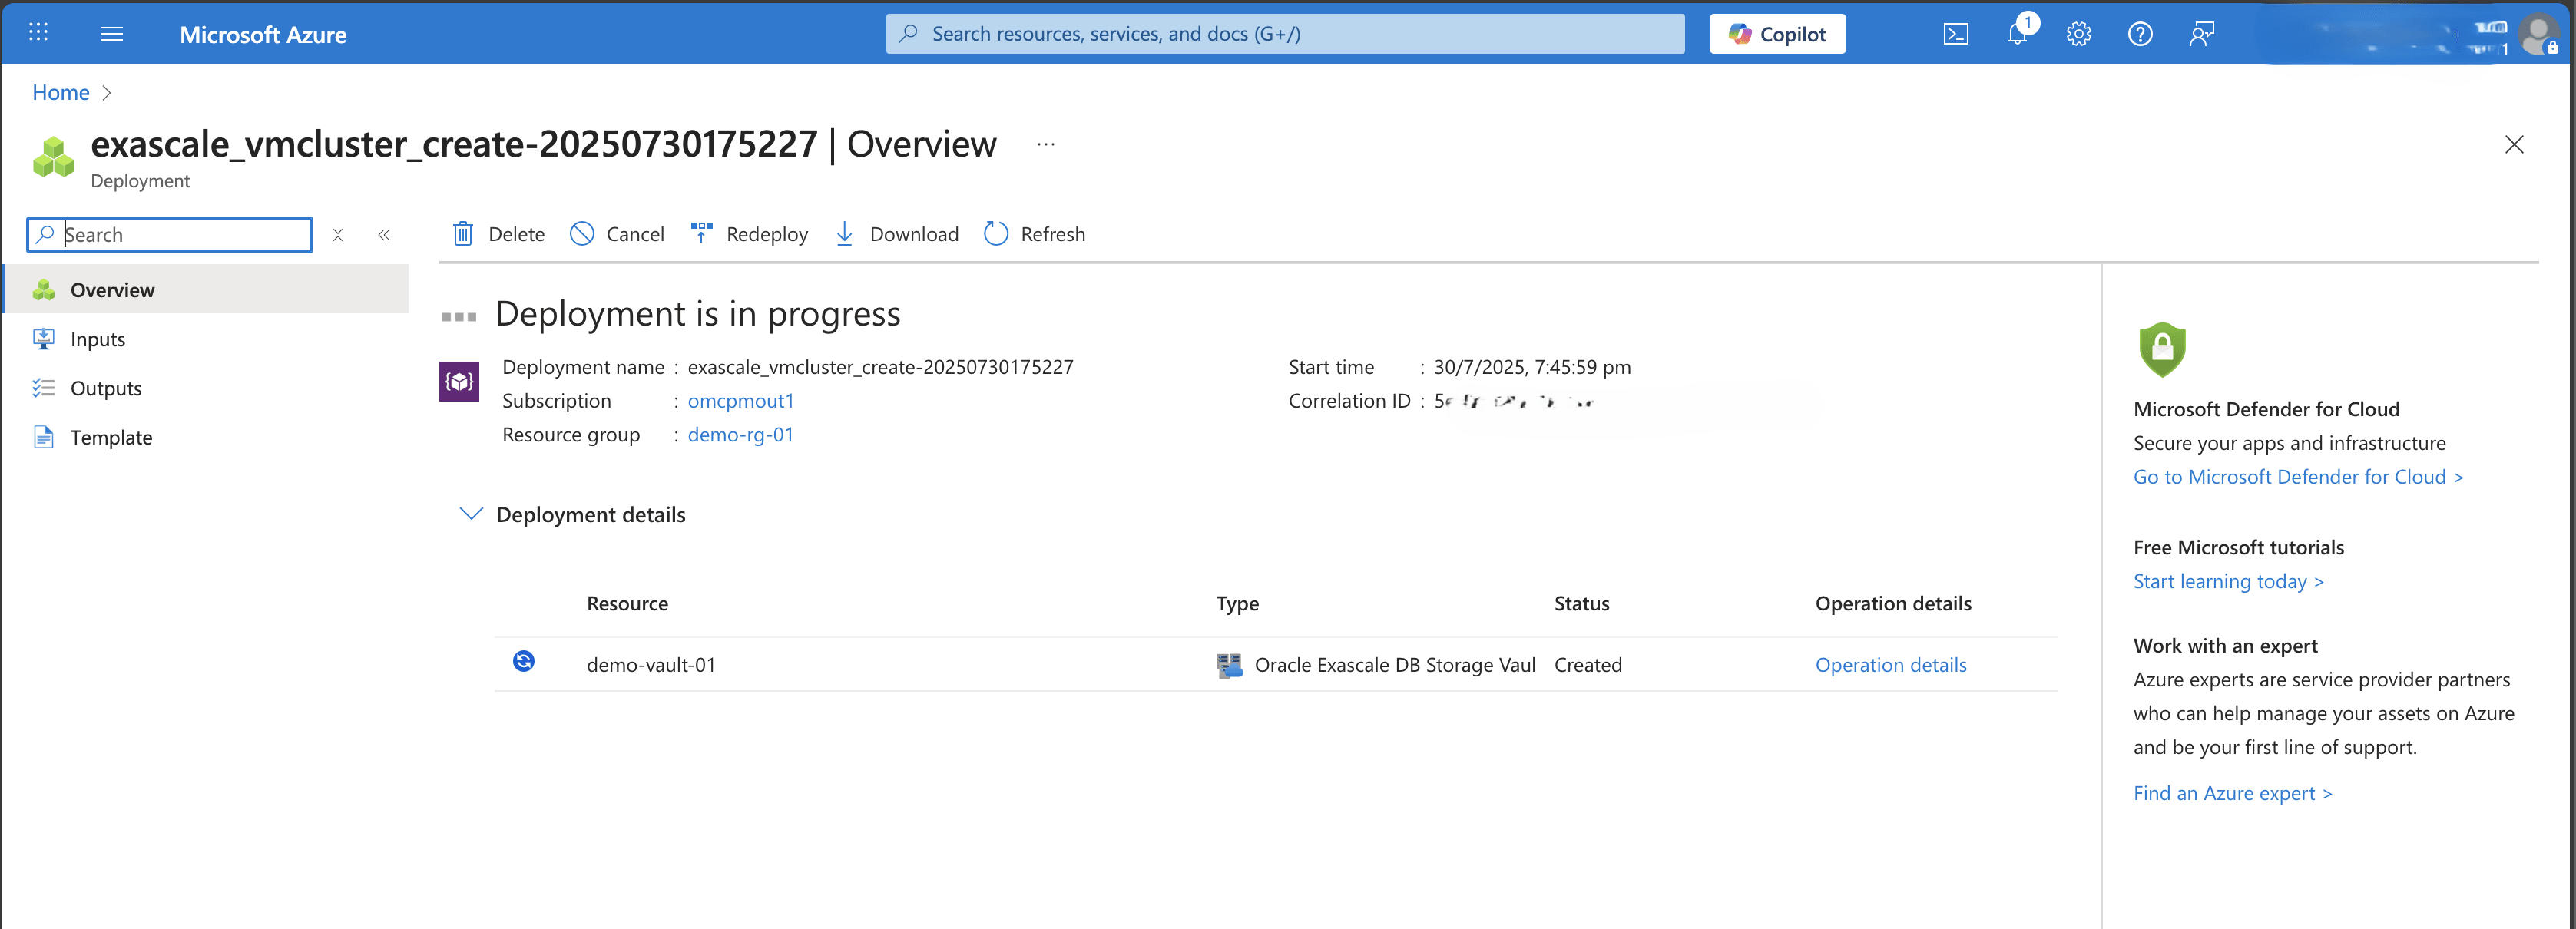
- You can monitor and manage the Status of the Deployment details from Oracle Exascale VM Cluster blade.

Exascale VM Cluster creation is only available through the Azure Portal and Azure CLI.
There is currently no content for this page. Oracle Database@Azure team intends to add content here, and this placeholder text is provided until that text is added. The Oracle Database@Azure team is excited about future new features, enhancements, and fixes to this product and this accompanying documentation. We strongly recommend you watch this page for those updates.
What's Next?
- Create an Exascale Database.