Autonomous AI Database
This topic explains how to modify resources for Oracle Autonomous AI Database Service.
Disaster Recovery
Oracle Autonomous AI Database Service provides you with the capability to set up and modify disaster recovery configurations. It is crucial to establish your recovery time objective (RTO) and recovery point objective (RPO) for different levels of failures, including both planned and unplanned events.
Follow these steps to set up the different types of disaster recovery.- Backup-based disaster recovery:
Oracle Autonomous AI Database Service on Azure supports backup-based disaster recovery (DR).
- Autonomous Data Guard:
Autonomous Data Guard for Oracle Autonomous AI Database Service provides high availability and disaster recovery by maintaining a standby database in a separate availability zone (AZ) or region. When enabled, it ensures that the primary and standby databases remain synchronized with a RPO of 1 minute and it allows automatic failover in the event of an outage or disaster.
Note
If you have selected deployment mode as Secure access from everywhere or Secure access from allowed IPs, you may create up to 1 local peer. If you have selected deployment mode as Managed private virtual network IP only, you may create up to 1 local peer and one cross region peer for every remote paired region.These are the paired regions as of today.Table 1-1 Paired Regions
Regional Pair A Regional Pair B US East US West US East Canada Central US East Brazil South US East Central US West US US East Canada Central US East Brazil South US East UK South UK West UK South Australia East UK West UK South Australia East UK South France Central (Paris) Germany West Central France Central (Paris) Italy North Germany West Central France Central Italy North France Central Central US US East 2 US East 2 Central US US East 2 Canada Central US East 2 Brazil South US East 2 US West Southeast Asia France Central Southeast Asia US East 2 France Central US East 2 Canada Central Canada East Canada East Canada Central Add
Complete the following steps to set up a disaster recovery.- From the Azure portal, select Oracle Database@Azure.
- From the left navigation menu, select Oracle Autonomous AI Database.
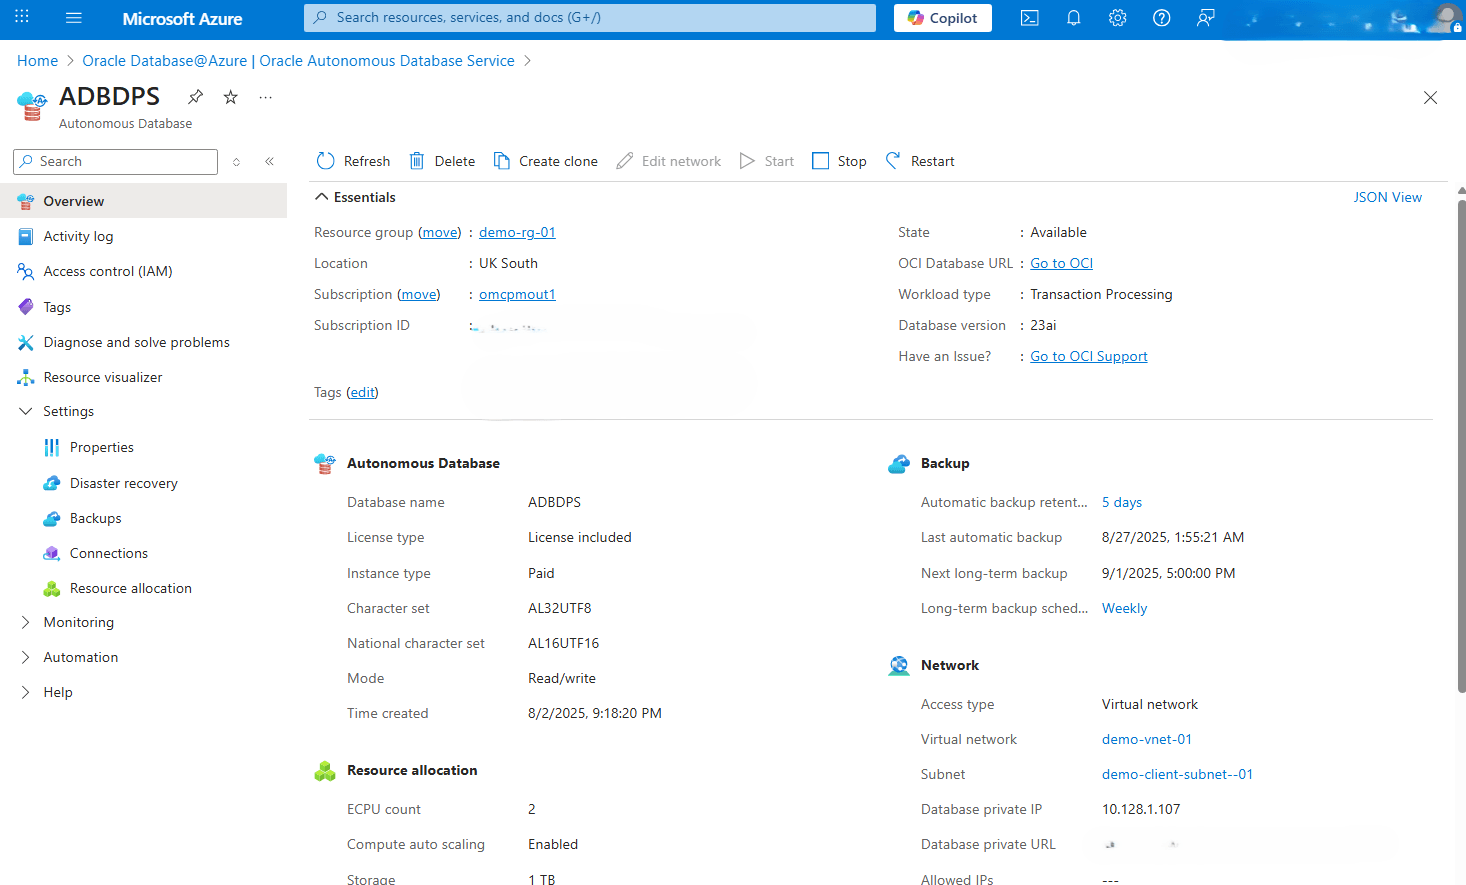
- Select your Autonomous AI Database that you want to modify.
- Expand the Settings section, and then select the Disaster recovery link.

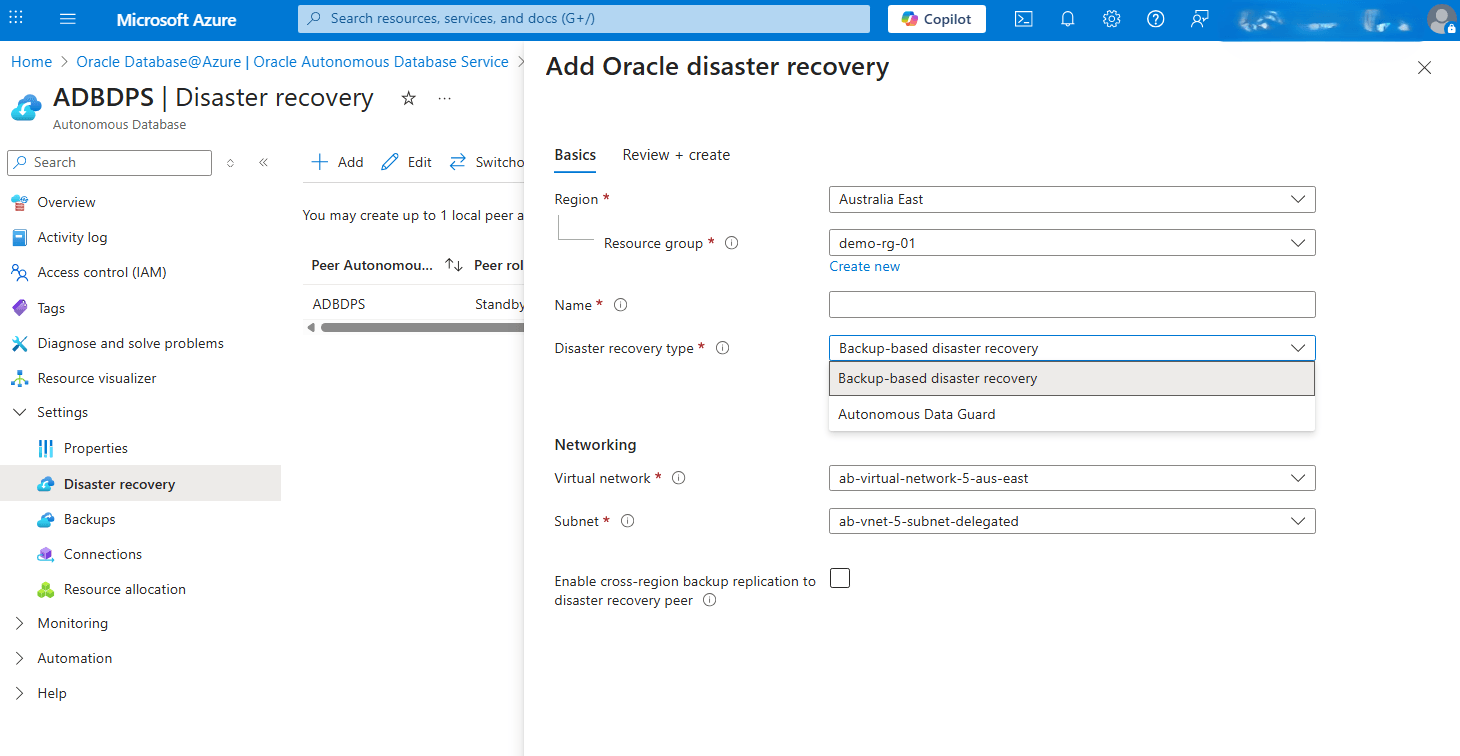
- Click the Add button, and then complete the following substeps.
- From the dropdown list, select your Region.
- From the dropdown list, select your Resource group.
- Enter an unique Name. The value must contain only letters and numbers, starting with a letter. 30 characters max. Spaces are not allowed.
- Select your Disaster recovery type from the dropdown list. Choose either the Backup-based disaster recovery or Autonomous Data Guard option.
- From the Networking section, select your Virtual network and Subnet.
- To Enable cross-region backup replication to disaster recovery peer, select the checkbox.
- Select the Next button to proceed.
- From Review + create tab, select the Create button. Go to the previous page to correct any validation errors.

- Once you complete, select the Review + create button.
For more information, see Service Level Objectives (SLOs).
Edit
Complete the following steps to edit a disaster recovery.- From the Azure portal, select Oracle Database@Azure.
- From the left navigation menu, select Oracle Autonomous AI Database.
- Select your Autonomous AI Database that you want to modify.
- Expand the Settings section, and then select the Disaster recovery link.
- Click the Edit button, and then complete the following substeps.
- From the dropdown list, select Peer autonomous database.
- The Disaster recovery type field has two options. Choose either Autonomous Data Guard or Backup-based disaster recovery.
- Enable the Automatic Failover with data loss limit in seconds option if it is required.
- Select the Edit button.
Switchover
Switchover is a planned transition from the primary database to its standby. This operation is typically used for maintenance, testing, or proactively shifting the workloads. When using Oracle Autonomous Data Guard, switchover ensures minimal downtime and zero data loss by promoting the standby database to primary status while demoting the original primary to standby. To perform a switchover, your Autonomous AI Database must be part of a configured Disaster Recovery Protection Group.
Complete the following steps to perform a switchover.- From the Azure portal, select Oracle Database@Azure.
- From the left navigation menu, select Oracle Autonomous AI Database.
- Select your Autonomous AI Database that you are using.
- Expand the Settings section, and then select the Disaster recovery link.
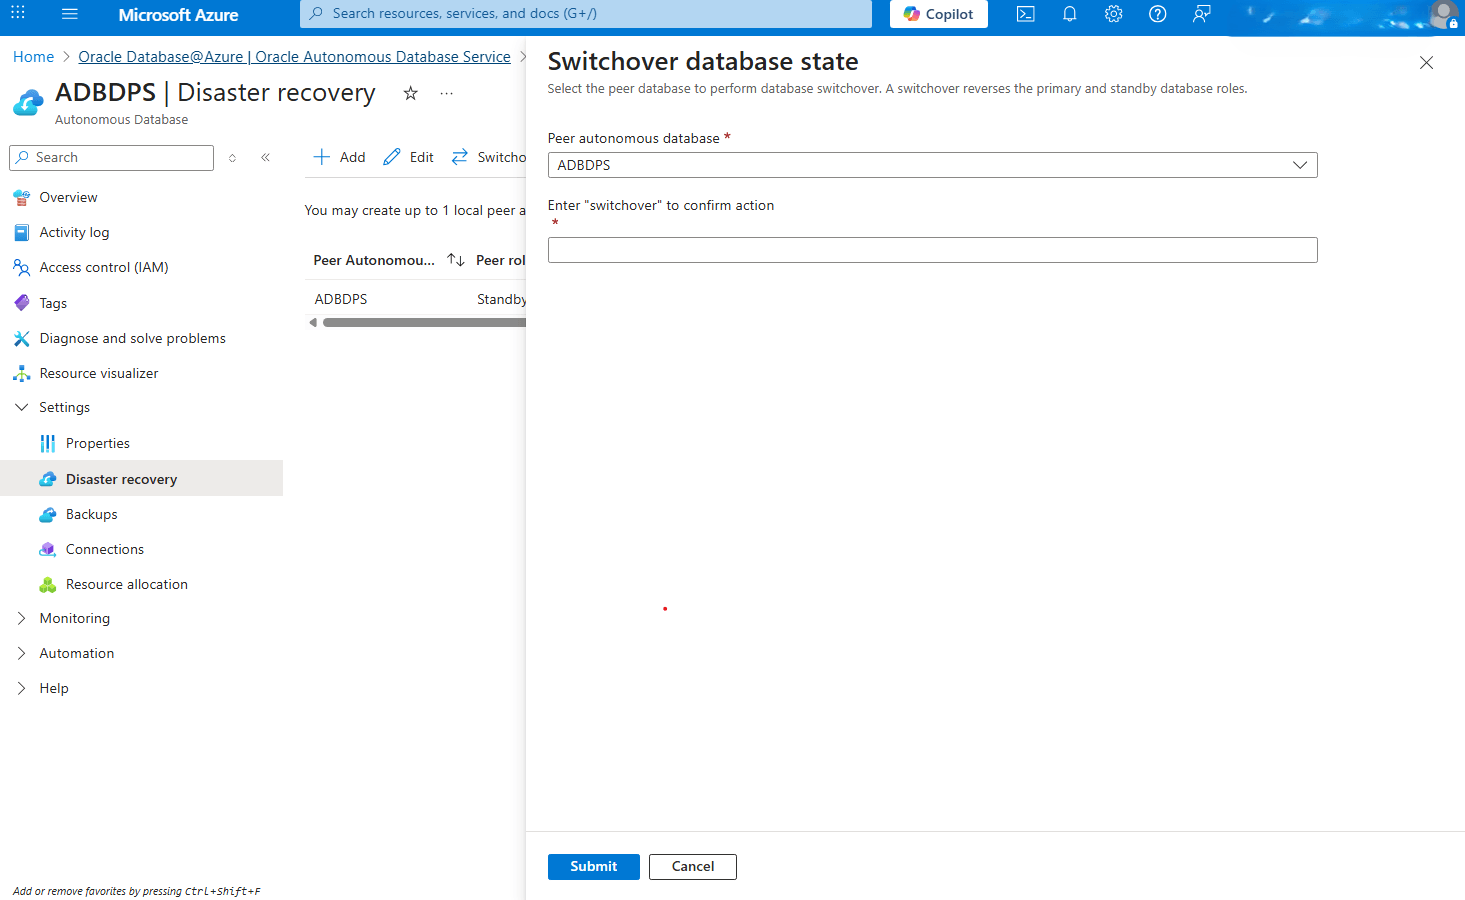
- Select the Switchover button and from the Swithover database state page, complete the following substeps:
- From the dropdown list, select your Peer autonomous database.
- Enter switchover into the field to confirm your action.
- Select the Submit button to apply the changes.

Backup
Follow the steps in the Restore and Backup documentation for more information.
Tags
These are steps to modify tags of Autonomous AI Database Services.- From the Azure portal, select Oracle Database@Azure.
- From the left navigation menu, select Oracle Autonomous AI Database.
- Select your Autonomous AI Database that you are using.
- From the left navigation menu , select the Tags link.
- You can add, remove or modify Tags based on the requirements.

Auto Start and Stop Schedule
These are the steps to schedule the automatic start and stop of your Autonomous AI Database from the Azure portal.- From the Azure portal, select Oracle Database@Azure.
- From the left menu, select Oracle Autonomous AI Database.
- From the Name column, select your database that you are using.
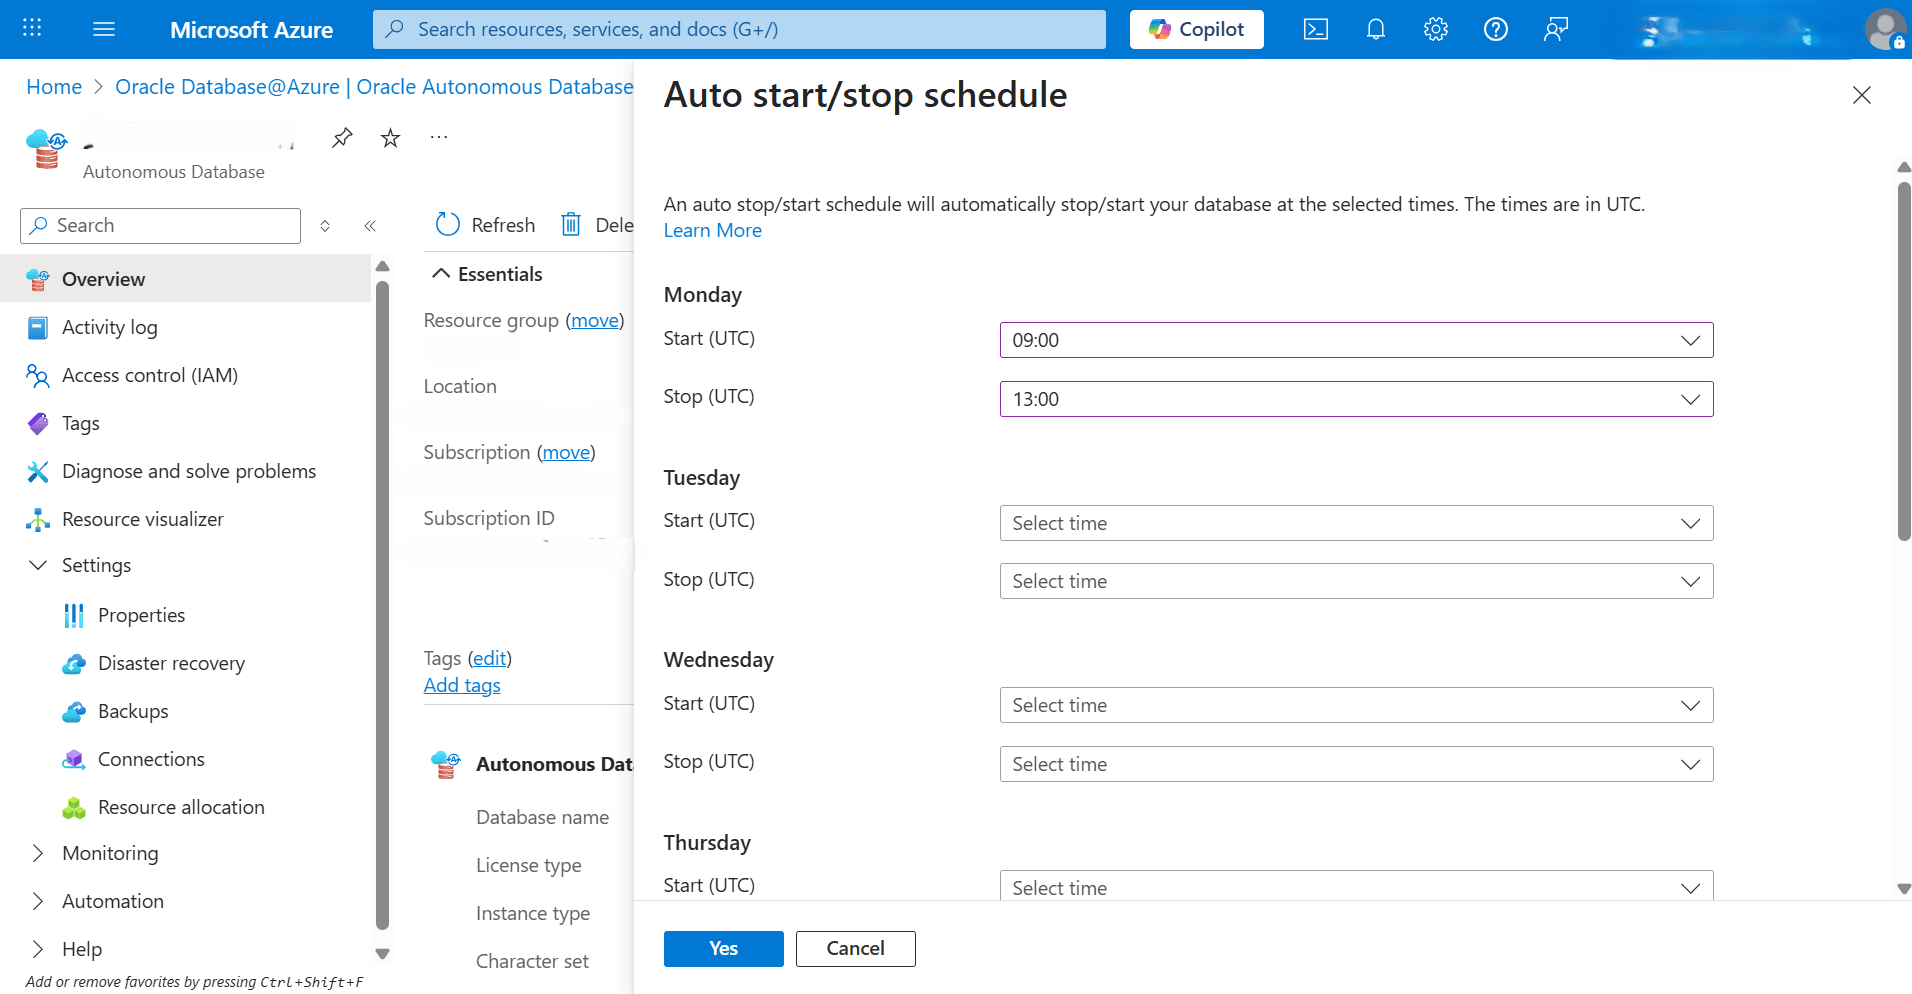
- Select the Auto start/stop schedule button from the top menu, and then complete the following substeps:
- From the Auto start/stop schedule page, you can configure the auto start/stop schedule by selecting the days and the times from the dropdown lists. For each day of the week:
- Start (UTC): Select the start time for the schedule on this day.
- Stop (UTC): Select the stop time for the schedule on this day.

- Select the Yes button to save your changes.
- From the Auto start/stop schedule page, you can configure the auto start/stop schedule by selecting the days and the times from the dropdown lists. For each day of the week:
Change Administrator Password
These are the steps to change your administrator password of your Autonomous AI Database from the Azure portal.- From the Azure portal, select Oracle Database@Azure.
- From the left menu, select Oracle Autonomous AI Database.
- From the Name column, select the database for which you want to change the administrator password.
- From the Overview page, select the Change Administrator Password button, and then enter the following information.
- The User name field is read-only.
- Enter your New password. Password must be 12–30 characters long and include at least one uppercase letter, one lowercase letter, and one number. It can not contain spaces, the double quote (") or single quote (') characters, or the username "admin". The password must be different from your last four passwords, cannot be reused within 24 hours, and cannot be used in conjunction with OCI Vault secrets.
- Enter your password in the Confirm password field.
- Select the Change button to apply the changes.

- Backup-based disaster recovery:
There is currently no content for this page. Oracle Database@Azure team intends to add content here, and this placeholder text is provided until that text is added. The Oracle Database@Azure team is excited about future new features, enhancements, and fixes to this product and this accompanying documentation. We strongly recommend you watch this page for those updates.
There is currently no content for this page. Oracle Database@Azure team intends to add content here, and this placeholder text is provided until that text is added. The Oracle Database@Azure team is excited about future new features, enhancements, and fixes to this product and this accompanying documentation. We strongly recommend you watch this page for those updates.
There is currently no content for this page. Oracle Database@Azure team intends to add content here, and this placeholder text is provided until that text is added. The Oracle Database@Azure team is excited about future new features, enhancements, and fixes to this product and this accompanying documentation. We strongly recommend you watch this page for those updates.
There is currently no content for this page. Oracle Database@Azure team intends to add content here, and this placeholder text is provided until that text is added. The Oracle Database@Azure team is excited about future new features, enhancements, and fixes to this product and this accompanying documentation. We strongly recommend you watch this page for those updates.