Autonomous Database
To create an Autonomous Database, follow these steps.
- From the Oracle Database@Google Cloud dashboard , select Autonomous Database Service > Autonomous Database from the left-menu.

- Select the + Create button.
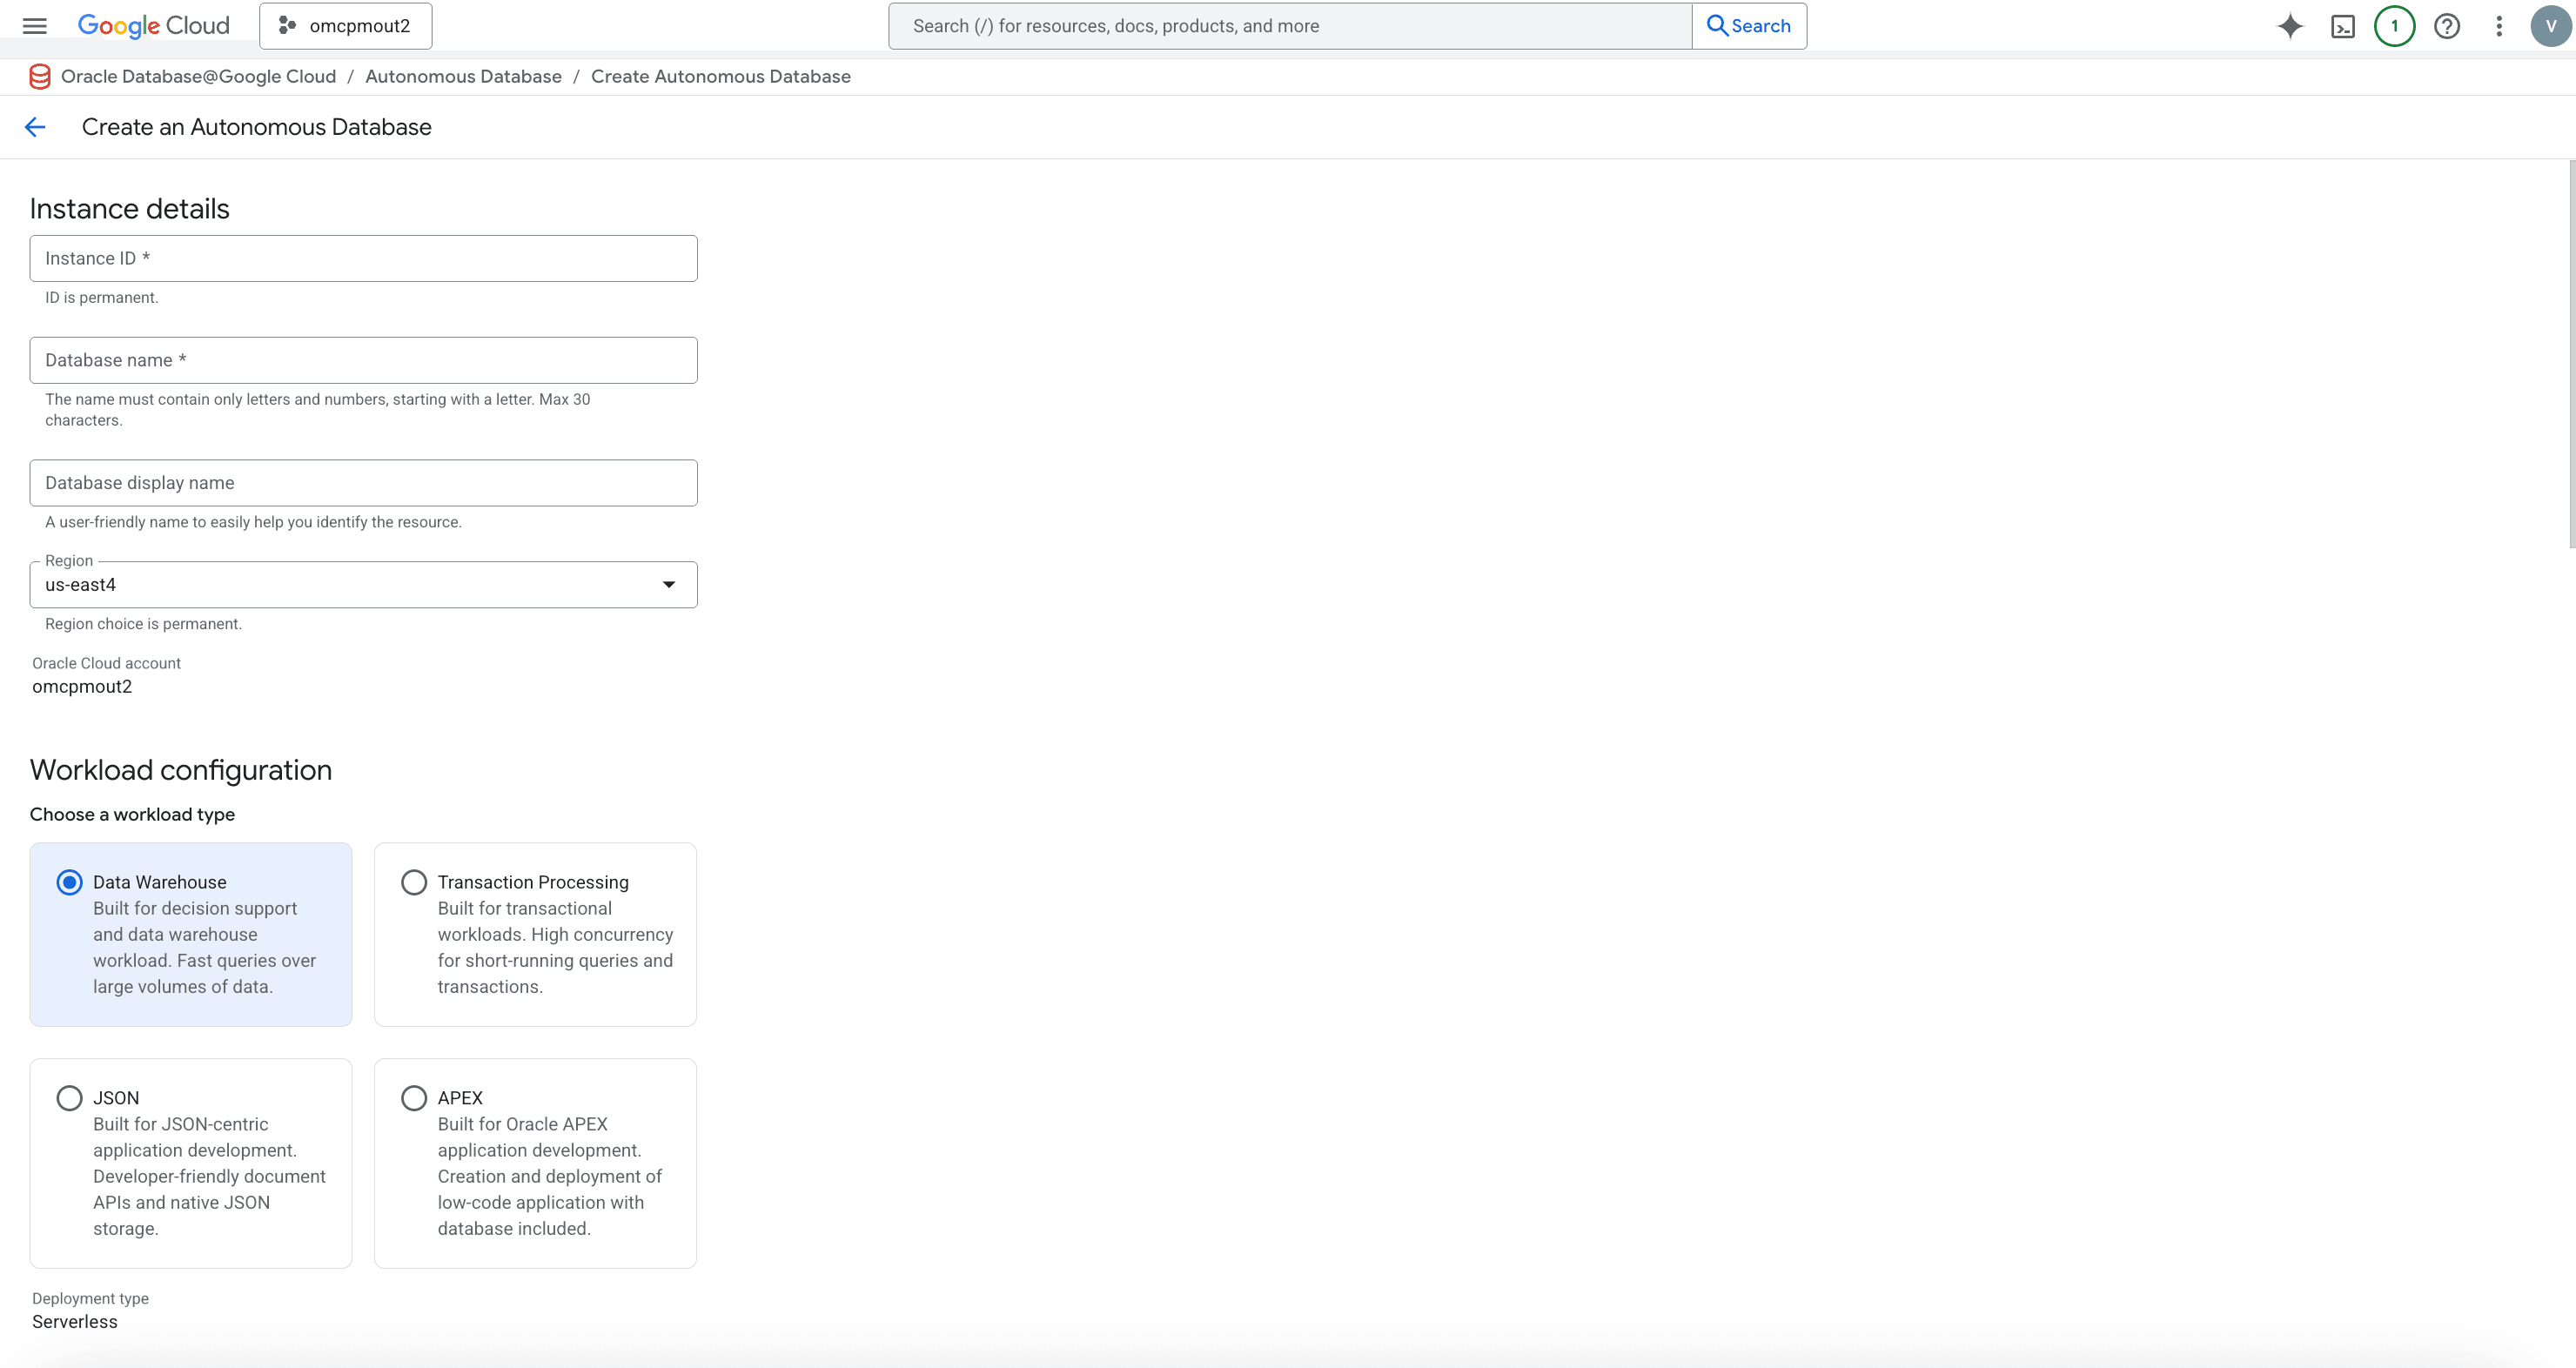
- In the Instance details section, enter the following information.
- In the Instance ID field, enter a value of your choice from 1-63 characters consisting of lowercase letters, numbers, and hyphens (-) that must start with a lowercase letter and end with a lowercase letter or number. This value cannot be changed after creation.
- In the Database name field, enter a value of your choice from 1-30 characters consisting of letters and numbers that must start with a letter.
- In the Database display name field, enter a value of your choice from 1-255 characters consisting of letters, numbers, underscores (_), and hyphens (-) that must start with a letter or underscore and cannot contain two consecutive hyphens.
- From the Region drop-down, select the region of your choice. This value cannot be changed after creation.
- The Oracle Cloud account is a read-only value provided for reference.
- In the Workload configuration section, use the Choose a workload type radio group to select Data Warehouse, Transaction processing, JSON, or APEX as needed.

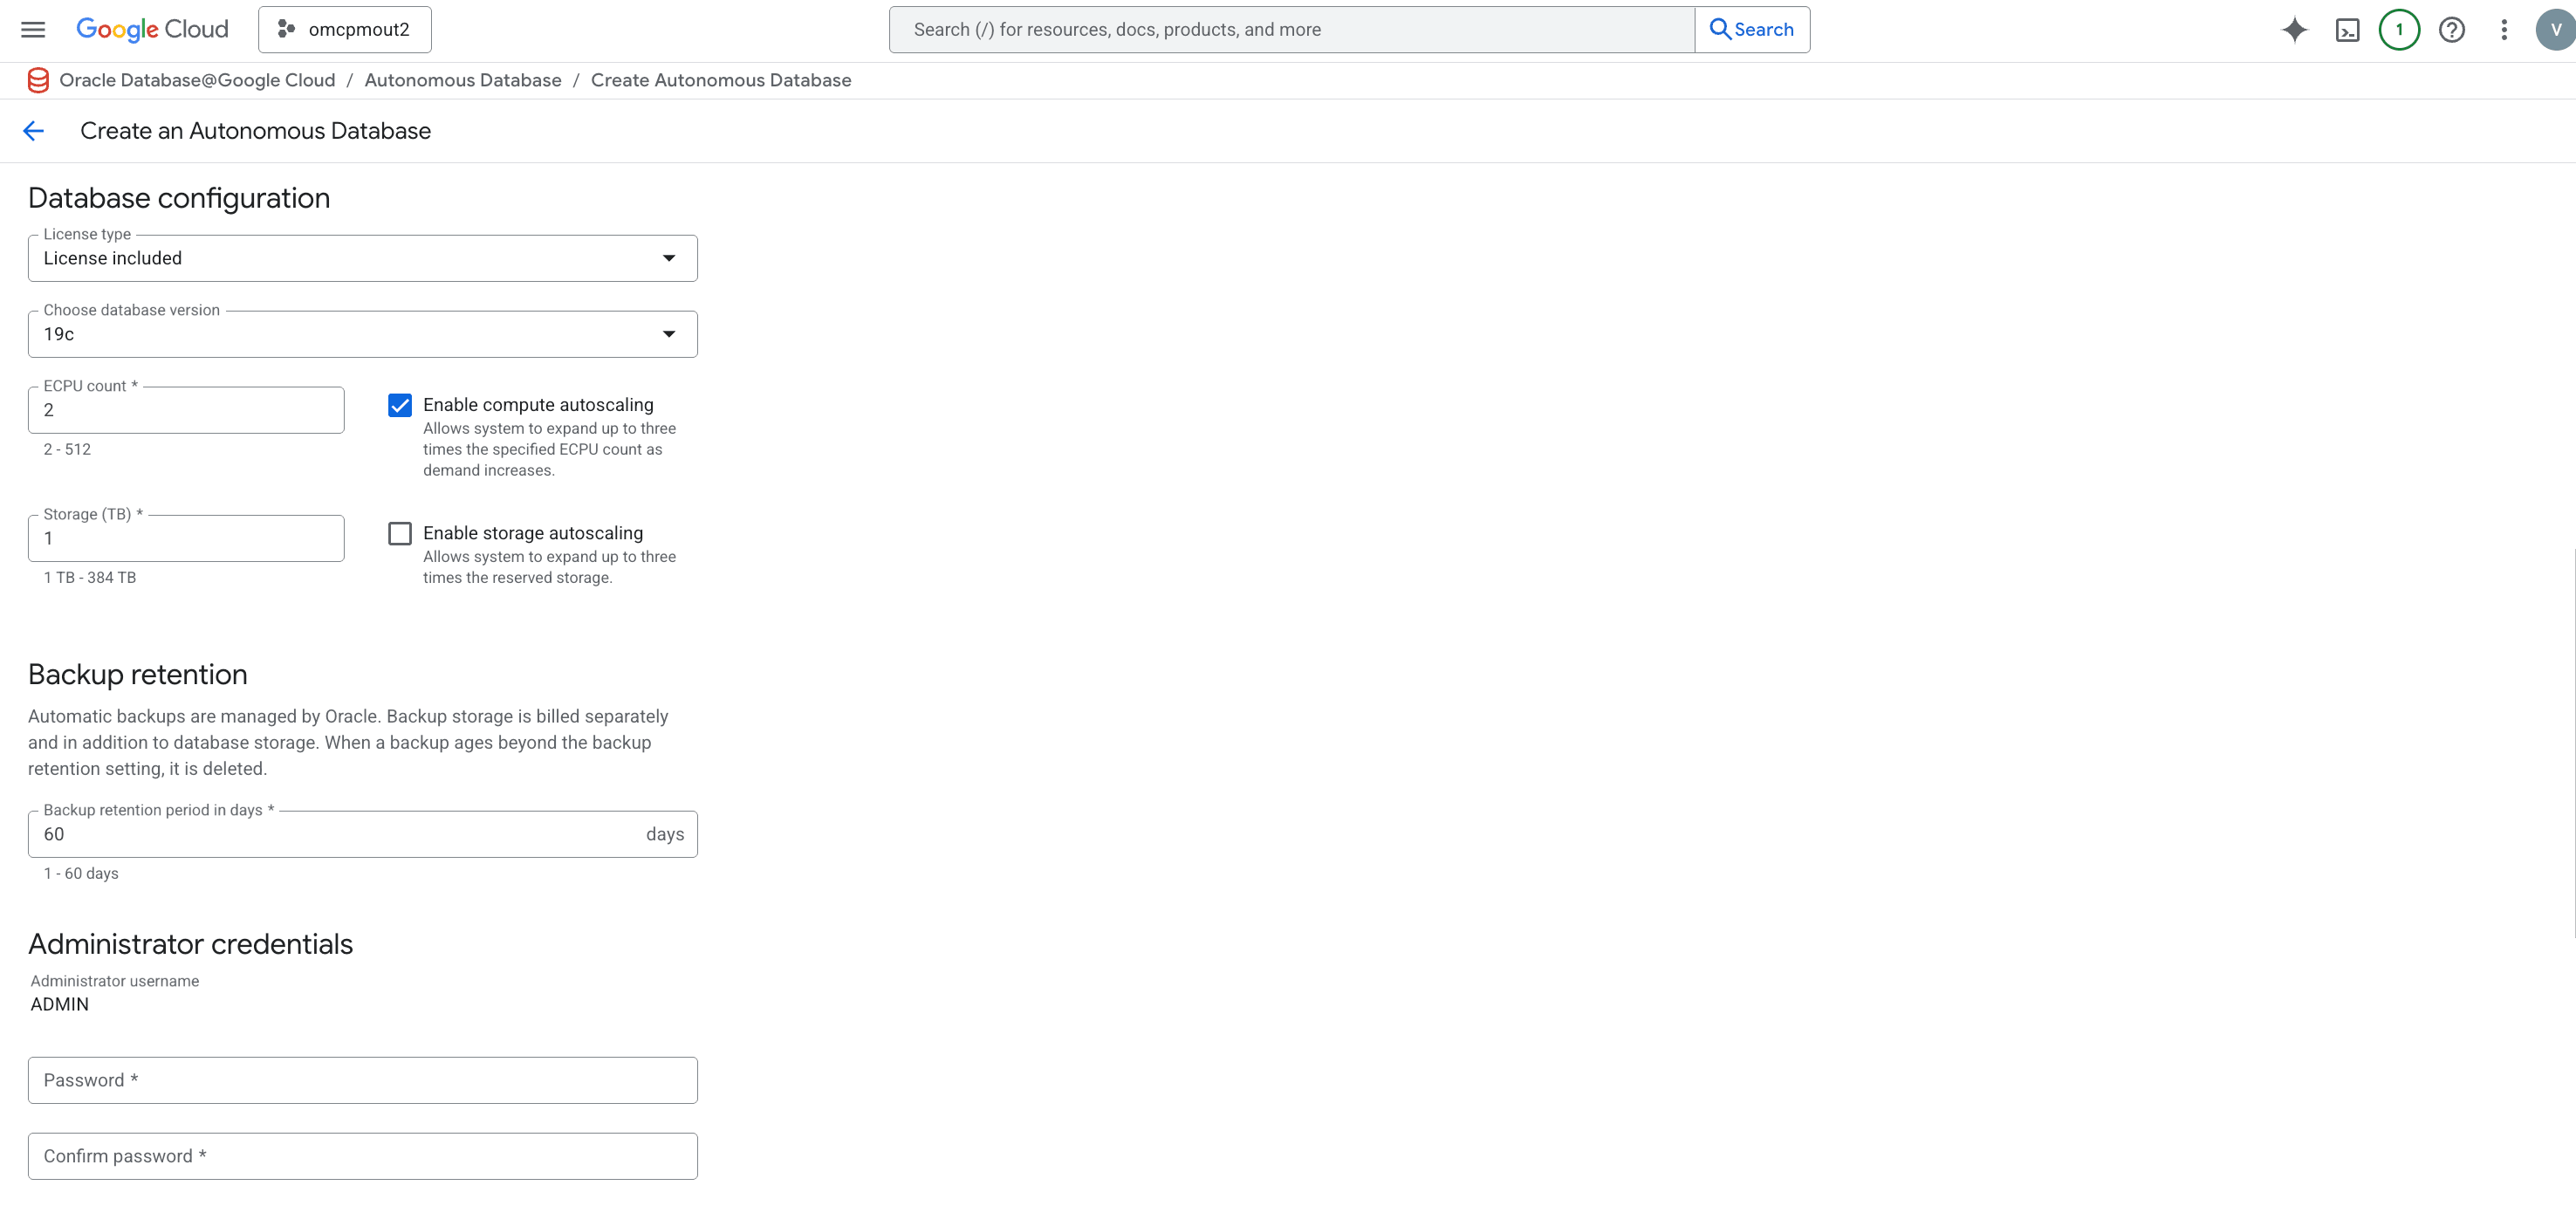
- In the Database configuation section, enter the following information.
- In the License type drop-down, select either License included or Bring your own license (BYOL).
Note
License included means the cost of this resource will include the Oracle software license(s) and the service. Bring Your Own License (BYOL) means you use your organization's existing Oracle software licenses for this resource. For more information, see Bring Your Own License. - If you selected Bring your own license (BYOL), an additional drop-down, Oracle Database Edition, will appear. Select either Oracle Database Enterprise Edition (EE) or Oracle Database Standard Edition. The Oracle Database Enterprise Edition (EE) selection allows you to select your ECPU limit, and the Oracle Database Standard Edition has a 32 ECPU limit including auto scale.
- In the Choose database version drop-down, select the version.
- In the ECPU count field, enter a value from 2 to 512.
Note
If you selected Bring your own license (BYOL) and then selected Oracle Database Standard Edition, your maximum limit will be 32 ECPUs. - The Enable compute autoscaling checkbox, allows system to expand up to three (3) times the specified ECPU count as demand increases.
- In the Storage (TB) field, enter a value from 1 to 384 TB.
- The Enable storage autoscaling checkbox, allows system to expand up to three (3) times the specified reserve storage as demand increases.
- In the License type drop-down, select either License included or Bring your own license (BYOL).
- In the Backup retention section, enter the Backup retention period in days value from 1 to 60 days. Automatic backups are managed by Oracle. Backup storage is billed separately and in addition to database storage. When a backup ages beyond the backup retention setting, it is deleted.
- In the Administrator credentials section, enter the following information.
- In the Password field, enter your password. Your password must be 12-30 characters, contain at least one (1) uppercase letter, one (1) lowercase letter, and one (1) number. The password cannot contain the double quote (") character or be set to the admin.
- In the Confirm password field must match the Password field.

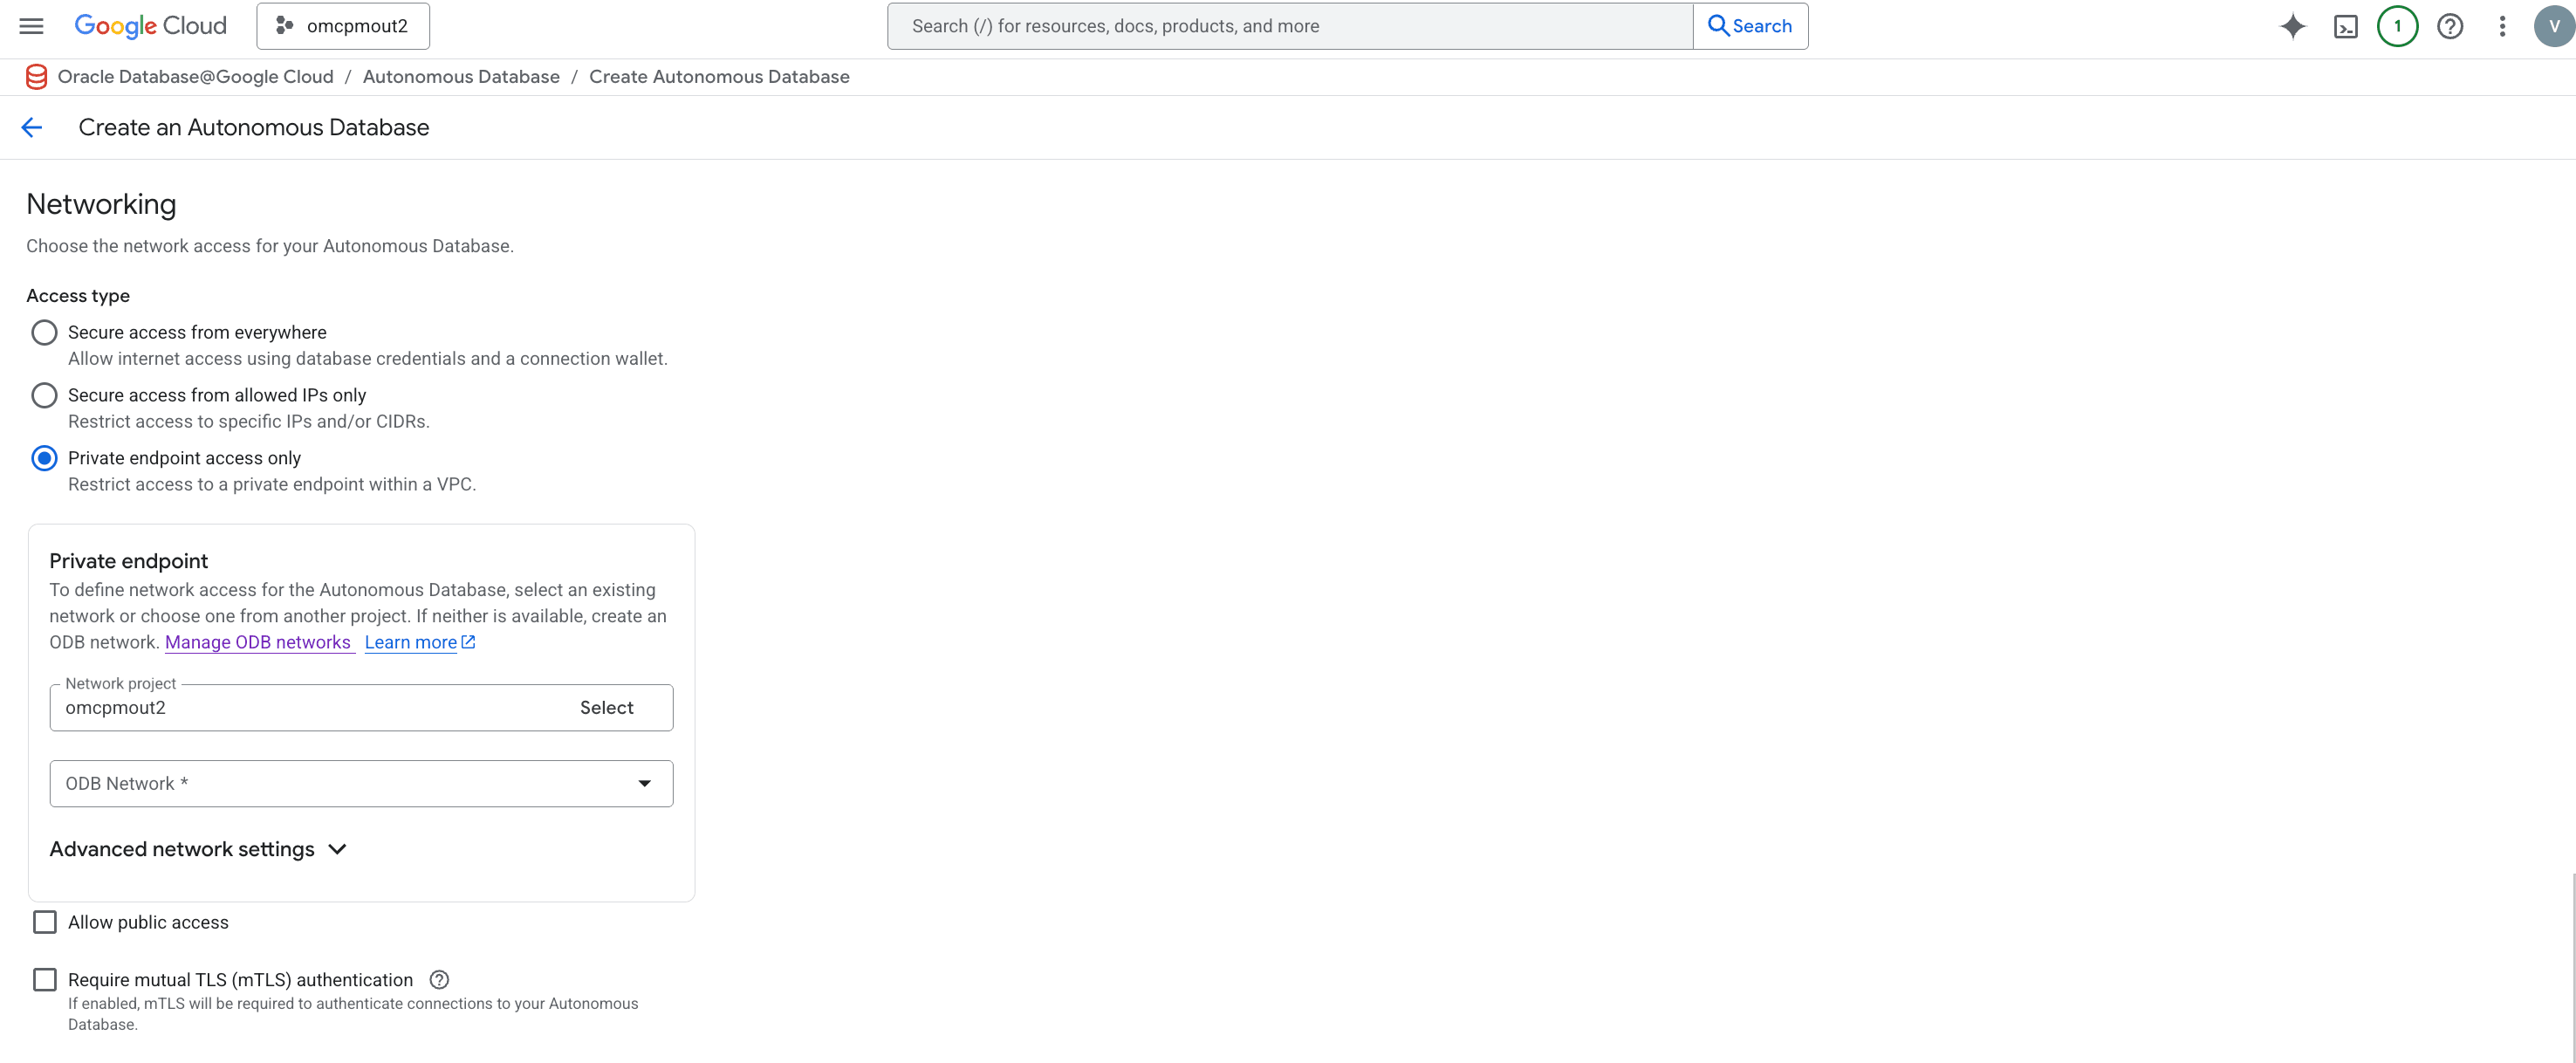
- In the Networking section, enter the following information.
- In the Access type radio group, select Secure access from everywhere, Secure access from allowed IPs only, or Private endpoint access only as needed. The detault is Private endpoint access only which restricts access to a private endpoint within the VPC.
- If you select Secure access from everywhere, the Require mutual TLS (mTLS) authentication checkbox appears but is not updatedable. Secure access from everywhere allows internet access using database credentials and requires a connection wallet and mTLS.
- If you select Secure access from allowed IPs only, the Network access section appears with the following fields.
- In the IP notation drop-down, select either IP address or CIDR block.
- If the IP notation drop-down is set to IP address, the IP address field allows you to enter a valid IP address.
- If the IP notation drop-down is set to CIDR block, the Use CIDR notation field allows you to enter a valid CIDR block.
- To add additional IP addresses or CIDR blocks, select the Add a network access link.
- To delete an IP address or CIDR block, select the trashcan icon for that item.
- The Require mutual TLS (mTLS) authentication checkbox appears and is unselected by default. If selected, this will require mTLS connections to your Autonomous Database.

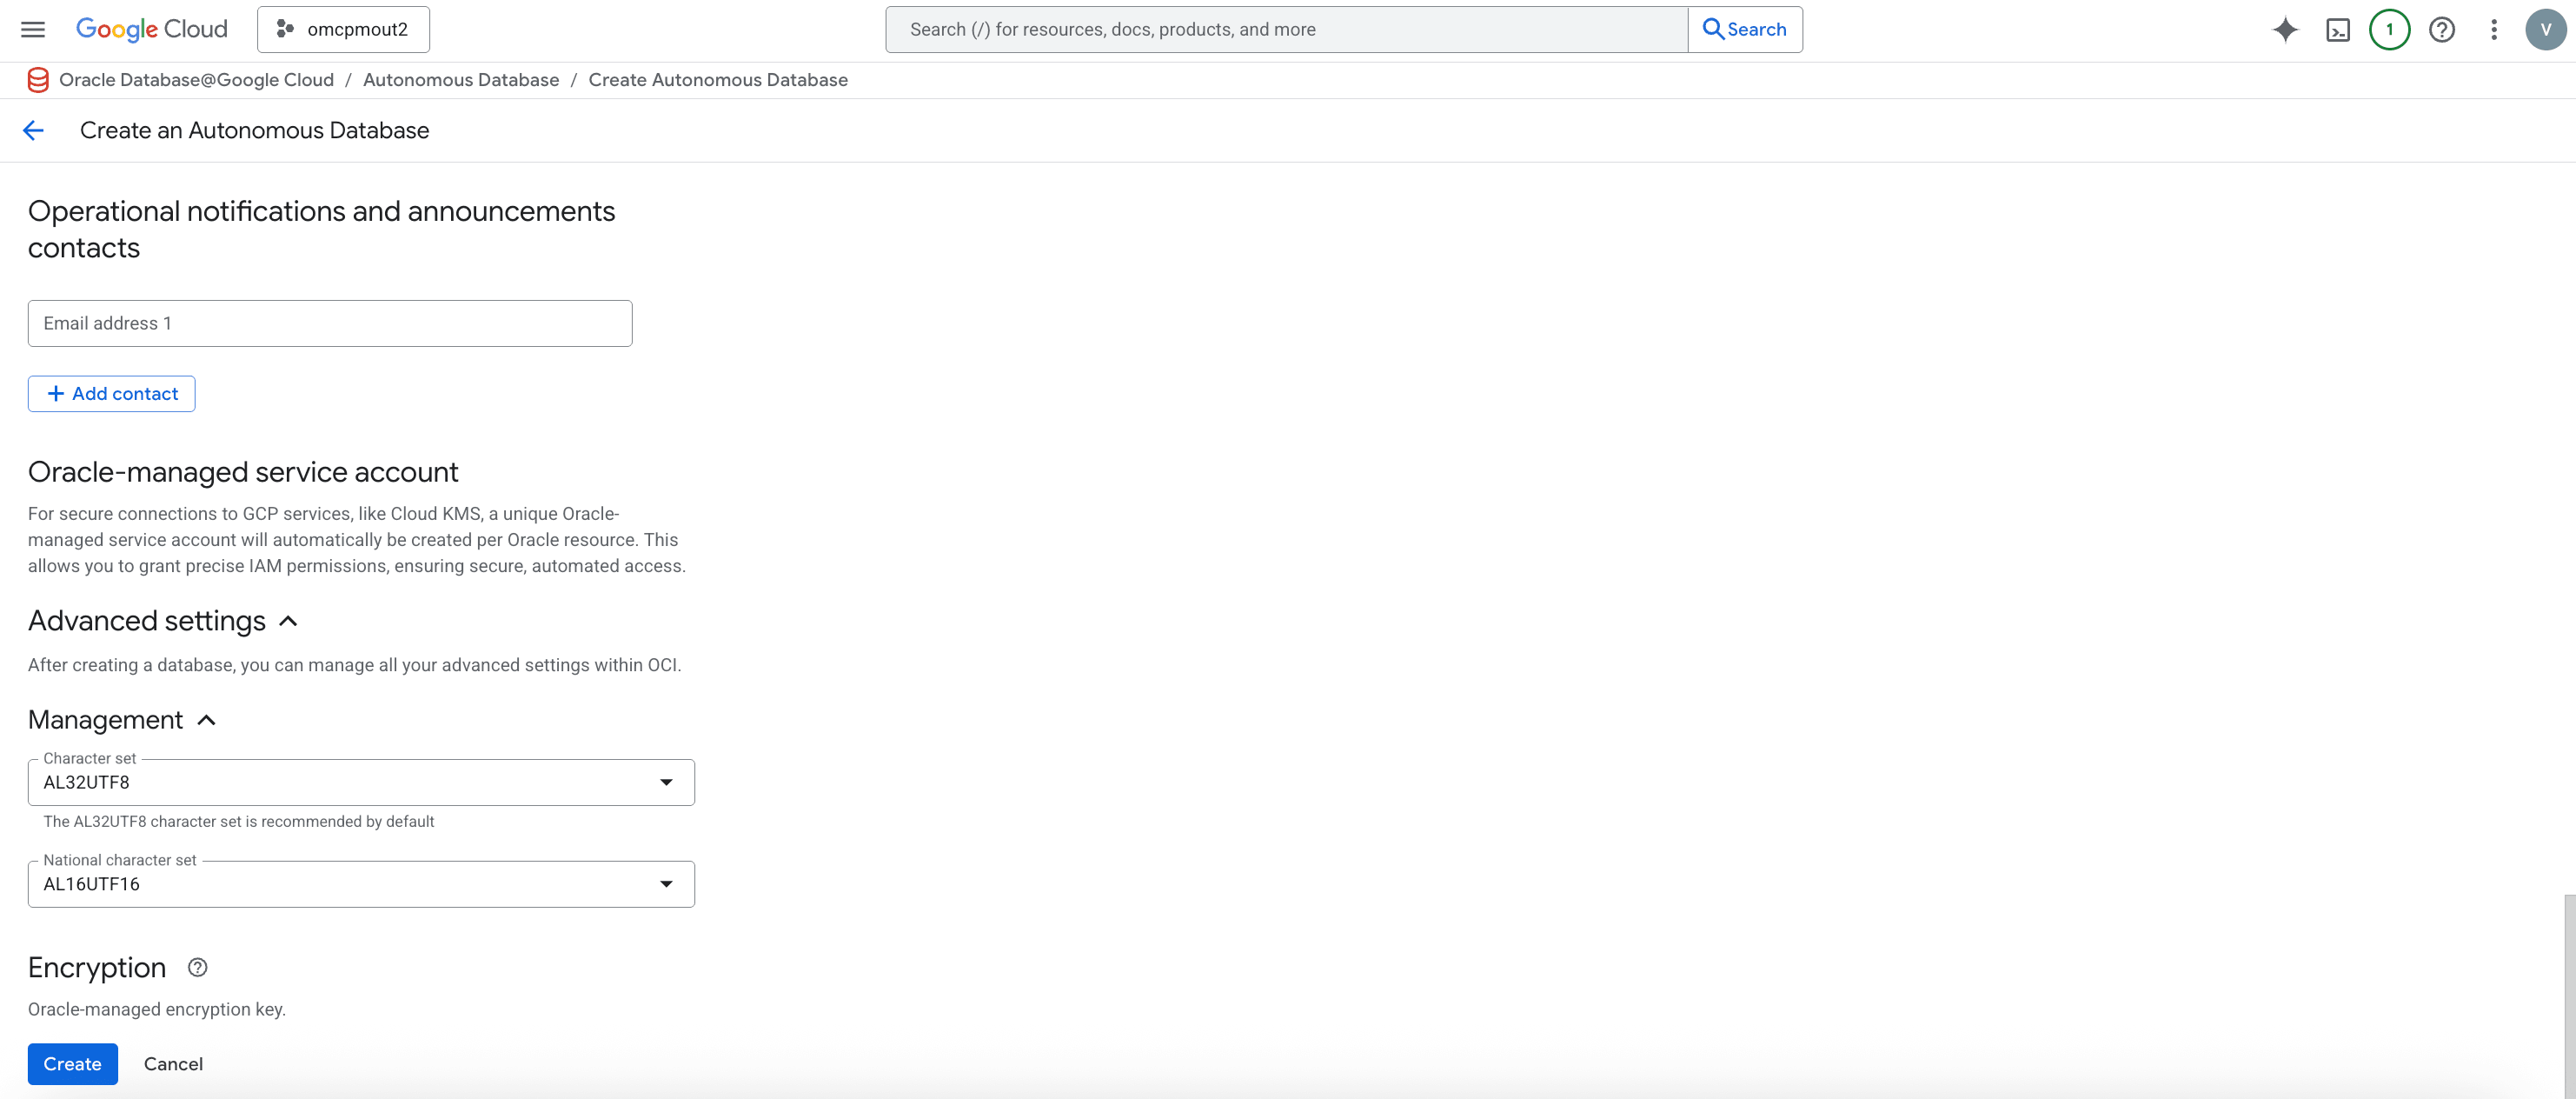
- In the Operational notifications and announcements contacts section, enter the following information.
- In the Email address 1 field, you can enter a valid email address.
- If you need additional contacts, up to 10, select the + Add contact button. This will create an additional input field.
- To delete a contact, select the trashcan icon beside that email address.
- In the Advanced settings section, which is optional and collapsed by default, you can expand it to see the Management section. The Management section is optional. You can set the following values.
- In the Character set drop-down, select the value you want for your Autonomous Database.
- In the National character set drop-down, select the value you want for your Autonomous Database.
- The Encryption section is set to Oracle-managed encryption key by default. If you want to change this to a customer-managed Google Cloud KMS key, you can do so in the Encryption section of the Autonomous Database's resource details after creation.

- Select the Create button to finish creating your Autonomous Database.
- From the Oracle Database@Google Cloud dashboard , select Autonomous Database Service > Autonomous Database from the left-menu.
Autonomous Database creation is only available through the gloud Console and gcloud CLI.
There is currently no content for this page. Oracle Database@Google Cloud team intends to add content here, and this placeholder text is provided until that text is added. The Oracle Database@Google Cloud team is excited about future new features, enhancements, and fixes to this product and this accompanying documentation. We strongly recommend you watch this page for those updates.