Base Database
To create a Base Database, follow these steps.
- From the Oracle Database@Google Cloud dashboard , select Core Database Service > Base Database Service from the left-menu.
- Select the + Create button.

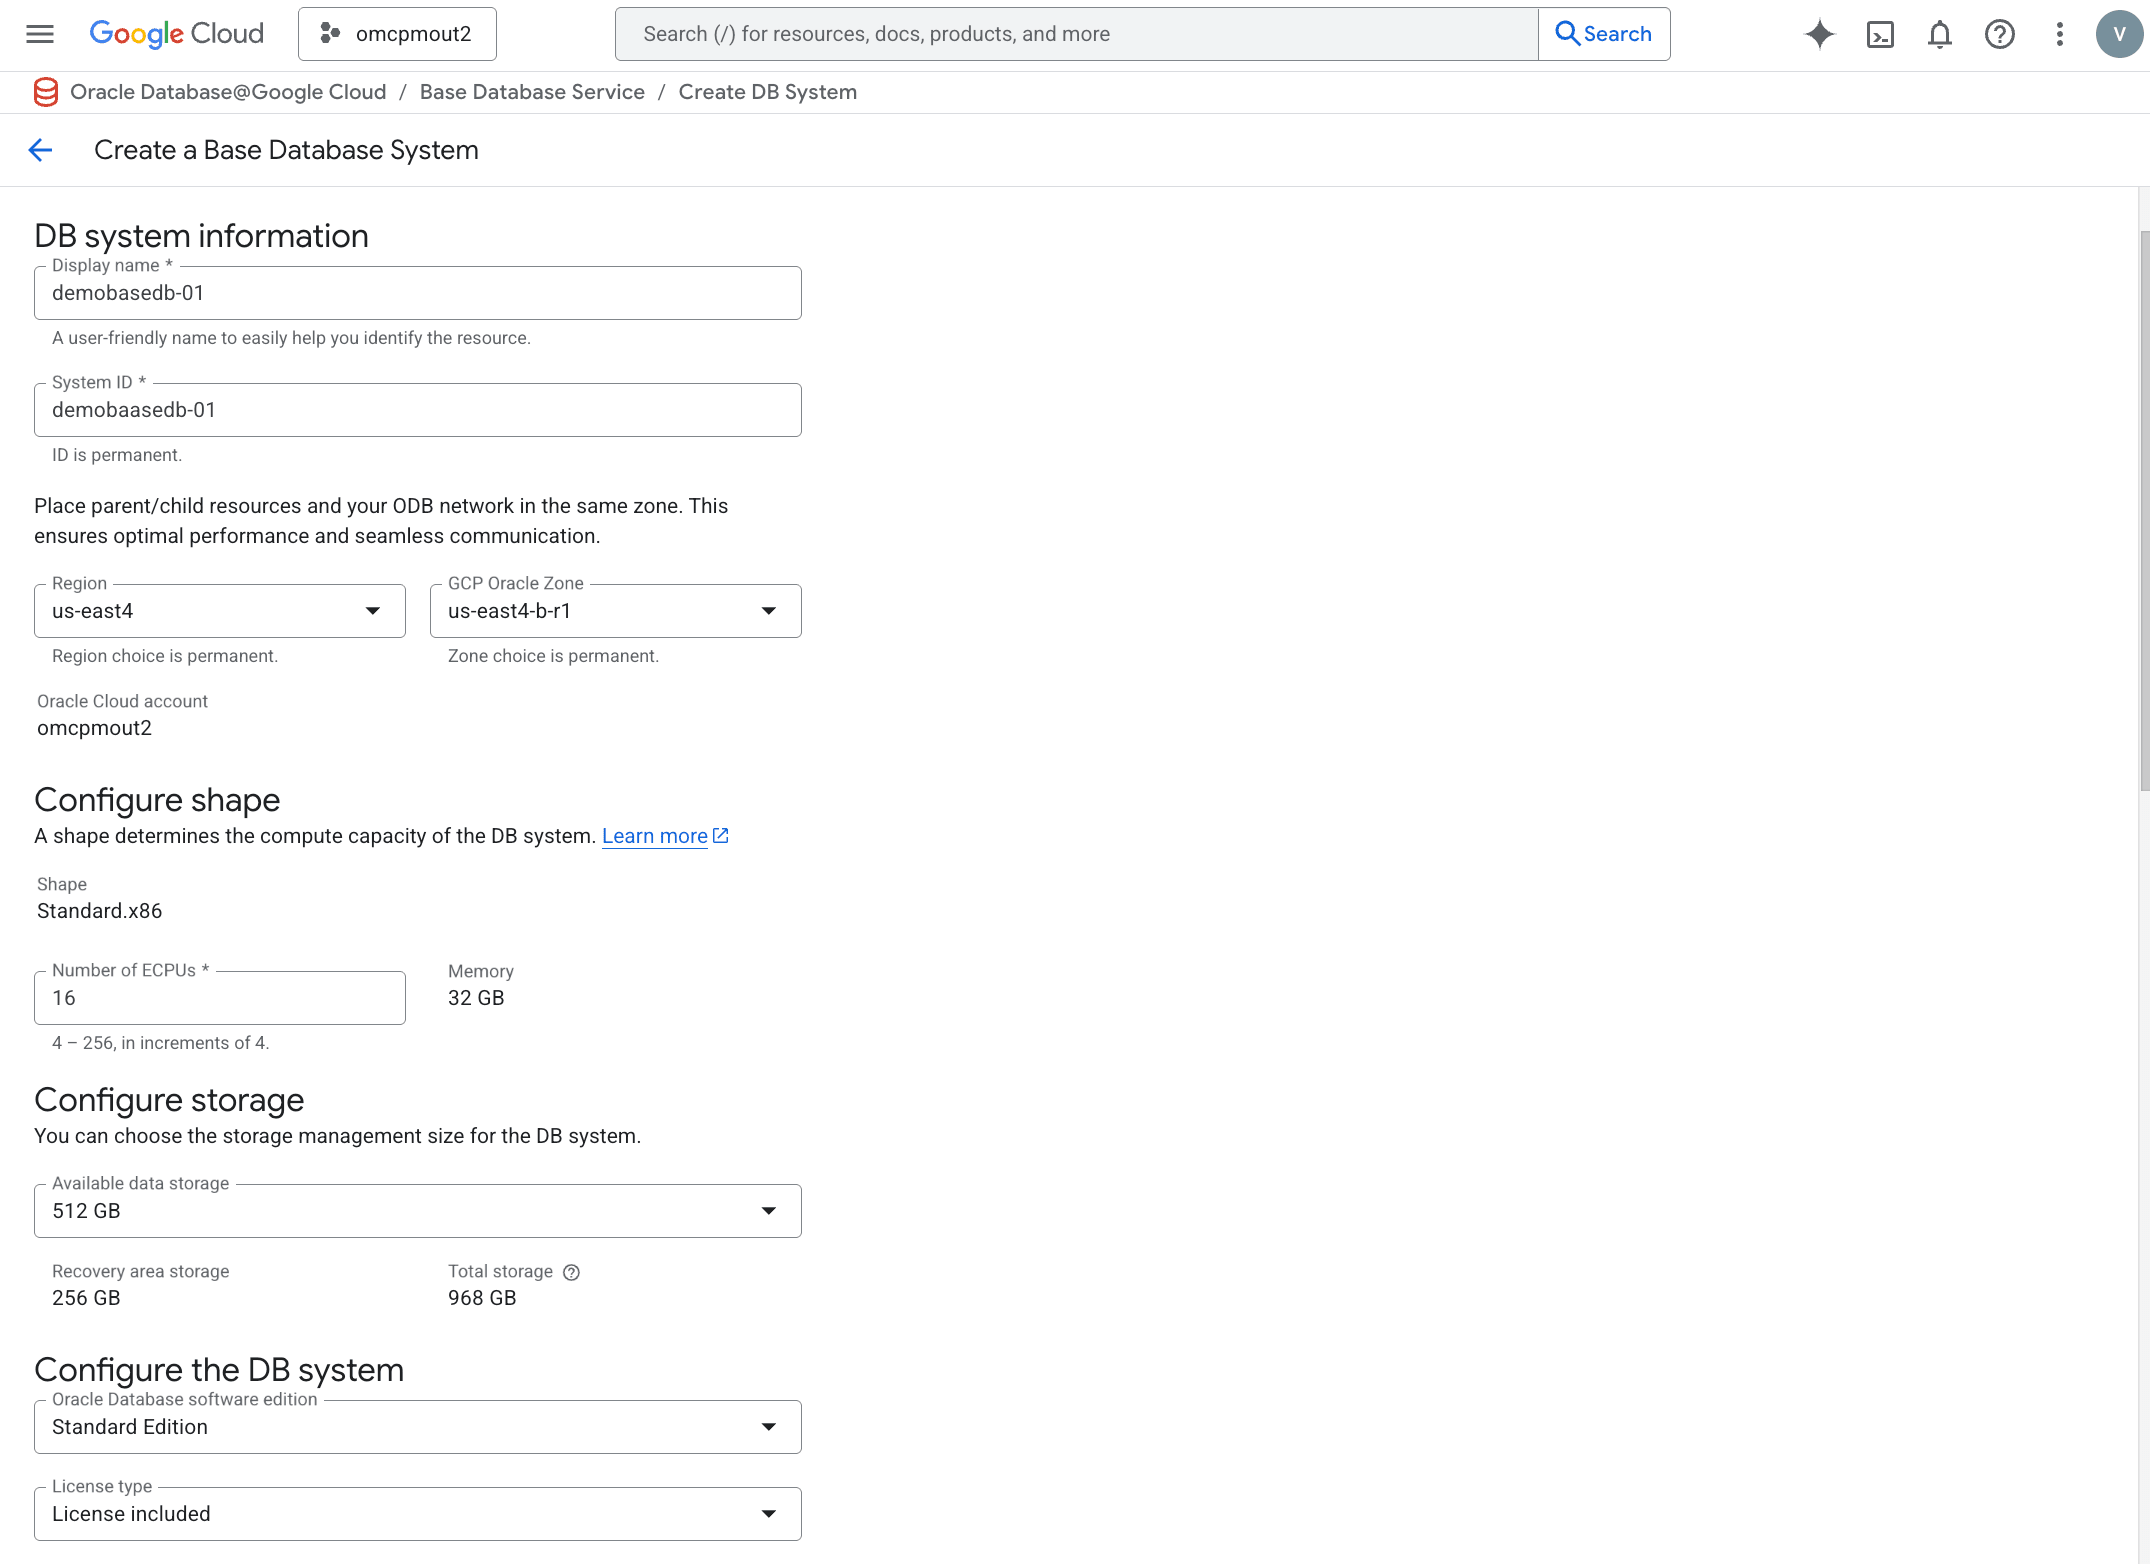
- In the DB system information section, enter the following information.
- In the Display name field, enter a value of your choice from 1-255 characters consisting of letters, numbers, underscores (_), and hyphens (-) that must start with a letter or underscore and cannot contain two consecutive hyphens.
- In the System ID field, enter a value of your choice from 1-63 characters consisting of lowercase letters, numbers, and hyphens (-) that must start with a lowercase letter and end with a lowercase letter or number.
- In the Region drop-down, select a value. This value cannot be changed after the Base Database is created.
- In the GCP Oracle Zone drop-down, select a value. This value cannot be changed after the Base Database is created.
- The Oracle Cloud Account is a read-only value provided for reference.
- In the Configure shape section, enter the following information.
- The Shape field may be read-only. If so, the default
Standard.X86shape is selected. - In the Number of ECPUs field, enter a value from 4 to 256 in increments of 4.
- The Memory field is calculated based on your input.
- The Shape field may be read-only. If so, the default
- In the Configure storage section, enter the following information.
- In the Available data storage drop-down, select the value.
- The Recovery area storage and Total storage fields are calculated from your input.
Note
Total storage shows the amount of storage used by the database. 200 GB is used for the file system. Oracle bills for the total storage used.
- In the Configure DB system section, enter the following information.
- In the Oracle Database software edition drop-down, select the value.
- In the License type drop-down, select the value.
Note
License included means the cost of this resource will include the Oracle software license(s) and the service. Bring Your Own License (BYOL) means you use your organization's existing Oracle software licenses for this resource. For more information, see Bring Your Own License.

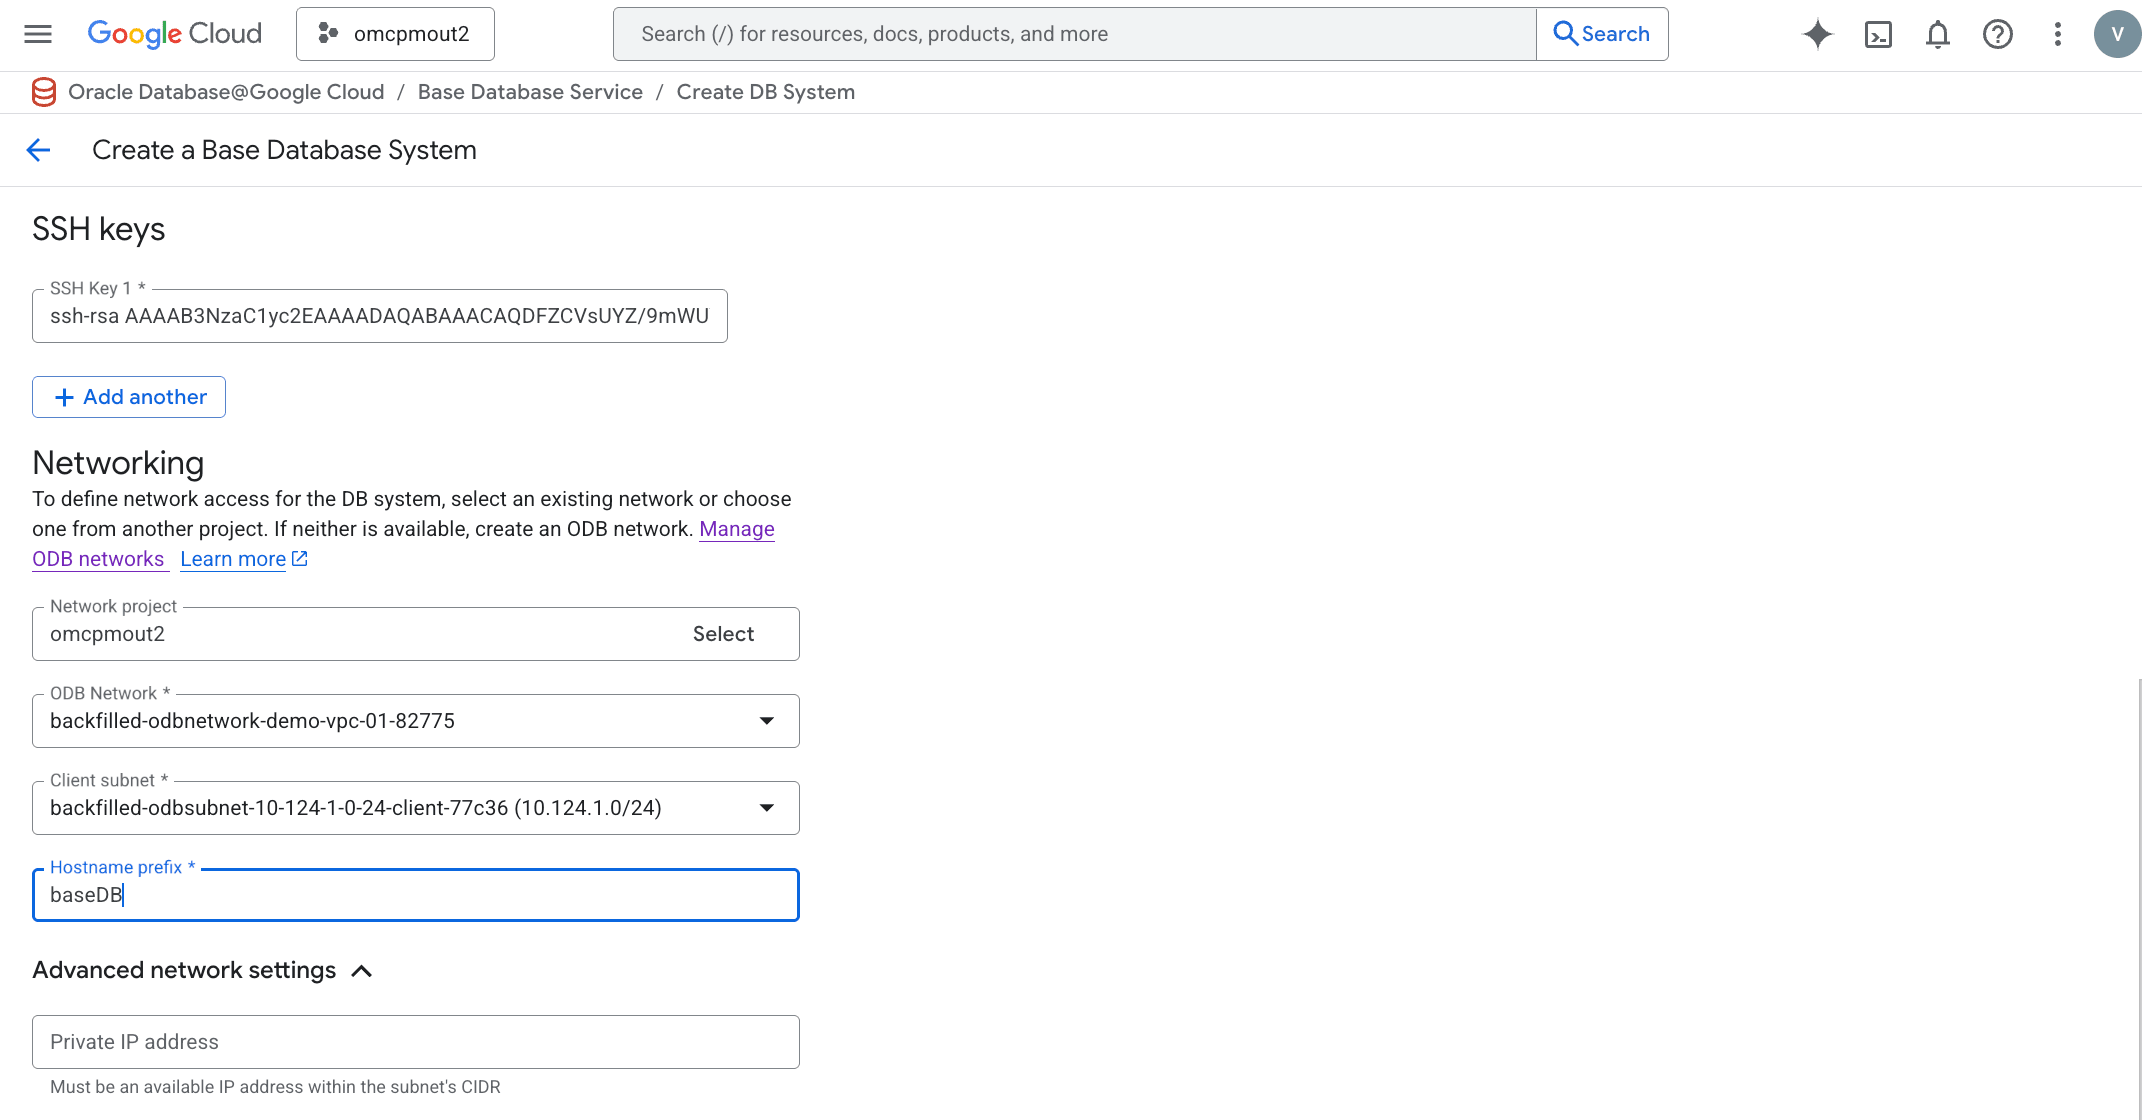
- In the SSH keys section, enter the following information.
- In the SSH key 1 field, enter a valid public SSH key. You must define at least one (1) SSH key.
- If you wish to enter more that one (1) SSH key, select the + Add another button, and enter the additional key(s).
- If you wish to delete an SSH key, select the trashcan icon beside that SSH key value.
- In the Networking section, enter the following information.
- In the Network project field, the default project is entered. If you want to use a different Google Cloud project, select the Select button. You can then select from any project to which you have privileges.
- In the ODB network drop-down, select a value.
- In the Hostname prefix field, enter a hostname prefix from 1-16 characters of letters, numbers, and hyphens (-) that must start with a letter.
- The Advance network settings section is optional and collapsed by default. The Private IP address, if entered, must be an available IP address within the subnet's CIDR.

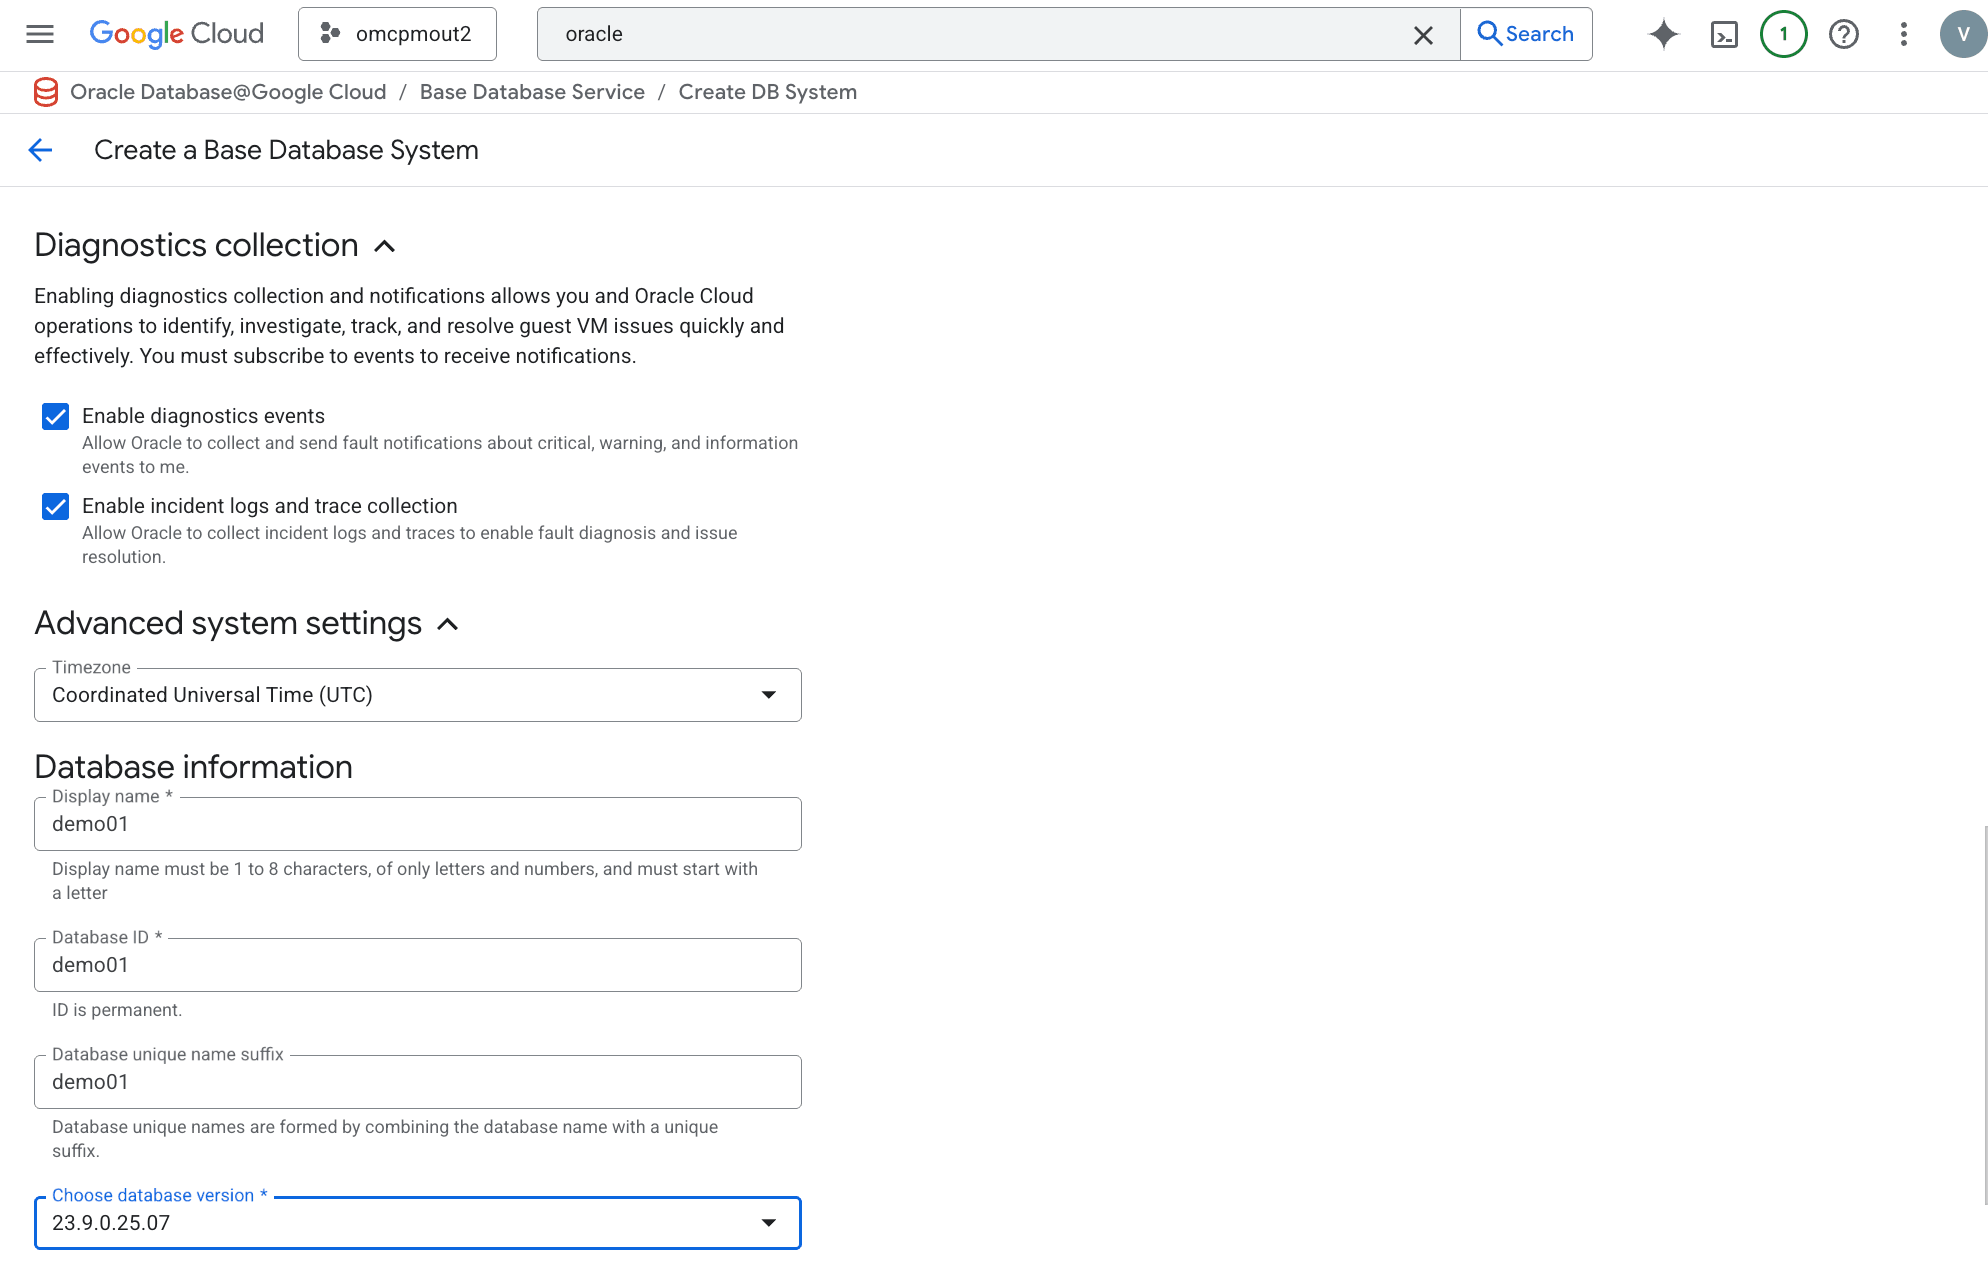
- In the Diagnostics collection section, which is optional, contains the following information.
- The Enable diagnostic events checkbox, allows Oracle to collect and send fault notifications about critical, warning, and information events to you.
- In the Enable incident logs and trace collection checkbox, allows Oracle to collect incident logs and traces to enable fault diagnosis and issue resolution.
- In the Advanced system settings section, which is optional, in the Timezone drop-down allows you to select a value. The default is Coordinated Universal Time (UTC).
- In the Database information section, enter the following information.
- In the Display name field, enter a value of 1-8 characters of only letters and numbers that starts with a letter.
- In the Database ID field, enter a value of your choice from 1-63 characters consisting of lowercase letters, numbers, and hyphens (-) that must start with a lowercase letter and end with a lowercase letter or number. This value cannot be changed after the Base Database is created.
- In the Database unique name suffix field, which is optional, you can enter a value to enable unique names to be formed by combining the database name with a unique suffix.
- In the Choose database version drop-down, select a value.

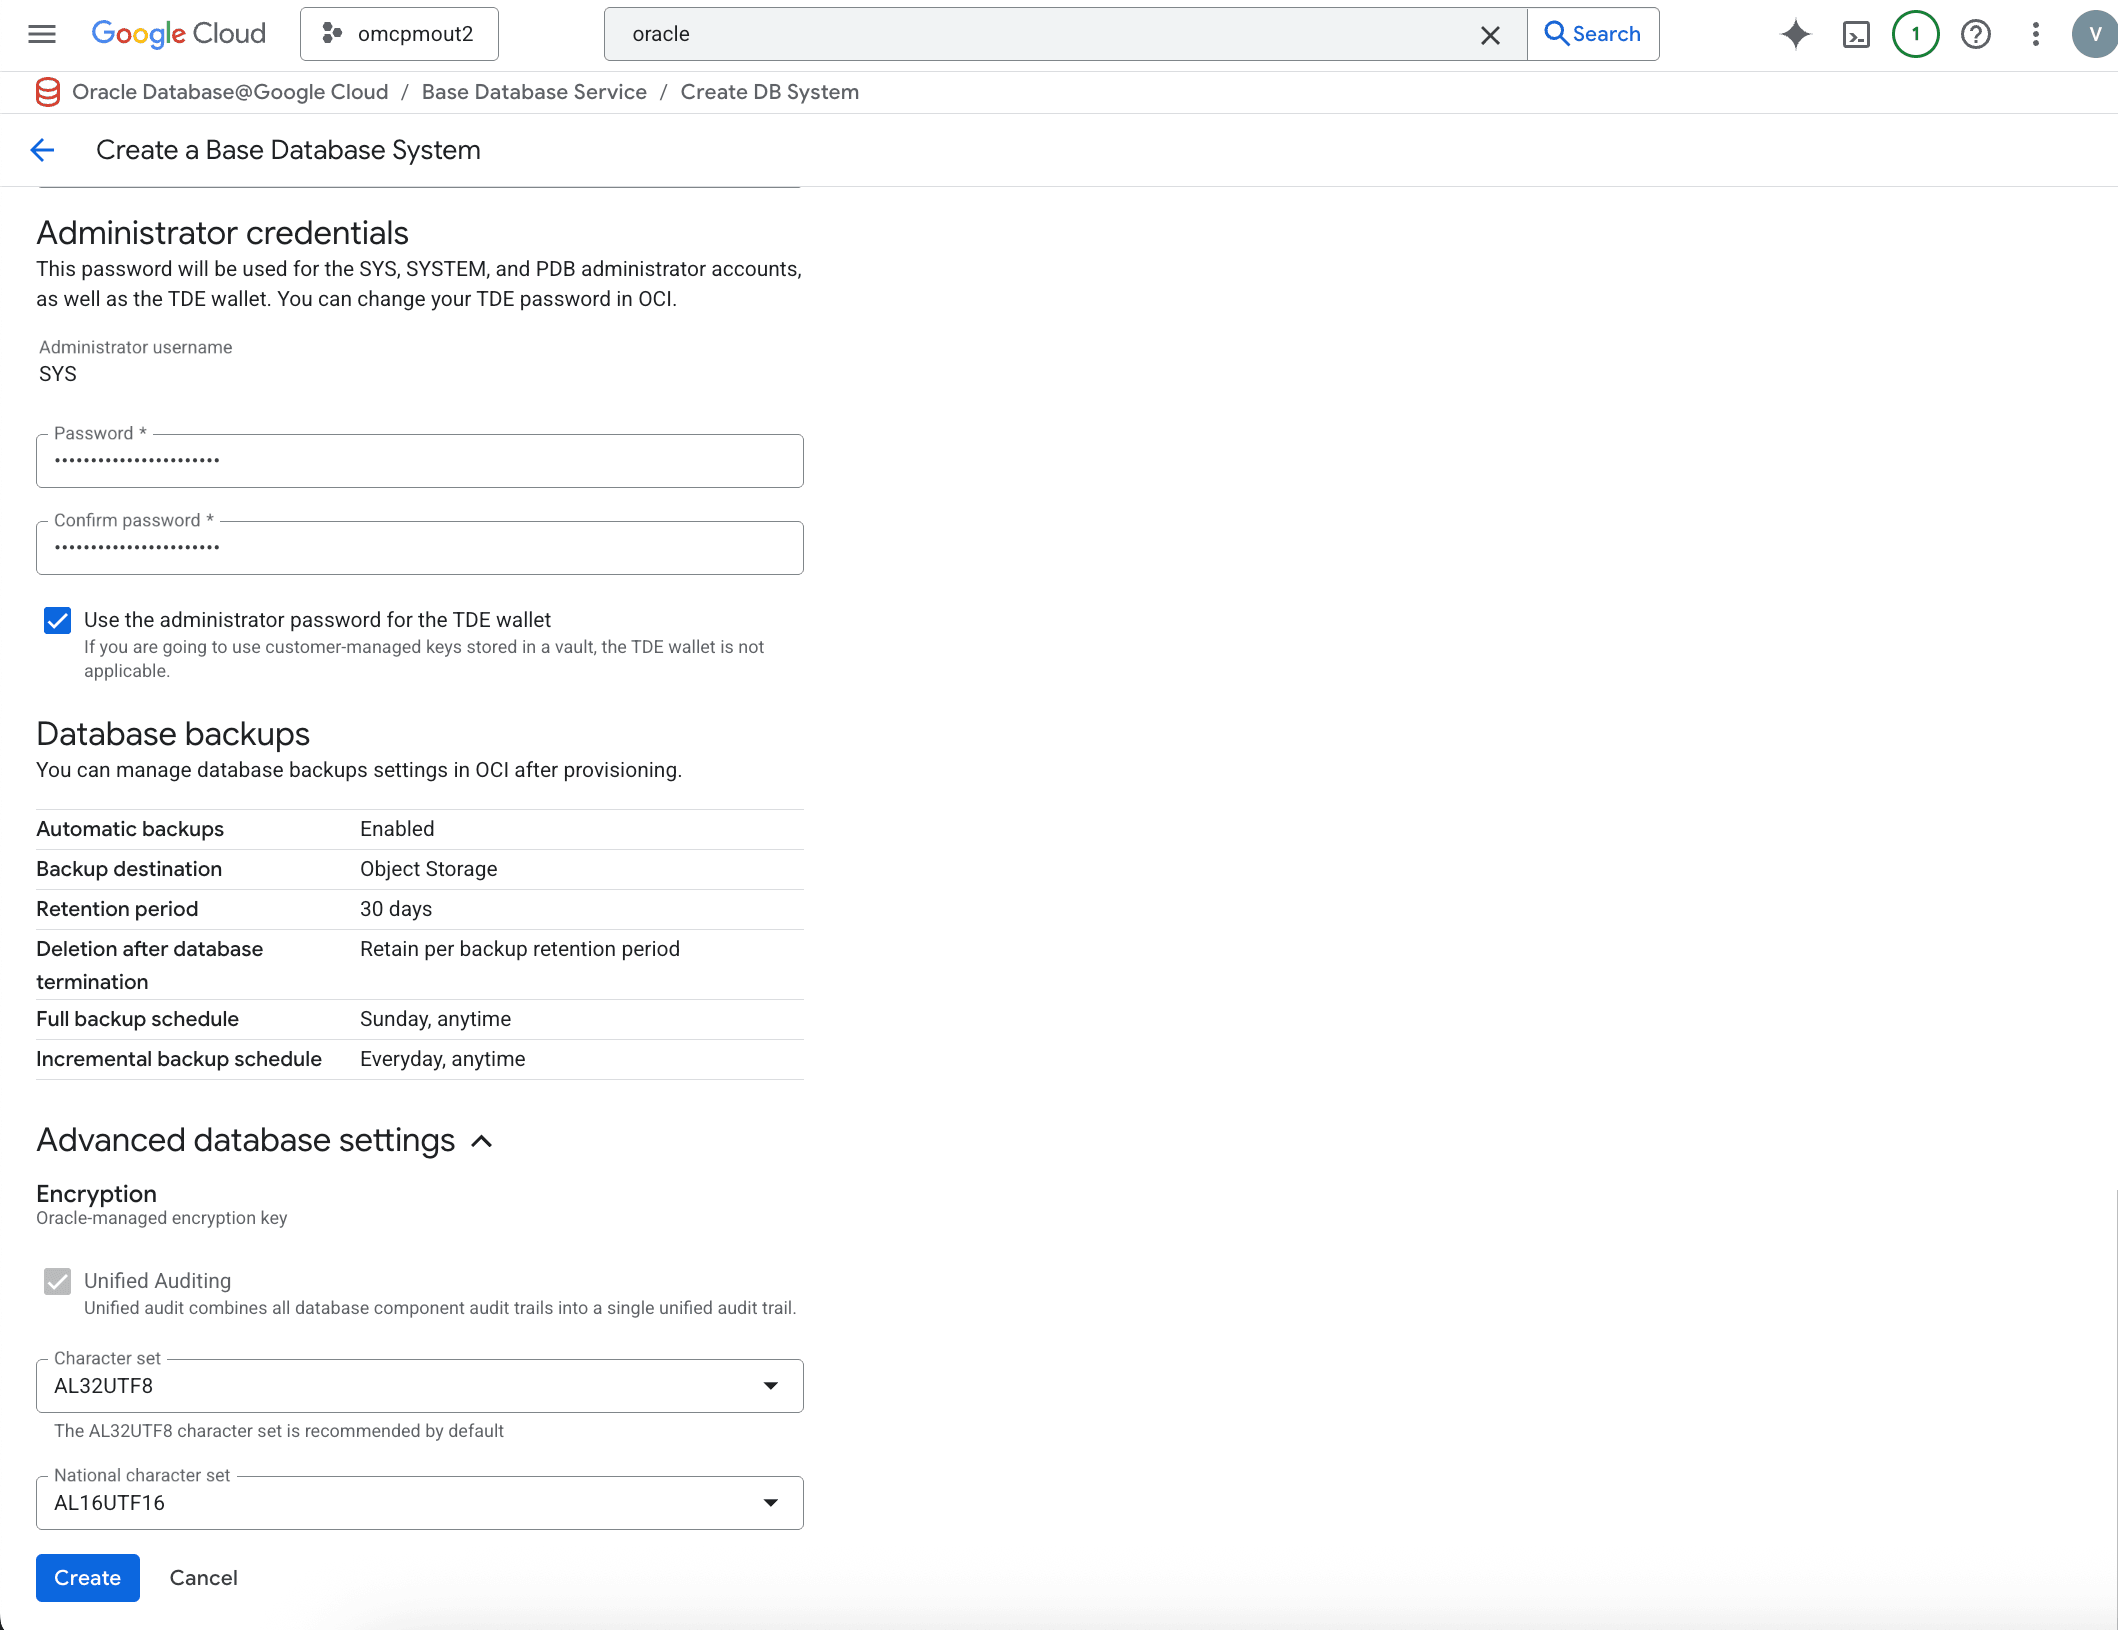
- In the Administrator credentials section, enter the following information.
- In the Password field, enter your password. Your password must be 9-30 characters, contain at least two (2) uppercase letters, two (2) lowercase letters, two (2) special characters in _ (underscore), #, or - (hyphen), and two (2) numbers.
- In the Confirm password field must match the Password field.
- The Use the administrator password for the TDE wallet checkbox is selected by default. If you are going to use customer-managed keys stored in a vault, the TDE wallet is not applicable. If you unselect this checkbox, you will enter a TDE wallet password and Confirm TDE wallet password. Your TDE wallet password must be 9-30 characters, contain at least two (2) uppercase letters, two (2) lowercase letters, two (2) special characters in _ (underscore), #, or - (hyphen), and two (2) numbers.
- In the Database backups section, you will see the default settings. This cannot be changed at this time. You manage database backups settings in OCI console after provisioning.
- In the Advanced database settings section, which is optional and collapsed by default, you can set the following values.
- In the Character set drop-down, select the value you want for your Autonomous Database.
- In the National character set drop-down, select the value you want for your Autonomous Database.

- Select the Create button to finish creating your Base Database.
There is currently no content for this page. Oracle Database@Google Cloud team intends to add content here, and this placeholder text is provided until that text is added. The Oracle Database@Google Cloud team is excited about future new features, enhancements, and fixes to this product and this accompanying documentation. We strongly recommend you watch this page for those updates.
There is currently no content for this page. Oracle Database@Google Cloud team intends to add content here, and this placeholder text is provided until that text is added. The Oracle Database@Google Cloud team is excited about future new features, enhancements, and fixes to this product and this accompanying documentation. We strongly recommend you watch this page for those updates.
There is currently no content for this page. Oracle Database@Google Cloud team intends to add content here, and this placeholder text is provided until that text is added. The Oracle Database@Google Cloud team is excited about future new features, enhancements, and fixes to this product and this accompanying documentation. We strongly recommend you watch this page for those updates.
There is currently no content for this page. Oracle Database@Google Cloud team intends to add content here, and this placeholder text is provided until that text is added. The Oracle Database@Google Cloud team is excited about future new features, enhancements, and fixes to this product and this accompanying documentation. We strongly recommend you watch this page for those updates.