ODB Network
Creating an ODB network is a prerequisite for creating Oracle Exadata VM Cluster(s), and Oracle Exascale VM Cluster, including Oracle Autonomous AI Database Serverless.
Note:
When deploying the first Oracle AI Database@Google Cloud resource in a project, the service creates a compartment in OCI dedicated to storing all Oracle AI Database@Google Cloud resources for that project. This compartment has restrictive IAM policies applied to protect the contents of the compartment from modification by the customer (you).
To maintain service integrity, OCI administrators must not modify the compartment name or description or move or delete any of the resources created by the service in that compartment. Doing so creates a risk that the service loses its ability to manage those resources.
Create an ODB Network
-
Complete the prerequisites before creating an ODB network. For more information, see the Prerequisites section.
-
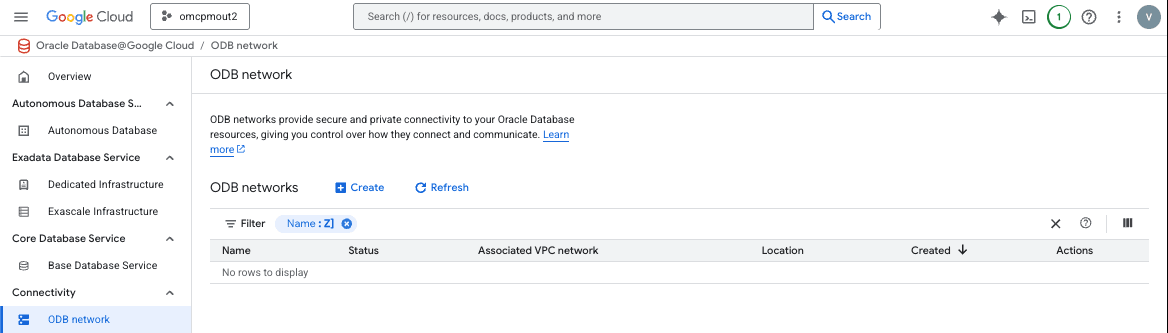
From the Oracle AI Database@Google Cloud dashboard, select Connectivity > ODB network from the left-menu.
-
Select the Create icon.
-
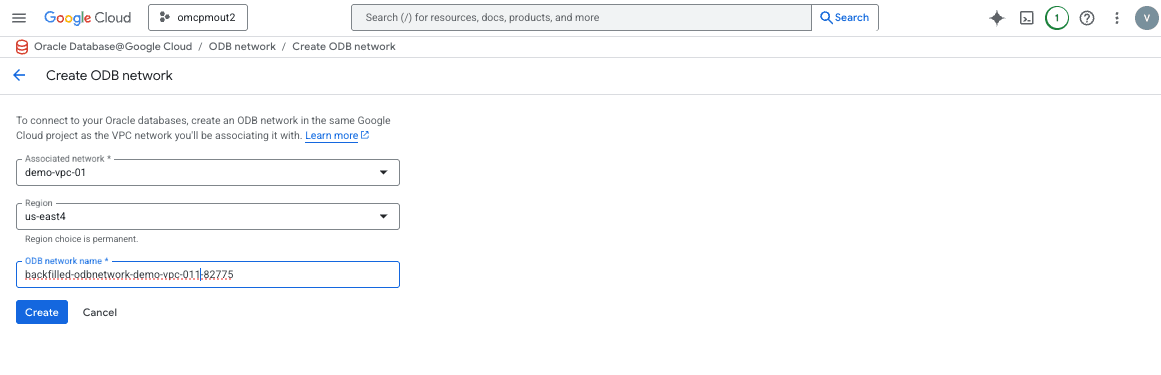
On the Create ODB network page, enter information for the required fields.
-
The Associated Network drop-down allows you to select an existing VPC. This VPC must be in the same Google Cloud project.
-
The Region drop-down allows you to select from available regions (for example,
us-east4). This cannot be changed after ODB network creation. -
The ODB network name is a field where you can enter a meaningful and unique name for your Google Cloud project. can be up to 63 characters. It can include the following characters: a-z, 0-9, and hyphen (-). It must start with a lowercase letter and must end with a lowercase letter or number.
-
-
Select the Create button.
-
Your ODB network and its required components will be created.
Create an ODB Subnet
-
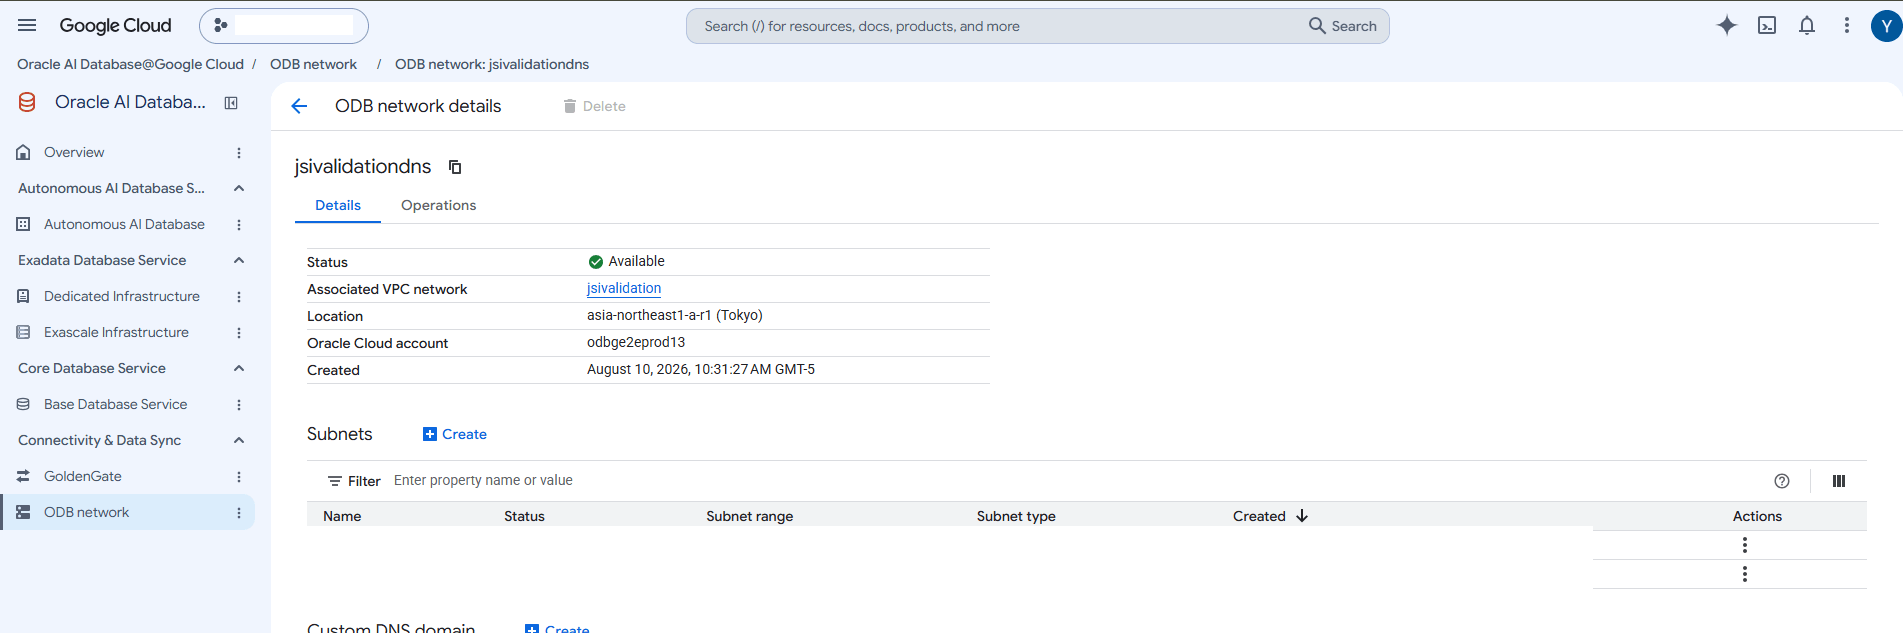
Select the ODB Network that you created previously, and then select the Create button to create a subnet.
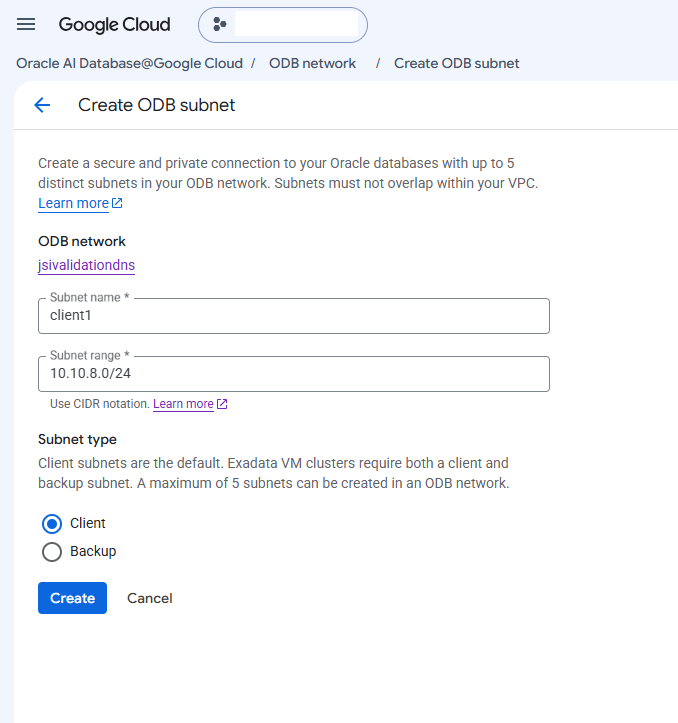
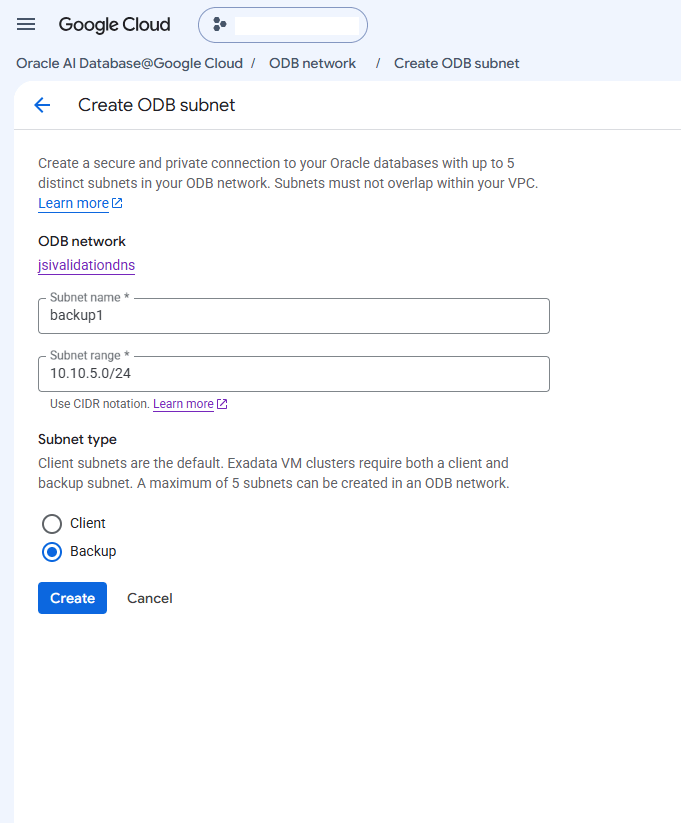
- From the Create ODB subnet page, complete the following steps:
-
Enter a subnet name. The Subnet name must be at most 63 characters. It must consist of lowercase letters (a-z), numbers, and hyphens, must start with a lowercase letter, and must end with a lowercase letter or number.
-
The Subnet range must use CIDR notation to define your subnet range. For more information, see CIDR notation.
-
From the Subnet type section, select one of the options:
-
Client: Client subnets are the default.
-
Backup:
 Note
Note:
-
Exadata VM clusters require both a client and backup subnet. A maximum of 5 subnets can be created in an ODB network.
-
For Autonomous AI Databases, you must select the Client subnet.
-
-
Review your information and then select the Create button.
-
-
-
Navigate back to **ODB network details page to view the details of your subnet(s).
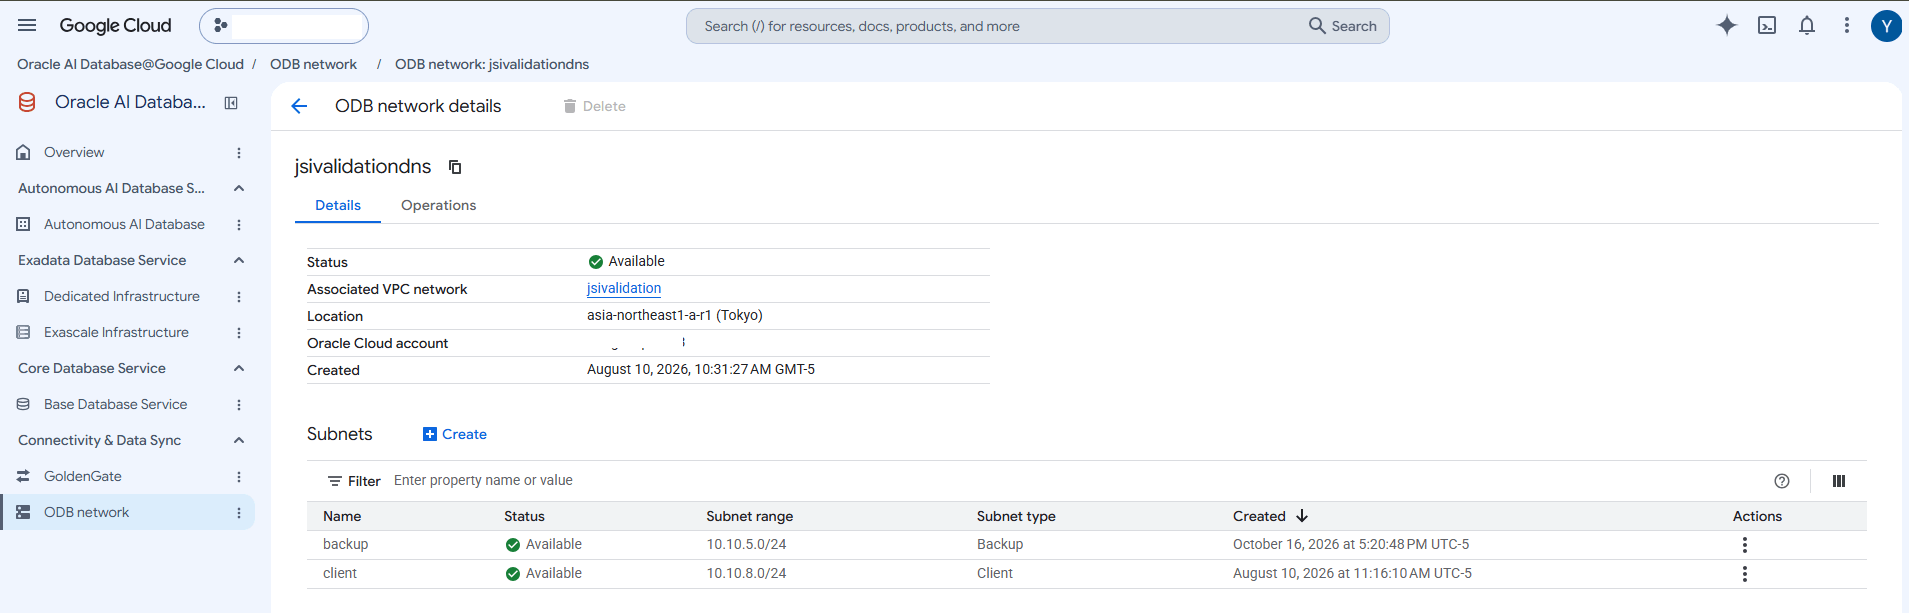
Create a Custom Domain
-
Select the ODB Network that you created previously, and then select the Create button to create a custom DNS domain.
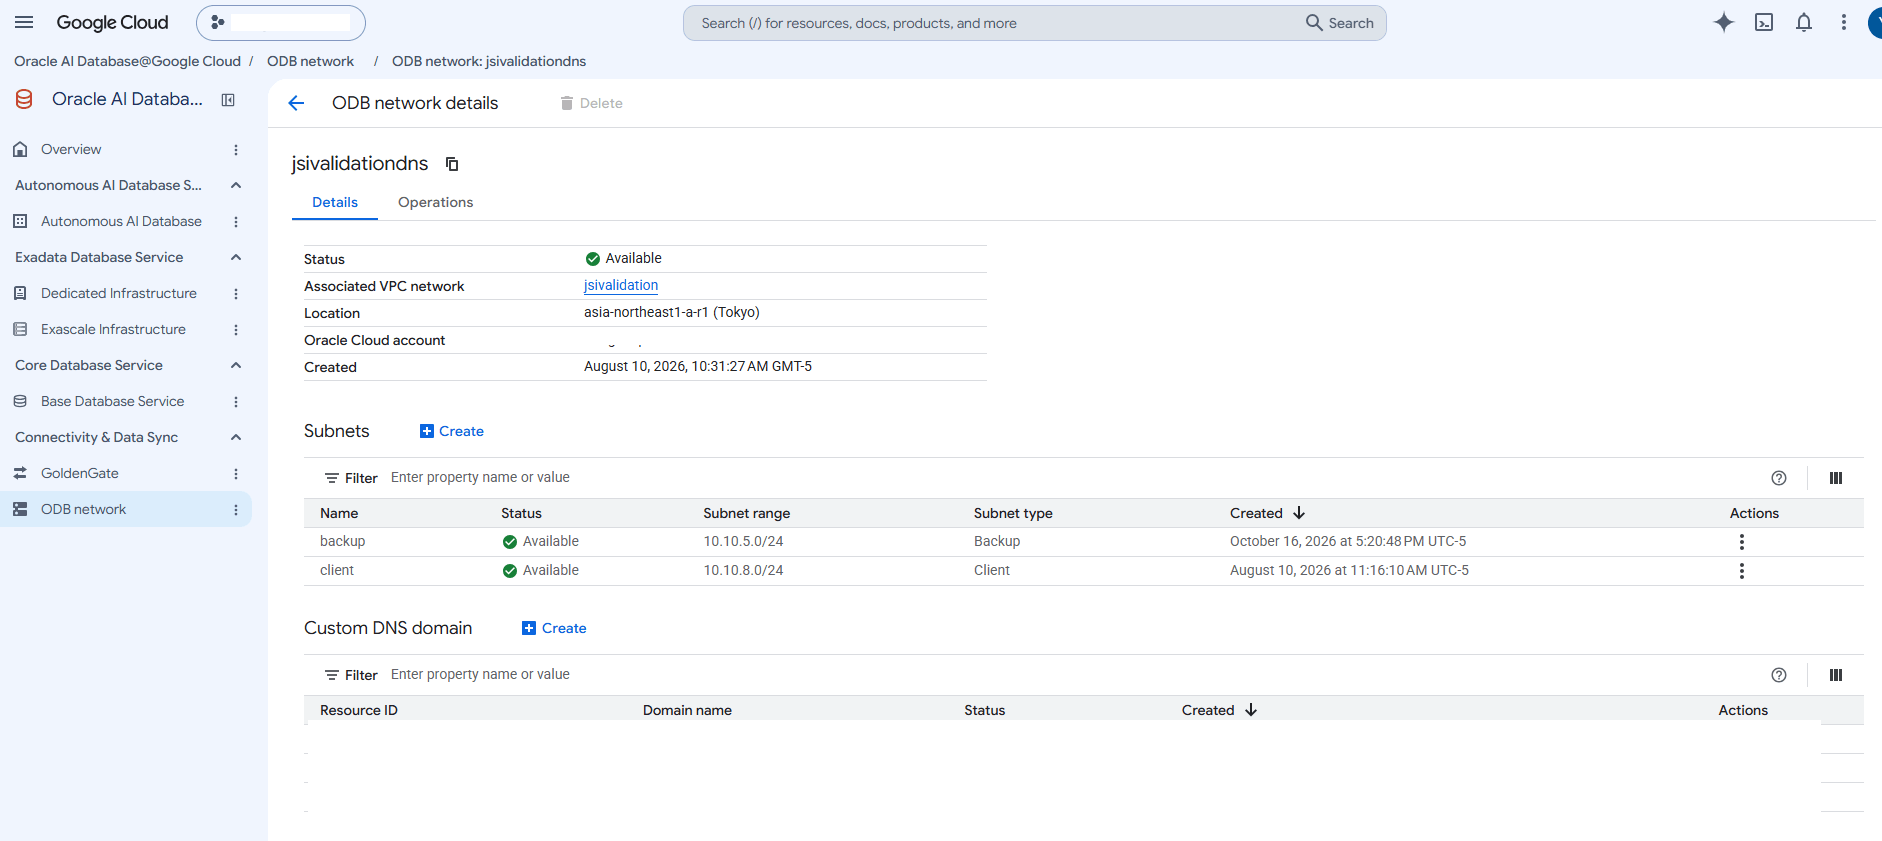
-
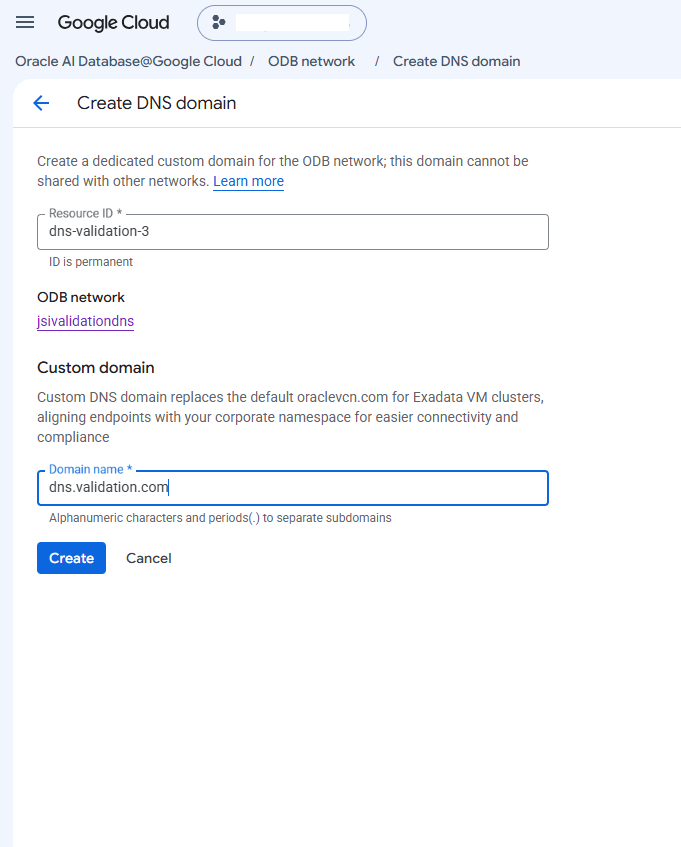
From the Create DNS domain page, complete the following steps:
- Enter a Resource ID. The Resource ID must be at most 63 characters. Must consist of lowercase letters (a-z), numbers, and hyphens, must start with a lowercase letter, and must end with a lowercase letter or number.
- Specify the domain name. Custom DNS domain replaces the default
oraclevcn.comfor Exadata VM Cluster(s), aligning endpoints with your corporate namespace for easier connectivity and compliance. Use alphanumeric characters and periods(.) to separate subdomains, with the combined prefix and domain under 112 characters. - Select the Create button.
-
Navigate back to **ODB network details page to view the details of your subnet(s).
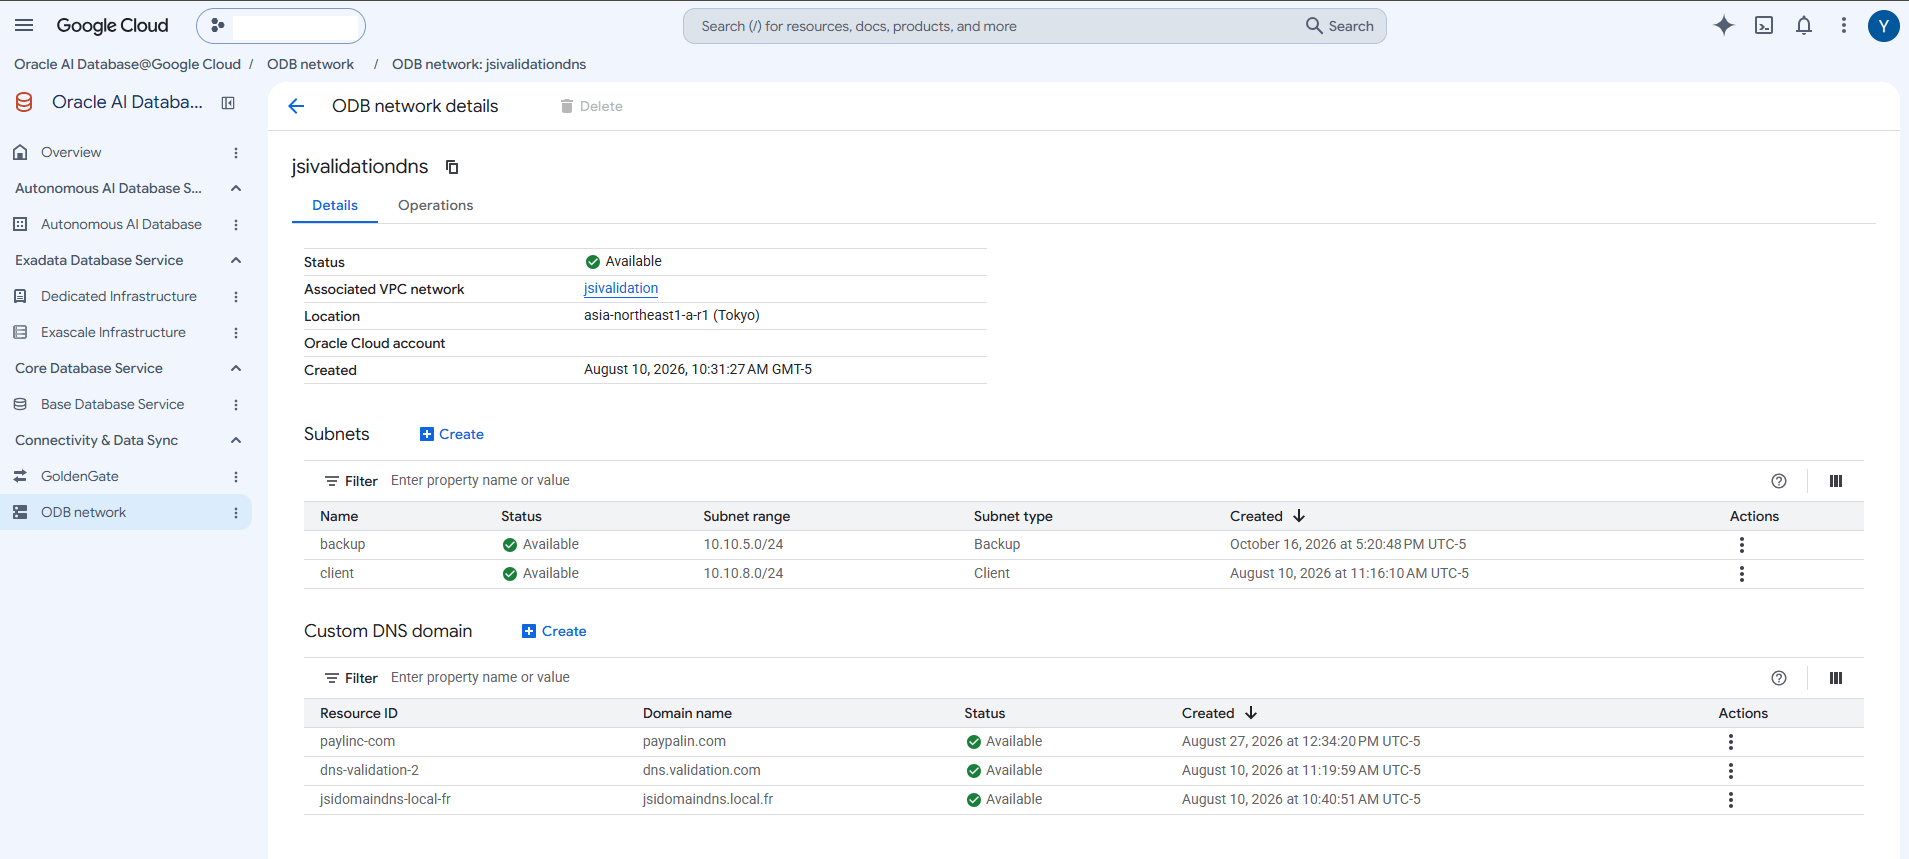
-
ODB Network creation is only available through the gcloud Console and gcloud CLI.
There is currently no content for this page. Oracle AI Database@Google Cloud team intends to add content here, and this placeholder text is provided until that text is added. The Oracle AI Database@Google Cloud team is excited about future new features, enhancements, and fixes to this product and this accompanying documentation. We strongly recommend you watch this page for those updates.
ODB Network creation is only available through the gcloud Console and gcloud CLI.
You can provision an ODB Network in Google Cloud using Google Cloud Terraform provider.
Prerequisites
-
Terraform or OpenTofu installed
-
Google Cloud credentials configured
-
HashiCorp Google Cloud provider version >= 7.0
-
HashiCorp OCI provider version =7.29.0 or higher
Sample Terraform Configuration using Google Cloud Terraform Provider
# Set Google Cloud & OCI Provider source and version terraform { required_providers { # Google Cloud Provider google = { source = "hashicorp/google" version = "~> 7.0" # Use the latest major version } # OCI Provider oci = { source = "oracle/oci" version = "7.29.0" } } } # Configure the Google Cloud Provider provider "google" { project = "xxxxxxxxxxxx" # Replace with your Google Cloud Project region = "us-central1" } # Configure the OCI Provider provider "oci" { tenancy_ocid = "ocid1.tenancy.oc1..aaaaaaaa2pg53mzroh6r2ub72r5mxxxxxxxxxxxxxpylciiqdihofe3dq" user_ocid = "ocid1.user.oc1..aaaaaaaaa6wyl3kzbgogsqpsixxxxxxxxxxxxxxxxuwzkemcrgue5q" private_key_path = "C:\\OCI-Terraform\\private-key.pem" # This example is for Windows OS fingerprint = "6c:c7:a7:60:f2:99:62:b9:8e:01:fc:e8:9b:eb:61:61" region = "us-desmoines-1" } # Create a VPC with Application Subnet resource "google_compute_network" "vpc_network" { name = "demo-vpc-tf" auto_create_subnetworks = false # Sets the VPC to "Custom" mode mtu = 1460 } # Define an Application Subnet within the VPC resource "google_compute_subnetwork" "app_subnet" { name = "app-subnet" ip_cidr_range = "157.0.1.0/24" region = "us-central1" network = google_compute_network.vpc_network.id } # Create ODB Network resource "google_oracle_database_odb_network" "odb_network"{ odb_network_id = "demo-odb-network-tf" location = "us-central1" project = "xxxxxxxxxxxx" # Replace with your Google Cloud Project network = google_compute_network.vpc_network.id gcp_oracle_zone = "us-central1-a-r1" labels = { env = "dev" } deletion_protection = "false" } # Create ODB Network Subnets resource "google_oracle_database_odb_subnet" "odb_client_subnet"{ odb_subnet_id = "client-subnet" location = "us-central1" project = "xxxxxxxxxxxx" # Replace with your Google Cloud Project odbnetwork = google_oracle_database_odb_network.odb_network.odb_network_id cidr_range = "192.168.1.0/24" purpose = "CLIENT_SUBNET" labels = { env = "dev" } deletion_protection = "false" } resource "google_oracle_database_odb_subnet" "odb_backup_subnet"{ odb_subnet_id = "backup-subnet" location = "us-central1" project = "xxxxxxxxxxxx" # Replace with your Google Cloud Project odbnetwork = google_oracle_database_odb_network.odb_network.odb_network_id cidr_range = "192.168.2.0/28" purpose = "BACKUP_SUBNET" labels = { env = "dev" } deletion_protection = "false" }-