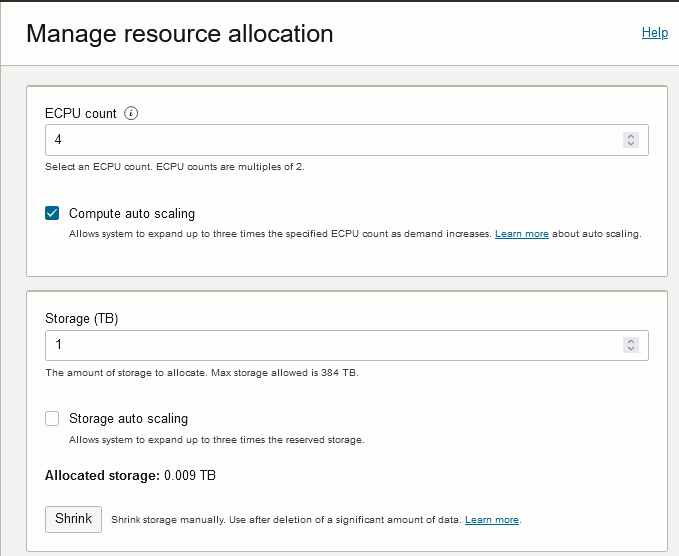
Add CPU or Storage Resources or Enable Auto Scaling

Describes how to scale your Autonomous Database on demand by adding CPU cores or storage. Also describes how to enable auto scaling.

Perform the following prerequisite steps as necessary:

  • Open the Oracle Cloud Infrastructure Console by clicking the navigation icon next to Oracle Cloud.

  • From the Oracle Cloud Infrastructure left navigation menu click Oracle Database and then, depending on your workload click one of: Autonomous Data Warehouse, Autonomous JSON Database, or Autonomous Transaction Processing.
  • On the Autonomous Databases page select an Autonomous Database from the links under the Display name column.

  1. On the Details page, click Manage resource allocation.
  2. In the Manage resource allocation area, add resources for your scale request.
    • Enter a value or click the up arrow to select a value for ECPU count (OCPU count if your database uses OCPUs). The default is no change.
    • Storage: Specify the storage you wish to make available to your database. Depending on your workload type and your compute model, you have these options:

      • Data Warehouse: Specify your storage in Terabytes (TB).

      • JSON: Specify your storage in Terabytes (TB).

      • Transaction Processing: Specify your storage in Gigabytes (GB) or Terabytes (TB). Enter the size in the Storage field. Select GB or TB for the Storage unit size. GB units are only available when the Workload type is Transaction Processing and the Compute model is ECPU.

      The default is no change.

    Description of adb_scale_dialog.png follows
  3. Enable compute auto scaling.

    Select Compute auto scaling to allow the system to automatically use up to three times more CPU and IO resources to meet workload demand, compared to the database operating with compute auto scaling disabled. The additional resources are available until you disable compute auto scaling.

    If compute auto scaling is disabled while more CPUs are in use than the specified ECPU count (OCPU count if your database uses OCPUs), then Autonomous Database scales the number of CPUs in use down to the ECPU count (OCPU count).

    See Use Auto Scaling for more information.

  4. To enable Storage auto scaling, select Storage auto scaling.

    When you select Storage auto scaling the database can expand to use up to three times the reserved base storage.

    If you disable Storage auto scaling and the used storage is greater than the reserved base storage, as specified by the storage shown in the Storage field on the Oracle Cloud Infrastructure Console, Autonomous Database shows a warning on the disable storage auto scaling confirmation dialog. The warning lets you know that the reserved base storage value will be increased to the nearest TB greater than the actual storage usage, and shows the new reserved base storage value.

    See Use Auto Scaling for more information.

    Note

    Clicking Shrink initiates the Shrink storage operation. See Shrink Storage for more information.
  5. Click Apply to change your resources.

When you click Apply with a resource change, the Lifecycle State changes to Scaling in Progress.... After the Lifecycle State changes to Available the changes apply immediately.