The Data Flow Library
Learn about the applications Data Flow Library in Data Flow, including reusable Spark application templates and application security. Also learn how to create and view applications, edit applications, delete applications, and apply arguments or parameters.
Reusable Spark Application Templates
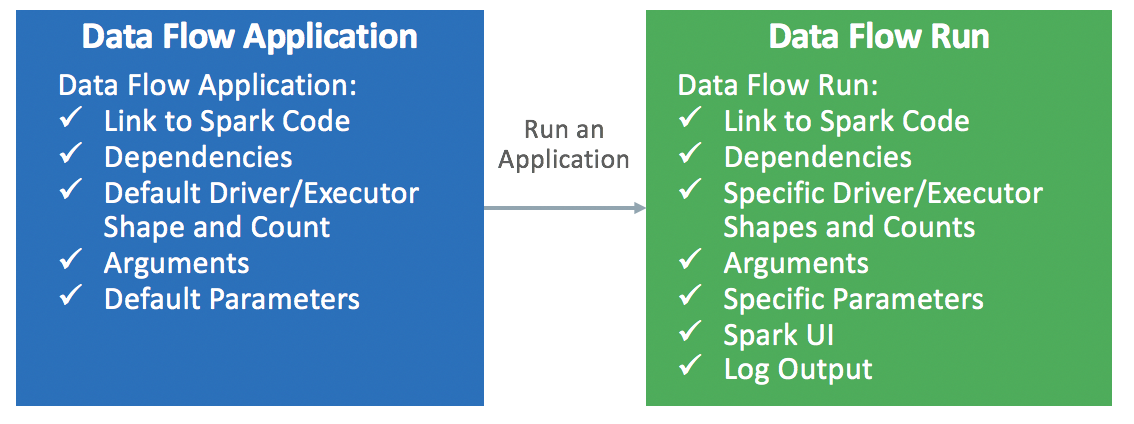
Data Flow
Data Flow Application are infinitely reusable Spark application
templates. They consist of a Spark application, its dependencies, default parameters,
and a default run-time resource specification. Once a Spark developer creates a Data Flow Application, anyone can use it without
worrying about the complexities of deploying it, setting it up, or running it. They can
use it through Spark analytics in custom dashboards, reports, scripts, or REST API
calls.
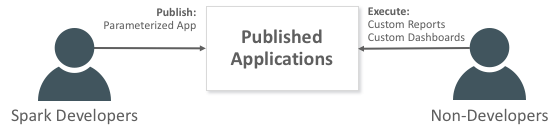
Every time you invoke the Data Flow Application, you create
a Data Flow
Data Flow Run . It fills in the details of the application template
and launches it on a specific set of IaaS resources.
View Data Flow Applications
From the Oracle Cloud Infrastructure Console, click Data Flow and then Applications, or from the Data Flow Dashboard, click Applications from the left-hand menu. The resulting page displays a table of the applications. It lists the name of each application, along with the language (Python, SQL, Java, or Scala), the owner, when it was created, and when it was last updated. To Edit an Application, or just to see more detailed information of the application, either click on the name of the application, or select Edit from the menu at the end of that application's row in the table. This menu also has options to Run or Delete the application.
If you have clicked on the Application name, the Details page for that application is displayed. The Detail Information tab displays the resource configuration and application configuration of details. There is also a Tags tab to display the tabs on the application. You can use Edit, Run, or Delete to change the application.
- In the left-hand side menu is a filters section. You can filter on the State of your applications and the Language used. These are drop-down lists. You can also set a date range during which applications were updated using the Updated Start Date and Updated End Date fields. Finally, you can enter all or part of a application name in the Name Prefix field, and filter by application name. You can choose to filter on one, or some, or all of these options. You can clear all these fields to remove the filters.
- The State filter gives the options of
Any state
,Accepted
,In Progress
,Canceling
,Canceled
,Failed
, orSucceeded
. - The Language filter lets you filter by
All
,Java
,Python
,SQL
, orScala
. - The Updated Start Date and Updated End Date fields allow you to pick a date from a calendar, along with a time (UTC). It displays the current month, but allows you to navigate to previous months. Or there are quick links to allow you to choose, today's date, yesterday's date, or the past three days.
- If you have applied tags to your applications, you can filter on these tags in the Tag Filters section. You can clear these tag filters.
These filtering options also allow you to search for an application if you can't remember the specifics of it. For example, you know it was created last week, but can't remember exactly when.
You can sort the list of applications by Created date, either ascending or descending.
Create a Java or Scala Data Flow Application
- Upload the JAR artifact to Oracle Object Storage.
- On the Applications page, click Create.
- In the Create Application panel, select JAVA or SCALA as appropriate from the Language options.
- Create the application and any necessary items.
- Provide a Name for the application.
- (Optional) Enter a Description which will help you search for it.
- Select the Spark Version from the drop-down list.
- Pick the Driver Type from the drop-down list.
- Select the Executor Type from the drop-down list.
- Enter the Number of Executors you need.
- Configure the Application.
- Enter the File URL to the application, using this format:
oci://<bucket_name>@<objectstore_namespace>/<file_name>
- Enter the Main Class Name.
- (Optional) Enter any Arguments. The Spark app expects two command-line parameters,
one for the input and one for the output. In the Arguments field,
enter:
You are prompted for default value. It’s a good idea to enter these now.${input} ${output}
Note
Do not include either "$" or "/" characters in the parameter name or value.
- Enter the File URL to the application, using this format:
- (Optional) Add advanced configuration options.
- Click Show Advanced Options.
- Enter the Key of the configuration property and a Value.
- Click + Another Property to add another configuration property.
- Repeat steps b and c until you've added all the configuration properties.
- Populate Application Log Location with where you want to save the log files.
- Choose Network Access.
- If you are Attaching a Private Endpoint to Data Flow, click the
Secure Access to Private Subnet radio button. Select
the private endpoint from the resulting drop-down list. Click
Change Compartment if it is in a different
compartment to the Application.Note
You cannot use an IP adress to connect to the private endpoint, you must use the FQDN. - If you are not using a private endpoint, click the Internet Access (No Subnet) radio button.
- If you are Attaching a Private Endpoint to Data Flow, click the
Secure Access to Private Subnet radio button. Select
the private endpoint from the resulting drop-down list. Click
Change Compartment if it is in a different
compartment to the Application.
- Click Create.
If you want to change the values for Language, Name, and File URL in the future you can Edit an Application to do this. You can only change Language between Java and Scala. You cannot change it to Python or SQL.
Create a PySpark Data Flow Application
- Upload a PySpark script to an Oracle Object Storage.
- On the Applications page, click Create.
- In the Create Application panel, select PYTHON from the Language options.
- Create a Python application in Data Flow.
- Enter a Name for the application.
- (Optional) Enter an appropriate Description which will help you search for it.
- Select the Spark Version from the drop-down list.
- Select the Driver Type from the drop-down list.
- Select the Executor Type from the drop-down list.
- Enter the Number of Executors you need.
- Configure the application.
- Enter the File URL to the application, using this format:
oci://<bucket_name>@<objectstore_namespace>/<file_name>
- Enter the name of the Main Python File.
- (Optional) Add any Arguments. Note
Do not include either "$" or "/" characters in the parameter name or value.
- Enter the File URL to the application, using this format:
- (Optional) Add advanced configuration options.
- Click Show Advanced Options.
- Enter the Key of the configuration property and a Value.
- Click + Another Property to add another configuration property.
- Repeat steps b and c until you've added all the configuration properties.
- Populate Application Log Location with where you want to save the log files.
- Choose Network Access.
- If you are Attaching a Private Endpoint to Data Flow, click the
Secure Access to Private Subnet radio button. Select
the private endpoint from the resulting drop-down list. Click
Change Compartment if it is in a different
compartment to the Application.Note
You cannot use an IP adress to connect to the private endpoint, you must use the FQDN. - If you are not using a private endpoint, click the Internet Access (No Subnet) radio button.
- If you are Attaching a Private Endpoint to Data Flow, click the
Secure Access to Private Subnet radio button. Select
the private endpoint from the resulting drop-down list. Click
Change Compartment if it is in a different
compartment to the Application.
- Click Create.
If you want to change the values for Name and File URL in the future you can Edit an Application to do this. You cannot change Language if Python is selected.
Create a SQL Data Flow Application
- Upload a SQL script to an Oracle Object Storage.
- On the Applications page, click Create.
- In the Create Application panel, select SQL from the Language options.
- Create the application.
- Enter a Name.
- (Optional) Enter a Description with which you can easily find the application and its runs.
- Select the Spark Version from the drop-down list.
- Select the Driver Type from the drop-down list.
- Select the Executor Type from the drop-down list.
- Enter the Number of Executors you need.
- Configure the application.
- Enter the File URL to the SQL script using the format:
oci://<bucket_name>@<objectstore_namespace>/<file_name>
- (Optional) Create any Parameters.
- Enter the Name and the Value of the parameter. Note
Do not include either "$" or "/" characters in the parameter name or value. - Click + Another Parameter to add another parameter.
- Repeat steps i and ii until you've added all the parameters.
- Enter the Name and the Value of the parameter.
- Enter the File URL to the SQL script using the format:
- Advanced Configuration Options
- Click Show Advanced Options.
- Enter the Key of the configuration property and a Value.
- Click + Another Property to add another configuration property.
- Repeat steps b and c until you've added all the configuration properties.
- Populate Application Log Location with where you want to save the log files.
- Choose Network Access.
- If you are Attaching a Private Endpoint to Data Flow, click the
Secure Access to Private Subnet radio button. Select
the private endpoint from the resulting drop-down list.
Note
You cannot use an IP adress to connect to the private endpoint, you must use the FQDN. - If you are not using a private endpoint, click the Internet Access (No Subnet) radio button.
- If you are Attaching a Private Endpoint to Data Flow, click the
Secure Access to Private Subnet radio button. Select
the private endpoint from the resulting drop-down list.
- Click Create.
If you want to change the values for Name and File URL in the future you can Edit an Application to do this. You cannot change Language if SQL is selected.
Application Parameters
If the Spark application requires one or more parameters at run time, then Data Flow lets you to provide the parameter name and default value when you create the application.
${MyParameter}
Once you provide the parameter name in the Arguments field, a Parameters section with two new fields appears below it. The fields are Name, and Default Value. The Name field is not editable, and contains the name of your parameter. The Default Value field is editable, and you can enter a default value for the parameter. The default value can be over-ridden at execution time.Parameter1
, Parameter2
, and
Parameter3
, with values of Value1
,
Value2
, and Value3
, and enter them as follows:
${Parameter1}${Parameter2} ${Parameter3}
then the resulting
argument provided to Data Flow, has only two
values:Value1Value2 Value3
which might not be what you want.Each parameter has its own Name and Default Value fields.
For SQL applications, the parameter entry does not use the ${MyParameter}
format. Instead, the Parameters section with a single Name text field and its corresponding Value field are present. Simply enter the name of the parameter and the default value in the corresponding field. If you need to add multiple parameters, click the +Add Parameters button.
Application Parameters when Running Applications
Application Parameters allow you to re-use your Data Flow Applications in a variety of different ways. See Run Applications for more information.
Tips For Your Application's Default Size
Every time you run a Data Flow Application you specify a size and number of executors which, in turn, determine the number of OCPUs used to run your Spark application. An OCPU is equivalent to a CPU core, which itself is equivalent to 2 vCPUs. Refer to Compute Shapes for more information on how many OCPUs each shape contains.
A rough rule of thumb is to assume 10 GB of data processed per OCPU per hour. Optimized data formats like Parquet will appear to run much faster since only a small subset of data will be processed.
As an example if we want to process 1 TB of data with an SLA of 30 minutes, we should expect to use about 200 OCPUs:
There are many ways of allocating 200 OCPUs. For example, you can select an executor shape of VM.Standard2.8 and 25 total executors for 8 * 25 = 200 total OCPUs.
This formula is a rough estimate and your run-times will vary. You can better estimate your actual workload’s processing rate by loading your Application and viewing the history of Application Runs. This history allows you to see the number of OCPUs used, total data processed and run-time, allowing you to estimate the resources you need to meet your SLAs. From there it is up to you to estimate the amount of data a Run will process and size the Run appropriately.
Develop Data Flow-compatible Spark Applications
Data Flow supports running ordinary Spark applications and has no special design-time requirements. We recommend that you develop your Spark application using Spark local mode on your laptop or similar environment. When development is complete, upload the application to Oracle Cloud Infrastructure Object Storage, and run it at scale using Data Flow.
Edit an Application
- Select Edit from the menu on the row for the application in question
- Click on the application name, and from the Application Details page click Edit.
Delete Applications
- Open the Applications page.
- Find the application to be deleted, and select the Delete menu item from the menu on the Application's row in the table.
When you delete an Application, its associated Runs are not deleted; the output and logs for these Runs remains available.
Application Security
Spark applications run in Data Flow use the same IAM
permissions as the user who initiates the run. The Data Flow Service creates a security token in the
Spark Cluster that allows it to assume the identity of the running user. This means the
Spark application can access data transparently based on the end user’s IAM permissions.
There is no need to hard-code credentials in your Spark application when you access
IAM-compatible systems.
If the service you are contacting is not IAM-compatible you will need to use credential management or key management solutions like Oracle Cloud Infrastructure Key Management.
Learn more about Oracle Cloud Infrastructure IAM in the IAM Documentation.
Adding Third-Party Libraries to Data Flow Applications
Your PySpark applications might need custom dependencies in the form of Python wheels or virtual environments. Your Java or Scala applications might need additional JAR files that you can't, or don't, want to bundle in a Fat JAR. Or you might want to include native code or other assets to make available within your Spark runtime.
Data Flow allows you to provide a ZIP archive in addition to your application. It is installed on all Spark nodes before launching the application. If you construct it properly, the Python libraries will be added to your runtime, and the JAR files will be added to the Spark classpath. The libraries added are completely isolated to one Run. That means they do not interfere with other concurrent Runs or subsequent Runs. Only one archive can be provided per Run.
Anything in the archive must be compatible with the Data Flow runtime. For example, Data Flow runs on Oracle Linux using particular versions of Java and Python. Binary code compiled for other operating systems, or JAR files compiled for other Java versions, might cause your Run to crash. Data Flow provides tools to help you build archives with compatible software. However, these archives are ordinary Zip files, so you are free to create them any way you want. If you use your own tools, you are responsible for ensuring compatibility.
Dependency archives, similarly to your Spark applications, are loaded to Oracle Object Storage. Your Data Flow Application definition contains a link to this archive, which can be overridden at runtime. When you run your Application, the archive is downloaded and installed before the Spark job runs. The archive is completely private to the Run. This means, for example, that you can run concurrently two different instances of the same Application, with different dependencies, but without any conflicts. Dependencies do not persist between Runs, so there won't be any problems with conflicting versions for other Spark applications that you might run.
- Download docker.
- Download the packager tool image:
docker pull phx.ocir.io/oracle/dataflow/dependency-packager:latest
- For Python dependencies, create a
requirements.txt
file. For example, it might look like:numpy==1.18.1 pandas==1.0.3 pyarrow==0.14.0
NoteThe Data Flow Dependency Packager uses Python's pip tool to install all dependencies. If you have Python wheels that can't be downloaded from public sources, place them in a directory beneath where you build the package. Refer to them in
Do not includepyspark
orpy4j
. These dependencies are provided by Data Flow, and including them will cause your Runs to fail.requirements.txt
with a prefix of/opt/dataflow/
. For example:/opt/dataflow/<my-python-wheel.whl>
where <my-python-wheel.whl> represents the name of your Python wheel. Pip sees it as a local file and installs it normally.
- For Java dependencies, create a file called
packages.txt
. For example, it might look like:ml.dmlc:xgboost4j:0.90 ml.dmlc:xgboost4j-spark:0.90 https://repo1.maven.org/maven2/com/nimbusds/nimbus-jose-jwt/8.11/nimbus-jose-jwt-8.11.jar
The Data Flow Dependency Packager uses Apache Maven to download dependency JAR files. If you have JAR files that cannot be downloaded from public sources, place them in a local directory beneath where you build the package. Any JAR files in any subdirectory where you build the package are included in the archive.
- Use docker container to create the archive. Use this command if using MacOS or
Linux:If using Windows command prompt as the Administrator, use this command:
docker run --rm -v $(pwd):/opt/dataflow -it phx.ocir.io/oracle/dataflow/dependency-packager:latest
If using Windows Powershell as the Administrator, use this command:docker run --rm -v %CD%:/opt/dataflow -it phx.ocir.io/oracle/dataflow/dependency-packager:latest
These commands create a file calleddocker run --rm -v ${PWD}:/opt/dataflow -it phx.ocir.io/oracle/dataflow/dependency-packager:latest
archive.zip
. - (Optional) You can add static content. You might want to include other content in
your archive. For example, you might want to deploy a data file, an ML model file,
or an executable your Spark program will call at runtime. You do this by adding
files to
archive.zip
after you created it in Step 4.For Java applications:- Unzip
archive.zip
. - Add the JAR files in the
java/
directory only. - Zip the file.
- Upload it to your object store.
For Python applications:When your Data Flow application runs, the static content is available on any node under the directory where you chose to place it. For example, if you added files under- Unzip
archive.zip
. - Add you local modules to only these three subdirectories of the
python/
directory:python/lib python/lib32 python/lib64
- Zip the file.
- Upload it to your object store.
Note
Only these four directories are allowed for storing your Java and Python dependencies.python/lib/
in your archive, they are available in the/opt/dataflow/python/lib/
directory on any node. - Unzip
- Upload
archive.zip
to your object store. - Add the library to your application. See Create a Java or Scala Data Flow Application or Create a PySpark Data Flow Application for how to do this.
Dependency archives are ordinary ZIP files. Advanced users might choose to build archives with their own tools rather than using the Data Flow Dependency Packager. A properly-constructed dependency archive will have this general outline:
python
python/lib
python/lib/python3.6/<your_library1>
python/lib/python3.6/<your_library2>
python/lib/python3.6/<...>
python/lib/python3.6/<your_libraryN>
python/lib/user
python/lib/user/<your_static_data>
java
java/<your_jar_file1>
java/<...>
java/<your_jar_fileN>
requirements.txt
file includes the Oracle Cloud Infrastructure
SDK for Python version 2.14.3 in a Data Flow
Application:-i https://pypi.org/simple
certifi==2020.4.5.1
cffi==1.14.0
configparser==4.0.2
cryptography==2.8
oci==2.14.3
pycparser==2.20
pyopenssl==19.1.0
python-dateutil==2.8.1
pytz==2020.1
six==1.15.0
requirements.txt
file includes a mix of PyPI sources,
web sources, and local sources for Python wheel
files:-i https://pypi.org/simple
blis==0.4.1
catalogue==1.0.0
certifi==2020.4.5.1
chardet==3.0.4
cymem==2.0.3
https://github.com/explosion/spacy-models/releases/download/en_core_web_sm-2.2.0/en_core_web_sm-2.2.0.tar.gz#egg=en-core-web-sm
idna==2.9
importlib-metadata==1.6.0 ; python_version < '3.8'
murmurhash==1.0.2
numpy==1.18.3
plac==1.1.3
preshed==3.0.2
requests==2.23.0
spacy==2.2.4
srsly==1.0.2
thinc==7.4.0
tqdm==4.45.0
urllib3==1.25.9
wasabi==0.6.0
zipp==3.1.0
/opt/dataflow/mywheel-0.1-py3-none-any.whl
ojdbc8-18.3.jar
oraclepki-18.3.jar
osdt_cert-18.3.jar
osdt_core-18.3.jar
ucp-18.3.jar