Free Tier: Install Apache and PHP on an Oracle Linux Instance
In this tutorial, you use an Oracle Cloud Infrastructure Free Tier account to set up an Oracle Linux instance. Then, you install an Apache web server with PHP and access your new server from the internet.
This tutorial covers all the steps necessary to set up a virtual network for your host and connect the host to the internet. Key tasks include how to:
- Set up a compartment for your development work.
- Set up a new Virtual Cloud Network (VCN).
- Install your Oracle Linux instance.
- Configure the OCI VCN and related network services required for your host to connect to the internet.
- Set up
sshencryption keys to access your Oracle Linux instance.
- Configure ingress rules for your VCN.
- Install Apache and PHP on your instance.
- Connect to your instance from the internet.
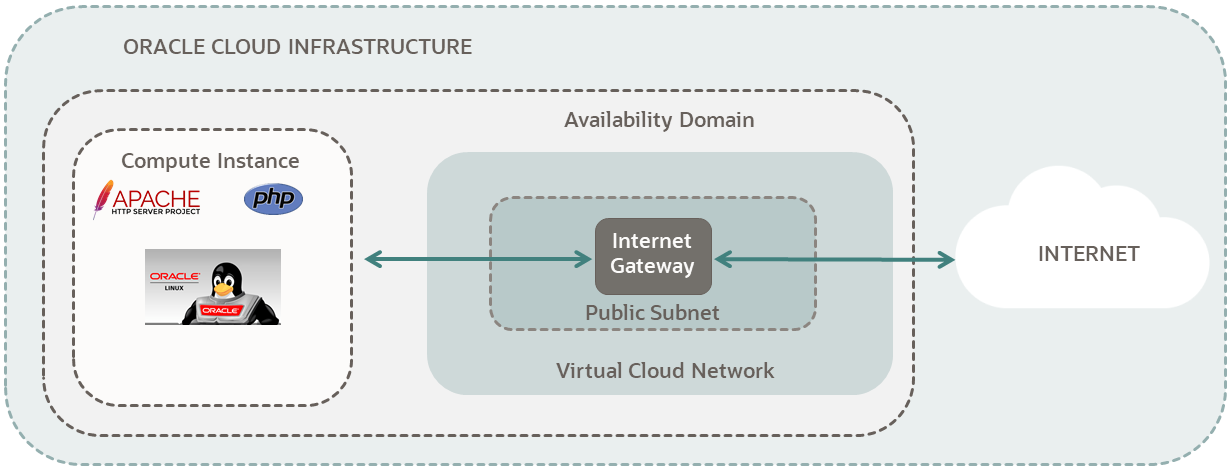
Here is a simplified diagram of the setup for your Linux instance.
For additional information, see:
Before You Begin
To successfully complete this tutorial, you must have the following:
Requirements
- An Oracle Cloud Infrastructure Free Tier account. Oracle Cloud Infrastructure Free Tier.
- A MacOS, Linux, or Windows computer with
sshsupport installed.
1. Set up a Compartment for Development
Configure a compartment for your development.
Create a compartment for the resources that you create in this tutorial.
- Sign in to the Oracle Cloud Infrastructure Console.
- Open the navigation menu and click Identity & Security. Under Identity, click Compartments.
- Click Create Compartment.
- Fill in the following information:
- Name:
<your-compartment-name> - Description:
Compartment for <your-description>. - Parent Compartment:
<your-tenancy>(root)
- Name:
- Click Create Compartment.
Reference: Create a compartment
2. Install a Virtual Cloud Network
Use the Start VCN Wizard workflow to create a new Virtual Cloud Network (VCN).
The workflow does several things when installing the VCN:
- Creates a VCN.
- Adds an Internet Gateway which enables internet connections.
- Creates and configures public and private subnets for the VCN.
- Sets up route tables and security lists for the subnets.
For more information on VCNs, see: VCN and Subnet Management.
To create a VCN, follow these steps:
The steps provided are for a Free Tier account. If you are using a paid account, the steps might differ from those shown here.
- Open the navigation menu , select Networking, and then select Virtual cloud networks.
- If needed, select your compartment from the Compartment control in the left navigation.
- Click Start VCN Wizard.
- Select Create VCN with Internet Connectivity.
- Click Start VCN Wizard.
- Configure the VCN. The configure dialog contains the following sections.
Basic Information
Enter the VCN Name and select a Compartment.
- Name:
<name-for-the-vcn>Enter a name for your VCN. Avoid entering confidential information.
- Compartment:
<your-compartment-name>Select your compartment.
Configure VCN
- Keep the default values for VCN IPv4 CIDR block and DNS resolution.
Configure public subnet
- Keep the default values for IP address type and IPv4 CIDR block.
Configure private subnet
- Keep the default values for IP address type and IPv4 CIDR block.
- Name:
- Click Next.
- Review you selections. Click Previous to go back and make changes.
- Click Create to create the VCN.
The system creates the VCN and all its resources. This might take a moment.
Once the creation is complete, click View VCN to see your new VCN.
3. Install an Oracle Linux Instance
Use the Create a VM Instance workflow to create a new compute instance.
The workflow does several things when installing the instance:
- Creates and installs a compute instance running Oracle Linux.
- Select your VCN and public subnet to connect the Oracle Linux instance to the internet.
- Creates an
sshkey pair you use to connect to the instance.
To get started installing an instance with the Create a VM instance workflow, follow these steps:
The steps provided are for a Free Tier account. If you are using a paid account, the steps might differ from those shown here.
- Open the navigation menu and select Compute. Under Compute, select Instances.
- Click Create Instance.
The Create compute instance page is displayed.
- Choose the Name and Compartment.
Initial Options
- Name:
<name-for-the-instance>Enter a name for your instance. Avoid entering confidential information.
- Create in compartment:
<your-compartment-name>Select your compartment. Use the compartment created in the preceding step.
- Name:
- Review the Placement settings.
- Take the default values. An availability domain is assigned to you.
The default values are similar to the following:
- Availability domain: AD-1
- Capacity type: On-demand capacity
- Fault domain: Let Oracle choose the best fault domain
Note
For Free Tier, use the Always Free Eligible option for availability domain. - Review the Security settings.
- Take the default settings.
The default values are similar to the following:
- Shielded instance: Disabled
- Confidential computing: Disabled
- Review the Image and shape settings. Click Edit.
Note
The following is sample data for an Ampere A1 virtual machine. The actual values might differ.- Keep the default Oracle Linux 8 image.
- Click Change Shape.
- Select Virtual Machine.
- For shape series select Ampere.
- Select VM.Standard.A1.Flex the "Always Free" shape.
- Select 1 OCPUs.
- Click Select Shape.
Selected values are similar to the following:
- Image: Oracle Linux 8
- Image build:
<current-build-date> - Shape: VM.Standard.A1.Flex
- OCPU: 1
- Memory (GB): 6
- Network bandwidth (Gbps): 1
Note
For Free Tier, use Always Free Eligible shape options. - Review the Networking settings. Select the VCN you created in the preceding step. The networking values are similar to the following:
- Virtual cloud network: <your-vcn>
- Subnet: <pubic-subnet-for-your-vcn>
- Launch options: -
- DNS record: Yes
- Use network security groups to control traffic: No
- Assign a public IPv4 address: Yes
- Private IPv4 address: Automatically assigned on creation
- IPv6 address: Not available
- Review the Add SSH keys settings. Take the default values provided by the workflow.
- Select the Generate a key pair for me option.
- Click Save Private Key and Save Public Key to save the private and public SSH keys for this compute instance.
If you want to use your own SSH keys, select one of the options to provide your public key.
Note
Put your private and public key files in a safe location. You can't retrieve keys again after the compute instance has been created. - Review the Boot volume settings.
Select the Use in-transit encryption setting. Leave the other two settings blank.
- Review the Block Volume settings. Take the default values provided by the workflow which does not select any block volumes. You can add block volumes later.
- Click Create to create the instance. Provisioning the system might take several minutes.
You have successfully created an Oracle Linux instance to run an Apache Web Server.
4. Enable Internet Access
The Create a VM Instance wizard automatically creates a VCN for your VM. You add an ingress rule to your subnet to allow internet connections on port 80.
Follow these steps to select your VCN's public subnet and add the ingress rule.
- Open the navigation menu and click Networking, and then click Virtual Cloud Networks.
- Select the VCN you created.
- With your new VCN displayed, click <your-public-subnet-name> subnet link.
The public subnet information is displayed with the Security Lists at the bottom of the page. A link to the Default Security List for your VCN is displayed.
- Click the Default Security List link.
The default Ingress Rules for your VCN are displayed.
- Click Add Ingress Rules.
An Add Ingress Rules dialog is displayed.
- Fill in the ingress rule with the following information.
- Stateless: Checked
- Source Type: CIDR
- Source CIDR: 0.0.0.0/0
- IP Protocol: TCP
- Source port range: (leave-blank)
- Destination Port Range: 80
- Description: Allow HTTP connections
- Click Add Ingress Rules.
Now HTTP connections are allowed. Your VCN is configured for Apache server.
You have successfully configured a VCN to allow HTTP connections.
5. Install and Configure Apache and PHP
With your compute instance and VCN setup, install, and configure Apache web server and PHP to run on your Oracle Linux instance.
Follow these steps to configure your Oracle Linux instance.
- Open the navigation menu and click Compute. Under Compute, click Instances.
- Click the link to the instance you created in the previous step.
From the Instance Details page look under the Instance Access section. Write down the Public IP Address the system created for you. You use this IP address to connect to your instance.
- Open a Terminal or Command Prompt window.
- Change into the directory where you stored the
sshencryption keys you created in a preceding step. - Connect to your instance with this SSH command.
ssh -i <your-private-key-file> opc@<x.x.x.x>Since you identified your public key when you created the instance, this command logs you into your instance. You can now issue
sudocommands to install and start your server. - Install Apache Server.
sudo dnf install httpd -y - Enable Apache.
sudo systemctl enable httpdThe command returns:
Created symlink from /etc/systemd/system/multi-user.target.wants/httpd.service to /usr/lib/systemd/system/httpd.service. - Start Apache.
sudo systemctl restart httpdNext, test that your server is up. The
curlcommand connections to your local port 80 and returns the default Apache web page.curl localhostThe HTML for the default Apache page is displayed.
If the page is not displayed, review the preceding steps to make sure Apache was installed and restarted.
Perform the following steps to configure the firewall for HTTP.
- Enable HTTP connections through the Linux firewall on port 80.
sudo firewall-cmd --add-service=http --permanentThe commands returns:
successNote
If you intend to set up HTTPS later (recommended), also enable HTTPS connections on port 443:sudo firewall-cmd --add-service=https --permanent - Reload the firewall.
sudo firewall-cmd --reloadThe commands returns:
success - Test your server.
You can test your server from the command line with
curl localhost. Or, you can connect your browser to the public IP address assigned to your instance: http://<x.x.x.x>.
Congratulations! You have successfully installed Apache on your Oracle Cloud Infrastructure instance.
Follow these steps to install PHP.
- Get the list of available PHP packages on Oracle Linux.
sudo dnf module list phpThe commands returns output similar to the following:
Oracle Linux 8 Application Stream (aarch64) Name Stream Profiles Summary php 7.2 [d] common [d], devel, minimal PHP scripting language php 7.3 common [d], devel, minimal PHP scripting language php 7.4 common [d], devel, minimal PHP scripting language php 8.0 common [d], devel, minimal PHP scripting language php 8.2 common [d], devel, minimal PHP scripting language Hint: [d]efault, [e]nabled, [x]disabled, [i]nstalled - Install PHP 8.
sudo dnf install @php:8.2 -yThe command installs
php,php-cli, andphp-common. - Restart Apache.
sudo systemctl restart httpd - Verify installation. Type the following command to verify the installation.
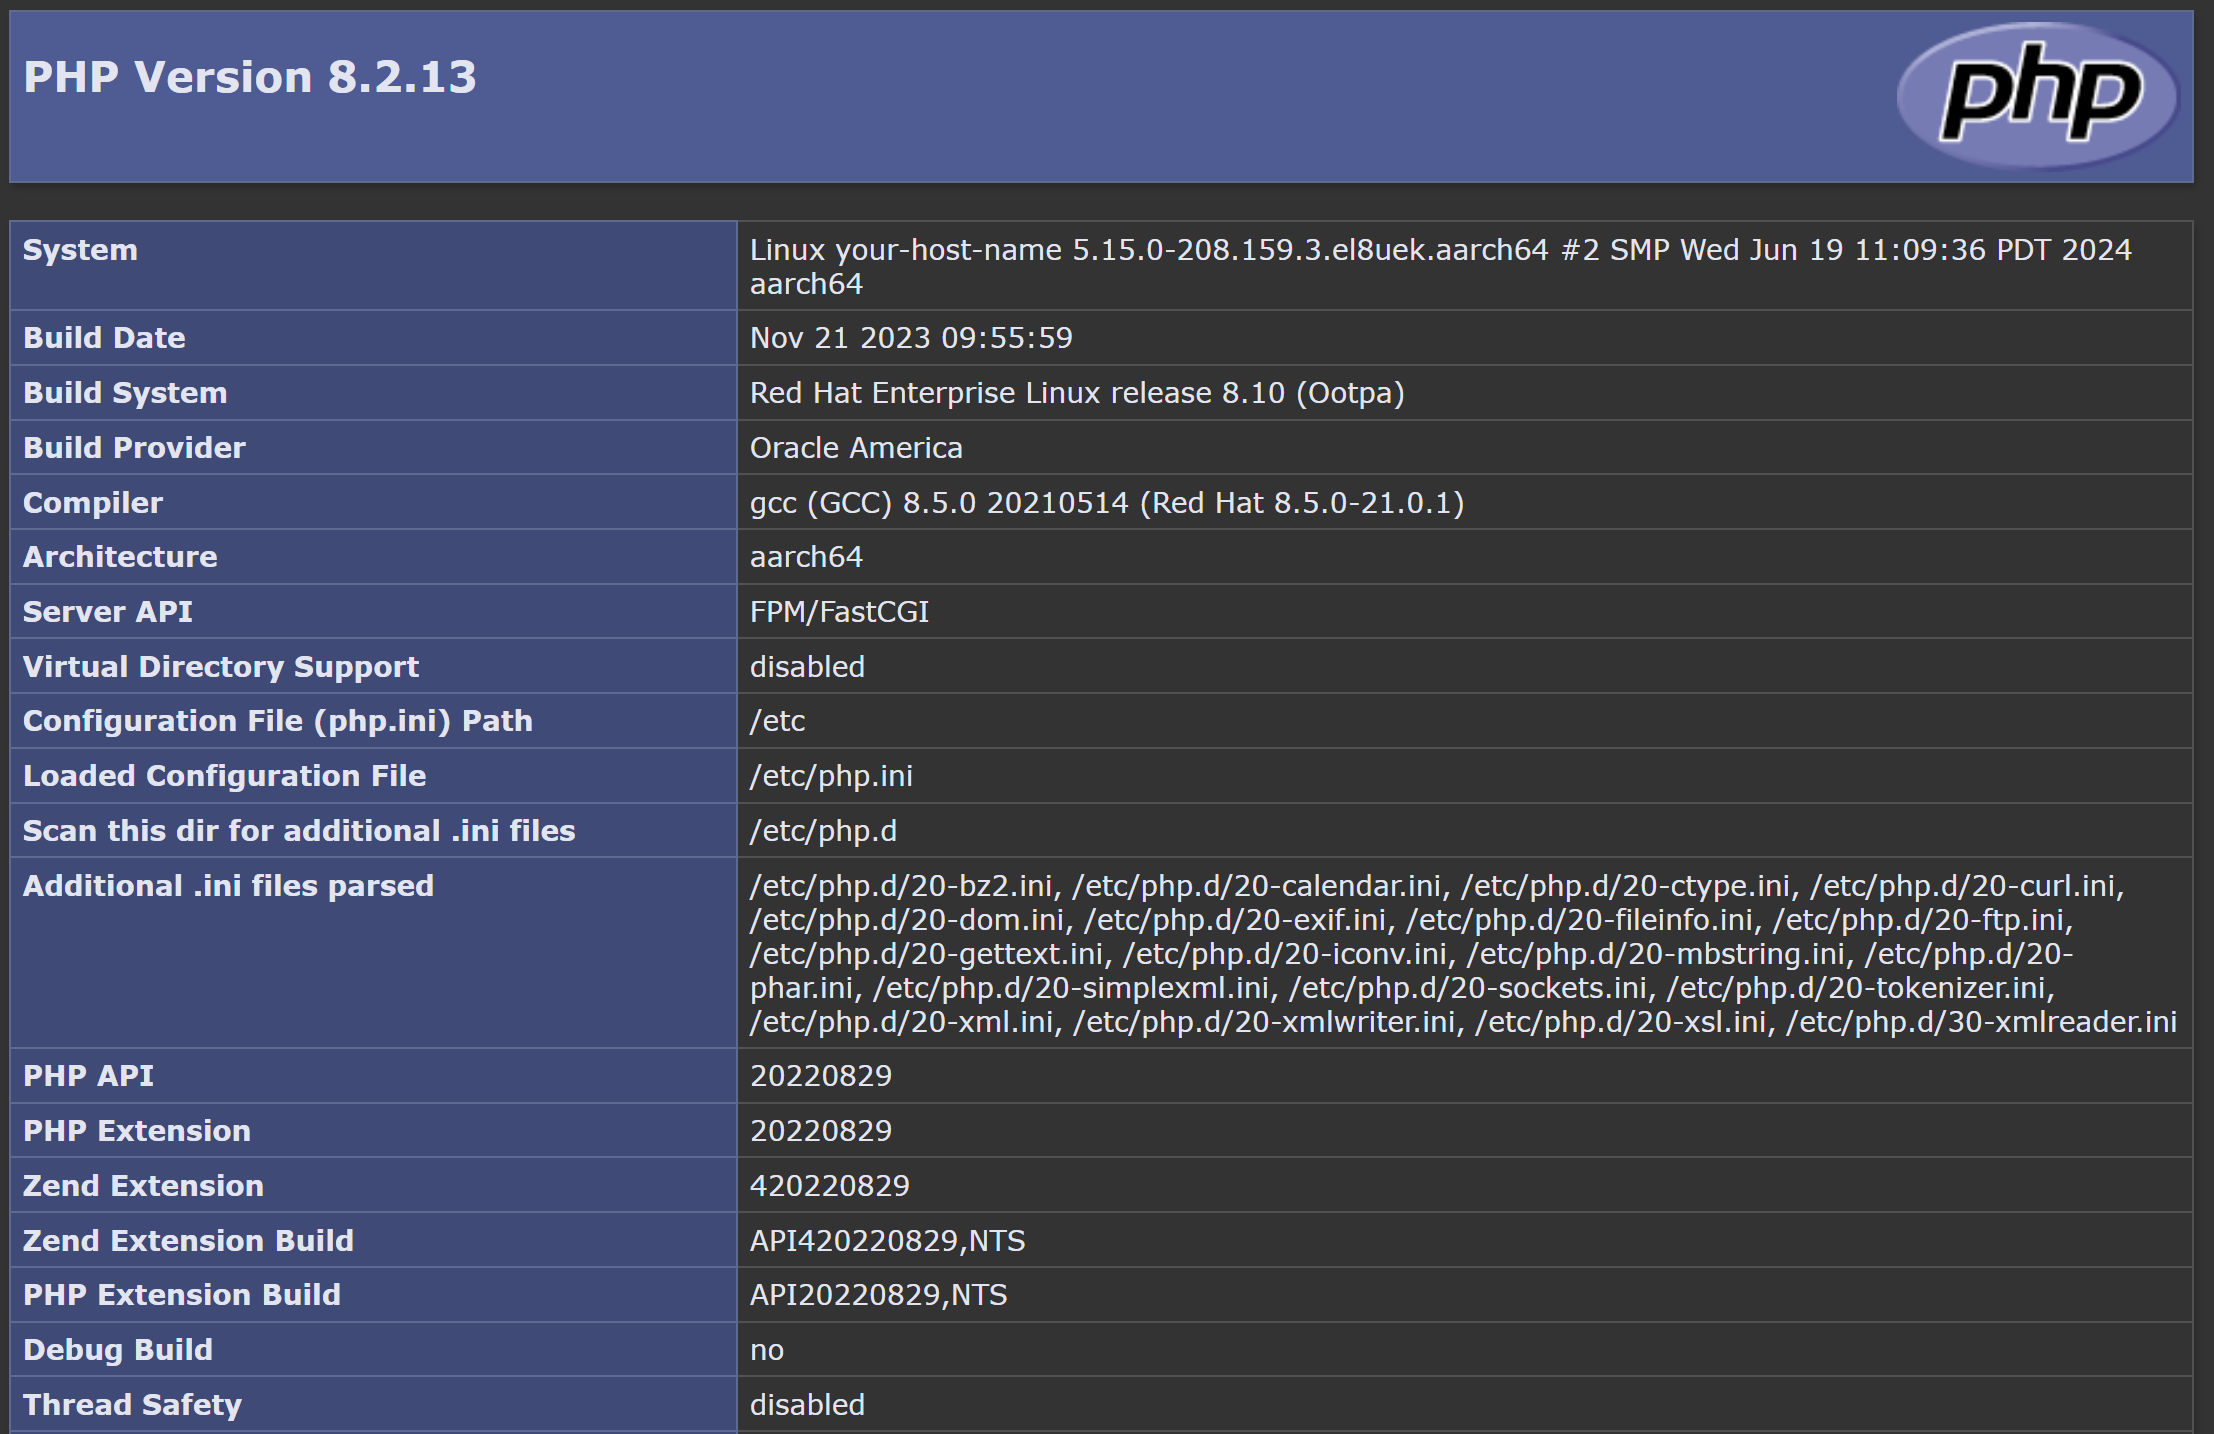
php -vThe command returns text similar to the following. Results differ if a different version is installed.
PHP 8.2.13 (cli) (built: Nov 21 2023 09:55:59) (NTS gcc aarch64) Copyright (c) The PHP Group Zend Engine v4.2.13, Copyright (c) Zend Technologies - Add a PHP test file to your instance.
Create the file:
sudo vi /var/www/html/info.phpOr alternatively, you can use
nano.sudo nano /var/www/html/info.phpIn the file, input the following text and save the file:
<?php phpinfo(); ?> - Connect to your PHP test page.
In your browser, connect to http://<your-public-ip-address>/info.php.
The browser produces a listing of PHP configuration on your instance.
 Important
After you are done testing, remove info.php from your system.
Congratulations! You have successfully installed Apache and PHP 8 on your Oracle Cloud Infrastructure instance.
What's Next
You have successfully installed and deployed an Apache web server on Oracle Cloud Infrastructure using a Linux instance.
To explore more information about development with Oracle products: