Viewing Intercompany Transactions
After you load transaction details or create them manually, you can view the transactions list in the Manage Intercompany page. You can change entity and partner selections and select other criteria to filter the transaction list.
You select a point of view for which to view transactions. The scenario and year must be valid dimension members as defined in the application, and the period must be a base period of the Scenario frequency. The entity must be a valid base entity. After you select the point of view, the system displays the transaction detail related to the selected point of view.
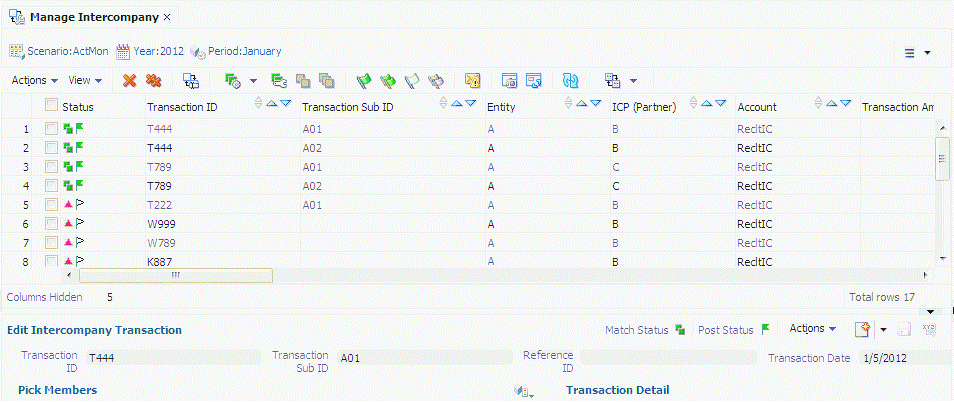
Figure 10-1 Sample Transactions in Manage Intercompany Transactions

In addition to the transaction detail that you entered, the transactions list displays system-generated information about the transaction that cannot be changed manually. For example, it displays the matching status, posting status, match code, user ID of the last user to modify the transaction, and the date and time the transaction was last modified. Matched transactions are indicated by double green boxes, and posted transactions are indicated by a green flag in the Status column. Mismatched transactions are indicated by a red triangle.
To view intercompany transactions:
-
Select Consolidation, then Intercompany, and then Manage.
-
In the Point of View bar, select a scenario, year, and period.
-
Optional: To filter the list of transactions, select columns and rows.
Selecting an Entity and Partner
An application can have many transactions for a scenario/year/period combination. You can filter the list of transactions to display by selecting only the entity and partner transactions to view.
You can use the Entity and Partner text boxes to manually enter the member names to view, or browse to select members from the Member Selection dialog box. You can select multiple members if you separate them with a semicolon (;). You can also select member lists.
If you do not select any members for the entity and partner, the system displays transactions for all entities and partners.
Displaying Transaction Columns
You can select the columns to display in the transactions list. You can sort the columns by ascending or descending order, or select no sorting. For example, if you want to see all of your posted transactions at the top of the list, you can sort the posting status in descending order.
To select the transaction columns to display:
-
Select Consolidation, then Intercompany, and then Manage.
-
Select View, then Columns, and select the columns, or select Show All.
-
Optional: To show or hide columns, select View, then Columns, then Manage Columns, and use the arrow keys to move columns to the Hidden or Visible column lists, and then click OK.
-
Optional: To reorder columns, select View, then Reorder Columns, and use the arrow keys to reorder the columns.
-
Optional: To change the column sort order, click the header icons and select an option:
-
Ascending
-
Descending
-
No Sort
-
-
To display the dimension label, corresponding description, or both, expand Display Options in the right pane, then from Dimension Options, select a dimension, and select Label, Description, or Both.
-
To save the column settings, click Save Current Settings.
Tip:
To reset the settings to the last saved state, click Reset Settings.
Displaying Transaction Rows
You can select the rows to display on the transaction list and filter the list of transactions. You can display Entity transactions, Partner transactions, or both.
You can display only intercompany transactions for a specific entity and partner, or you can also display the corresponding transactions from the partner with the entity. For example, if you select only the transactions for Entity A with Partner B in the Entity and Partner selections, the system displays only the transactions that Entity A has with Partner B. However, to see the corresponding transactions for Entity B with Partner A, you can select to include both the Entity transactions and the Partner transactions.
You can use the percent sign (%) as a wildcard in these fields marked with an asterisk (*): Transaction ID, Transaction Sub ID, Reference ID, Match Code, or leave a text box blank to avoid filtering. The row settings are saved when you exit the session.
If you do not specify row filters, the system displays all transaction rows.
Note:
Depending on the setup of your database, text boxes might be case-sensitive. For example, filtering with "testgroup" might return different results than filtering with "TestGroup".
To select transaction rows to display:
-
Select Consolidation, then Intercompany, and then Manage.
-
From Row Filter, select filter options for rows:
-
For Entity, either use the default entity, enter an entity, or click Browse and select a member.
-
For Partner, either use the default partner entity, enter a partner entity, or click Browse and select a member.
-
If you select to display Entity Transactions, for Entity Account and Customs, enter an account, or click Browse and select an account.
-
If you select to display Partner Transactions, for Partner Account and Customs, enter a partner account, or click Browse and select an account.
-
Optional: Filter rows by ID, or leave blank to display all:
-
Transaction ID
-
Transaction Sub ID
-
Reference ID
-
-
Optional: Filter rows by Transaction criteria, or leave blank to display all:
-
Amount From and To
-
Start Date and End Date
-
Reason Code
-
Match Code
-
Transaction Currency
-
-
-
For Display, select Entity Transactions, Partner Transactions, or both.
-
From Include, select one or more options: Matched, Unmatched, Mismatched, Posted, or Unposted.
-
Expand Display Options, and from Scale Factor, select a value or use the Default value.
-
From Decimal Override, select a value between 0 and 6, or use the Default value.
-
From Common Currency, select a currency.
-
For Dimension Options, for the dimensions, select to display Label, Description, or Both.