Creating Infrastructure Schemas Using Repository Creation Utility

The Repository Creation Utility (RCU) is used to create schemas to support Oracle Enterprise Performance Management System Java web applications.. This process requires SYSDBA credentials.

If you don't have SYSDBA credentials, see Creating the RCU schema on Oracle Database Without SYSDBA Rights section under the Configuration Tips and Solutions topic in the Oracle Enterprise Performance Management System Installation and Configuration Troubleshooting Guide. This is applicable only for EPM Schema creation.

Note:

For Essbase Schema creation, ensure that you have SYSDBA credentials. See Configure Essbase on Linux topic for more information. For additional details on administrator credentials, see Step 4f of the Run Configuration Tool section.

Make sure you've set up database schemas for your database. See Preparing a Database.

Note:

If you are using SQL Server, you must create an additional database for use with RCU. See Using a Microsoft SQL Server Database.

In a distributed environment for SQL Server, each RCU must be created on a separate schema. You need need a separate schema for each RCU and each schema needs to be mapped to a different login user.

To create schemas using the Repository Creation Utility:

  1. Navigate to Middleware home/oracle_common/bin/.
  2. Launch rcu.bat.

    For Linux, run ./rcu

  3. The Welcome page is the first screen that appears when you start the RCU. On the Welcome page, click Next.
  4. Use the Create Repository screen to select a method to create and load component schemas into the database. On the Create Repository page, select System Load and Product Load. This procedure assumes that you have SYSDBA privileges.
  5. Click Next.
    If you have previously created a repository and configured EPM System, and you want to perform a fresh configuration , drop the repository, and then create a new repository.
  6. On the Database Connection Details page , specify a user with DBA or SYSDBA privileges, such as sys, provide the fully qualified host name, service name, and then click Next.
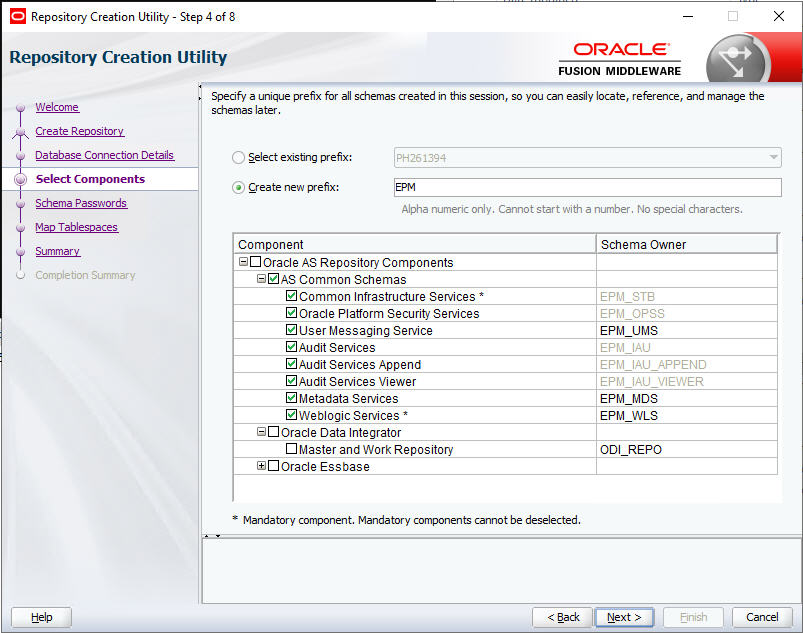
  7. On the Select Components page, perform these tasks, and then click Next:
    • Select Create new prefix and provide a prefix.

      Oracle recommends that you use the same prefix for the EPM System database user and for the RCU database.

      Note:

      In a distributed environment, create a new, different prefix for each machine in the environment.
    • Expand AS Common Schemas and select all the options.
      • Clear the selection (Uncheck) for Oracle Data Integrator if Oracle Data Integrator is selected.
      • Clear the selection (Uncheck) for Oracle Essbase if Oracle Essbase is selected.
    • Make a note of the Schema Owner names for all the components because you need them to configure Oracle Web Services Manager.

  8. On the Schema Passwords page, you must select Use same passwords for all schemas. Enter a password, make a note of it, and then click Next.

    The maximum password length is 16 characters.

    The password can contain alphabets, numbers, and the following special characters: $, #, _. Password should not start with a number or special character.

  9. On the Map Tablespaces page, click Next, and then click OK to create tablespaces.
  10. On the Summary page, review the selections, and then click Create.
  11. On the Completion Summary page, click Close.

For additional information on the Repository Creation Utility, see the Oracle® Fusion Middleware Repository Creation Utility User’s Guide 12c Release (12.2.1.4).