- Administrator's Guide
- Creating Profitability and Cost Management Applications
- Creating Applications Using the Profitability Applications Console
- Working with Applications in the Profitability Applications Console
- Viewing Tasks in the Profitability Applications Console Job Library
Viewing Tasks in the Profitability Applications Console Job Library
The Job Library tab provides a list of all jobs created in the Profitability Applications Console.
To view the Job Library:
- From Oracle Hyperion Enterprise Performance Management Workspace, select Navigate, then Administer, and then Profitability Applications.
- Select the Job Library tab (
 ).
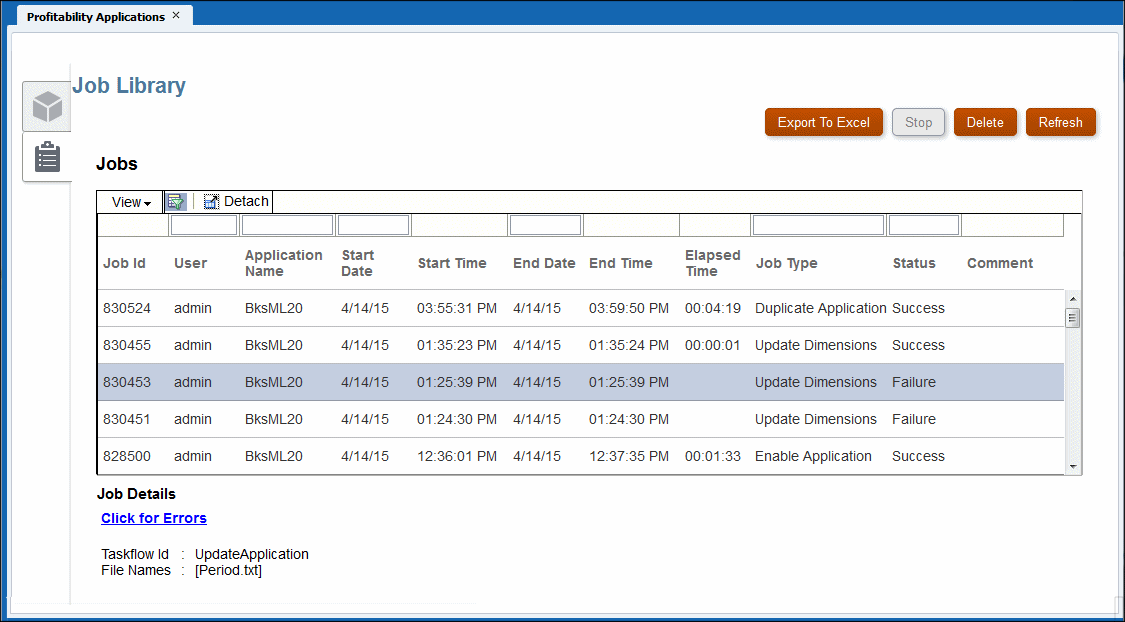
).Figure 3-3 The Profitability Applications Console Job Library Screen

The Job Library screen contains the following controls:
-
Export to Excel button—Saves the Job Library table to a Microsoft Excel file
-
Stop button—Cancels the selected job
-
Delete button—Removes the selected job from the Job Library table
-
Refresh button—Updates the Job Library table with the most recent job information
-
View menu— Hide, show, and rearrange the order of columns; detach and reattach the Job Library table; display and hide the Query by Example boxes at the top of each column
-
Filter button—
 , displays and hides Query by Example boxes at the top of each column
Enter text to match into a Query by Example box to select specific entries in the Job Library table.
-
Detach button—
 , floats the Job Library table in its own window; click to attach it again
-
- View the information for each job:
-
Job Id is a sequential identification number assigned by the system.
-
User identifies the user name of the individual who submitted the task for processing.
-
Application Name displays the name of the application for which the task is being run.
-
Start Date/Time displays the date and time on which the job was submitted or is scheduled to be run.
-
End Date/Time displays the date and time when the job stopped, successful or not.
-
Elapsed Time is the difference between the Start Time and the End Time.
-
Job Type displays the type of task that is being performed, such as Create Application or Update Dimensions.
-
Status displays the current state of the job, such as Running, Success or Failure.
-
Comment shows a user-entered note or details about a specific job. The Comment is entered when the task is submitted.
-
- Optional: Under Job Details, review additional summary level detail about the selected job. The Job Details include a taskflow ID and may include a hyperlink that enables you to click to view more detail, such as error or impact analysis information. If a hyperlink is offered, you can save the information to a file.
Note:
Task Flow ID is the system-generated task ID for the specific task, displayed in the format <application name>:<task name><generated taskflow number>.
For example, the generated taskflow number may be displayed as AppMgmt_DeployApplication_D20120824T08520_5ed, where AppMgmt is the application name, DeployApplication is the task, and D20120824T08520_5ed is the generated taskflow instance ID.
- Optional: If you used a View option or the Filter button to show the Query by Example boxes, use the text box at the top of each column to locate a job by entering text to match in the box.
- Optional: If required, click Stop to end the selected task in Running state.
Note:
While the task flow stops quickly after the button is pressed, activities that affect results may require additional time to ensure that the state of the data is consistent.
Note:
The Job Library screen within an open application and the Job Library screen in the Profitability Applications Console both allow you to export the job history to an Excel spreadsheet file. The exported file is created in .html format. If you give the file an .html suffix when you save it, you can open it in any browser, in MS Word, MS Excel, or in other programs that handle .html files.