Editing Custom Queries
You can edit custom queries.
To edit queries:
- From the Task Area, select Reporting, and then Manage Queries.
The Manage Queries screen is displayed, showing all existing queries for all applications for which the user is provisioned as an Admin, Power.
- Click the Edit Query button
 to open the query wizard.
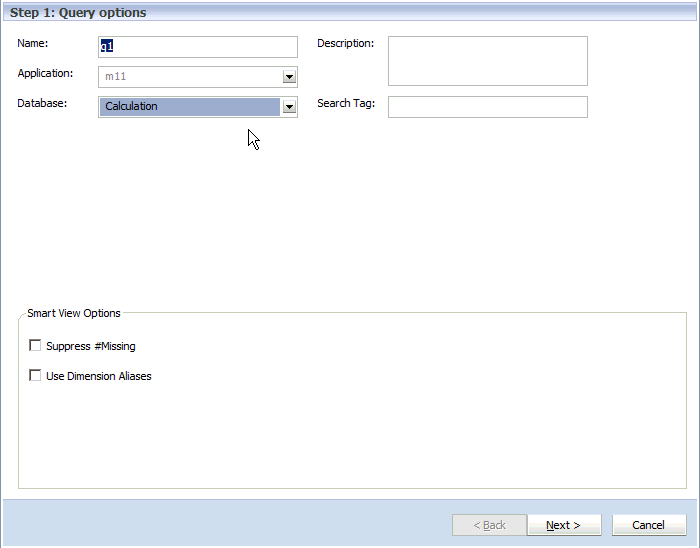
- On Step 1: Query Options, modify any of the following fields to modify the query:
-
Name for the query
-
Optional: Description of the query
-
Select another Database to be used for the query from the drop-down list:
-
Calculation (BSO)
-
Reporting (ASO)
-
-
Optional: Enter a descriptive Search Tag to be used to sort queries in the main Smart View Query screen.
Note:
You cannot modify the Query Type or Query Options. To change the Type, create a new query.
-
- Optional: Under Smart View Options, select Suppress #Missing to set the data suppression option for the first query in Oracle Smart View for Office, if required.
-
If you select Suppress #Missing, the Smart View option is only set for the first query run, not all queries. To set the option for subsequent drills into the data, set the option manually in Smart View.
-
Selecting Suppress #Missing in a Query definition returns the error "Cannot perform cube view operation.null" when you run the query. If you deselect this option, the query runs, and you will see data along with missing data rows.
-
- Optional: Under Smart View Options, select Use Dimension Aliases to display any assigned aliases for all dimensions in the query, if required.
- Click Next.
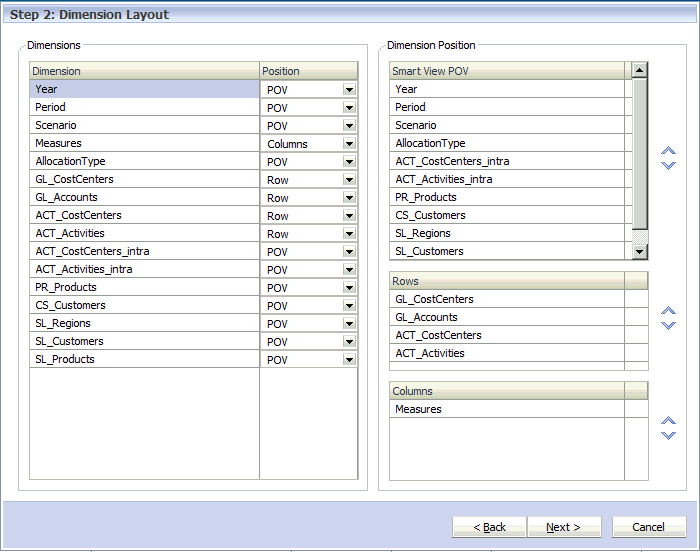
Step 2 - Dimension Layout screen is displayed.

- Under Dimensions, for each Dimension, select the Position for the placement of the dimension under the Dimension Position column on the screen using the drop-down list:
-
Smart View POV
-
Rows
-
Columns
By default, all dimensions in the application outline are displayed, and selections are set to defaults that are appropriate for the type of query you are creating.
For example, if you select stage measures for a specific stage, the dimensions for that stage display in the Rows section, and the top member of the first hierarchy is pre-selected for each of the stage dimensions. The other stage dimensions are placed in the Smart View POV section, and the "NoMember" member from each stage is selected.
-
- Optional: Under Dimension Position, in the Smart View POV section, use the Up and Down arrows to fine tune the position of a highlighted dimension in the query.
- Optional: Under Dimension Position, in the Rows section, use the Up and Down arrows to fine tune the position of a highlighted dimension in the query.
- Optional: Under Dimension Position, in the Columns section, use the Up and Down arrows to fine tune the position of a highlighted dimension in the query.
- Click Next.
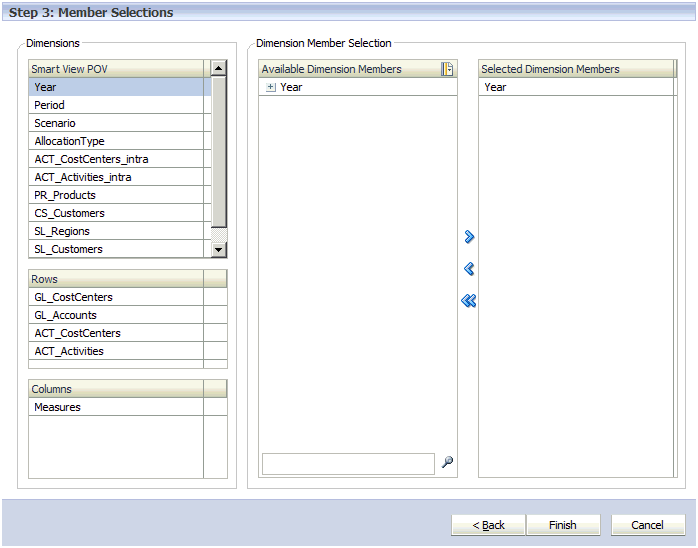
Step 3 - Member Selections is displayed. All dimensions from the Smart View POV, Rows and Columns are displayed in the order defined on the Dimension Layout screen. Use the arrows to scroll up or down through the list.

- Under Dimension Member Selections, use the Add arrow
 to move the dimension members to be included in the query to the Selected Dimension Members column.
 The list displays all dimension members, including alternate hierarchies and the NoMember member. Because there are no restrictions on level, alternate hierarchy, shared or base member, any member may be selected.
Use the Ctrl key to select multiple dimensions, or the Shift key to select the first and last members in a range.
- Click Finish.
The modified query is saved and available on the Manage Queries screen.