Checking In Doclets

This topic applies to Office-based doclets of all types, including reference and supplemental. Unless otherwise noted, the term doclets refers to all Office-based doclet types.

Note:

To check in PDF doclets and non-Office supplemental doclets, use the Narrative Reporting web interface.

After you have finished modifying an Office-based doclet, you must check it back in so that your changes are incorporated into the report package and other users can view your changes.

Note:

Before you check in a doclet, you must first upload it. You can perform an upload and checkin in one step using the procedure in this topic. To upload only, see Uploading and Working with Page Attributes and Slide Masters.

To check in a doclet, reference doclet, or Office-based supplemental doclet:
  1. If not already open, in the Smart View Panel, navigate to the doclet and double-click it to open it.
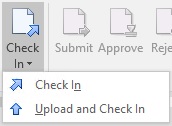
  2. From the Narrative Reporting ribbon, select Check In, and then Check In.

    The Check In button from Performance Reporting ribbon showing a drop-down menu with two options, Check In, and Upload and Check In.

    Alternatively, if you haven't yet uploaded the doclet, select Check In, and then Upload and Check In.

    In the Smart View Panel, the lock icon is removed from the doclet in the doclet responsibilities list, indicating that it is no longer checked out.

    Note:

    • If you want to discard the changes that you made and revert back to the original version of the doclet, click Cancel Checkout instead (see Undoing Checkouts).

    • Doclet versioning is optimized to minimize the impact of multiple automated check-ins. When multiple automated check-ins are performed on the doclet due to variable or embedded content changes, the system will update the doclet contents but will not generate a new version.