Cell Styles

Cell Styles control the display of certain types of member and data cells.

On the Cell Styles page, you can specify formatting to indicate certain types of member and data cells. Because cells may belong to more than one type (for example, a member cell can be both parent and child), you can also set the order of precedence for how cell styles are applied.

Cell style options are global options, which apply to the entire current workbook, including any new worksheets added to the current workbook, and to any workbooks and worksheets that are created henceforth. Changes to global option settings become the default for all existing and new Microsoft Office documents.

It is not necessary to use Apply to All Worksheets or Save as Default Options with these options.

Video

Your Goal Watch This Video

Learn about basic Oracle Smart View for Office functionality related to Planning, including specifying cell styles.

video icon Entering and Saving Plan Data in Smart View with Oracle Planning and Budgeting Cloud

To specify a style:

  1. Expand the list of available cell types.
  2. Select a cell type.
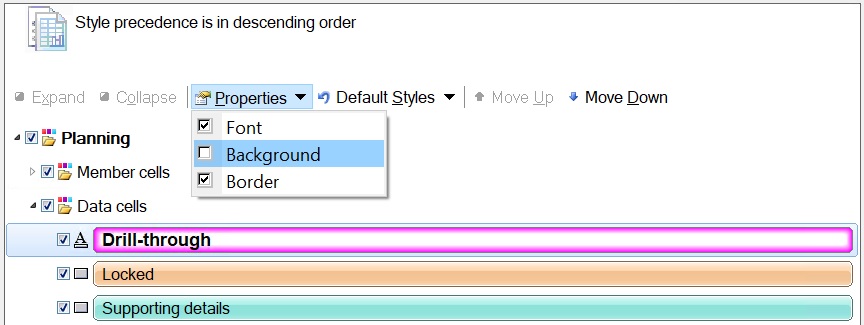
  3. Select Properties and specify any combination of font style, background color, and border color, per your requirements.

    You may apply one, two, or three style types.

    If a check box for a style property is cleared, click the property to define the style. If a check box for a style property is checked, and you want to clear or remove the style, click the property.

    In the following example, to add a background color, click Background. To clear the font style, click Font; to clear the border style, click Border


    Properties drop-down menu listing the Font, Background, and Border style properties

    Tip:

    If a cell can belong to multiple member or data types, Oracle recommends setting only one property (font, border, or background color) per type. For example, a data cell may contain supporting details and cell text at the same time. If all three style properties are set for each data type, then depending on the precedence of styles specified, properties for cells with higher priority will completely overwrite properties of cells with lower priority. If only one property per cell type is set (for example, a border for supporting details and a font style for cell text), then the cell can more easily be identified as belonging to all the applicable cell types.

    Note:

    Smart View 20.200+ allows the setting of all three style properties per cell type. For example, you may set a font style, a background color, and a border color for Parent members.

    Smart View releases earlier than 20.200 allow the setting of only one style property per cell type. For example, you may set a font style or a background color or a border color for Parent members, but you cannot set all three styles for Parent members.

  4. To re-order precedence of cell styles, use the Move Up and Move Down buttons or drag and drop the cell styles.
  5. Click OK. The setting takes effect after you refresh or perform a drill operation.
  6. Optional: To revert cell styles or precedence to the default styles of the connected Smart View provider, click Default Styles.
  7. Optional: To set your selections on this page as default settings, click the arrow in the OK button, and then select Save as Default Options.

The sections that follow list the Formatting Options supported by provider.

Note:

There are no cell styles defined for Narrative Reporting.