Creating an Identity Store
In the OAM Console, in the Configuration area, click the User Identity Stores.
Click the Create button.
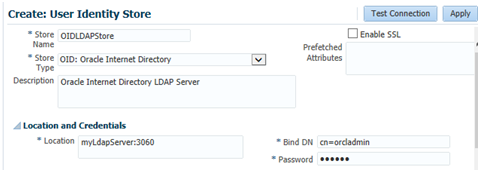
Enter a store name and store type in the applicable fields.
In the *Location field, enter your LDAP Server and port.
In the Bind DN and Password fields, enter the credentials to the LDAP Server.
Click Test Connection.
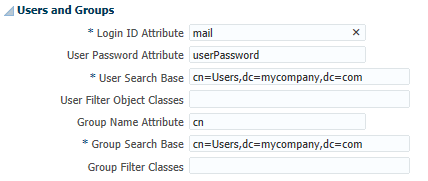
In the Users and Groups area, change the User Name Attribute to use the long ID attribute, such as "mail" for OID.
Note:Use "userPrincipalName" for Active Directory.
Click the Apply button to add the identity store.
In the Users and Groups area, change the User Name Attribute to use the long ID attribute, such as "mail" for OID:
Note:Use "userPrincipalName" for Active Directory.
Click the Apply button to add the identity store.
Return to the User Identity Store main page and select your identity store as the Default Store.Select the Default Store option to make it the default identity store.