Creating
the Attachment Steps
Creating
the Attachment Steps Before You Begin
This 30-minute tutorial shows you how to build an orchestration that uses many of the new operations available in the Attachments step in the Orchestrator Studio.
In this tutorial, you will:
- Create an orchestration to get, add, and update text attachments.
- Create an orchestration that receives file input and uploads the received file input as a file-type attachment.
- Create an orchestration that retrieves a file attachment from JD Edwards EnterpriseOne and returns it as file output in the orchestration response.
Background
Starting with Tools Release 9.2.6.0, a new step type called Attachments is available in the Orchestrator Studio. Using this step, you can call the attachment (media object) REST APIs that were previously available as REST calls. These seven actions are available in the Attachments page of the Orchestrator Studio to manage attachments:
- List: Applies to file, text, and URL attachments types
- Get Text: Applies to text attachments type
- Add: Applies to text and URL attachments types
- Update Text: Applies to text attachments type
- Upload File: Applies to file attachments type
- Download File: Applies to file attachments type.
- Delete: Applies to file, text, and URL attachments types.
 Creating
an Orchestration to Manage Text Attachments
Creating
an Orchestration to Manage Text Attachments
In this task, you will learn how to use the new Attachment step within an orchestration to manage text type attachments.
Note: This task relies on EnterpriseOne demo data. You can use other data available in your system to enter a sales order to perform this task.
Getting a List of Existing Attachments
- Sign in to the EnterpriseOne web client.
- Access the Manage Existing Order (P42101) application using
the Fast Path or open the application from the Navigator menu.
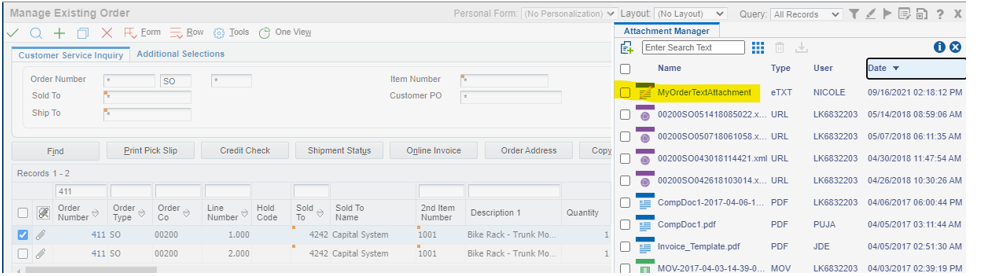
- Click Find and search for the record that has the paper clip icon. For example, search for Order Number 411.
- Select the record, click the Row menu, select Order , and then select Header Attachments.
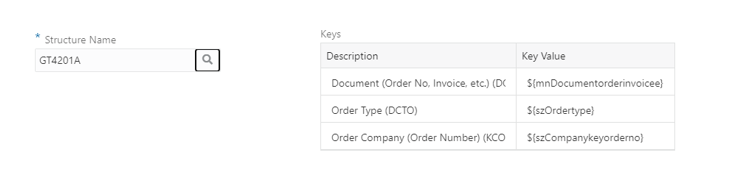
- Click the About Attachments icon (i) in the Attachment Manager window and note the structure name. In this example, the structure name is GT4201A.
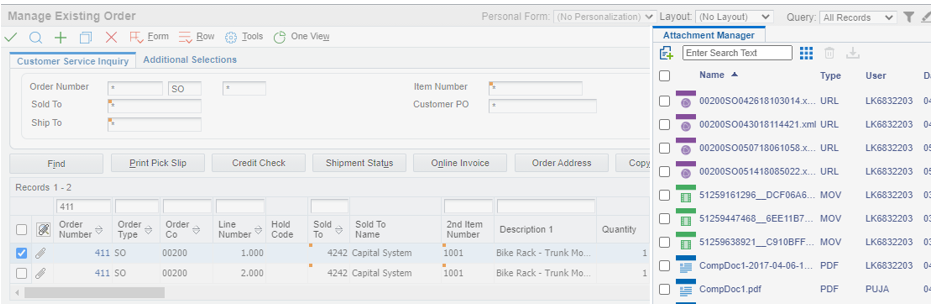
Attachment Manager Window 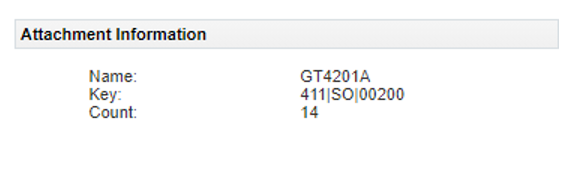
Attachment Information - Sign in to the JD Edwards Orchestrator Studio.
- Click Orchestrations and click New.
- In the Name field, enter
Order Text Attachments. - To add a step, click the Add icon (+) icon and select Attachments.
- Click New.
- In the Name field, enter
ListAllOrderAttachments. - In the Structure Name field, enter
GT4201A, and press the Tab key. The values in the Keys table are automatically populated. - In the Action section, select the List option.
- Click Save and click the Close icon.
- Click Save to save the orchestration.
- Click the ListAllOrderAttachments step and select Transformations.
- Click the Add Inputs to Orchestration button and then click the Auto Map button.
- Click Save.
- Click the End icon and click Outputs and Assertions.
- Enable the Select All option and click outside the window to close the Outputs and Assertions window.
- Click Save to save the orchestration.
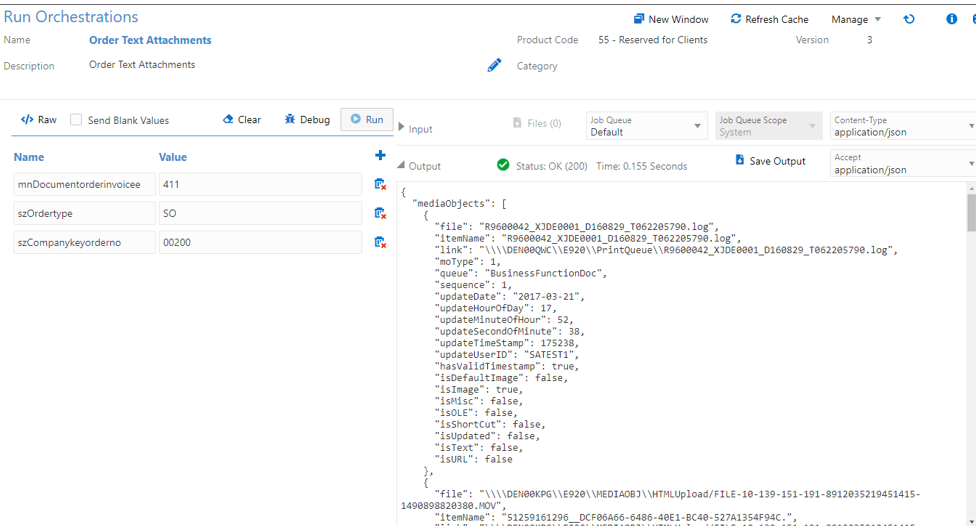
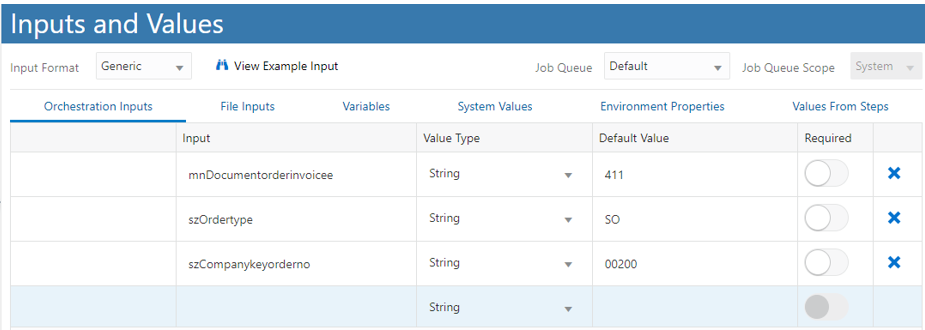
- Click the Start icon and select Inputs and Values.
- Enter these values in the Default Values field for the inputs and save the orchestration:
- Click the Start icon and click Run Orchestration.
- Click Run.
- Examine the response, notice that all the types of attachments and their individual details are included.
| Input | Default Value |
| mnDocumentorderinvoicee | 411 |
| szOrdertype |
SO |
| szCompanykeyorderno |
00200 |
Getting a List of Existing Text Attachments
- Sign in to the EnterpriseOne web client.
- Access the Manage Existing Order (P42101) application using the Fast Path or open the application from the Navigator menu.
- Click Find and search for the record that has the paper clip icon. For example, search for Order Number 411.
- Select the record, click the Row menu, click Order , and then select Header Attachments.
- Ensure that the Attachment Manager window contains at least one text attachment. If a text attachment is not available, click the Add icon (+) and add a text attachment.
- Access the JD Edwards Orchestrator Studio.
- Click the Orchestrations icon .
- Click the Order Text Attachments orchestration created in the “Getting a List of Existing Attachments” section.
- Click Design Mode.
- Click the Add icon (+)after the ListAllOrderAttachments step.
- Select Attachments and click New.
- Enter the name as
GetTextAttachments. - Enter the structure name as
GT4201A, and press the Tab key. The values in the Keys table are automatically populated. - In the Action section, select the Get Text option
- In the Input section, enable the Get All option and then click Save to save the attachment step.
- Click Close to return to the orchestration.
- Click the new GetTextAttachments step and click Transformations.
- Click Auto Map and click Save.
- Click the End icon and click Outputs and Assertions.
- Enable the Select All option and then click Save to save the orchestration .
- Click the Start icon and select Inputs and Values.
- Enter these values in the Default Value field for the inputs
and save the orchestration.
Input Default Value mnDocumentorderinvoicee 411
szOrdertype
SO
szCompanykeyorderno
00200
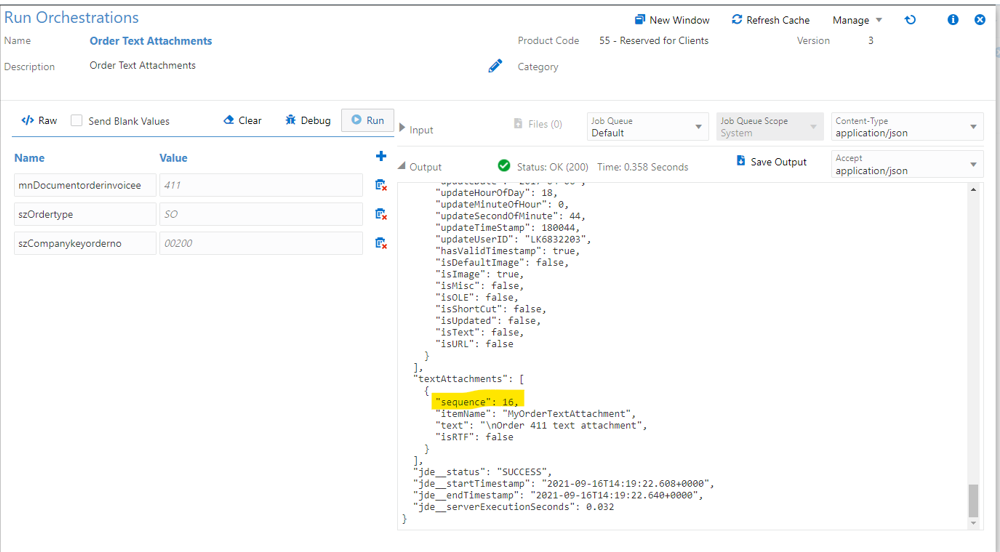
- Click the Start step and then click Run Orchestration.
- Click Run.
- Scroll to the end of the output to see the details of the text attachments returned in the response. Make a note of the sequence number returned for the text attachments. In the following example, the sequence number is 16.
Getting a Single Text Attachment
- Access the JD Edwards Orchestrator Studio.
- Click the Orchestrations icon.
- Click the Order Text Attachments orchestration.
- Click Design Mode.
- Click the Add icon (+) icon after the GetTextAttachments step.
- Select Attachments and click New.
- Enter the name as
GetSingleTextAttachment. - In the Structure Name field, enter GT4201A, and press the Tab key. The values in the Keys table are automatically populated.
- In the Action section, click the Get Text option.
- Enter the sequence number as a variable:
${sequenceNo}. - Save the attachment step and return to the orchestration.
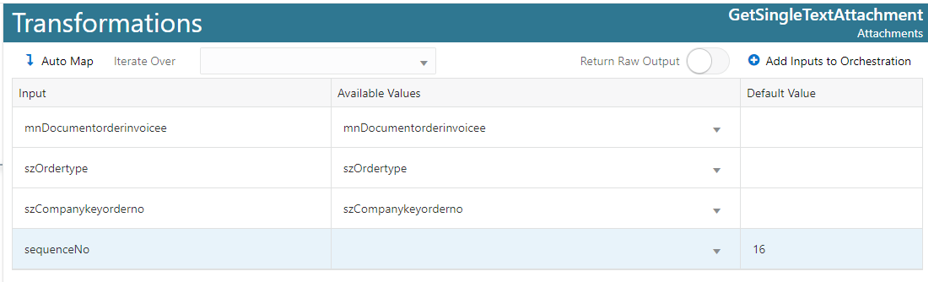
- Click the GetSingleTextAttachment step and click Transformations.
- Click Auto Map. The system automatically populates the Keys table.
- Enter your sequence number in the Default Value field of the
sequenceNo input field. For example, enter
16. - Click Save.
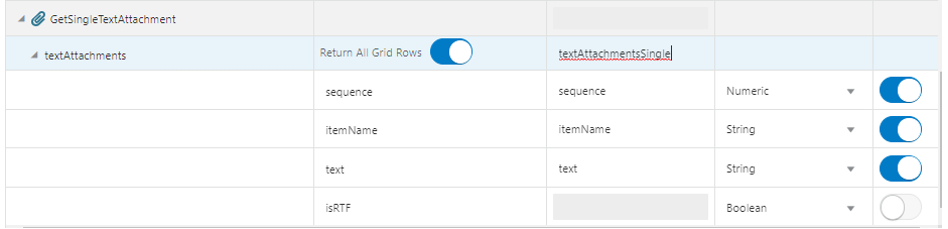
- Click the End icon and select Outputs and Assertions.
- For the attachment GetSingleTextAttachment, enable the Return
All Grids option. In the Output field, replace the
default name with this new name :
textAttachmentsSingle. - Enable the Select option for the fields sequence, itemName, and text.
- Save the orchestration.
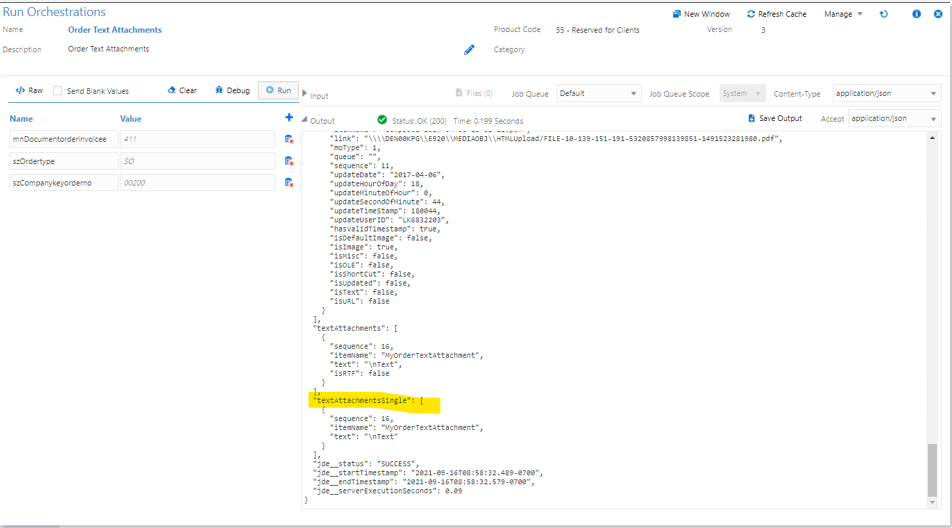
- Click the Start icon and click Run Orchestration.
- Click Run.
- Scroll to the end of the output and examine the response. Notice that the details of the text attachments for that key are provided, and the new section contains just the text attachment for the specified sequence number, which is 16.
Adding a Text Attachment
- Access the JD Edwards Orchestrator Studio.
- Click the Orchestrations icon.
- Click the Order Text Attachments orchestration.
- Click Design Mode.
- Click the Add icon (+)after the GetSingleTextAttachment step.
- Select Attachments and click New.
- Enter the name as
AddTextAttachment. - In the Structure Name field, enter
GT4201A, and press the Tab key. The values in the Keys table are automatically populated. - In the Action section, click the Add option.
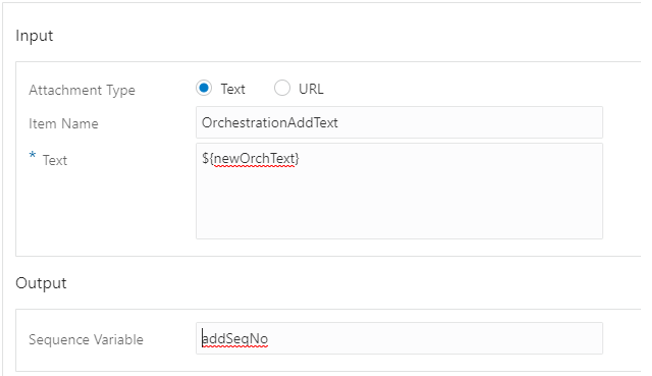
- In the Input field, select the Text option for the Attachment Type field.
- In the Item Name field, enter
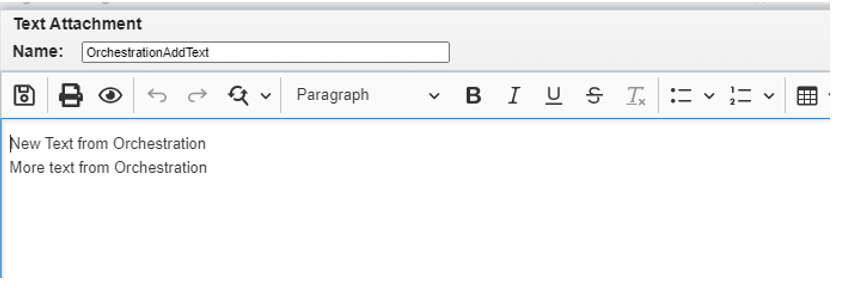
OrchestrationAddText. - Enter this variable for the Text field:
${newOrchText}. - In the Output section, in the Sequence Variable field, enter
addSeqNo. - Save the step and return to the orchestration.
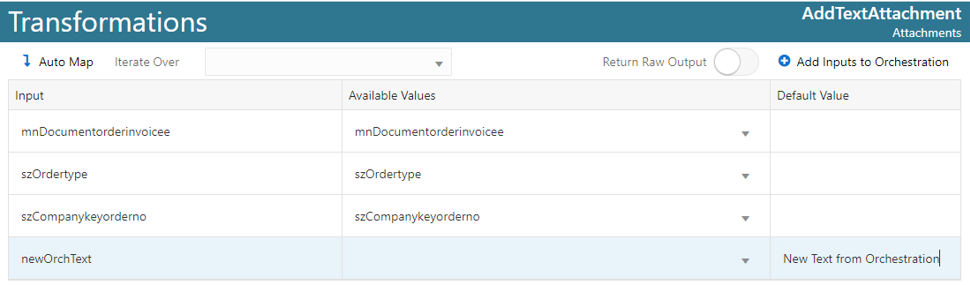
- Click the AddTextAttachment step and select Transformations.
- Click Auto Map to populate the Keys table,
and in the Default Value field for the newOrchText input
field, enter
New Text from Orchestration. - Click Save.
- Click the End icon and select Outputs and Assertions.
- Scroll to the bottom of the output and find
AddTextAttachment. Enable the Select option
for the sequence field. Change the value in the Output field
to
newTextSequence. - Click Save.
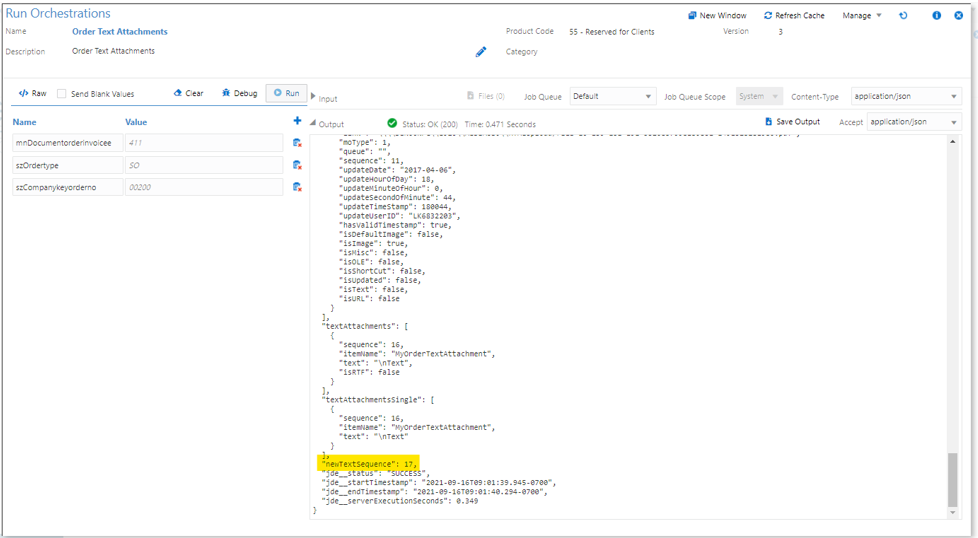
- Click the Start icon and select Run Orchestration.
- Click Run.
- Scroll to the end of the output and notice that a new sequence number is provided for the added text attachment.
Note: Notice the difference between the input variables and the output variables. For the input variables, the variable notation is used (because inputs can be literal values or variables). For the output variables, the variable notation is not used, as each of these variables are just a name given to a known output value.

Updating a Text Attachment
- Access the JD Edwards Orchestrator Studio.
- Click the Orchestrations icon.
- Click the Order Text Attachments orchestration.
- Click Design Mode.
- Click the Add icon (+) icon after the AddTextAttachment step.
- Select Attachments and click New.
- Enter the name as
UpdateTextAttachment. - Enter
GT4201Ain the Structure Name field, and press the Tab key. The values in the Keys table are automatically populated. - In the Action section, select the Update Text option
- In the Sequence field, enter
${updateTextSeq}. - Select the Append option.
- In the Text field, enter
${appendText}. - Save the step and return to the orchestration.
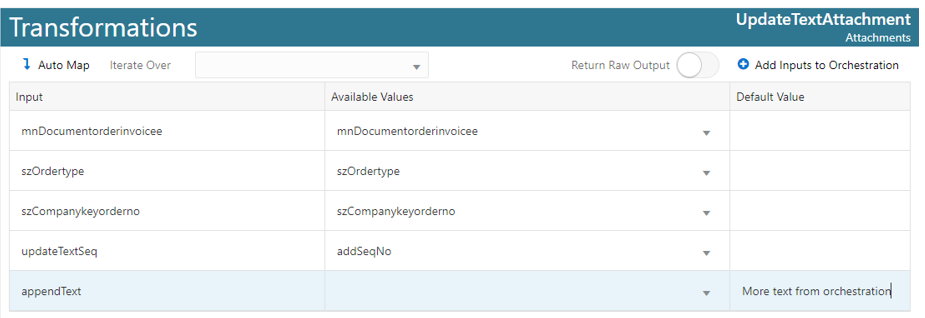
- Click the UpdateTextAttachment step and click Transformations.
- Click Auto Map to populate the Keys table.
- For the UpdateTextSeq input, select addSeqNo from the Available Values drop-down menu.
- For the appendText input, in the Default Value field, enter
More text from orchestration. - Click Save.
- Click the End icon and select Outputs and Assertions.
- Scroll to the bottom of the output and for the UpdateTextAttachment attachment, enable the Select option.
- Save the orchestration.
- Click the Start icon and select Run Orchestration.
- Click Run.
- Scroll to the end of the output and notice the update status.
- From the Tools menu, click JD Edwards EnterpriseOne, and navigate to P42101. Search for and find your order.
- Select the order, from the Row menu, select Order, and then click Header Attachments.
- Notice that the new attachment is updated with the name from the add step and it is also updated with the append text from the update step.


 Creating
an Orchestration that Accepts and Uploads Files as EnterpriseOne
Attachments
Creating
an Orchestration that Accepts and Uploads Files as EnterpriseOne
Attachments
In this exercise, you will define an orchestration that receives any number of files containing the key information for an order, and upload those files as attachments to that order key.
Creating an Orchestration to Receive Files
- From the Orchestrator Studio home page, select Attachments.
- Click New.
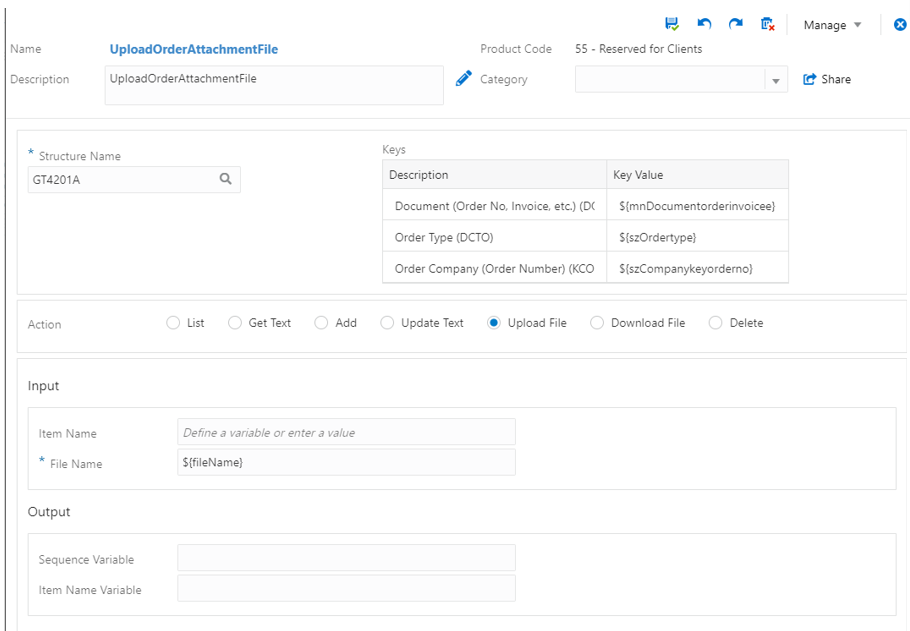
- In the Name field, enter
UploadOrderAttachmentFile. - Enter GT4201A as the structure name , and press the Tab key. The values in the Keys table are automatically populated.
- In the Action section, select the Upload File option.
- Leave the Item Name field blank (it will be populated with the file name by default).
- In the File Name field, enter the variable input value as
${fileName}.
This file is always stored in a temporary directory. First, the system looks for the file in the user session temporary directory, and then in the root temporary directory. - Save the attachment step.
- From the Manage menu, click Create Orchestration.
- Save the new orchestration (retain the default name).
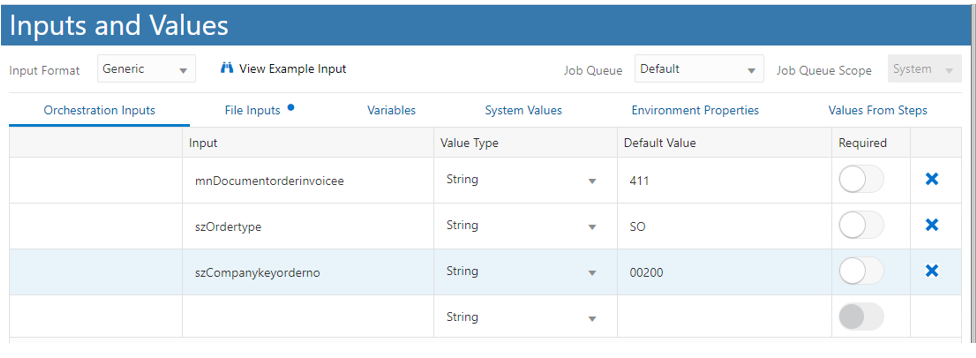
- Click the Start icon and click Inputs and Values.
- Click the Delete icon (X) to delete the fileName input. In this tutorial, you will create an array of files to use as input.
- Enter these values in the Default Value field for the inputs.
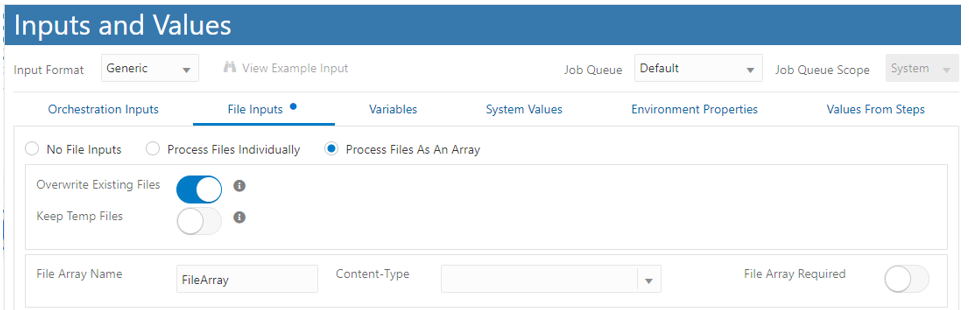
- Click the File Inputs tab and perform these steps:
- Select the Process Files As An Array option.
- Enable the Overwrite Existing Files option to keep the original file names.
- In the File Array Name field, enter
FileArray.
- Save the orchestration.
- Click the UploadOrderAttachmentFile step and click Transformations.
- From the Iterate Over drop-down menu, select FileArray.
- Disable the Return Raw Output option.
- From the Available Values drop-down list in the fileName row, select FileArray.fileName.
- Save the orchestration.
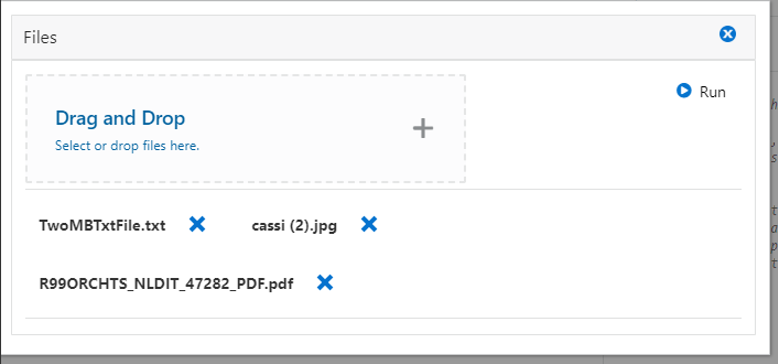
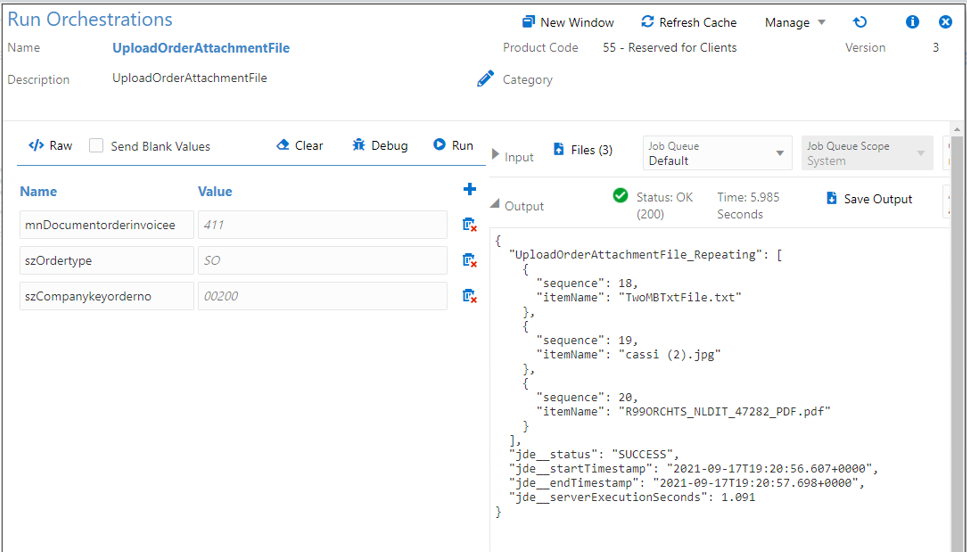
- Click the Start icon and click Run Orchestration.
- Click the Files(0) button and select a few
files from your local machine.
They must be valid files that can be uploaded as attachments in EnterpriseOne. A configuration controls which extensions are allowed. For this example, a .txt file, a .jpg file, and a .pdf file are used. - Click Run.
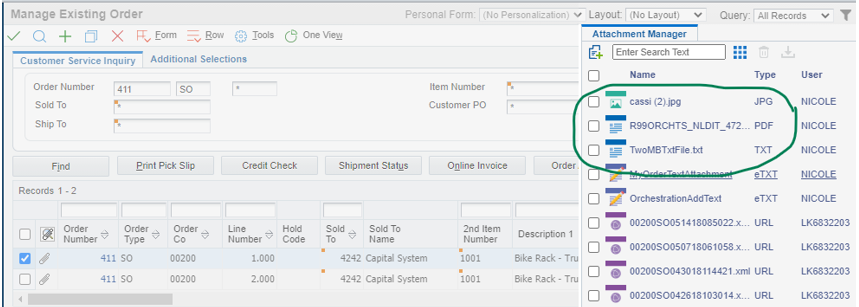
The response shows that the upload step runs for each file in the request. - From the Tools menu, click JD Edwards EnterpriseOne, and navigate to P42101. Search for and find your order.
- Select the order, from the Row menu, select Order
and then select Header Attachments.
You should see the files that were just uploaded through the orchestration.
| Input | Default Value |
| mnDocumentorderinvoicee | 411 |
| szOrdertype |
SO |
| szCompanykeyorderno |
00200 |

 Creating
an Orchestration to Download File Type Attachments
Creating
an Orchestration to Download File Type Attachments
In this task, you will create an orchestration that fetches files from the order attachments and returns those files in the orchestration response.
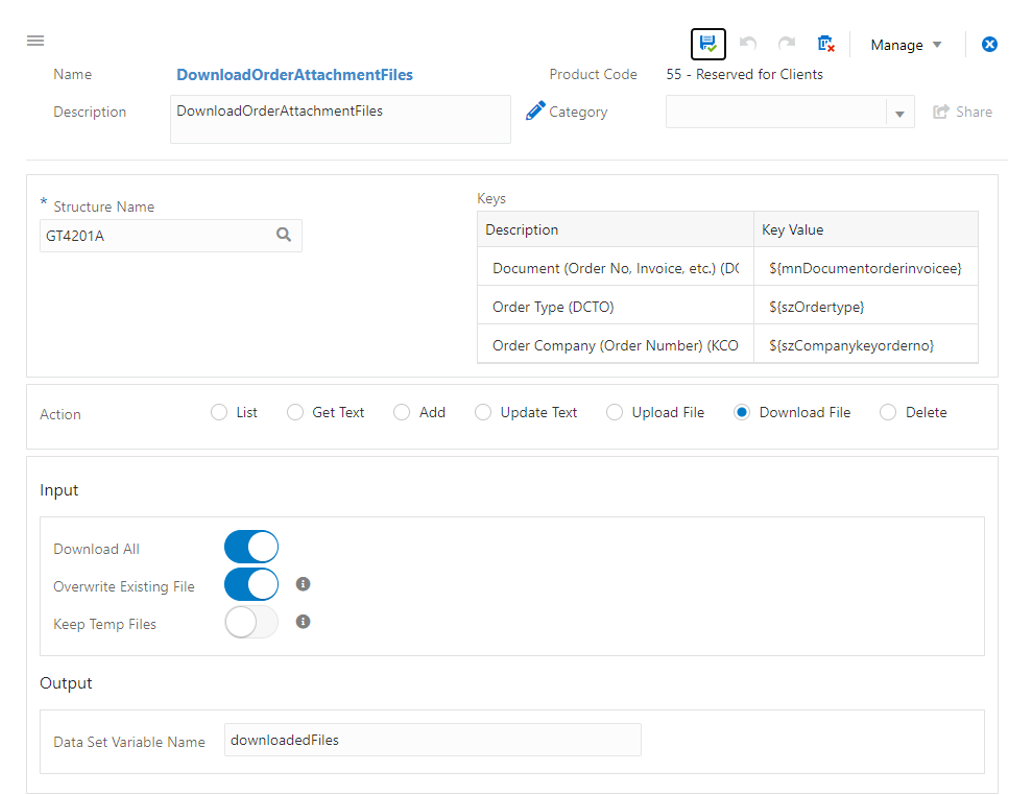
- From the Orchestrator Studio home page, select Attachments.
- Click New.
- In the Name field, enter
DownloadOrderAttachmentFiles. - Enter the structure name as GT4201A, and press the Tab key. The values in the Keys table are automatically populated.
- In the Action section, select the Download File option.
- Enable the Download All option.
- In the Output section, in the Data Set Variable Name field,
enter
downloadedFiles. - Save the attachment step.
- From the Manage menu, select Create Orchestration.
- Save the resulting orchestration.
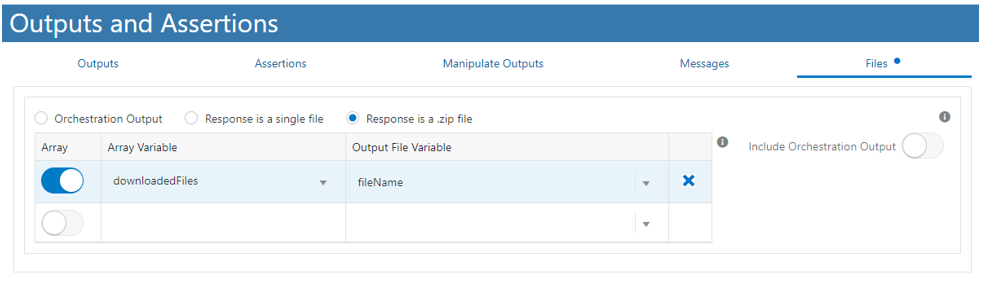
- Click the End icon and choose Outputs and Assertions.
- Click the Files tab.
- Select the Response is a .zip file option.
- In the first row, enable the Array option .
- From the Array Variable drop-down menu, select the dowloadedFiles option and from the Output File Variable drop-down menu, select fileName.
- Save the orchestration.
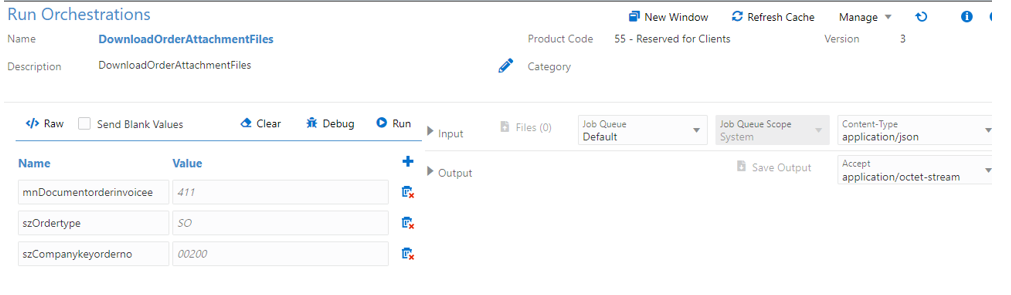
- Click the Start icon and click Inputs and Values.
- Enter these values for in the Default Value field for the inputs and save the orchestration.
- Click the Start icon and click Run
Orchestration.
Note: To download file inputs, change the value selected in the Accept drop-down menu to application/octet-stream. - Click Run.
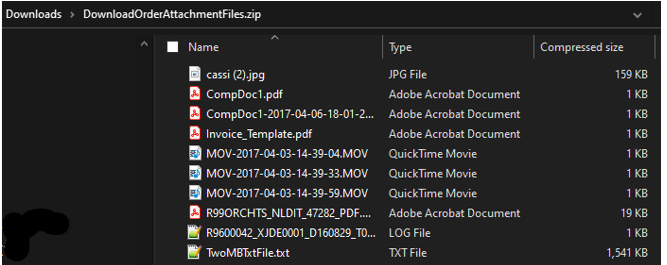
- Verify that the resulting .zip file is downloaded by your browser.
- Open the .zip file to view the attached files. The .zip file contains all the file-type attachments for that media object key.
| Input | Default Value |
| mnDocumentorderinvoicee | 411 |
| szOrdertype |
SO |
| szCompanykeyorderno |
00200 |