Entering Project Timecards Using the Mobile Smartphone Application
To enter project timecards:
Open the application by tapping the icon on your device, and then log in.
The Project Time home screen appears, and by default, displays all of the timecard accounts for which time has already been charged to during the current pay period.
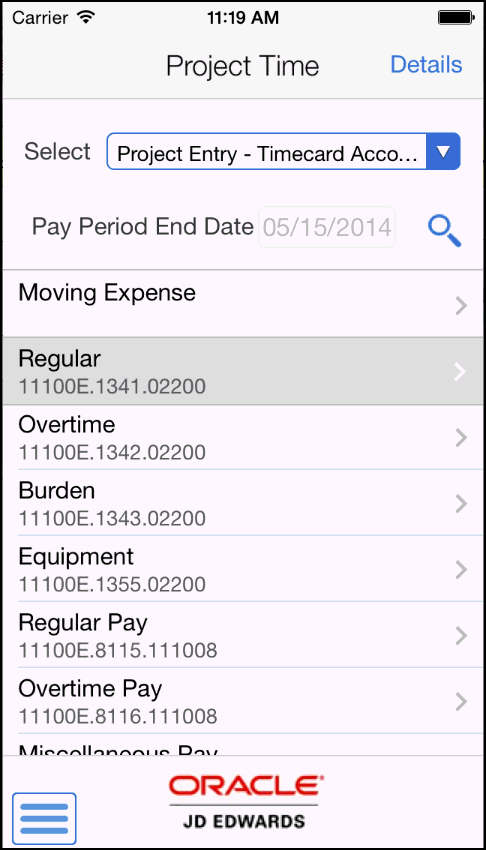
To enter project time, you must first select a timecard account or account master. From the Select drop down menu, select one of these options:
Project Entry - Timecard Accounts
Select this option to display a list of timecard accounts for which time has already been charged to during the specified pay period. You can then select one of the accounts to use when entering your new timecard.
Note that if the timecard account you want to use has not been used previously, it will not appear in this list. To enter a timecard using an account that has not yet been used, you must select the Project Entry - Account Master option.
Project Entry - Account Master
Select this option to search for project accounts. You can specify filter criteria when you select this option to search for project accounts that are not currently displayed in the list. After entering search criteria, and clicking search, the system displays the list of project accounts that match your criteria. You can then select one of the accounts to use when entering your new timecard.
Note: You can change the Pay Period End Date by tapping the search button and then selecting a new pay period. You might choose to change the pay period if you want to search for accounts that were used on timecards that were entered during a previous pay period.Select an account record from the left pane. An add screen then appears on the right side of the screen.
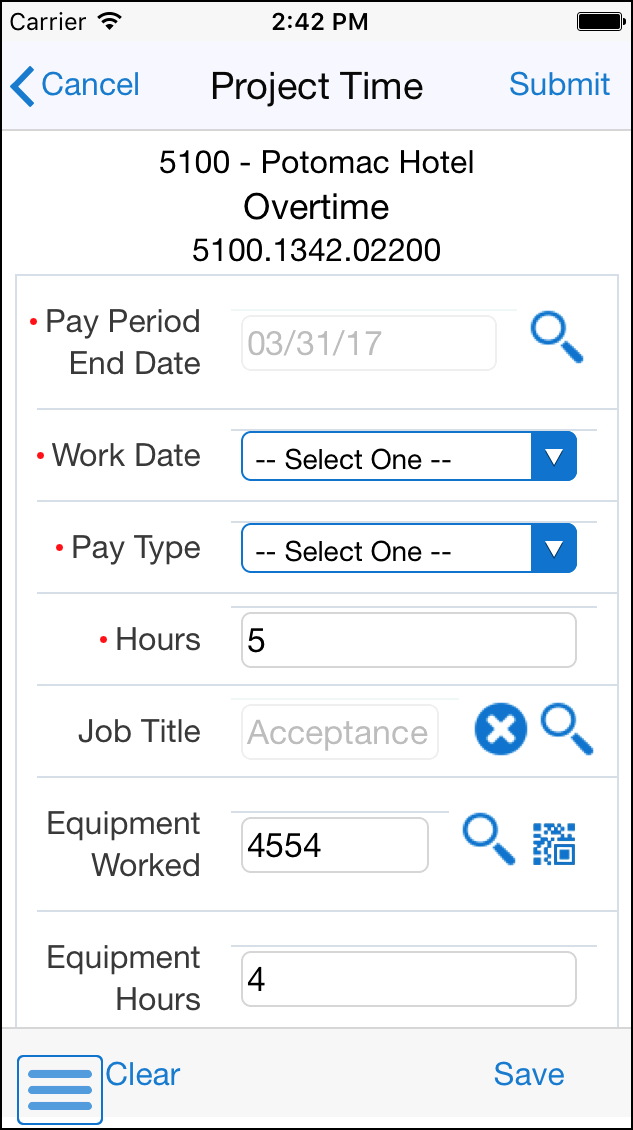
Complete the time entry fields on the timecard.
Equipment Worked (Release 9.2 Update)
Enter data in the Equipment Worked field using one of these options:
Use the keyboard on your mobile device to manually enter the data. Alternately, you can tap the search and select button to search and select a piece of equipment.
Use the camera application on your mobile device to scan the data.
To use this option, tap the QR Code button next to the Equipment Worked field. The system launches the device camera and you can scan the barcode of the equipment.
Use a Bluetooth-enabled scanning device to scan the data.
To use this option, tap the Equipment Worked field to activate the scanning device. Then, scan the barcode of the equipment using the scanning device.
See Setting Up the Bluetooth Option in the Mobile Device to Scan Barcodes
Note:The Equipment Worked field is designed to accept the asset that you identify with an identification symbol in the Fixed Assets Constants program (P001012).
See Setting Up Fixed Asset Constants in the JD Edwards EnterpriseOne Applications Fixed Assets
Implementation Guide.For example, if the symbol to identify the serial number is "/" and the serial number is "4CE0460D0G"; then you need to enter "/4CE0460D0G" in the Equipment Worked field to search and select a piece of equipment.
After you complete entering data in the time entry fields on the timecard, tap one of these options:
Save
Tap this option if you want to save the timecard.
Cancel
Tap this option if you want to clear the timecard without saving any of the entered values.
Submit
Tap this option if you want to save and submit the timecard for approval.
To enter additional timecards for the pay period, repeat steps 2 through 4 in this task.