Entering Timecards Using the Field Progress Labor Entry Mobile Smartphone Application
To enter timecards for field progress:
Open the application by tapping the Labor Entry icon on your device, and then log in.
From the Field Progress Labor Entry home screen, enter the job number in the Enter Job Number field and then tap the Search button.
The system displays the list of records based on your search criteria.
If you do not know the job number, or if you want to enter additional search criteria to narrow your search results, tap the filter button.
In the Filters pane, the values for Cost Code, Cost Type, and Level of Detail are populated based on the default information that is set up in the versions of the programs specified in the processing options. You can leave these values as they are, override them, or clear them to meet your search needs. Tap the Apply button. When you tap the Apply button, the system:
Takes you to the list of cost codes that are displayed based on your filter values.
Saves the filter values that you entered. The system displays the saved filter values the next time you open the filter screen.
To discontinue the use of filter values in your search, tap the Cancel button. When you tap the Cancel button, the system:
Takes you to the cost code list associated with the last saved filter values, if applicable.
Ignores the filter values that you entered, and restores the last saved filter values to the filter fields.
To delete all filter values you specified, and to enter new filter values, tap the Clear button.
The system returns you to the Field Progress Labor Entry screen with a list of records that meet your search criteria.
Tap any record in the list to review to create timecards for that record.
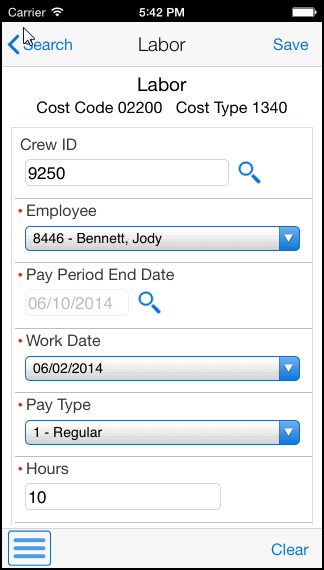
On the Labor screen, enter the timecard details.

- Crew ID and Employee Fields
Select an employee from the Employee drop down list. If you entered a value in the Crew ID field, the system populates the Employee list with only those employees who belong to the specified crew. If you leave the Crew ID field blank, the system populates the Employee list with all direct reports of the logged on user.
The system displays an error if you do not have the authority to enter timecards for the selected employee.
Whether the Crew ID field is required or optional is controlled by the application's processing options.
- Pay Period End Date and Work Date
Use the visual assist to retrieve a valid pay period end date. The system provides only valid pay period end dates based on the selected employee's pay cycle code.
After selecting a pay period end date, select a work date. The system allows you to select from dates within the pay period associated with the specified pay period end date.
- Pay Type and Hours
Select a pay type from the Pay Type drop down list. The system provides only those pay types that the employee has been authorized to use. Enter the number of hours for the timecard. These fields are required.
Complete any of the remaining optional fields on the Labor screen.
Tap the Save button at the top right of the screen.
To log out of the application, tap the Menu button at the bottom left of the screen, and then tap Logout.