Reviewing Equipment Details Using the Equipment Mobile Smartphone Application
To review equipment details:
Open the application by tapping the Manage Eq icon on your device, and log in.
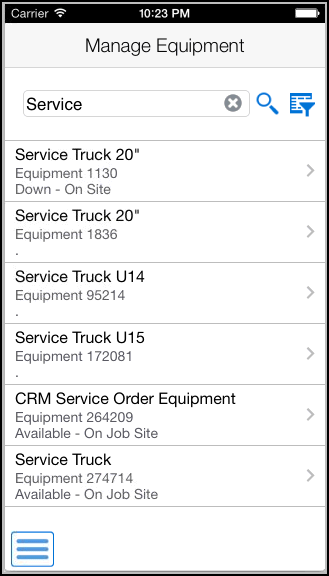
From the Manage Equipment home screen, enter the description partially or in whole in the Enter Equip Desc field to narrow the search for a specific piece of equipment. Then, tap the Search button next to the Enter Equip Desc field to search for equipment by description. Alternately, you can leave the Enter Equip Desc field empty and tap the Search button to retrieve all equipment.
To search details of an equipment by site, location, or status, tap the Filter button next to the Enter Equip Desc field.
- Site
This field retrieves the equipment based on the address book number of the site location.
Enter the address book number in the Site field.
Alternately, tap the Search button next to the Site field, and then tap the Search button on the Address Book Search window. You can also search by entering a description or address book type.
The device displays address book numbers based on your search. Tap the address book number that you want to select.
- Location
This field retrieves the equipment based on the current physical location of an asset. Enter a location in the Location field.
Alternately, tap the Search button. Enter a description for location in the Description field, tap the Search button on the Location Search window. The device displays business unit locations based on your search. Tap the business unit that you want to select.
- Equipment Status
This field retrieves the equipment list based on the status assigned to the equipment record. To search for equipment by status, tap the Equipment Status drop down menu and select a status.
- Equipment Number (Release 9.2 Update)
This field retrieves the equipment list based on the equipment number. Enter data in the Equipment Number field using one of these options:
Use the keyboard on your mobile device to manually enter the data. Alternately, you can tap the search and select button to search and select a piece of equipment.
Use the camera application on your mobile device to scan the data.
To use this option, tap the QR Code button next to the Equipment Number field. The system launches the device camera and you can scan the barcode of the equipment.
Use a Bluetooth-enabled scanning device to scan the data.
To use this option, tap the Equipment Number field to activate the scanning device. Then, scan the barcode of the equipment using the scanning device.
See Setting Up the Bluetooth Option in the Mobile Device to Scan Barcodes..
Note:The Equipment Number field is designed to accept the asset that you identify with an identification symbol in the Fixed Assets Constants program (P001012).
See Setting Up Fixed Asset Constants in the JD Edwards EnterpriseOne Applications Fixed Assets
Implementation Guide.For example, if the symbol to identify the serial number is "/" and the serial number is "4CE0460D0G"; then you need to enter "/4CE0460D0G" in the Equipment Number field to search and select a piece of equipment.
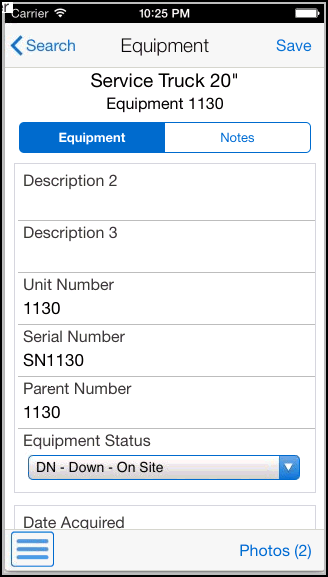
To review details about a specific equipment record, tap the record from the equipment list.
To update the equipment details, perform these steps:
To update the equipment status, tap the Equipment Status drop down menu, and then tap a status to select.
To review the location, scroll down on the screen. To update the location, select the current location and enter the new location.
Alternately, to update the location, tap the Search button. Enter a description for location in the Description field, tap the Search button on the Location Search window, and then tap the location to update.
Tap the Save button.
Tap the data in the Site Address and Site Coordinates sections of the screen to use the map or navigational features of your device.
To view photos for the selected piece of equipment, tap the Photos button. The device displays the list of photos for the selected piece of equipment on the Photos screen.
Note: The number displayed on the Photos button represents the total number of photos related to the piece of equipment. If you add or delete photos from the photo list, this number changes accordingly.To add photos to the equipment record, tap the Add button on the Photos screen. The device displays a popup with two options: Album and Camera.
To attach an existing photo from your device's photo gallery, tap the Album option and then select the photo you want to attach. On the New Photo screen, enter a name for the photo and tap the Save button.
To take a new photo, tap the Camera option to use the device's camera feature.
To enlarge the photo, tap the photo twice. To zoom in on the photo, pinch and drag. To zoom out, reverse the drag and pinch motion.
Note: The zoom feature is not available on Android devices.To delete a photo, tap the photo you want to delete. Tap the Delete button on the Photo screen.
To refresh the photo list, tap the Refresh button on the Photos screen.
Tap the List button to return to the Photos screen.
Tap the Back button on the Photos screen to return to the Equipment screen.
To view and modify notes, tap the Notes tab. Tap the text area and enter or modify notes. Tap the Save button.
To return to the home screen of Manage Equipment, tap the Search button on the top left of the screen.
To log out of the application, tap the Menu button at the bottom left of the screen, and then tap Logout.