Using the Inventory Transfer Mobile Tablet Application (M41242)
To transfer inventory:
Open the application by tapping the Inv Transfer icon on your device, and then log in.
See Logging In to Mobile Enterprise Applications
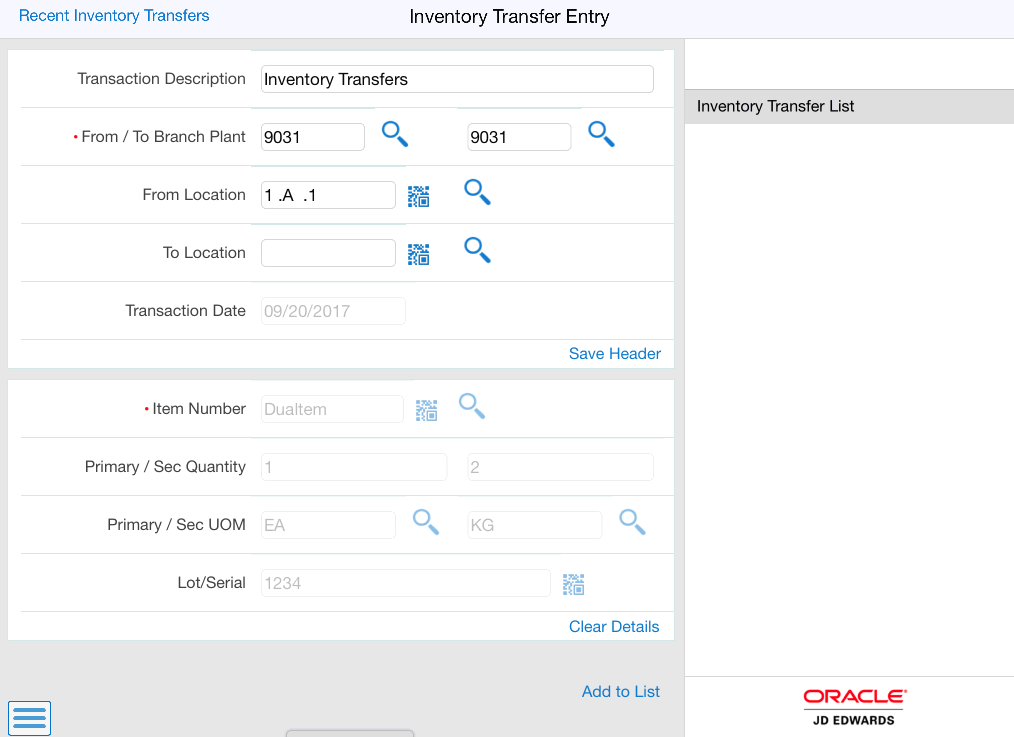
The Inventory Transfer Entry form opens, and it has three major sections.
Header
Details
Recent Inventory Transfers
Provide the required information in the Header section.
- Header
The header section displays inventory transfer information such as location, transaction date, and description. You can save the information in the header section for multiple inventory transfer records. The header information is common for all the items/records transferred as part of a single inventory transfer document.
- Transaction Description
Enter a brief description about the transaction. By default, the field displays the default document type description.
- From / To Branch Plant
Add the branch plant information from where you want to transfer and the branch plant to which you want to transfer your inventory. You can manually enter the data or you can use the Search icon to search and select the branch plant.
Note: You can set the default from branch plant value in the Default processing option. See Setting Processing Options for the Inventory Transfer Tablet Application (M41242).- From Location
Enter the From Location using one of these options:
Use the keyboard on your mobile device to manually enter the data.
Use the Search icon to search and select the data.
Use the camera application on your mobile device to scan the data.
To use this option, tap the QR Code button next to the From Location field. The system launches the device camera and you can scan the barcode of the location.
Use a Bluetooth-enabled scanning device to scan the data.
To use this option, tap the From Location field to activate the scanning device. Then, scan the barcode of the item using the scanning device.
See Setting Up the Bluetooth Option in the Mobile Device to Scan Barcodes
- To Location
Enter the To Location using one of these options:
Use the keyboard on your mobile device to manually enter the data.
Use the Search icon to search and select the data.
Use the camera application on your mobile device to scan the data.
To use this option, tap the QR Code button next to the To Location field. The system launches the device camera and you can scan the barcode of the location.
Use a Bluetooth-enabled scanning device to scan the data.
To use this option, tap the To Location field to activate the scanning device. Then, scan the barcode of the item using the scanning device.
See Setting Up the Bluetooth Option in the Mobile Device to Scan Barcodes
Note: You can also provide the To Location data after entering the information in the Details section.- Transaction Date
By default, the application displays the current transaction date.
Tap the Save Header button to save the header information and to use it for multiple inventory transfer records.
To edit the header information, tap on Edit Header button. Update the header information and tap Save Header button to save the data changes.
You can also edit header information after entering the Details data. The Details section disables when you edit the header information.

Provide the required information in the Details section.
- Details
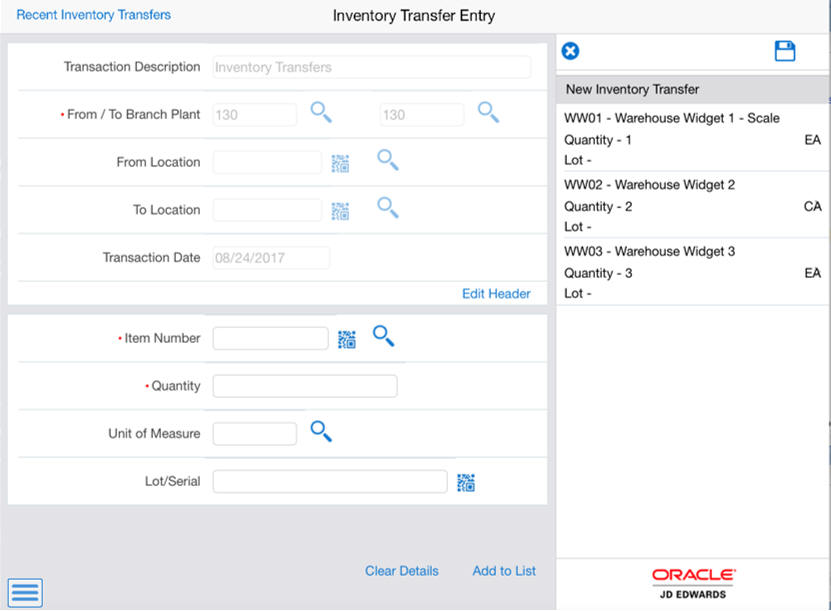
The details section displays inventory transfer information such as item number, lot/serial number, unit of measure, and quantity information. You can list and save multiple inventory records with different information in the details section under the same header information.
- Item Number
Enter Item Number using one of these options:
Use the keyboard on your mobile device to manually enter the data.
Use the Search icon to search and select the data.
Use the camera application on your mobile device to scan the data.
To use this option, tap the QR Code button next to the Item Number field. The system launches the device camera and you can scan the barcode of the equipment.
Use a Bluetooth-enabled scanning device to scan the data.
To use this option, tap the Item Number field to activate the scanning device. Then, scan the barcode of the item using the scanning device.
See Setting Up the Bluetooth Option in the Mobile Device to Scan Barcodes
- Quantity
Enter the quantity of the item you want to transfer. When you scan an item, by default, the quantity is displayed as 1.
- Unit of Measure
Enter the unit of measure for the quantity of item.
Note: You can add both Primary and Secondary Quantity and Unit of Measure if you have set the Display processing option as 1. See Setting Processing Options for the Inventory Transfer Tablet Application (M41242).
- Lot/Serial
Enter the Lot/Serial using one of these options:
Use the keyboard on your mobile device to manually enter the data.
Use the Search icon to search and select the data.
Use the camera application on your mobile device to scan the data.
To use this option, tap the QR Code button next to the Lot/Serial field. The system launches the device camera and you can scan the barcode of the equipment.
Use a Bluetooth-enabled scanning device to scan the data.
To use this option, tap the Lot/Serial field to activate the scanning device. Then, scan the barcode of the item using the scanning device.
See Setting Up the Bluetooth Option in the Mobile Device to Scan Barcodes
Note: You can tap the Clear Details button to discard the inventory transfer information in the details section.
Tap the Add to List button to add the inventory transfer record in the Inventory Transfer List. You can add multiple inventory transfer records with the same header information in the Inventory Transfer List.
You can perform the following actions to the inventory transfer records in the Inventory Transfer List:
Save - Tap the Save icon on the top of the Inventory Transfer List. A confirmation message appears; tap Yes to save the list of inventory transfer records.
Cancel - Tap the Cancel icon on the top of the Inventory Transfer List to clear all inventory transfer records in the list.
Edit - You can edit any particular inventory transfer record in the Inventory Transfer List. Tap to select the record in the list. The information for the selected record is displayed in the Details section. You can edit any information in the Details section.
Delete - You can delete any particular inventory transfer record in the Inventory Transfer List. Tap to select the record in the list and swipe left. A confirmation message appears; tap Yes to delete the selected record.

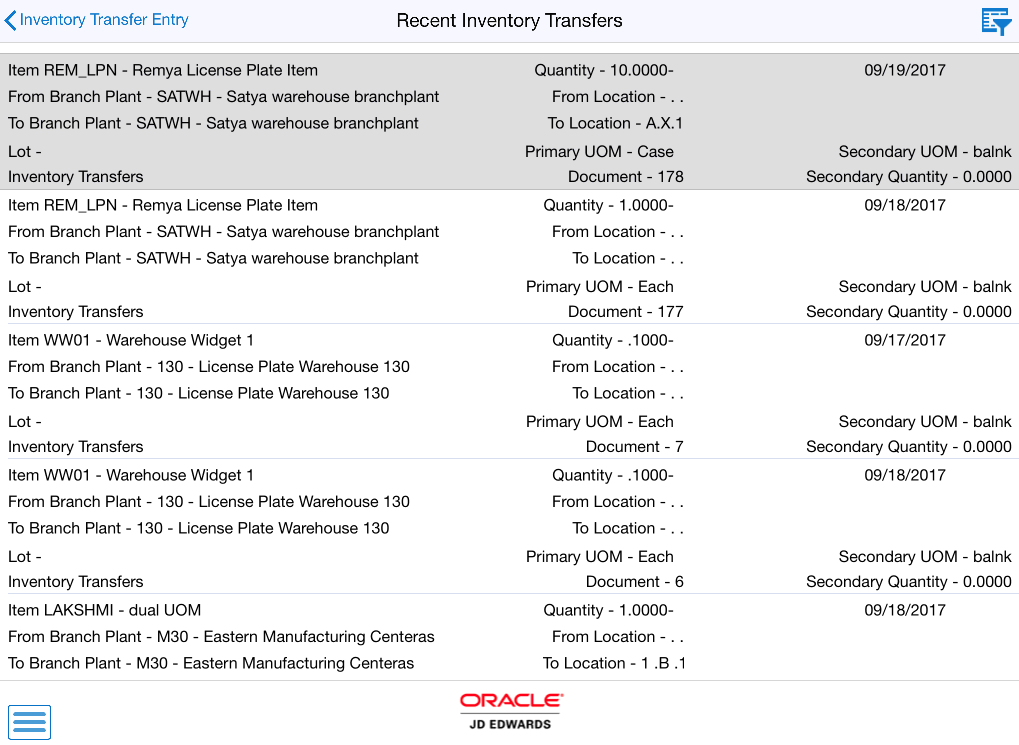
Tap the Recent Inventory Transfers button in the top left of the screen to view the recent inventory transactions.
- Recent Inventory Transfers
Displays a list of recent inventory transfers for the last 14 days by default. You can set the date range in the filter and search the records. To set the date range, you:
Tap the Filter icon on the top right.
Enter From and To Transaction Date information.
Tap the Apply button to apply the filter and search the records.
Each record displays information such as item number, from and to branch plants, from and to location, quantity, unit of measure, and lot number.

To define filter criteria, tap the Filter button in the top right of the screen.
You can filter records based on item number, location, lot number, branch plant, and a range of transaction dates.
To filter by item number, location, and lot number, you populate data in the Item Number, Location, and Lot Number fields using one of these three options:
Use the keyboard on your mobile device to manually enter the data.
Use the Search icon to search and select the data.
Use the camera application on your mobile device to scan the data.
To use this option, tap the QR Code button next to the Item Number, Location, and Lot Number field. The system launches the device camera and you can scan the barcode of the item number, location, and lot number.
Use a Bluetooth-enabled scanning device to scan the data.
To use this option, tap the Item Number, Location, and Lot Number field to activate the scanning device. Then, scan the barcode of the location and lot/serial number using the scanning device.
Tap the Apply button to apply your filter and search.
You can tap Clear button to clear the filter data and tap Cancel button to close the filter.