Designing a Meter Type Widget
You can associate the Meter type Widgets as a composed tile to a Composed EnterpriseOne page. Starting with Tools Release 9.2.9.4, you can add a Meter type Widget to a Widget Pane.
The Meter type widgets display the blue, orange, and red colors by default to indicate the normal, warning, and critical thresholds, respectively. You can customize these threshold colors.
To design a Meter type Widget:
- Access the JD Edwards EnterpriseOne Orchestrator Studio.
- Click Widgets.
- On the Widgets side panel, click New.
-
On the Widgets design page, complete these fields:
-
Name: Enter a name for the widget. Do not include special characters in the name.
-
Description: Enter a description. This description appears below the widget name in the widget side panel list. If you do not enter information in this field, the Description defaults from the name you specify when you save your widget. You can update the description using this field after the Widgets page is saved.Note: You can click the Long Description icon to provide more details about the widget.
-
Product Code: Enter the product code you want to associate with the widget. Oracle recommends you use product code 55 for customized widgets. The product code is set to 55 by default.
-
- In the Definition tab, select the Meter option under Widget Type, and
complete these fields:
- Title: Enter a title for the meter widget type.
- Refresh Interval (Minutes): The system displays 60 by default. You can edit this value and enter a number greater than or equal to 5.
- Link: Complete the Application, Form, and Version fields to specify the form that you want the application link to launch.
-
In the Orientation section, select the required orientation display option for the meter type widget. The available options are Arch, Circular, Horizontal, and Vertical.
When you select the Arch type, the system displays the Start Angle and Angle Extent fields with 210 and 240 as default values, respectively. You can edit these values and enter any number between 0 and 360.
When you select the Circular type, the system displays the Start Angle and Angle Extent fields with 90 and 360 as default values respectively. These values cannot be changed.
- In the Number Formatting section, you can enable the Use Short Number Format or Round options. You can also enter a value greater than or equal to 0 in the Maximum Digits After Decimal field.
-
Click the Data Source tab and complete these fields:
-
In the Orchestration section, click Select Orchestration, and search and select the orchestration to define the data source for the widget. The list of inputs, outputs, and their types defined in the selected orchestration is automatically displayed in the Inputs and Outputs sections, respectively.Note: You can click the Edit Orchestration button and edit the orchestration if required.
-
In the Inputs section, you can review the values in the Orchestration Input row, and enable the Widget Input option. When you enable the Widget Input option for an input, you can edit the name of the input in the Input field and enable the Required option. In the Default Value column, you can modify the input names by entering a default name or a variable.Note: If the Widget Input option is enabled, the system allows you to enter the inputs in the Widget Configuration window when you add a Widget type tile in the Designer Pane of the Composed EnterpriseOne page. For more information see, Adding and Configuring a Component in Designer Pane in the JD Edwards EnterpriseOne Tools Using and Approving User Defined Objects Guide.
-
In the Outputs section, map the widget output fields to the orchestration output fields by selecting the values from the Orchestration Output drop-down list. You can enter a value or a variable in the Default Value field.
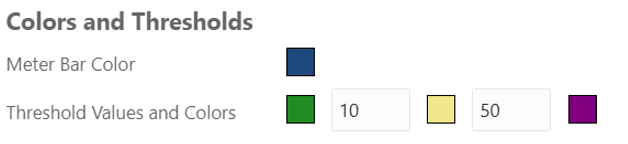
- In the Colors and Thresholds section, click the Square icon next to
the Meter Bar Color field. The Select Color window is displayed. Choose the
color as required from the Select Color window to customize the color of the
meter bar. Similarly, in the Threshold Colors and Values field, you can
click and choose the colors and enter the values to customize the threshold
limit.
In the following example, the Meter Bar Color is set to Blue, and the threshold values are set between 10 and 50. Here, the system displays the threshold color as green up to 10, yellow up to 50, and the rest are displayed in purple in the output meter widget.
-
- Click Save.
-
Click the Preview tab.
In the Widget Inputs section, the system displays the widget input names and their types. If you have selected an input as Required in the Data Source section, the system enables you to enter the input in the Value field. Enter the input and click the Refresh button to refresh the preview. The system displays the preview of the output in the Rendered Widget, Widget Output (JSON), and Orchestration Output (JSON) sections.