Defining the Notification Message
Use the Message section of the Notification design page to define the subject and text of the notification message, to add application and other links, to add attachments and to add a Data Dictionary text item.
Starting with Tools Release 9.2.6.3, you can use the message editor to create a message body to include rich formatting of text enabling you to use typefaces, emphasis, and colors of your choice. You can create layouts for messages that include links and images that are interspersed with text. You can also include tables and formatted content from external sources such as Microsoft Word.
To define a notification message:
Expand the Message section of the notification design page.
Use the Output and Output Type fields to define user options in Subscription Manager. If you specify a Boolean Output Type, subscribers can decide if they want to be notified if the Boolean value is true or false. If the notification is based on a Watchlist, the Output Type is Watchlist Level and cannot be changed; subscribers can decide if they want to be notified for warning, critical, or normal Watchlist levels. See "Adding a New Subscription" in the JD Edwards EnterpriseOne Tools Foundation Guide for more information.
In the Subject field, enter text, variables, or a combination of both. To insert variables, see step 10.
Note:If using only a variable in the Subject field, remember that it is possible the variable could be blank and then the message will have a blank subject. This makes it difficult for a user to open the message, which is done by clicking on the subject, in both the Notification List and Message Center.
Keep in mind that the Work Center only allows 40 characters for the subject. This means that if you create a subject line that is longer than 40 characters and it is delivered to the Work Center, the subject will be truncated.
-
(Release 9.2.6.3) Enable the Plain Text option to include a plain text in the message.
Disable the Plain Text option to add rich formatting to your existing messages. This option is disabled by default for new messages.
-
(Release 9.2.6.3) To format the messages:
- Enter the message in the body field and use the options
such as Paragraph, Bold, Italics, Underline,
Strikethrough, Bulleted and Numbered List, and so on
from the toolbar to format your messages. You can
use the Insert Table and Insert Image options to
insert tables and images.
You can also insert action links within your formatted messages. The link IDs defined for Data Dictionary, Application Links, Other Links, and Report Attachments are displayed in the Placeholder drop-down menu. To add an action link to your message, keep the cursor where you want to insert the placeholder, and click the Placeholder drop-down menu and then select the required action link identifier. Additionally, you can add a horizontal line in your message by clicking the Horizontal Line icon.
Starting with Tools Release 9.2.6.4, you can add a hyperlink to the text in the body of the message. Highlight the relevant text, and then click the Link icon in the toolbar, enter the required address, and click the Save icon.
- To use an existing template, click the Template button,
select the template from the left-hand panel in the
Templates window and place the template at the
position you want by using the Insert at Top,
Insert at Cursor, or Insert at
Bottom buttons. Note: The templates are created using the Work With Media Object Templates(P98TMPL) application.
Starting with Tools Release 9.2.7.4, the following new options are available in the editor:
- Subscript and the Superscript icons to add mathematical formulas. For example, y = x2n + z3n , a1 = a2 + a3, and so on.
- List Properties option in the Numbered List drop-down to change the properties of the numbered list order.
-
Optionally, you can click the Preview button to verify the formatted message. Click the Mobile icon in the Preview window to verify how the message appears on a mobile device.
> quick tour:> learning path: - Enter the message in the body field and use the options
such as Paragraph, Bold, Italics, Underline,
Strikethrough, Bulleted and Numbered List, and so on
from the toolbar to format your messages. You can
use the Insert Table and Insert Image options to
insert tables and images.
To include boilerplate text from a message template in the data dictionary:
Expand the Data Dictionary section.
- If the Plain Text option is disabled, the system
displays the DD Link ID field.
Enter a unique ID in the DD Link ID field and click the Apply button. This data dictionary link ID is displayed in the Placeholder drop-down menu enabling you to add it as a placeholder in your formatted message.
You will not be allowed to change the DD Link ID after you click the Apply button. The system displays an error message if you enter a duplicate ID.
Note:The character limit for the DD Link ID field is 50 and special characters are not allowed in this field except underscore (_).
-
In the Data Dictionary field, enter the name of the message template data item and click Load.
If the message template contains variables, use the grid to override the variables with a default value or a variable.
For each variable used in the message template, a row is added to the adjacent grid.
In the grid, slide the Literal toggle to right to replace the variable in the template with a literal value. Slide the Literal toggle to left to select an existing notification, orchestration, or a watchlist input variable from the drop-down list.
To include a shortcut to an application:
-
In the Application Links section, click Add and expand the section.
To set up task tracking, see Setting Up Task Tracking (Release 9.2.8).
-
If the Plain Text option is disabled, the system displays the Application Link ID field. Enter a unique ID in the Application Link ID field and click the Apply button. This application link ID is displayed in the Placeholder drop-down menu enabling you to add a placeholder in your formatted message.
You will not be allowed to change the Application Link ID after you click the Apply button. The system displays an error message if you enter a duplicate ID.
Note:The character limit for the Application Link ID field is 50 and special characters are not allowed in this field except underscore (_).
In the New Shortcut section, complete the Application, Form, and Version fields to specify the form that you want the shortcut to launch.
-
(Release 9.2.9.3) Enable the Version Variable toggle to pass a notification input or an orchestration output as a version variable. When you enable the Version Variable, the Version field is populated with the list of available Notification Inputs and Orchestration Outputs. Select the specific Notification Input or Orchestration Output you want to pass as a variable version.Note: When you enable the Version Variable toggle, the options for Personal Form, Query, and Watchlist are hidden as they are not supported.
If required, define a personal form, query, or watchlist to be used when the application opens.
If the user receiving the message does not have view access to that particular personal form, query, or watchlist, the application will open without it.
-
If the Plain Text option is enabled, you can see the Pre Text, Link Text, and Post Text fields. Use these fields to define the text that appears before, as, and after the link, respectively, in the message.
If the Plain Text option is disabled, you can see the Link Text field.
In the Link Text field, enter the text you would like to appear in the message for the shortcut. This shortcut text appears in the notification message.
In the grid, you can use variables to pass in data to the application when the application is launched from the shortcut.
Click the Add button in the Application Links section and repeat these steps to include multiple application links in a message.
You can click the Remove button (X) at the end of the New Shortcut section header to delete the application link that is added.
-
To include other links (for example, to launch an orchestration or notification):
In the Other Links section, click Add and expand the section.
To set up task tracking, see Setting Up Task Tracking (Release 9.2.8).
- If the Plain Text option is disabled, the system
displays the Other Link ID field.
Enter a unique ID in the Other Link ID field and click the Apply button. This other link ID is displayed in the Placeholder drop-down menu enabling you to add it as a placeholder in your formatted message.
You will not be allowed to change the Other Link ID after you click the Apply button. The system displays an error message if you enter a duplicate ID.
Note:The character limit for the Other Link ID field is 50 and special characters are not allowed in this field except underscore (_).
Select the type of link you would like to add from the Type drop-down menu. Valid values are Orchestration, Notification, or URL.
Depending on the type you have selected, either select the orchestration name, notification name, or enter the URL.
In the Link Text field, enter the text you would like to appear as link in the message.
This link text appears in the notification message.-
In the Pre Text and Post Text fields, enter the text you want to appear before and after the link text.
The Pre Text and Post Text fields are not displayed if the Plain Text option is disabled.
Use the grid to work with orchestration input, notification input, or a key for the URL, depending on which type of link you are using. In the Value column, you can enter either a variable or a default value as the input.
Click the Add button in the Other Links section and repeat these steps to include multiple links in a message.
You can click the Remove button (X) at the end of the GroupBy section header to delete the links that were added.
To include report output as an attachment:
-
In the Attachments section, click Report Attachments, and then click Add.
- If the Plain Text option is disabled, the system
displays the Report Link ID field.
Enter a unique ID in the Report Link ID field and click the Apply button. This report link ID is displayed in the Placeholder drop-down menu enabling you to add it as a placeholder in your formatted message.
You will not be allowed to change the Report Link ID after you click the Apply button. The system displays an error message if you enter a duplicate ID.
Note:The character limit for the Report Link ID field is 50 and special characters are not allowed in this field except underscore (_).
In the grid, enter Link Text, Job Number, Server, and File Type for the report output that you want to attach. The report output can be generated at this stage by an orchestration or it can be previously generated outside of any orchestrations or notifications. Either standard EnterpriseOne reports or BI Publisher reports can be attachments. You can define the Link Text, Job Number, and Server as variables.
Enable the Send As Link toggle to attach the report as a link in the message.
Click the Add button in the Attachments section and repeat these steps to include multiple attachments in a message.
Click the Remove button (X) at the end of the each row in the grid to delete the reports that were added.
-
To include variables in the subject, body, message template text, or shortcut:
Type ${var name} where var name is the name of the variable that you want to include.
Make sure the syntax includes the $ sign and brackets, for example:
${creditmanager}
The variable will be substituted into the message when the notification is sent. The variable can come from any of these places:
Any input you define for the notification
Watchlists return a set of output that you can use as variables. You can see them by pressing the Test button with the Dispatch Notification switch off. For example, if you want to include the number of Watchlist records in your message you could include this sentence:
"There are ${records} records in this Watchlist."
Orchestrations also return outputs, which you can define when you create the orchestration. You can see them by pressing the Test button with the Dispatch Notification switch off.
-
(Release 9.2.6) To include an EnterpriseOne attachment (media object) in a message:
-
In the Attachments section, click File Attachments, and then click Add.
-
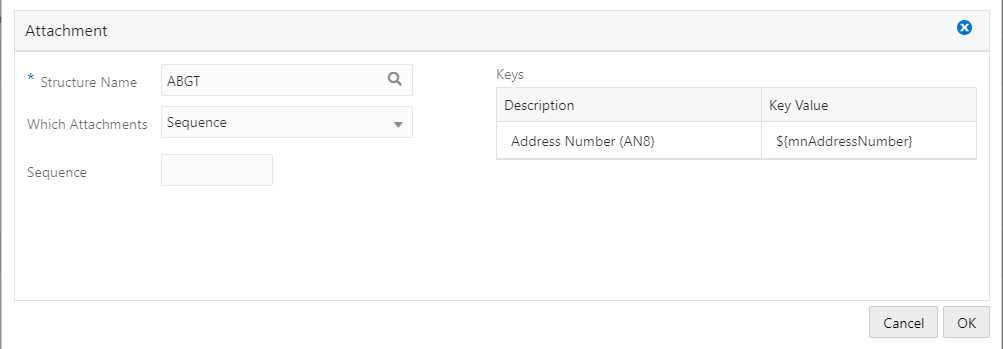
In the File Attachment window, click the Search icon next to the Structure Name field, and then search for and select the required value.
Depending on the value in the Structure Name field, the values in the Description and Key Value fields are automatically populated in the Keys table. You may delete the automatically populated variable value in the Key Value field and enter a literal value.
-
Click the Which Attachments drop-down menu and select the required option. The available options are:
-
All: Choose this option to select all the attachments present in the structure.
Sequence: Select this option to specify the sequence number of the attachment present in the structure. The Sequence field is displayed when you select this option. In the Sequence field, enter a sequence number or a sequence number variable.
-
Default Image: Choose this option to select the default image attachment.
-
First: Choose this option to select the first attachment present in the structure.
The Attachment Type drop-down menu is displayed when you select this option. From the Attachment Type drop-down menu, select any of these options as required:
Note: JD Edwards EnterpriseOne supports these attachment types: File Attachment, Text Attachment, and URL Attachment.-
File : Choose this option to select the first file attachment.
File Extension: Choose this option to filter the first attachment by extension. The File Extension drop-down menu is displayed when you select this option and you can enter the required extension type. For example, if you enter
.pdf, the first PDF file is added as an attachment in the message.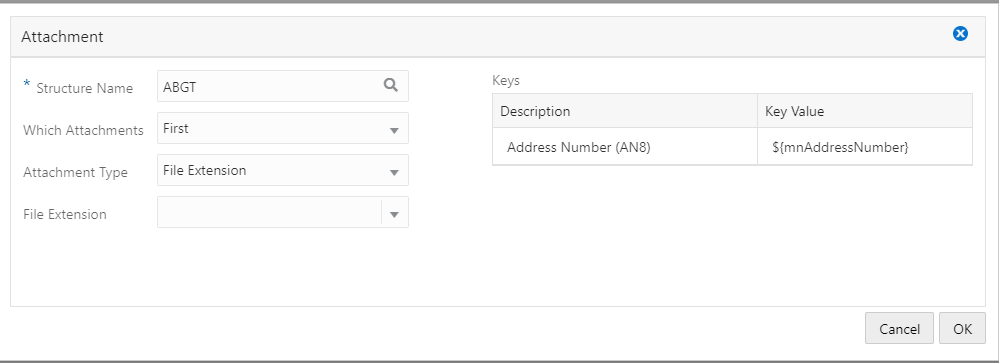
-
Image: Choose this option to select the first image attachment.
-
Text: Choose this option to select the first text attachment.
-
URL: Choose this option to select the first URL attachment.
-
-
Last: Choose this option to select the last attachment in the structure.
The Attachment Type drop-down menu is displayed when you select this option. From the Attachment Type drop-down menu, select any of these options:
-
File : Choose this option to select the last file attachment.
-
File Extension: Choose this option to select the last attachment by extension. The File Extension drop-down menu is displayed when you select this option and you can enter the required extension type. For example, if you enter
.pdf, the last PDF file in the structure is added as an attachment in the message. -
Image: Choose this option to select the last image attachment.
-
Text: Choose this option to select the last text attachment.
-
URL: Choose this option to select the last URL attachment.
-
-
All of Type: Choose this option to select all the attachments of a particular type to the message.
The Attachment Type drop-down menu is displayed when you select this option. From the Attachment Type drop-down menu, select any of these options:
-
File : Choose this option to select all the file attachments present in the structure.
-
File Extension: Choose this option to select the attachments by extension. The File Extension drop-down menu is displayed when you select this option and you can enter the required extension type. For example, if you enter
.pdf, all PDF files in the structure are added as attachments in the message. -
Image: Choose this option to select all the image attachments.
-
Text: Choose this option to select all the text attachments.
-
URL: Choose this option to select all the URL attachments.
-
-
- Click OK.
-
Click Save to save your changes.