Working with Scheduler
Using the Scheduler user interface you can perform the following:
Use the Start selected
 button to start anto start an individual or multiple notification and
orchestration jobs that you have selected. The Start selected button is enabled
only when you select a job from the notification and orchestration jobs list.
button to start anto start an individual or multiple notification and
orchestration jobs that you have selected. The Start selected button is enabled
only when you select a job from the notification and orchestration jobs list.
When you click the button, the selected jobs are started and the Scheduler user interface displays the following information in a dialog box:
Jobs Selected. Displays the number of jobs that are selected.
Jobs Started. Displays the number of jobs that have been started.
Jobs in Error. Displays the number of jobs that have errors or were not started.
Already Started. Displays the number of jobs that are already running among the selected jobs.
Alternatively, you can start an individual job by enabling the Start/Stop toggle in the Started column located in each row.
Use the Stop selected
 button to stop an individual or multiple notification and orchestration
jobs that you have selected. The Stop selected button is enabled only when you
select a job from the notification and orchestration jobs list.
button to stop an individual or multiple notification and orchestration
jobs that you have selected. The Stop selected button is enabled only when you
select a job from the notification and orchestration jobs list. When you click the button, the selected jobs are stopped and the Scheduler user interface displays the following information in a dialog box:
Jobs Selected. Displays the number of jobs that are selected.
Jobs Stopped. Displays the number of jobs that have been stopped.
Jobs in Error. Displays the number of jobs that have errors or were not stopped.
Already Stopped. Displays the number of jobs that are already stopped among the selected jobs.

Alternatively, you can stop an individual job by enabling the Start/Stop toggle in the Started column located in each row.
In the following example, the user is currently logged in as JDE, so the JDE user can access all the jobs that have JDE as the value in the User column. The JDE user can start the highlighted job by sliding the "Click to start job" toggle to the right. As the "Demo Get Item Availability" job also has JDE as the user, by sliding the toggle to left the user can stop the job.
The rest of the jobs in this example are disabled because these jobs have LK as the value in the User column. The toggle in the Running column indicates that the job is already running.
 Note:
Note:You can start only those jobs that are created by the currently logged-in user using the current environment, and the current role that the user is logged-in as. You can stop all the jobs that are created by the currently logged-in user. For the rest of the jobs, the Start/Stop toggle is disabled.
Use the Started column to view the status of the notification and orchestration jobs for which you have access.
Select one of the following values from the Started drop-down menu:
All. To view all the notification and orchestration jobs.
Started. To view only those notification and orchestration jobs that are currently being executed. This is the default option in the Started drop-down list.
Stopped. To view only those notification and orchestration jobs that are currently stopped.
Use the Type column to filter the notification and orchestration jobs. The icon in the column indicates if the job is an orchestration
 or a notification
  .
. You can click the notification or orchestration icon to open the corresponding notification or orchestration. To navigate back to the Scheduler user interface from the notification design page or orchestration, click the Scheduler link in the location link displayed at the top of page.
Select one of the following values from the Type drop-down menu:
All. To view all the notifications and orchestrations.
Notifications. To view only the notification jobs.
Orchestrations. To view only the orchestration jobs.
Use the Product Code column to view the product code that was associated with the notification or orchestration when it was created. The Product Code drop-down menu displays all the product codes for the notifications and the orchestrations in the table.
Selecting a product code from the drop-down menu displays only the associated notifications and orchestrations.
Use the Notification/Orchestration Name column to view the name of the notification and orchestration. When you click the notification or orchestration name, the corresponding description is displayed.
Use the Filter field to look for specific notifications or orchestrations. Use the Notification/ Orchestration Name sort button to sort the jobs in ascending or descending order of the notifications and orchestrations names.
Enable the Auto Start toggle to designate a notification or an orchestration job to automatically start whenever the Scheduler server is started. For information on the autostart job records, see Scheduler Autostart Jobs Manager.
Note:Enabling the Auto Start toggle does not start a job, but only designates the job to be started automatically whenever the Scheduler server is started. Use the Started toggle to start an individual job.
Use the Schedule Name column to view the name of the schedule when a notification or an orchestration has an attached schedule. When you click the schedule name, its corresponding description is displayed.
Select one of the following values from the Schedule Name drop-down menu:
All. To view all the notification and orchestration jobs.
Schedule. To view only those notification and orchestration jobs that have a schedule attached. This is the default option in the Schedule Name drop-down list.
No schedule. To view only those notification and orchestration jobs that do not have any attached schedule.
Note:When you select the No Schedule option for the Schedule Name column, you have to select the All option for the Started column to view the jobs in the list.
Click the Info icon to view the information about the job. When you click the Info icon, a dialog box appears displaying two sets of information: scheduled job information and health monitor.
Scheduled Job Information:
Displays the following data for the selected job that is associated with a specific user, environment, and role:
Notification or Orchestration Name
Notification or Orchestration ID
UDO Group
Last Run
Last Run Duration
Next Run
Total Runs
Schedule Name
Schedule ID
Interval
Consecutive Errors
% Errors
Total Errors
For the jobs that are not executing currently, only the Notification or Orchestration Name and ID, Schedule ID, and Interval information are displayed.
Health Monitor:
Displays high-level information about the performance of the selected job. A bar-chart shows up to the last 10 instances that the job was executed, with each bar representing a single instance. The instances are listed earliest to latest, from left to right. A red bar indicates a failure. A green bar indicates a success. The height of each bar indicates the time taken to process the job. Move your cursor over each bar to see the date and time when the job was executed and the time in seconds taken to complete processing the job.
For more information, see "Orchestrator Health and Exception Monitoring" in the JD Edwards EnterpriseOne Tools Orchestrator Guide.
The information that is displayed in the bar-chart for a job is based on the name of the notification or orchestration regardless of the user, environment, and role values.
As shown in the following example, the Scheduled Job Information section displays the information only for the highlighted job with respect to the specific user, environment, and role. In the Health Monitor section, each bar in the chart could be for any of the instances of the job with the notification name "Demo_Sold to Capital System RAP with Overrides" regardless of the user, environment, or role values.
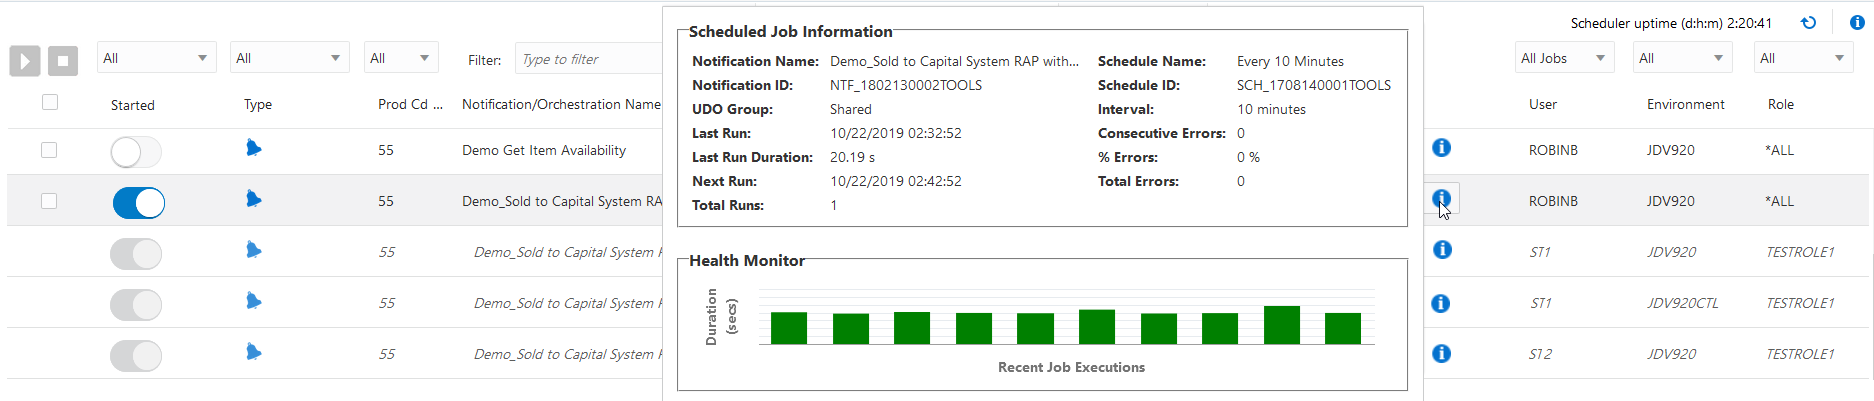
The Info icon indicates an error when the icon is displayed in red.
Use the User, Environment, and Role columns to view the user, environment, and roles information for the jobs.
User
The user who created the orchestration or notification. In the case of jobs that are currently executing, the User, Environment, and Role columns display the user who started the job.
Environment
The environment that the user who created the orchestration or notification is signed in to. The environments listed in this column are the environments that are available on the JAS server that is connected to the current AIS server. Therefore, if you log in to a different AIS server, the environments are listed based on the environments that are supported on the JAS server for that AIS server.
Role
The role of the user who created the orchestration or notification.
Use the drop-down menus to filter the jobs based on user, environment, and role. The user who is currently logged in will not be able to select, start, or stop the jobs that have been created by another user.
When you have jobs with the same notification or orchestration name running multiple times based on different user, environment, and role combinations, the Scheduler user interface lists the job that is associated with the currently logged-in user, the currently used environment, and current role of this user, as the primary record.
Next, the jobs that are associated with the currently logged-in user but created in different environments and through other roles are displayed. Followed by the jobs with the same notification or orchestration name, but associated with different user, environment, and role values. These instances of the job with the same name are displayed in italics.
The Orchestrator Studio preserves the options that are selected for the drop-down menus in the Scheduler user interface. The next time you log in, the Scheduler user interface will display the jobs according to the selection made in the previous session.
For the User drop-down list, only the All Jobs and My Jobs options are preserved.
When you filter a job based on a Role or an Environment, the system preserves the filter values. However, if the next time you log in and no data exists for that selection (for example, you filtered based on a role that no longer has any jobs that are currently executing), the drop-down menu will display the value All.