Configuring a Custom Service Request with Groovy (Advanced)
You can create a service request that uses Groovy scripting to execute a custom process or to route data into another database. To use Groovy for a service request, the Orchestrator Studio provides an edit area that contains a sample Groovy script with instructions on how to modify the script. You can use the Find and "Go to Line" fields and Undo and Redo buttons to work with the script. Using Apache Groovy for Custom Service Requests, Rules, and Manipulating Output (Orchestrator Studio 5.1.0 and Higher) provides information on how to work with the sample Groovy script.
To configure a customer service request with Groovy:
After naming the custom service request as described in Creating a Service Request, select the Groovy option.
Configure the script to perform the desired action.
In the "Input" grid, enter the names of the inputs.
The inputs will be placed in the inputMap of the "main" function and can be retrieved in the script by following the commented out example code.
Click the Load Outputs button.
This reads the script and adds any values added to the returnMap in the script to the Output grid.
(Optional) In the "Output" grid, enter a variable name for an output if you want to use the output value in a subsequent orchestration step.
When you add this service request to an orchestration, this name appears in the orchestration inputs grid, which makes the returned value available for mapping to subsequent steps in the orchestration.
Note: Even if no variables are used, all defined outputs are available for mapping using the Orchestration Output feature. See Working with Orchestration Output for more information.To test the script:
Enter a value in the Test Value column for one or more inputs.
Click the Test button.
Orchestrator Studio executes the script using the inputs you entered. If successful, it populates the results in the Test Output column of the Output grid.
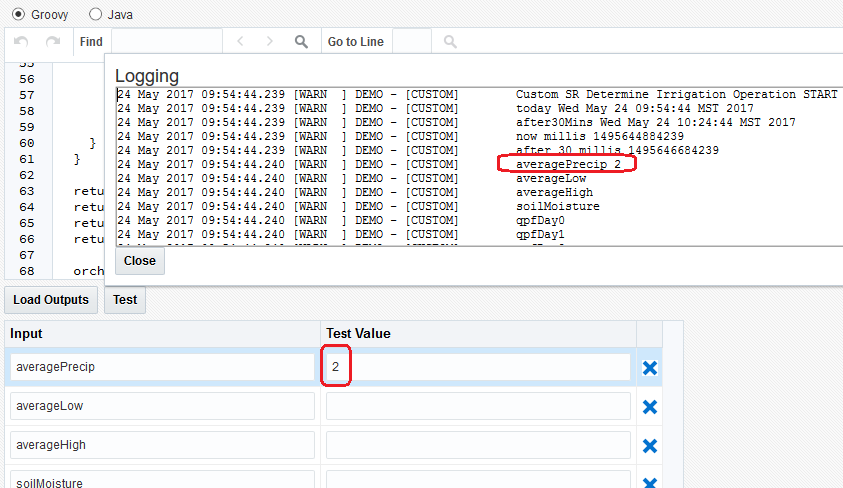
If you included orchAttr.writeWarn or orchAttr.writeDebug statements in the script, a Logging popup displays after execution. At runtime, log statements are included in the AIS Server log, which can be used for debugging script issues.
The following example shows the Logging popup, which you can use to verify the values passed to the inputs:

Click the Save button.
The Orchestrator Studio saves the custom Groovy service request. You can then access the orchestration in the Orchestration design page and add this custom Groovy service request as a step in the orchestration.