Using
Files As Orchestration Input and Output
Using
Files As Orchestration Input and Output  Before You Begin
This 45-minute tutorial shows how to create an orchestration that receives a CSV file as input, parses it, and uses a form request to insert records to JD Edwards EnterpriseOne. Additionally, you will learn how to create another orchestration that builds a CSV file of the records that were added and returns that as the output of the orchestration.
In this tutorial you will:
- Record the sales order creating process using the process recorder.
- Define an orchestration to receive multiple CSV files and additionally set a condition of receiving one file for each order.
- Add a custom step to read the file, create an object with the order rows, and pass the object to a form request to add the records. (The script is provided in this OBE.)
- Create another orchestration that fetches the new records, generates a CSV file, and returns the file as the output.
Background
Starting with Tools Release 9.2.6, you can define orchestrations to receive files as input or return files as output. You can perform several operations by using a file received as input to an orchestration, such as uploading the file as an attachment in JD Edwards EnterpriseOne, parsing the file by using a script, and using the data received.
Using a file received as an output, you can return a file
fetched from an FTP site, return a file fetched from
EnterpriseOne attachments, or generate a file in a script and
return it. To call an orchestration that has file inputs, you
must use the HTTP multipart/form-data type
request, and to receive an output from an orchestration, you
must use the application/octet-stream in the accept header of
the HTTP request.
 Recording
the Sales Order Creation Process
Recording
the Sales Order Creation Process
Note: This task relies on EnterpriseOne demo data. You can use other data available in your system to enter a sales order to perform this task. You must have Process Recorder access, which is enabled through user-defined object (UDO) Feature Security and Action Security.
- Sign in to the EnterpriseOne web client. You can access the EnterpriseOne web client from the Orchestrator Studio home page or from the Tools drop-down menu on any of the pages.
- On the EnterpriseOne page, click the drop-down menu next to your user name and select Record a Process.
- In the Process Recorder window, click the Start button.
- Access the Sales Order Entry (P42101) application from the Fast Path or open the application from the Navigator menu.
- Click Add.
- Complete these header fields:
- Sold To = 4243
- Ship To = 4243
- Branch/Plant = 30
- Enter these values in the grid:
-
Line 1
- Quantity Ordered = 1
- Item Number = 210
-
Line 2
- Quantity Ordered = 1
- Item Number = 220
- Click Submit and Close.
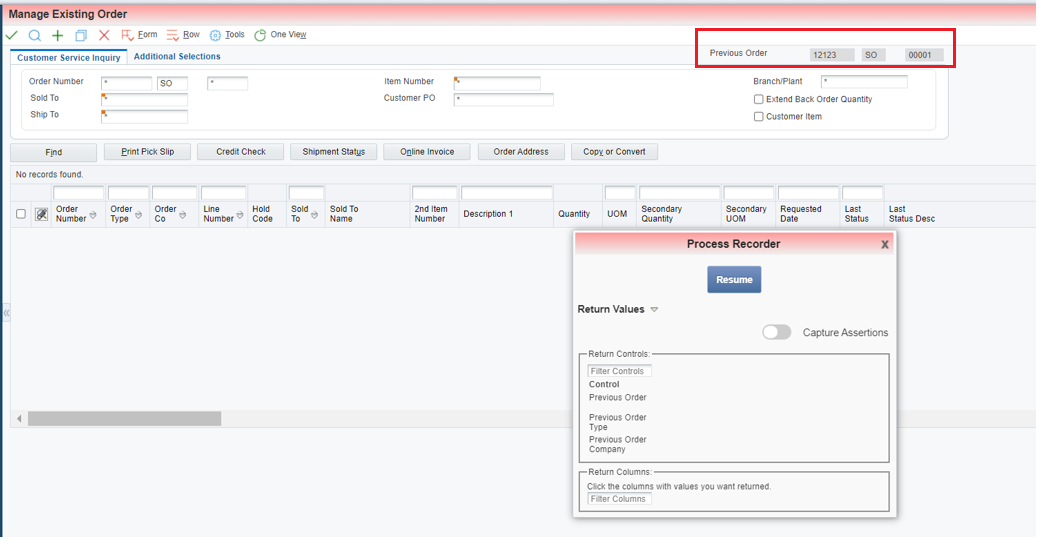
- Click Return Values in the Process Recorder window.
- Click Previous Order Number, Previous Order Type,
and Previous Order Company.
Note: You might have to move the Process Recorder window to see these fields. Click and drag the title bar to move it. - Click Resume in the Process Recorder window.
- Click Stop in the Process Recorder window
and enter a name:
Name = SO Entry - Click Save.
- Click Close to close the Process Recorder window.
 Creating
an Orchestration Using the Form Request
Creating
an Orchestration Using the Form Request
In this task, you will understand how to create an orchestration that performs order entry in JD Edwards EnterpriseOne. The orchestration created in this section will be used by the orchestration that receives the CSV file as an input explained in the section Creating an Orchestration to Accept the CSV Files as Input to Create Sales Orders.
- Log in to Orchestrator Studio.
- Click Form Requests.
- Select the SO Entry form request in the left panel.
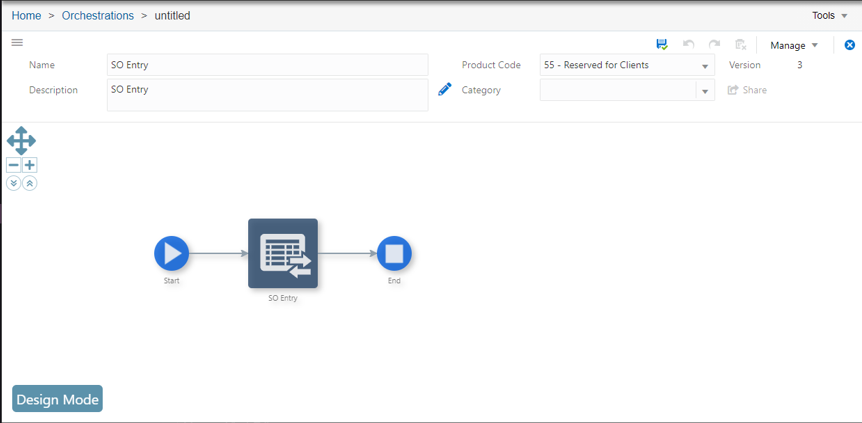
- From the Manage menu, select Create Orchestration.
The system creates an orchestration with inputs, transformations, and outputs to call the form service request. - Verify the orchestration.
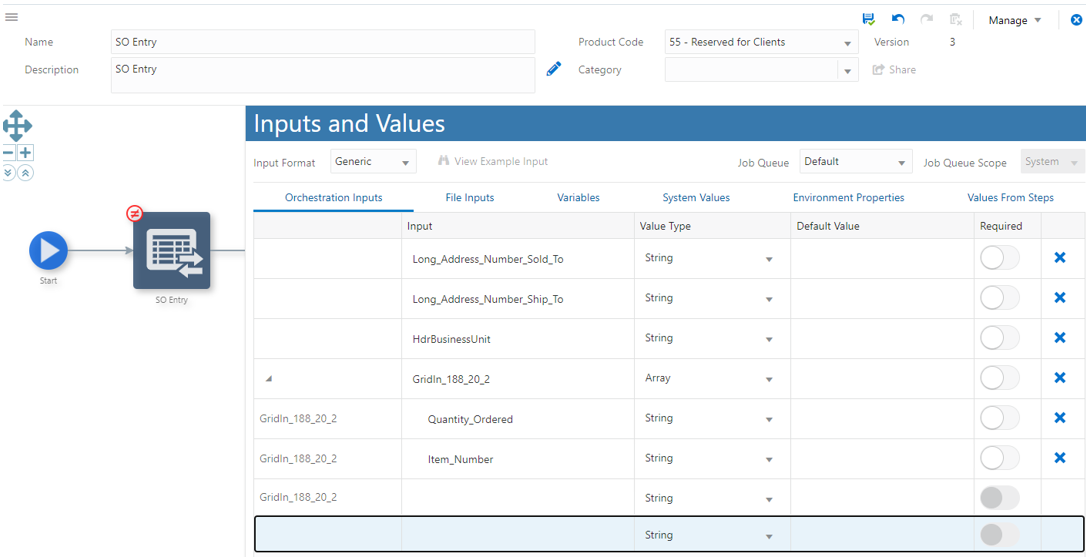
- Click the Start icon, and then click the Inputs and Values icon.
- In the Inputs and Values window, verify the inputs, and
click the Delete icon (X)
to delete
P42101_Version. - Click anywhere outside the Inputs and Values window to close the window.
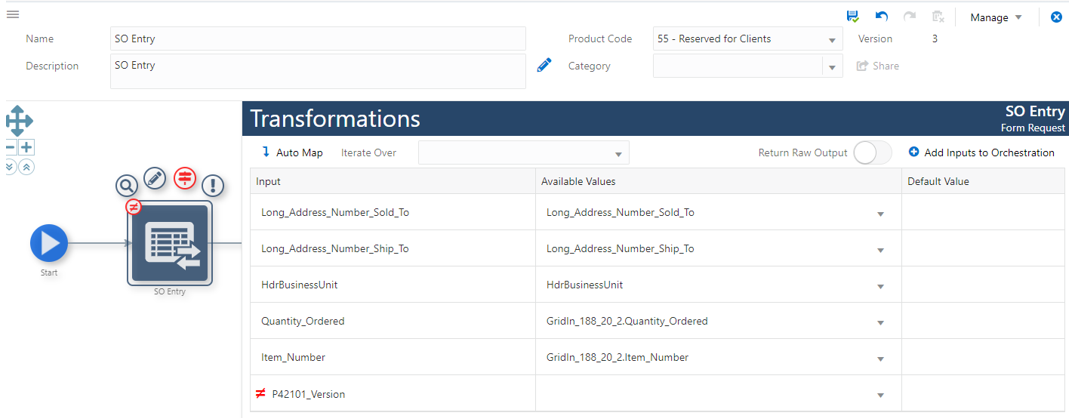
- Click the SO Entry form request and click
the Transformations icon. Verify the
transformations and click outside the Transformations window
to close it.
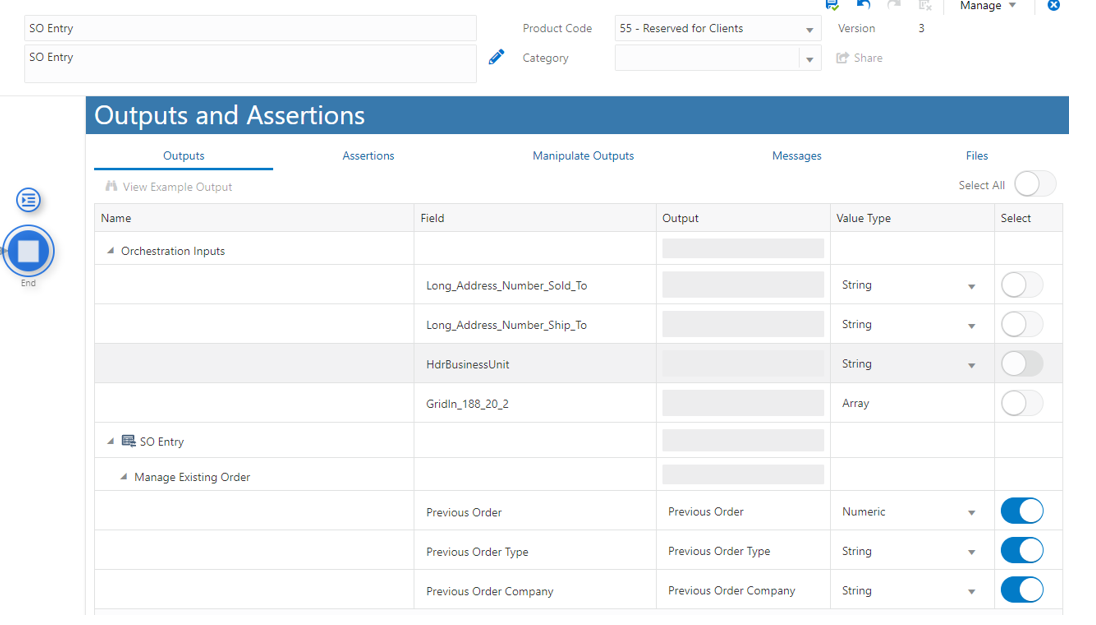
Note: The transformation for P42101_Version is invalid because you removed it as an orchestration input. That's OK. It will correct itself when you save the orchestration. - Click the End icon and click the
Outputs and Assertions icon.|
Verify the outputs and make sure that Select option is enabled for Previous Order, Previous Order Type, and Previous Order Company outputs. - Click Save. (The system saves the orchestration automatically with the name So Entry).
- Click the Start icon and click Run Orchestration.
- Click the Raw button and enter the following input to create the same order entered during the recording:
- Click Run. You should see a new order created.
- Click the Close icon.
- To verify the newly created order in JD Edwards EnterpriseOne, click the Tools menu and click JD Edwards EnterpriseOne.
- Access the Sales Order Entry (P42101) application using the Fast Path or open the application from the Navigator menu. Verify the newly created order.
{

                  "Long_Address_Number_Sold_To": "4243",

                  "Long_Address_Number_Ship_To": "4243",

                  "HdrBusinessUnit": "30",

                  "GridIn_188_20_2": [

                  {

                    "Quantity_Ordered": "1",

                    "Item_Number": "210"

                  },

                  {

                    "Quantity_Ordered": "1",

                    "Item_Number": "220"

                  }

                  ]

                  }


 Creating
an Orchestration to Accept the CSV Files as Input to Create
Sales Orders
Creating
an Orchestration to Accept the CSV Files as Input to Create
Sales Orders
In this task, you will understand how to create an orchestration that receives any number of CSV files (with order details for one order in each file) as input and then uses the orchestration created in the ”Creating an Orchestration to Add Sales Orders” section to add each order to JD Edwards EnterpriseOne.
Note:
In order to read the data from the input CSV file, parse it, and create sales orders you will need to use a custom step with a JRuby script. This tutorial is not focused on coding in JRuby, so you can simply copy and paste the script that is provided.
Creating Two CSV Files Using the Test Data
- To create a CSV file with one row of test values, copy the
following lines into any text editor and save the file with a
.csv extension:
Note:To ensure that the text is converted into a valid CSV file, enter the headers in one line which is followed by a new line, and enter all the values in the subsequent rows.
- Save the file as SODetail.csv.
- Similarly, create another CSV file with this data:
- Save the file as SODetail2.csv.
                  Long_Address_Number_Sold_To,Long_Address_Number_Ship_To,HdrBusinessUnit,Quantity_Ordered,Item_Number
                  4242,4242,30,1,210

                  4242,4242,30,3,220

                  4242,4242,30,2,230
Long_Address_Number_Sold_To,Long_Address_Number_Ship_To,HdrBusinessUnit,Quantity_Ordered,Item_Number
                  4243,4243,30,1,210


                  4243,4243,30,2,220
Creating the Orchestration to Receive the CSV Files as Input
- In the Orchestrator Studio home page, click Orchestrations.
- Click New.
- In the Name field, enter
EnterSOCSV. - Click the Start icon and click Inputs and Values.
- Select the File Inputs tab and perform
these steps:
- Select the Process Files As An Array option.
- Enable the Overwrite Existing Files option.
- In the File Array Name field, enter
CSVArray.
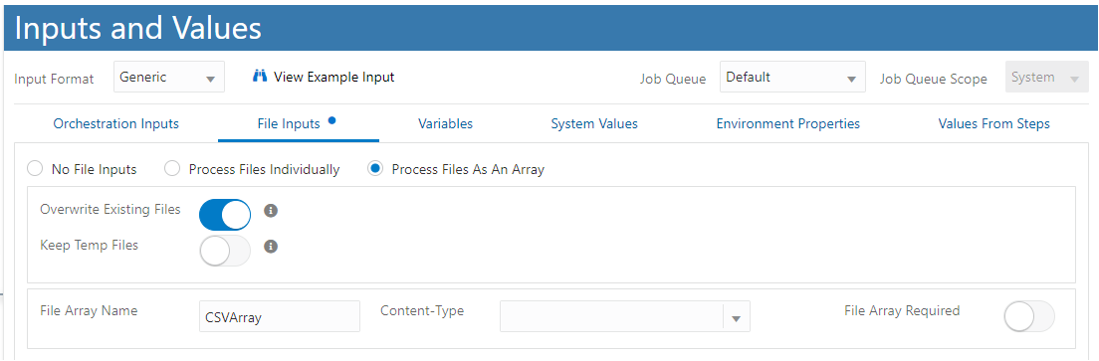
Inputs and Values Window - Click Save to save the orchestration.
- Click Design Mode.
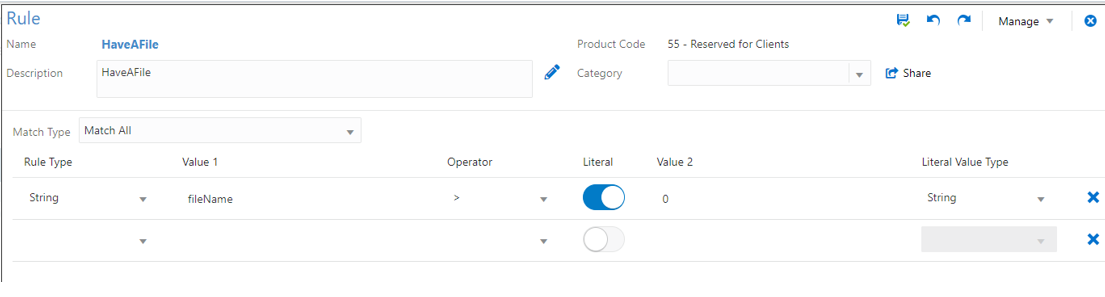
- Click the + icon between the Start and End icons, and select Rule.
- Click New and select Standard. This rule will be used to iterate over the incoming set of files.
- Enter
HaveAFilein the Name field. - Select Match All from the Match Type drop-down menu.
- Select String from the Rule Type drop-down menu.
- Enter
fileNamein the Value 1 field. - From the Operator drop-down menu, select
>. - Enable the Literal option.
- Enter
0in the Value 2 field. - Select String from the Literal Value Type
drop-down menu.
This rule compares an input string calledfileNameand checks if it is greater than 0. - Click Save and then click the Close icon.
- Click the HaveAFile rule and click the Transformations icon, and then from the Iterate Over drop-down menu, select CSVArray.
- Select CSVArray.fileName from the Available Values drop-down menu for the fileName input.
- Click Save.
- Click Design Mode.
- Click the + icon on the True path, select
Custom, click New, and then
select Script to add a new script.
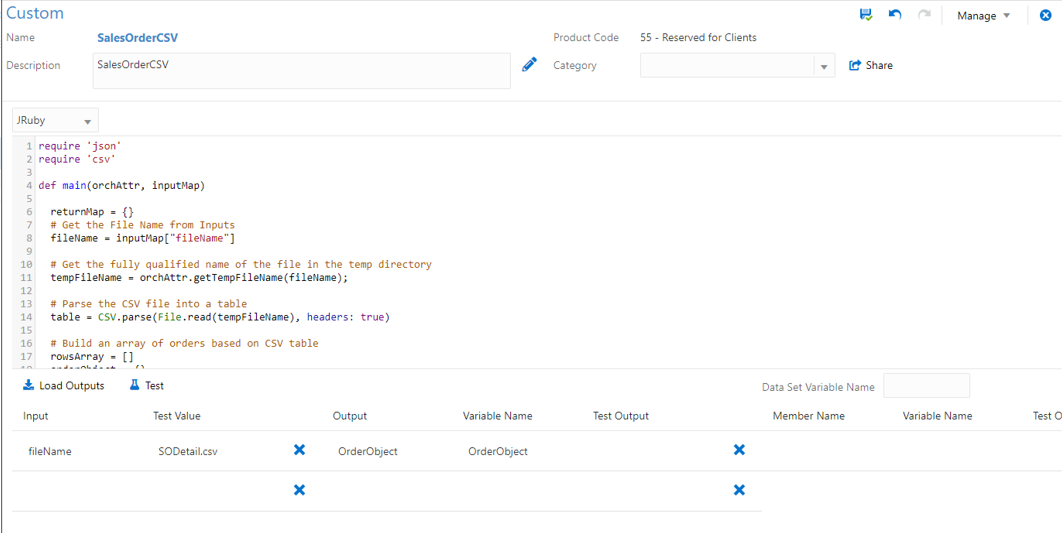
The script entered in this rule will use each file and create a JSON object to pass into the SO Entry orchestration. - In the Name and Description fields, enter
SalesOrderCSV. - Select JRuby as the language from the drop-down menu.
- Enter
fileNamein the input field. - Enter
SODetail.csvin the Test Value field. - Enter
OrderObjectin both the Outputs field and the Variable Name field. - Replace the entire contents of the code field with the following script:
- Verify that your custom step is displayed as shown in the following screenshot:
- Click Save and then click Close.
- Click the SalesOrderCSV step in the orchestration and click the Transformations icon.
- In the Transformations window, select
CSVArray.fileNamefrom the Available Values drop-down menu. - Click Save.
- Click the Design Mode.
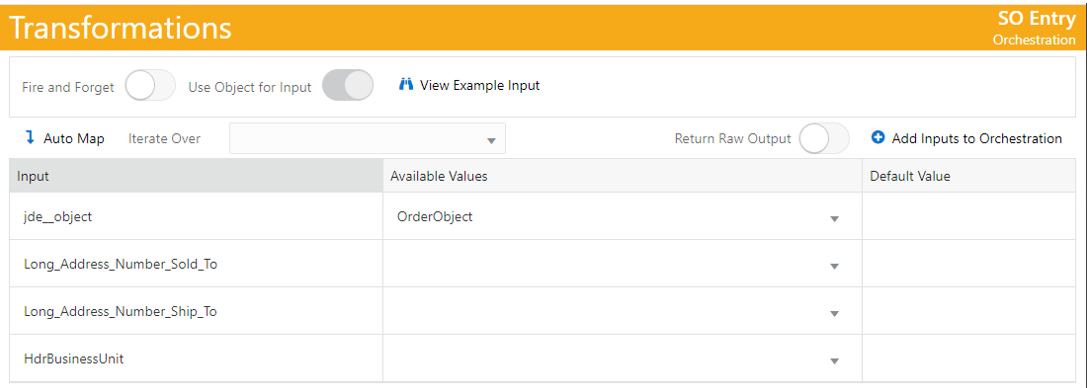
- Click the + icon on the line after the SalesOrderCSV step, select Orchestration, and then select the SO Entry orchestration.
- Click the SO Entry orchestration and then click the Transformations icon.
- From the Available Values drop-down menu, select OrderObject
for jde_object input
as shown in the following screenshot: - Click Save.
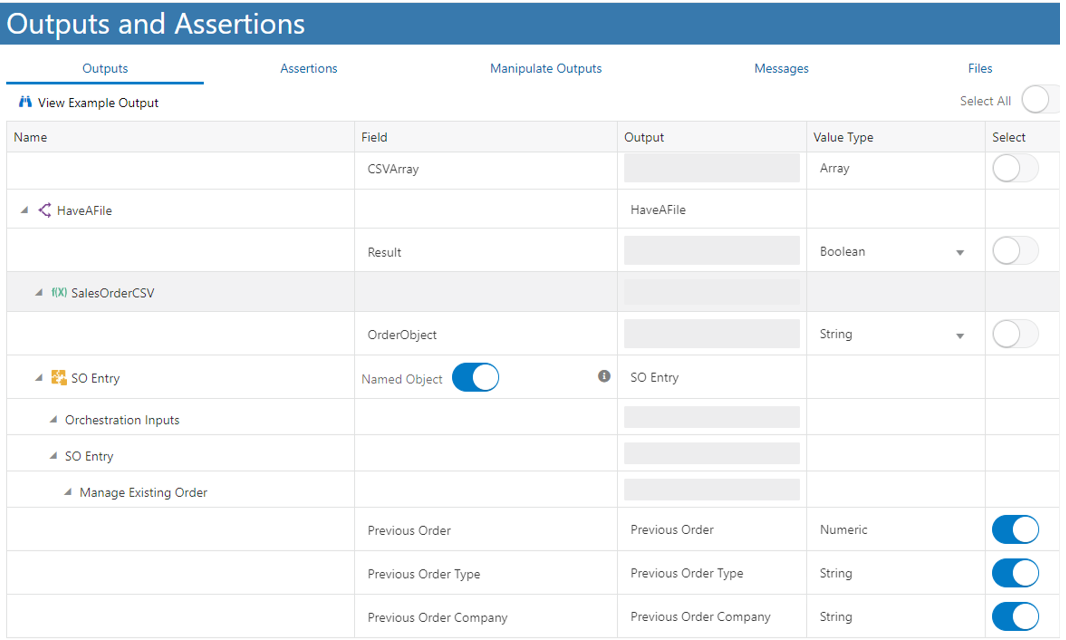
- Click the End icon and click Outputs and Assertions.
- In the Outputs and Assertions window, enable the Named Object option for SO Entry and enable the Select option for the Previous Order, Previous Order Type, and Previous Order Company output values.
- Save the orchestration.
- Click the Start icon and click Run Orchestration.
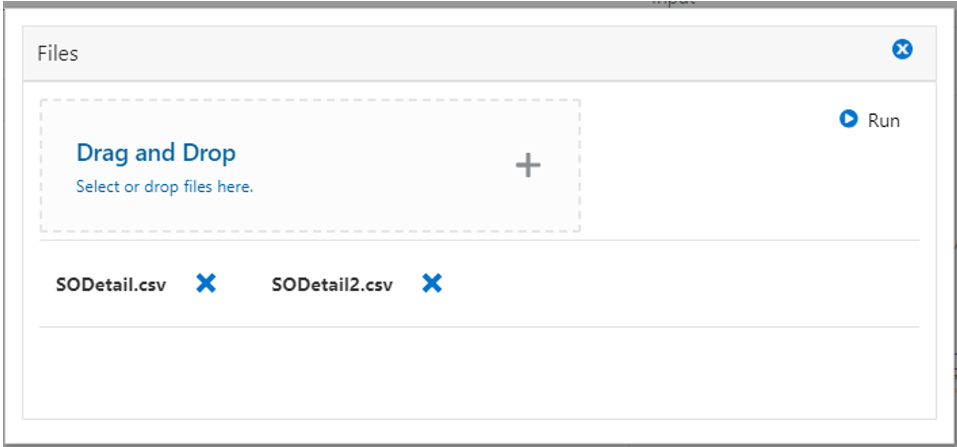
- Click the Files(0) button. The Files button is available for the orchestrations that have file inputs defined.
- In the Files window, browse and select, or drag and drop the SODetail.csv and SODetail2.csv files.
- Click Run.
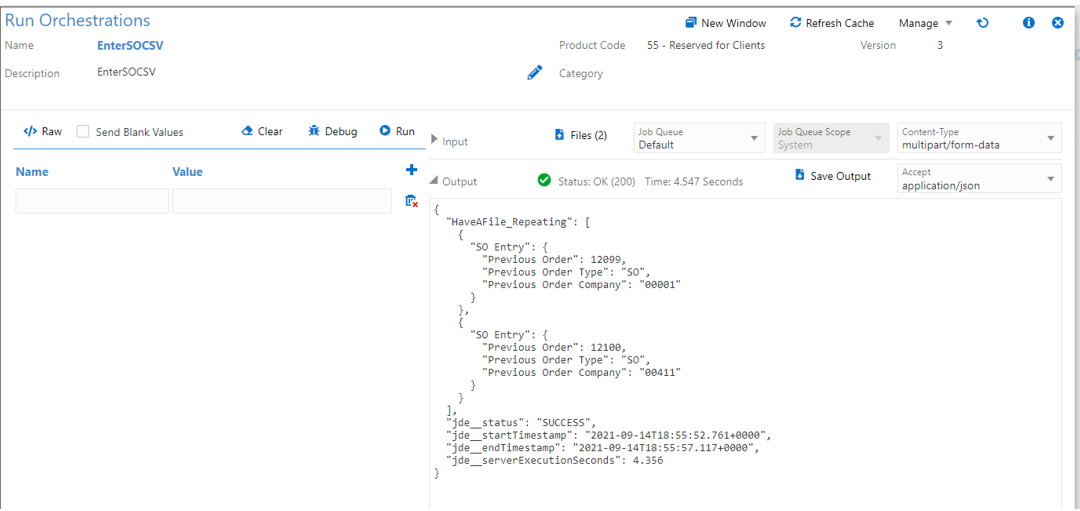
- Verify that the output is as shown in the following
screenshot. The orchestration result should contain details
about the two orders that were created (one order is created
from each .csv file).
Make a note of the two sales order numbers that were created. - Click the Close button.
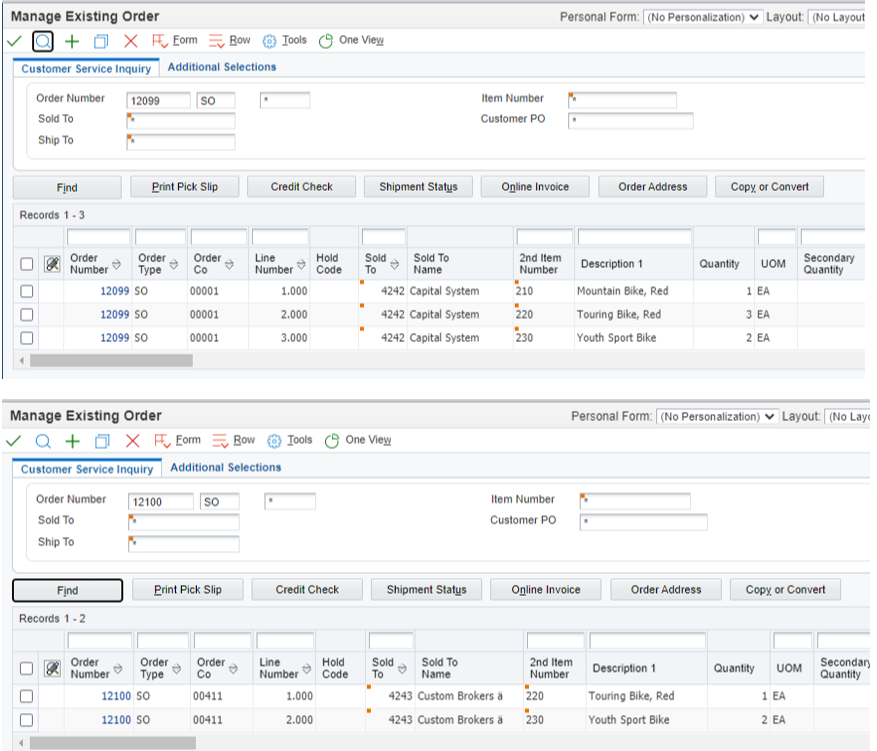
- To verify the results in JD Edwards EnterpriseOne, click the Tools menu and click JD Edwards EnterpriseOne.
- Log in to JD Edwards EnterpriseOne and access the Sales Order Entry (P42101) application from the Fast Path or open the application from the Navigator menu.
- Search the order numbers and verify that the order details match the details in each CSV file.

 require 'json'

                    require 'csv'


                    def main(orchAttr, inputMap)


                       returnMap = {}

                       # Get the File Name from Inputs

                       fileName = inputMap["fileName"]


                       # Get the fully qualified name of the file in
                    the temp directory

                       tempFileName =
                    orchAttr.getTempFileName(fileName);


                       # Parse the CSV file into a table

                       table = CSV.parse(File.read(tempFileName),
                    headers: true)


                       # Build an array of orders based on CSV table

                       rowsArray = []

                       orderObject = {}


                       orderObject["Long_Address_Number_Sold_To"] =

                       table[0] ["Long_Address_Number_Sold_To"]

                       orderObject["Long_Address_Number_Ship_To"] =

                       table[0]["Long_Address_Number_Ship_To"]

                       orderObject["HdrBusinessUnit"] =
                    table[0]["HdrBusinessUnit"]


                       table.each do |row|

                           #create row

                       hash =
                    {"Quantity_Ordered":row['Quantity_Ordered'],
                    "Item_Number":row['Item_Number']}

                        rowsArray  << hash

                       end

                    #put the rows in the grid order

                    orderObject["GridIn_188_20_2"] = rowsArray


                    # return the order, in a JSON object

                    returnMap["OrderObject"] = JSON.generate(orderObject)


                    return returnMap

                    end


 Creating
an Orchestration to Generate CSV Files and Return Them As
Orchestration Output
Creating
an Orchestration to Generate CSV Files and Return Them As
Orchestration Output
In this task, you will define an orchestration that fetches records from JD Edwards EnterpriseOne, generates a CSV file, and returns the file as the orchestration output.
Prerequisites
You must have orders available in the database to return them in the CSV file.
- In the Orchestrator Studio home page, select Data Requests.
- Click New and in the Name field, enter
F4211
                    Orders Today
. - Enter the table name
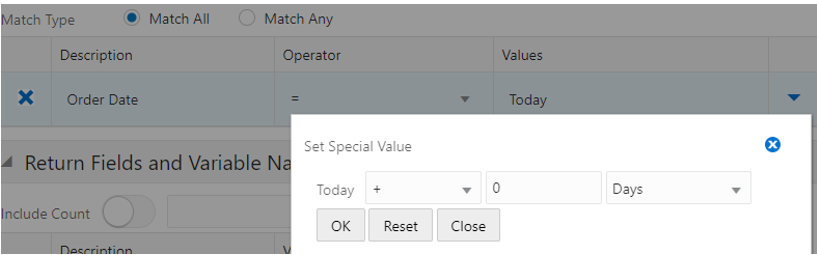
F4211and click Load. - Find the Order Date field and click the Filter icon.
- In the Filter Criteria section, click the drop-down button in the Values field and select Today, and then click OK in the Set Special Value window.
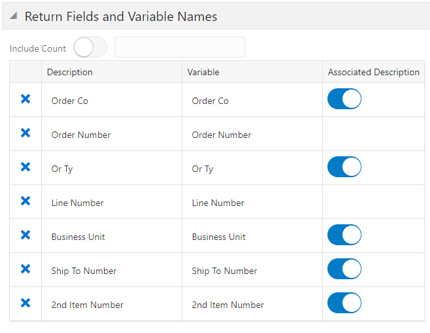
- In the left side panel, click the Return icon next to these fields: Order Co, Order Number, Or Ty, Line Number, Business Unit, Ship to Number, and 2nd Item Number.
- Verify that all the fields are displayed in the Return Fields and Variable Names section and enable the Associated Description option for the Order Co, Or Ty, Business Unit, Ship To Number, and 2nd Item Number fields.
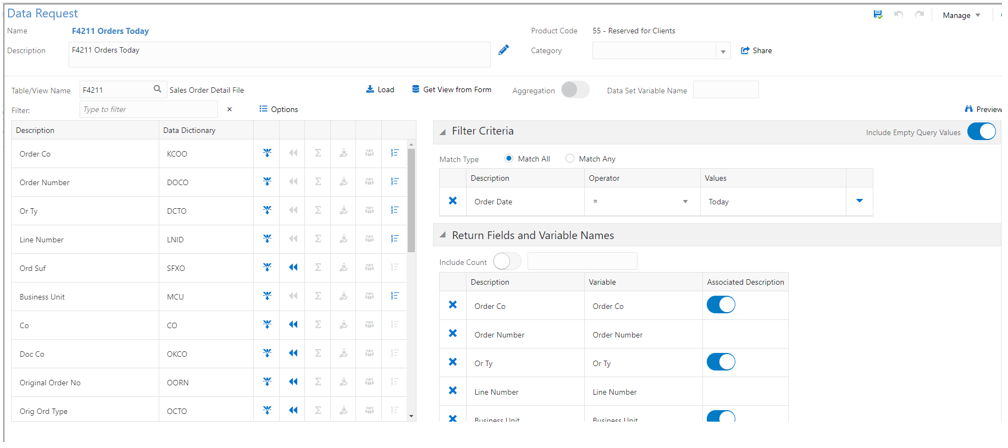
- Verify that the Data Request page is similar to the following screenshot. Click Save.
- From the Manage menu, click Create Orchestration.
- Click Save to save the resulting orchestration.
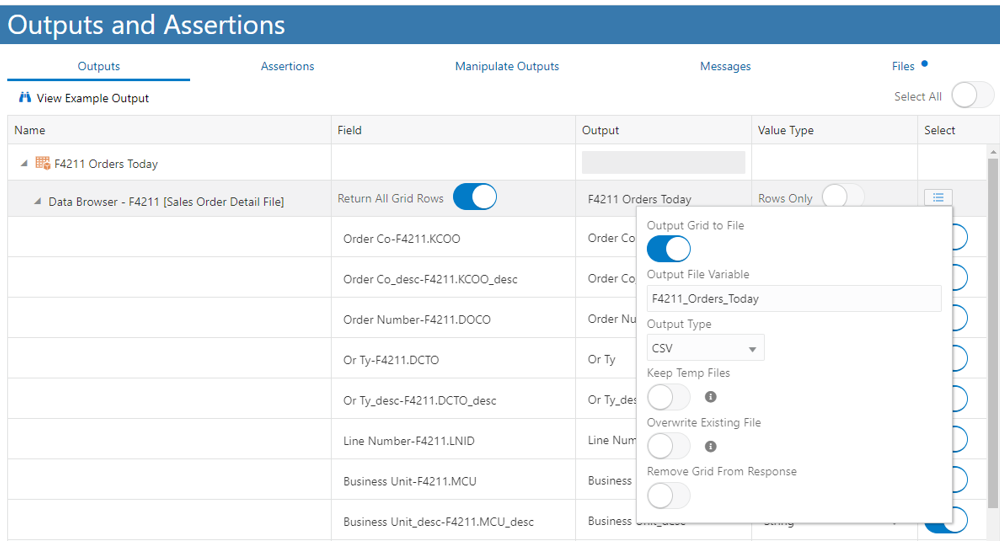
- Click the End icon and click Output and Assertions.
- Enable the Return All Grid Rows option and click the Output Grid to File icon which is in the last column of the same row.
- Enable the Output Grid to File option and
do not change the other default options or values.
Make sure that the Select option is enabled for all the values in the Output field for F4211 Order Today. - Click Save to save the orchestration.
- Click the End icon and select Output and Assertions.
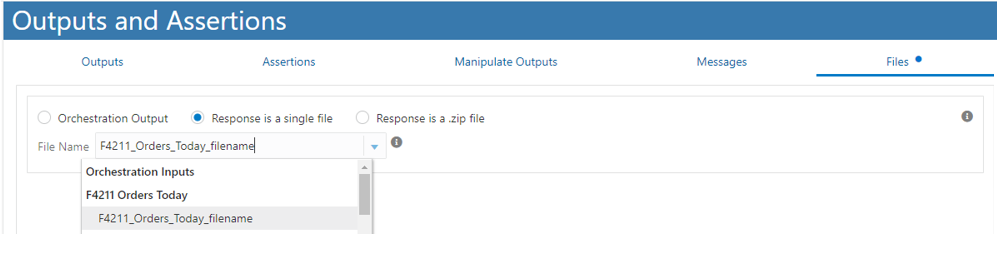
- Click the Files tab.
- Select the Response is a single file option.
- Select F4211_Orders_Today_filename from the File Name drop-down menu.
- Click Save to save the orchestration.
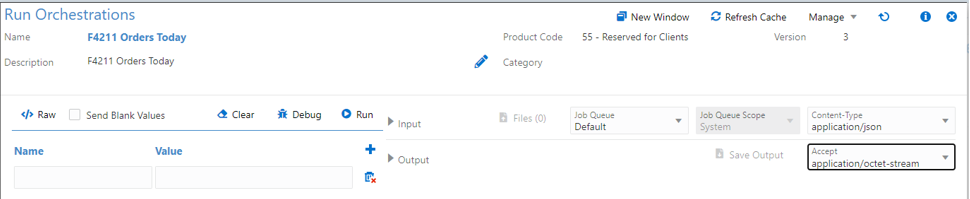
- Click the Start icon and then click Run Orchestration.
- To receive the file output, change the value in the Accept drop-down menu to application/octet-stream.
- Click Run.
- Verify that your browser has downloaded the resulting CSV file.
- Open the downloaded CSV file and verify the orders. In the following example, the downloaded file is opened using Microsoft Excel.