Working With Supply Monitor for Sales Order Lines
To work with supply monitor for sales order lines:
-
Access the Enter New Order form.
Form Name
Form ID
Navigation
Enter New Order
W42101D
Sales Order Processing (G4211).
Select Create Sales Order - Detail First.
On the Manage Existing Order form, click the Add button.
-
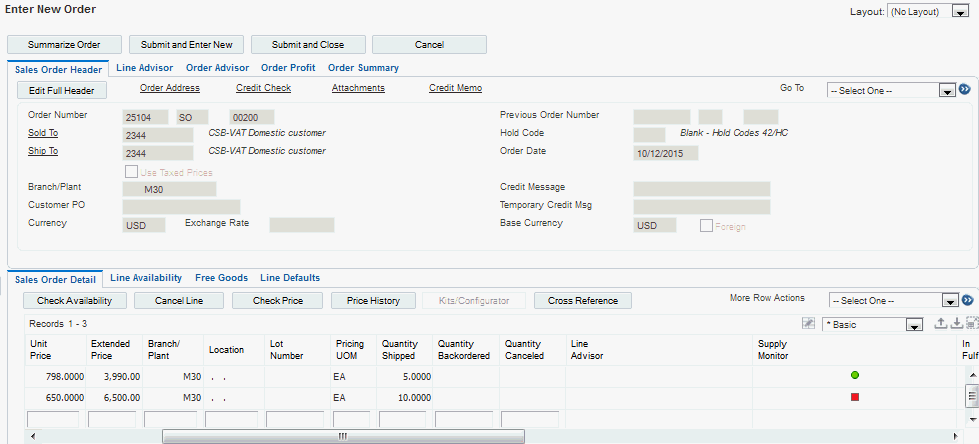
On the Enter New Order form, enter order header and detail information.
When you tab off the order line, the system displays a green, yellow, or red icon in the Supply Monitor field to indicate inventory availability:
-
The green icon (circle) indicates that there is enough availability to allocate inventory for the entire order line.
-
The yellow icon (inverted triangle) indicates that there is not enough inventory available to fill the entire order line. However, there is enough inventory to partially fill the order line.
-
The red icon (square) indicates there is no inventory available to allocate to the order line.
The system does not display an icon in the Supply Monitor field under the following circumstances:
-
The order line's order type, line type, and next status are not in the Supply/Demand inclusion rules.
-
The order line is a credit order.
-
The order line is for a non-stock item.
-
The order line is for an ETO parent item.
-
The order line is for a configured parent item.
-
The order line is for a kit parent item that does not generate a work order.
-
The order line is for an item that is a process.
-
The order line is for an item with a bulk stocking type and the Supply/Demand (P4021) processing options exclude bulk stocking type items.
-
The order line has been released from the Fulfillment Management system.
-
The order line is canceled.
-
The order line is for a Global Order Promising item.
-
Viewing the order line in change mode without modifying the line or selecting Evaluate Supply Monitor from the Row menu.
-
-
To display the Supply Monitor - Supply/Demand form, click the icon on a sales order line for which you want to see supply monitor information.
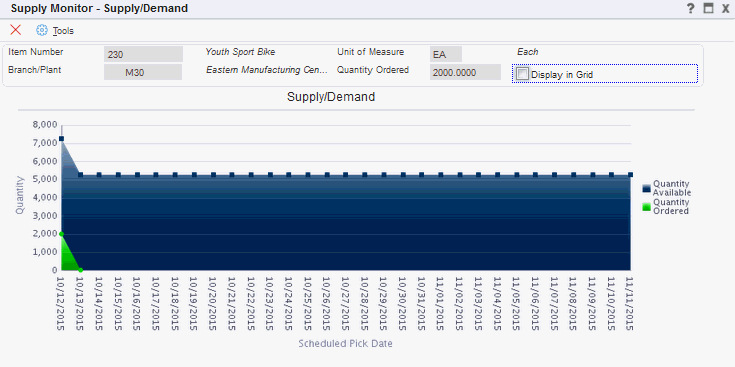
The chart displays the range of scheduled pick dates along the x-axis and the range of available Quantity along the y-axis. The blue area represents the total available quantity on the specified scheduled pick dates.
A green triangle indicates that there is enough quantity available on the scheduled pick date to allocate inventory to your order line.
A red triangle indicates that there is not enough quantity available on the scheduled pick date to allocate inventory to your order line.
A yellow triangle indicates that the system can allocate inventory to the order line to partially fill it. The top point of the icon indicates the total partial quantity that the system can allocate to your order line.
Note: You use the Sales Advisor Constants program (P42X00) to specify the number of calendar days the system displays on either side of the scheduled pick date for the order line.- Item Number
-
Displays the item number from the sales order line.
- Branch/Plant
-
Displays the branch/plant from the sales order line.
- Unit of Measure
-
Displays the unit of measure from the sales order line.
- Quantity Ordered
-
Displays the quantity ordered. This is the quantity ordered for the line item.
- Display in Grid
-
Select this option to have the system hide the graph and display the information in a grid format.
-
Select the Display in Grid option.

- Quantity Available
-
Displays the quantity that is available to be picked on the specified scheduled pick date.
- Quantity Ordered
-
Displays the quantity from the order.
- Unit of Measure
-
Displays the unit of measure from the sales order line.
- Unit of Measure Description
-
Displays the unit of measure description.
- Scheduled Pick Date
-
Displays the date that the quantity is scheduled for picking.
-
After reviewing the order information, click the Save and Submit button.
-
On the Manage Existing Order form, inquire on your sales order.
-
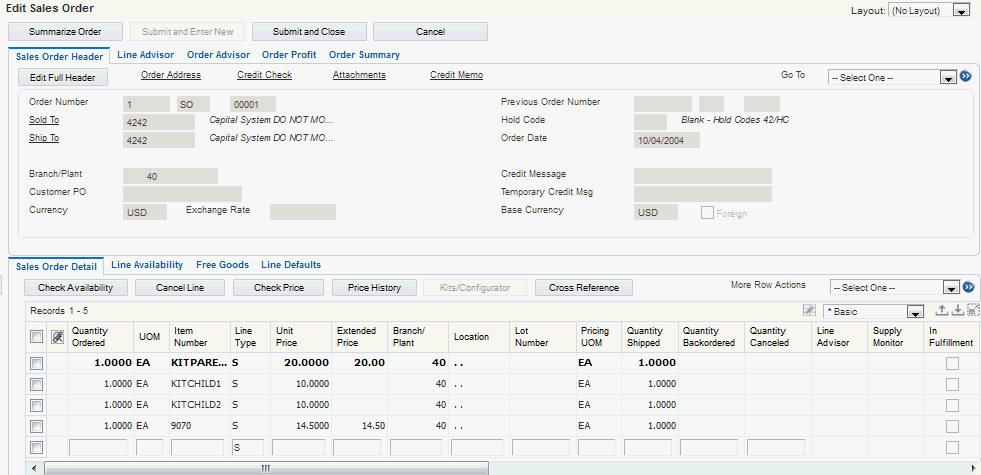
To display the Edit Sales Order form, select an order line and click the Select button.
When you initially access the Edit Sales Order form, the form does not display icons in the Supply Monitor field.
-
Select the order lines for which you want to evaluate supply monitor.
-
Select Evaluate Supply Monitor from the More Row Actions menu and click the Go button.
The system displays the icons in the Supply Monitor field.
