 Calling
an Orchestration from a Workflow Process
Calling
an Orchestration from a Workflow Process Before You Begin
Purpose
This OBE shows you how to call an orchestration and a notification from a workflow process.
To know more see the tutorial on Calling an Orchestration from a Workflow Process.
Time to Complete
1 hour 45 minutes.
Background
The JD Edwards EnterpriseOne Orchestrator is a key component of your JD Edwards digital platform. It enables the EnterpriseOne system to perform business tasks in an automated fashion. Starting with Release 23, you can call an orchestration and a notification from a workflow process. You can add an Orchestration task to your workflow process and choose to invoke either an orchestration or a notification or both. For details see, Using Orchestration Tasks (Release 9.2.7) in the Workflow Tools Guide.
The process of creating an orchestration or notification remain same. See:
- “Creating Orchestrations” in the Orchestration Guide.
- “Creating a Notification” in the Notifications Guide.
Scenario
For this OBE, consider a scenario in which you want to create a
new workflow to update the mailing address of a supplier. After
the request to change the mailing address is approved, the
workflow invokes an orchestration that updates the mailing
address. The workflow process also sends a notification, to any
interested subscribers, regarding the update in the mailing
address of the supplier. You goal for this OBE is to create a
simple orchestration that will update the supplier’s mailing
address and add that orchestration in a new workflow process.
You will also create a notification that will inform the user
about the update in the supplier’s address. Finally, you will
create a logic extension that initiates the workflow process,
and a form extension to call the logic extension.
For this OBE, you will act as the designer of the workflow,
orchestration, and notification; the initiator (requester) of
the workflow process, the approver, and the subscriber to the
notification. You will utilize the same data structures that
will pass through the workflow and act as inputs for the
orchestration and the notification.
Prerequisite
Before performing the tasks in this OBE, you must ensure that:
- You have access to a JD Edwards EnterpriseOne test
environment in which EnterpriseOne Tools 9.2.7 is deployed.
Note: The JD Edwards EnterpriseOne Trial Edition deployed on Oracle Cloud Infrastructure meets the requirement for this OBE.
- You have an Address Book number that is associated with your user ID.
- You have the following security permissions:
- Access to Orchestrator Studio
- Create orchestrations, notifications, and logic extensions
- Create form extensions
 Creating
a New Orchestration
Creating
a New Orchestration
In this task, you will create an orchestration that will update the supplier’s address after the request is approved. You will add this in a workflow process later. For this, you will record the process of updating the supplier’s mailing address and add that to a form request.
- Sign in to JD Edwards EnterpriseOne.
- Access Address Book application (P01012) from the fast path.
- In the menu bar, click your username and navigate to Personalization.
- Click Record a Process.
- On the Process Recorder pop-up, click Start.
- You can use any Address Number that exists in the system.
For this OBE, we will use the supplier with Address Number
3090. Enter
3090above the Address Number grid and click Find. - Select the record and click Select. Address Book Revision form opens.
- Click the Mailing tab to access the mailing address.
- Update the Mailing Name field with any change, for example, change “Supplies Unlimited” to “Supplies Unlimited, Inc.”
- Update the address in the Address Line 1 field with any change, for example, add a fictitious address.
- Update the City, State, and Postal Code. Be sure to add or make some change to each field.
- Click OK.
- Click Stop on the Process Recorder pop-up.
- Enter
Update Mailing Addressin the Name field. - Enter
Supplier’s Mailing Address Updatein the Description field. - You can leave the Product Code field blank. By default,
Product Code will be 55 – Reserved for clients. You can
continue to use the default value.
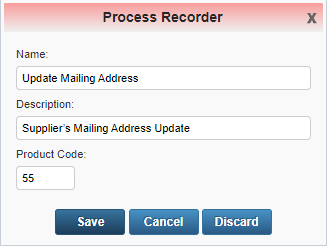
Process Recorder Window - Click Save.
- Click X to close the process recorder.
- Sign in to the Orchestrator Studio and open Form Requests.
- You will see Update Mailing Address that you created. Click
it to configure the order of execution.
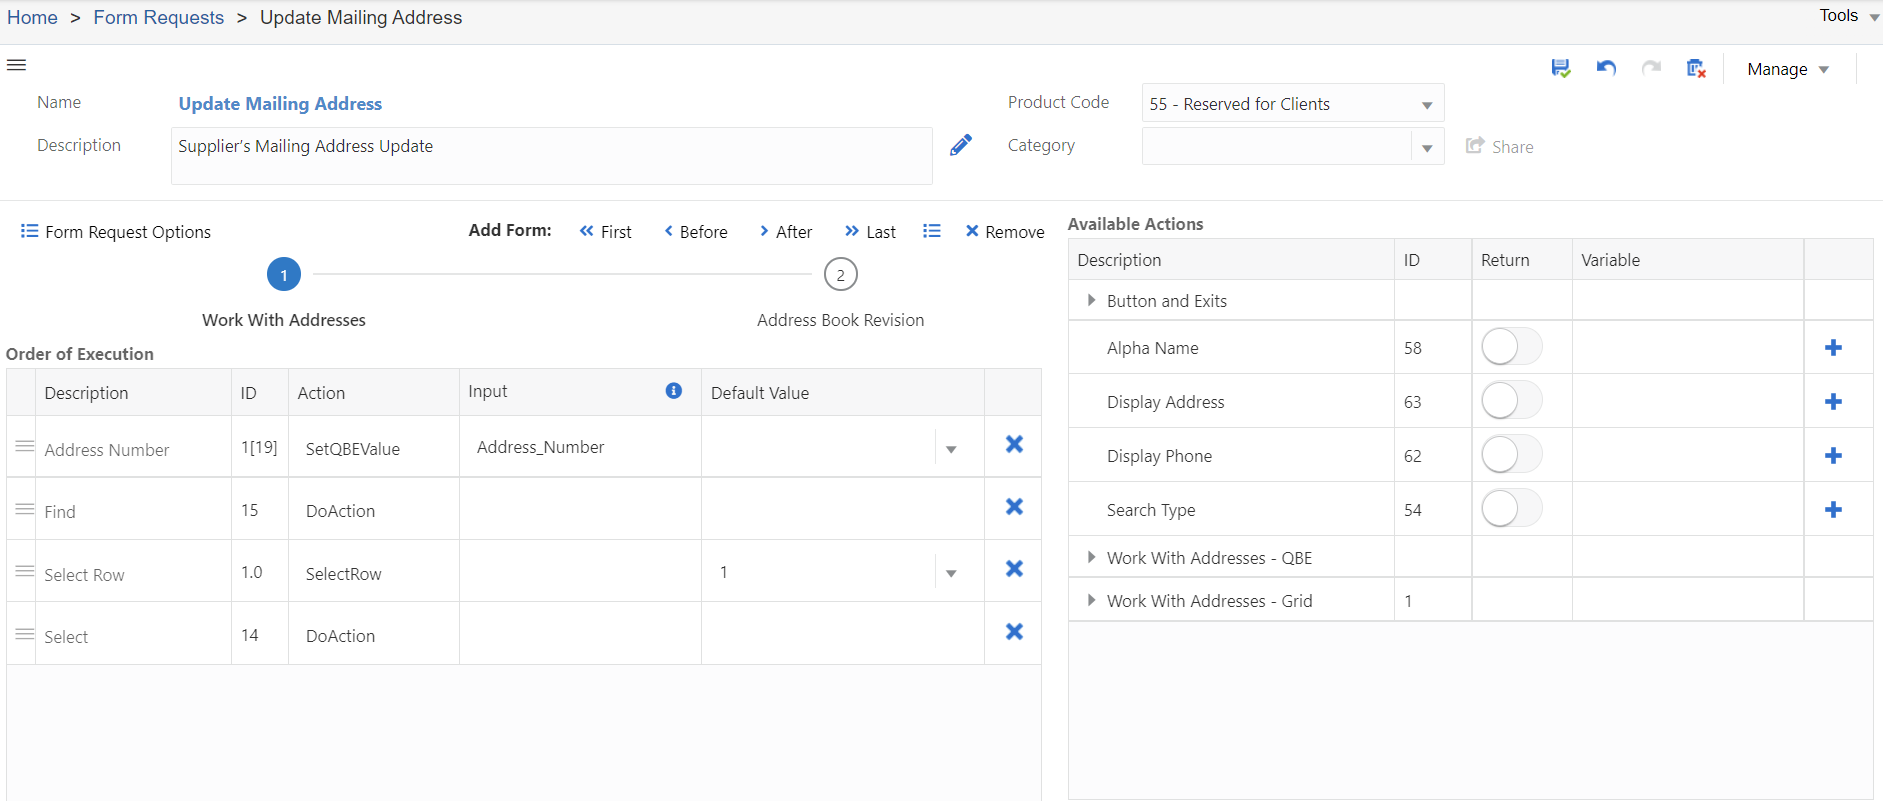
The form request will start with Work With Addresses form and will subsequently move to Address Book Revision form. You will see Work With Addresses as 1, followed by Address Book Revision as 2.
- In Work With Addresses, navigate to the Order of Execution table.
- For Address Number, delete the value in the Default Value column.
- For Select Row, delete Select_Row in Input column. Leave “1” in the Default Value column.
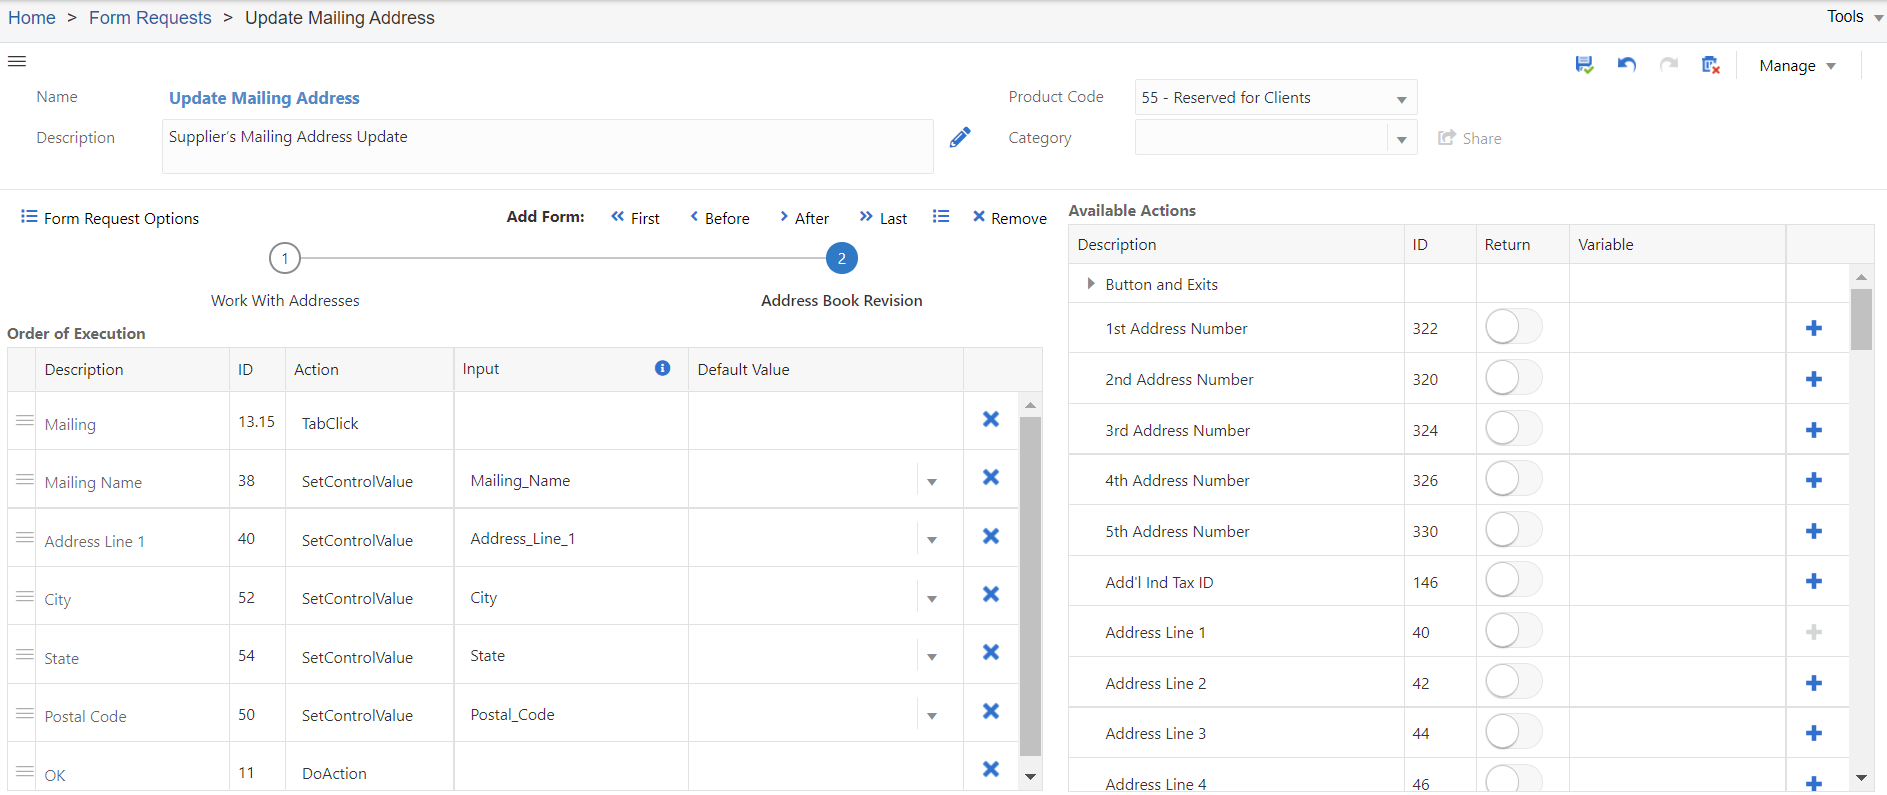
- Click 2, Address Book Revision, to configure the order of execution.
- In Address Book Revision, navigate to the Order of Execution table.
- For Mailing_Name, delete the value in the Default Value column.
- For Address Line 1, delete the value in the Default Value column.
- For City, delete the value in the Default Value column.
- For State, delete the value in the Default Value column.
- For Postal Code, delete the value in the Default Value column.
- Click Save.
Note: Ensure that Mailing_Name, Address_Line_1, City, State, and Postal_Code are available in the same order in the Order of Execution table. Add any missing items from the list of Available Actions on the right and drag it to arrange as per the image above.
- Click Manage, then click Create Orchestration. Orchestrator Studio automatically creates an orchestration containing your form service request.
- Click Save.
When you create the workflow process later in this OBE you will include this orchestration as a step in the workflow. Upon approval by the approver, this orchestration will automatically update the mailing address for the supplier.
 Creating
a New Notification
Creating
a New Notification
In this task you will create a notification and subscribe to it. This notification will inform any interested subscribers that the supplier’s mailing address has been updated.
- On the Orchestrator Studio Home page, click the Notifications icon.
- On the Notifications side panel, click the New button.
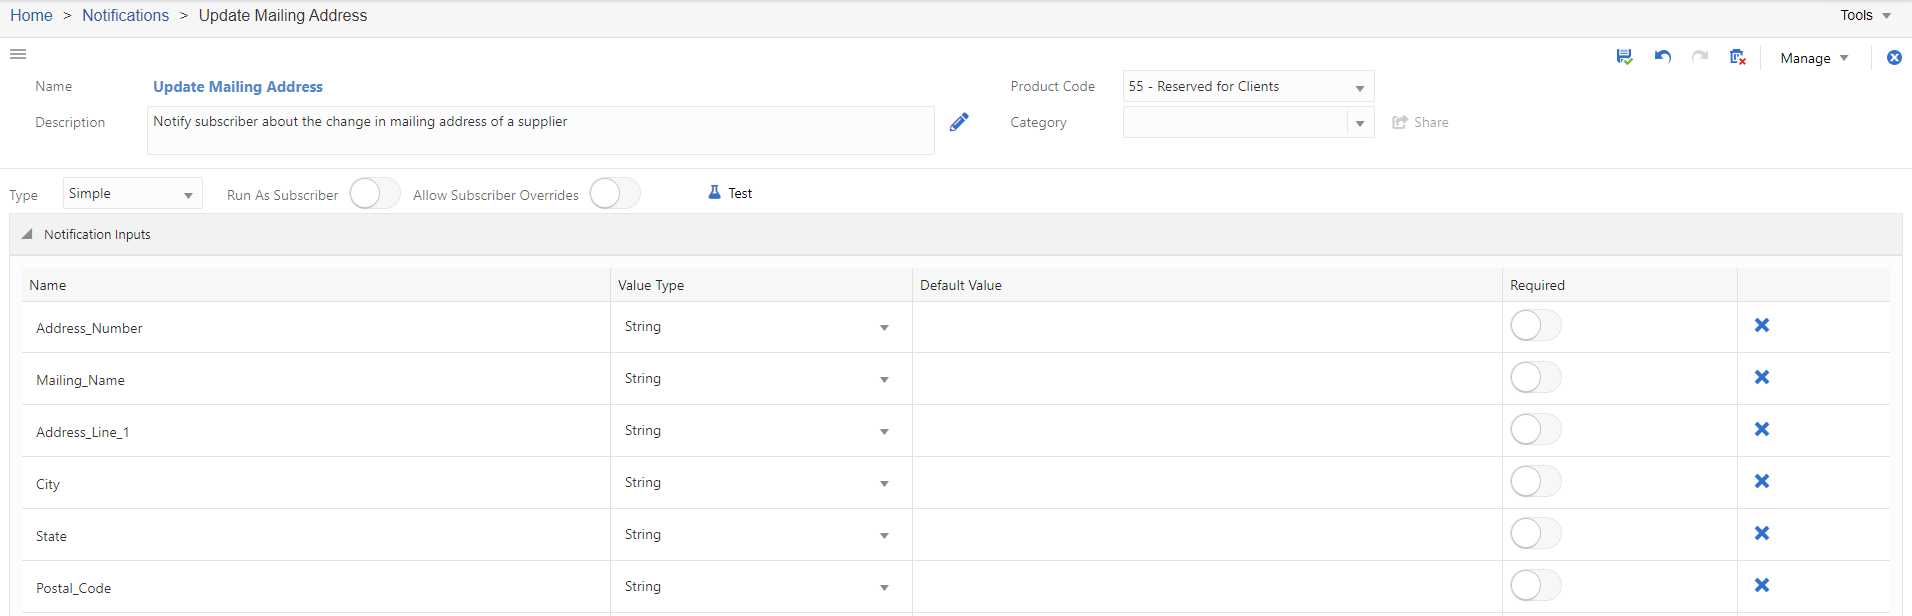
- On the Notifications design page, enter
Mailing
                    Address Update
in the Name field. - By default, the Product Code is selected as 55 – Reserved for Clients. You can continue to use this.
- Enter
Notify subscriber about the change in mailing
                    address of a supplier
in the description field. - By default, Type is selected as Simple. Continue with the selection.
- Expand the Notification Inputs section of the Notification design page.
- In the first empty row in the grid, enter
Address_Numberin the Name column. - In the following rows, enter
Mailing_Name,Address_Line_1,City,State, andPostal_Codein the Name column respectively. - By default, the Value Type is String. Continue with it.
- Click Save.
- Expand the Message section.
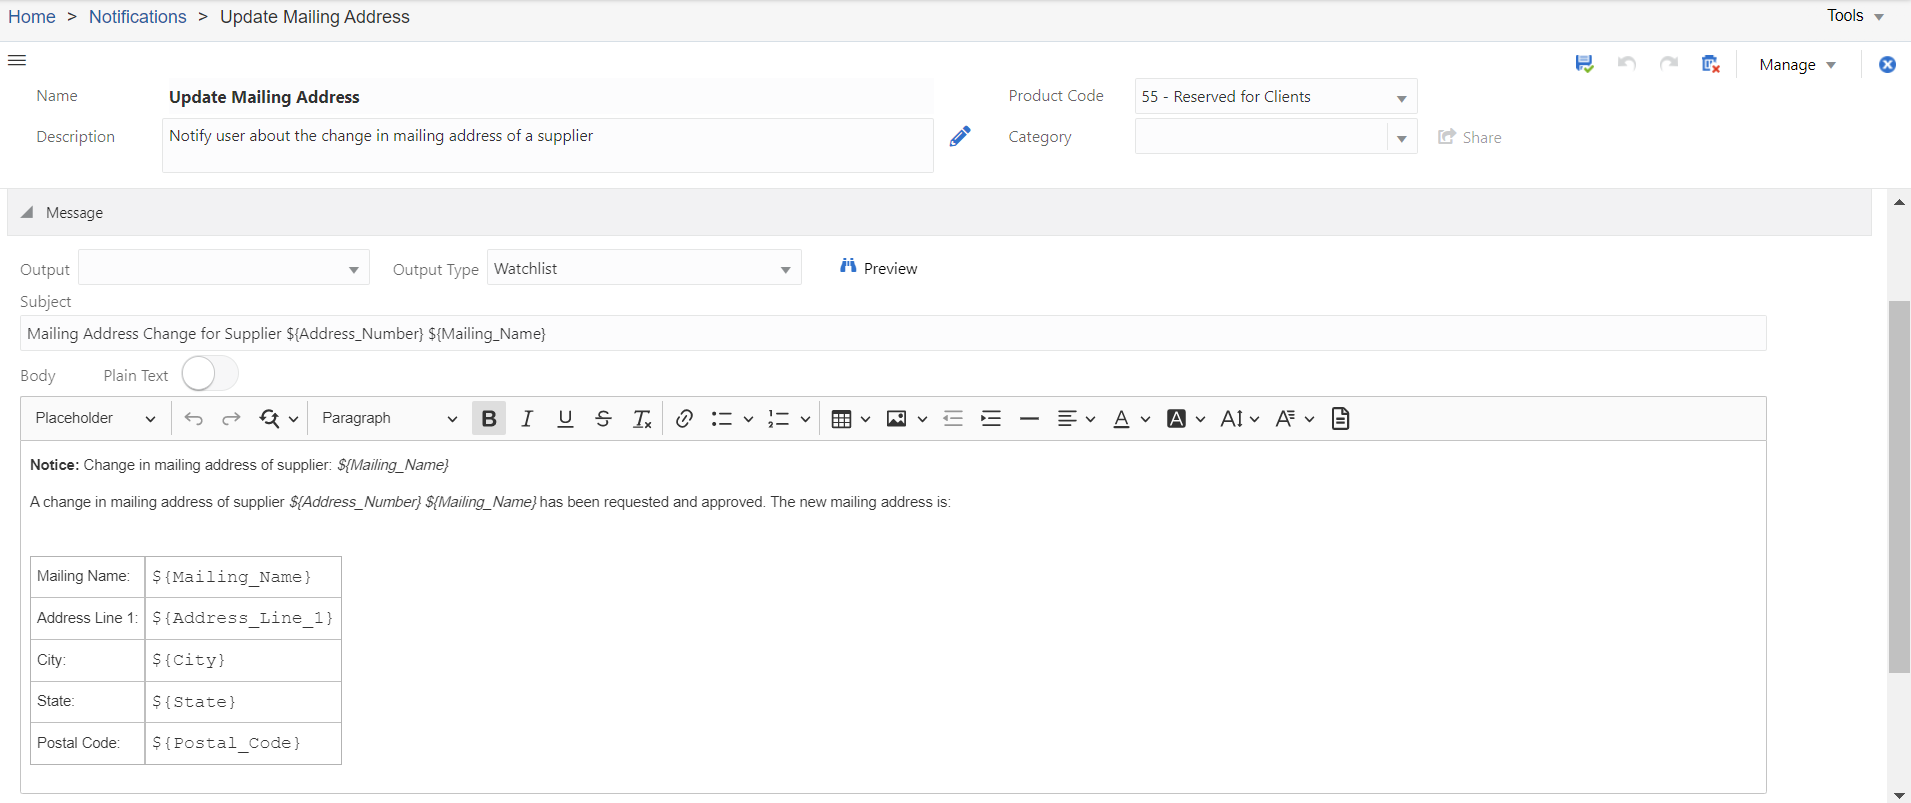
- In the Subject field, enter
Mailing Address Change
                    for Supplier ${Address_Number} ${Mailing_Name}
. - In the Body, enter the below message:
Notice: Change in mailing address of
                    supplier: ${Mailing_Name}


                    A change in mailing address of supplier ${Address_Number}
                    ${Mailing_Name} has been requested and approved. The new
                    mailing address is:
Mailing Name:${Mailing_Name}Address Line 1:${Address_Line_1}City:${City}State:${State}Postal Code:${Postal_Code}Tip: To create the table you can select Insert Table from the formatting bar and choose to insert two columns and five rows. You can double-click on the table to access Table Properties and then choose “Align table to the left.”
- Click Save.
Now that you have created a notification you must subscribe to it.
- Sign in to EnterpriseOne test environment.
Note: A notification is a user-defined object. Therefore, you must refresh your EnterpriseOne session to see it. If you are already signed into EnterpriseOne, sign out, then sign back in.
- Click your username and click Manage Notifications.
- From the drop-down list, click My Subscriptions.
- Click Add Subscription.
- Select Mailing Address Update from the list of Available Notifications. You can leave all default options as they are.
- Click Save.
- Close the My Subscriptions page.
 Creating
a New Workflow Message Template
Creating
a New Workflow Message Template
In this task, you will create a new workflow message that will be sent to the approver for approving the request to update a supplier’s mailing address.
- Sign in to the EnterpriseOne test environment.
- Navigate to EnterpriseOne Menus > EnterpriseOne Life Cycle Tools > Application Development > Data Dictionary Design > Workflow Messages. Alternatively, you can access the Work With Glossary Items application (P92002) from the Fast Path.
- Click Add.
- In the Item Specification tab, enter
LM55010121in the Alias field. - Enter
Yin the Glossary Group field. - Enter
55in the Product Code field. - Enter
55in the Product Code Reporting field. - Enter
Approve mailing address change for &1
                    &2
in the Description field. - Enter
3in the Error Level field. - Click the Item Glossary tab to enter the body of the message.
- Click in the text editor area to activate the cursor.
- Enter the below message:
Mailing address change requires your approval:

                      Address Book Number: &1

                      Mailing Name: &2

                      &3

                      &4, &5 &6

                      Upon approval this address change will be updated
                      automatically.
The elements, like &1, &2, &3, represent text substitution variables that will be populated from inputs at runtime. Later in this OBE you will map &1 to “Address_Number”, &2 to “Mailing_Name”, and so on.
- Click OK.
- Close the Work With Glossary Items form.

 Creating
a New Workflow Process
Creating
a New Workflow Process
In this task, you will create a new workflow process with an action message task.
- Sign in to the Orchestrator Studio.
- From the Home page, click the Workflows icon to access the Workflow Studio.
- Click New.
- Enter
ADDRESSCHGin the Name field. Since it is a new workflow process, the version would be automatically updated as 1. - The system assigns the Product Code as 55-Reserved for Clients by default. You can retain or change this product code according to your reporting requirement.
- Enter
Workflow for Updating Mailing Addressin the Description field. - Click the Key Data Structure icon and then click the Search icon. A search pop-up window opens.
- Enter
D0100388in the Search field and click the Search icon. - Select D0100388 from the Object list.
- Click the Additional Data Structure icon and then click the Search icon. A search window pops up.
- Enter
D0100021in the Search field and click the Search icon. - Select D0100021 from the Object list.
- Click Save.
Note: The key data structure and the additional data structure are required to define the data items (inputs) that the workflow needs for processing. For simplicity in this OBE, you are choosing data structures that already exist in the system. In actual practice you can create and deploy your own custom data structures to accommodate the data items that your workflow process requires.
- Click the Diagram icon to access the diagram workspace.
- Drag and drop the Action Message task between the Start and End tasks in the diagram workspace.
- Enter
APPROVEin the Task Name field andApprove the address changein the Description field. - Click the Edit icon to configure the Action Message task.
- In the Message Editor window, select Address Book from the drop-down list in the To Recipient field.
- Select mnAddressNumber_AN8 under
Additional Data – D0100021 from the drop-down list in the
Address Book Number field.
Note: The drop-down list provides data items from both the key data structure and the additional data structure. Both data structures include a data item called mnAddressNumber_AN8. Be sure to scroll down and choose the one listed under the Additional Data – D0100021.
- Select 02 – Priority Mail from the drop-down list in the Mailbox field.
- In the Subject Literal field, enter
Request for
                    Approval: Supplier Address Change
. - Click the Search icon in the Shortcut field. A search window pops up.
- Enter
P98806in the Search field and click the Search icon. - Select P98806 from the object list.
- In the Form field, select W98806A – Workflow Approval from the drop-down list. This is a generic workflow approval program and form. A link to this form will be included in the approval message that is sent to the approver.
- Toggle the Input switch on for szActivityInstanceUniqueID.
- In the Mapping column for szActivityInstanceUniqueID, select Current Workflow Task from the drop-down list under the System Values.
- You will now add the Workflow Message you created earlier. In the Message field, click the Search icon. DD Message Search window pops up.
- In Alias Search field, enter
LM55010121and click the Search icon. - Select LM55010121 from the search result. The message template that you created earlier is loaded into the message area.
- In the mapping table on the right click the Mapping column in the &1 row. For ID &1, select mnAddressNumber_AN8 under Mapping from the Key Data.
- For ID &2, select szNameMailing_MLNM under Mapping from the Additional Data.
- For ID &3, select szAddressLine1_ADD1 under Mapping from the Additional Data.
- For ID &4, select szCity_CITY1 under Mapping from the Additional Data.
- For ID &5, select szState_ADDS under Mapping from the Additional Data.
- For ID &6, select szZipCodePostal_ADDZ under Mapping from the Additional Data.
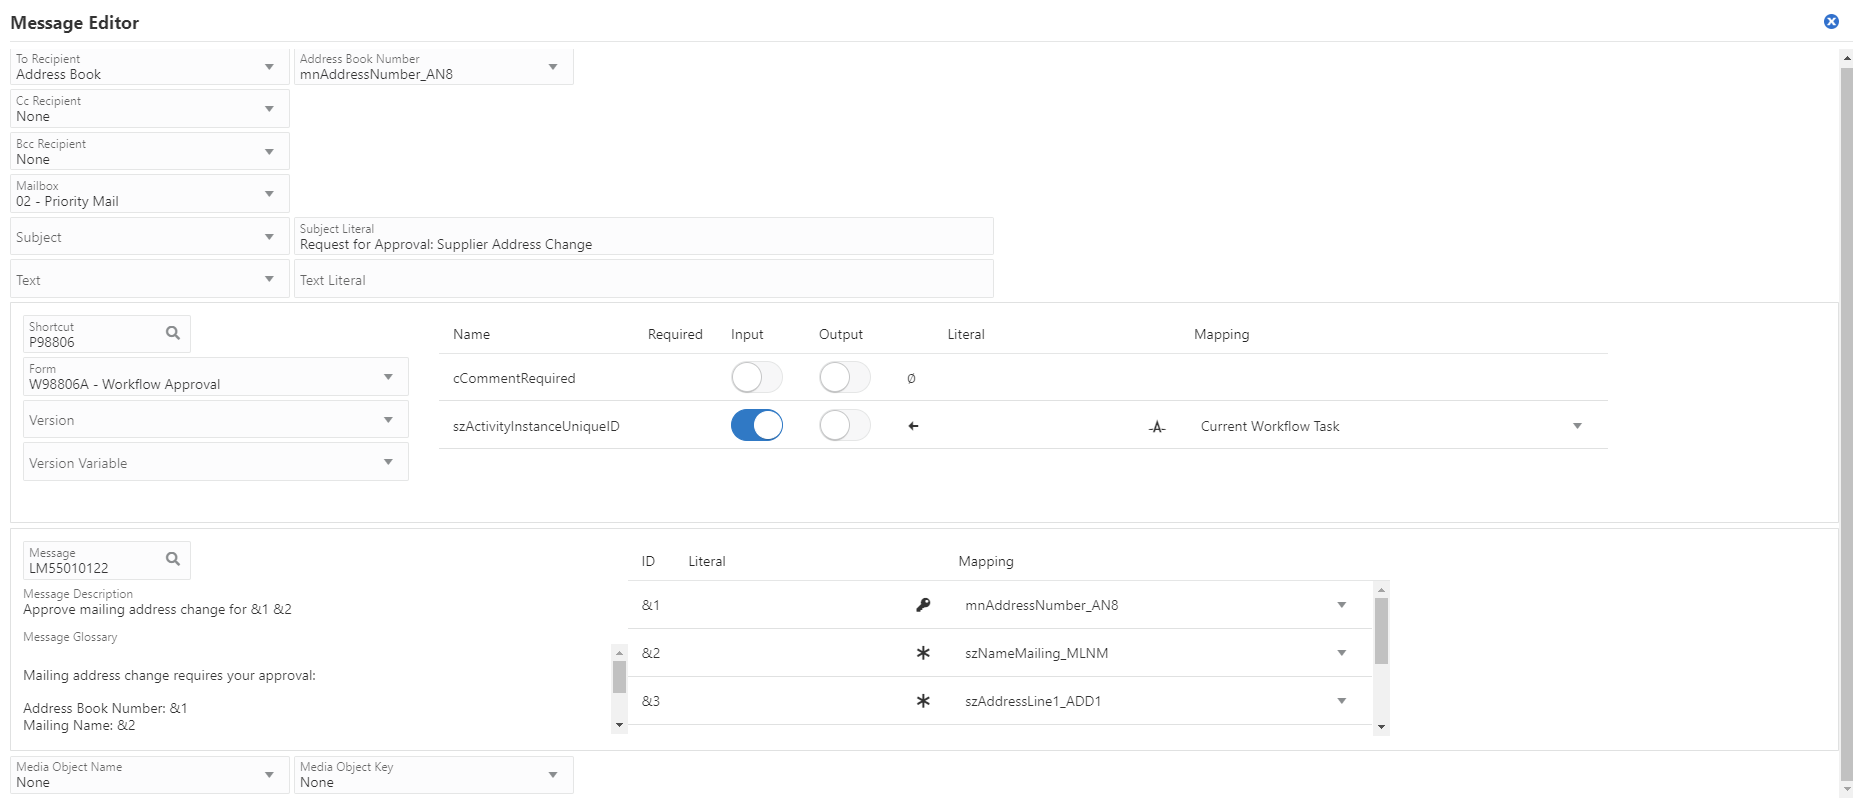
- Ensure that the Message Editor form looks like the image below:
- Click the X icon at the top right of the form to close the Message Editor window. Your work on this form is held in memory.
- Click Save.
 Adding
the Orchestration and Notification to the Workflow Process
Adding
the Orchestration and Notification to the Workflow Process
In this task you will add the orchestration and notification in the newly created workflow process.
- Drag and drop an Orchestration task and place it after the “Approve” Action Message task in the diagram workspace.
- Enter
UPDATEADDRin the Task Name field andCall orchestration to update the addressin the Description field. - Click the Edit icon to configure the Orchestration task.
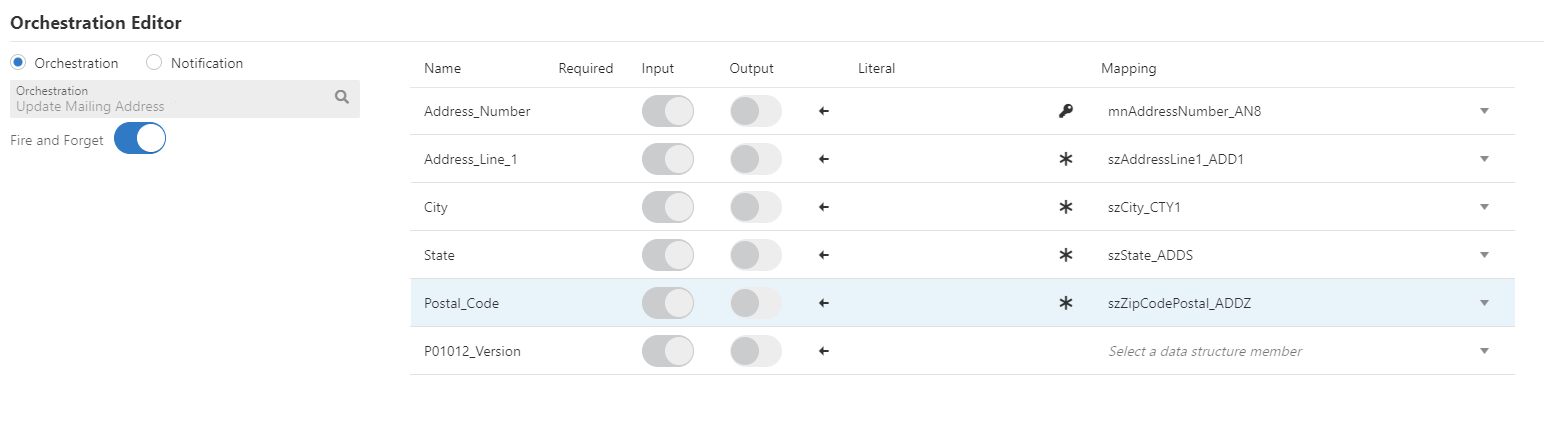
- In the Orchestration Editor window, ensure that Orchestration radio button is selected.
- Click the Search icon to open the list of existing orchestrations.
- Enter
Update Mailing Addressin the Search field and select the orchestration you created earlier. - For Address_Number, click the drop down under the Mapping column and select mnAddressNumber_AN8 from the Key Data – D0100388.
- For Mailing_Name, click the drop down under the Mapping column, scroll down to Additional Data – D0100021, and select szNameMailing_MLNM.
- For Address_Line_1, click the drop down under the Mapping column and select szAddressLine1_ADD1 from the Additional Data – D0100021.
- For City, click the drop down under the Mapping column and select szCity_CITY1 from the Additional Data – D0100021.
- For State, click the drop down under the Mapping column and select szState_ADDS from the Additional Data – D0100021.
- For Postal_Code, click the drop down under the Mapping
column and select szZipCodePostal_ADDZ from
the Additional Data – D0100021.
If you see a row for P01012_Version, you can leave it blank. By configuring these mappings, you are passing data from the workflow into the orchestration with the inputs it needs to make the address change.
- Toggle on the Fire and Forget. This allows the orchestration to process independently of the workflow, and the workflow will continue to its next step immediately.
- Click the X icon at the top right of the form to close the Orchestration Editor window. Your work on this form is held in memory.
- Drag and drop another Orchestration task and place it on the
arrow between the first Orchestration task and the End task.
We will configure the notification in this Orchestration task.
Note: On the workflow design pane you can drag the icons for each step to rearrange them and create more visual space between them.
- Enter
NOTIFYin the Task Name field andNotify subscribers of an address changein the Description field. - Click the Edit icon to configure the Notification task.
- In the Orchestration Editor window, select the radio button for Notification.
- Click the Search icon to open the list of existing notifications.
- Enter
Mailing Address Updatein the Search field and select the notification you created earlier. - For Address_Number, click the drop down under the Mapping column and select mnAddressNumber_AN8 from the Key Data – D0100388.
- For Mailing_Name, click the drop down under the Mapping column and select szNameMailing_MLNM from the Additional Data – D0100021.
- For Address_Line_1, click the drop down under the Mapping column and select szAddressLine1_ADD1 from the Additional Data – D0100021.
- For City, click the drop down under the Mapping column and select szCity_CITY1 from the Additional Data – D0100021.
- For State, click the drop down under the Mapping column and select szState_ADDS from the Additional Data – D0100021.
- For Postal_Code, click the drop down under the Mapping
column and select szZipCodePostal_ADDZ from
the Additional Data – D0100021.
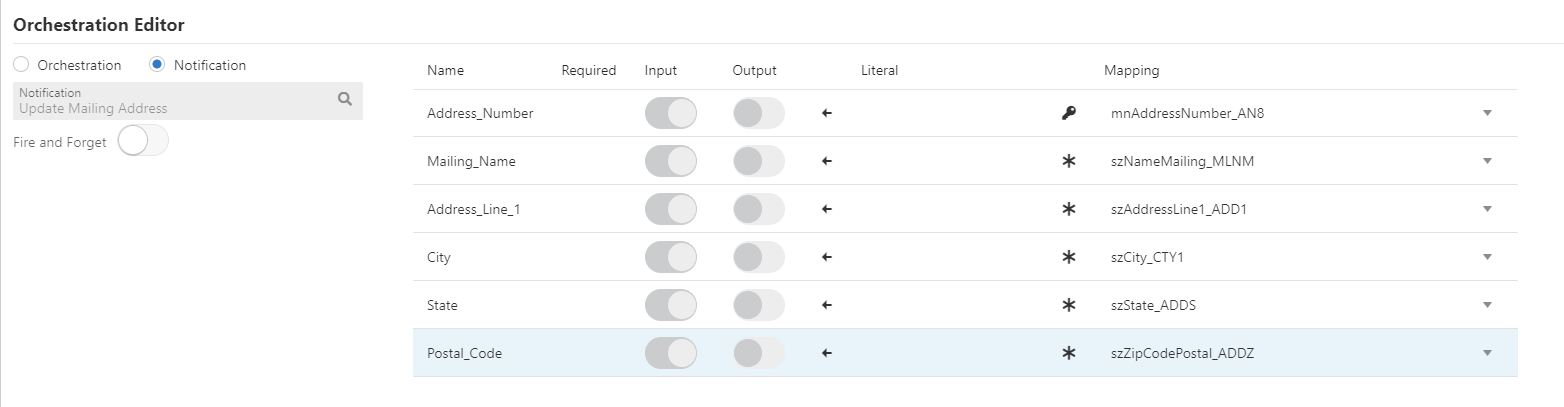
Configuring Notification By configuring these mappings, you are passing data from the workflow into the notification with the inputs it needs to form the body of the message.
- Click the X icon at the top right of the form to close the Orchestration Editor window. Your work on this form is held in memory.
- Click Save.
- From the Manage drop-down menu click Validate. If you receive the message “Validate Successful,” proceed to the next steps. If your validation is not successful, verify the steps to ensure that your workflow is configured correctly.
- From the Manage drop-down menu click Release Reservation.
- From the Manage drop-down menu click Activate.
 Adding
the Workflow Process to a Logic Extension
Adding
the Workflow Process to a Logic Extension
In order for a workflow process to run it must be initiated by an event. In this scenario the event will be pushing a button on a form. That button will invoke a logic extension, which will in turn start the workflow process. In this task, you will add the newly created workflow process to a logic extension.
- Access Orchestrator Studio and click the Logic Extensions icon on the Orchestrator Studio Home page.
- Click New.
- Enter
Start Address Change Workflowin the Name field. - Enter S
tarts the address change workflow processin the Description field. - Product Code is 55 – Reserved for Clients. Continue with it.
- Access the Data Structure tab in the Logic Extensions page.
This tab is displayed by default when you start creating a new
logic extension.
In these next steps you will create a data structure for the logic extension, which is a set of data items (inputs) that the workflow process needs. These data items will be familiar to you, because it is the same set of inputs you created for the workflow, the orchestration, and the notification.
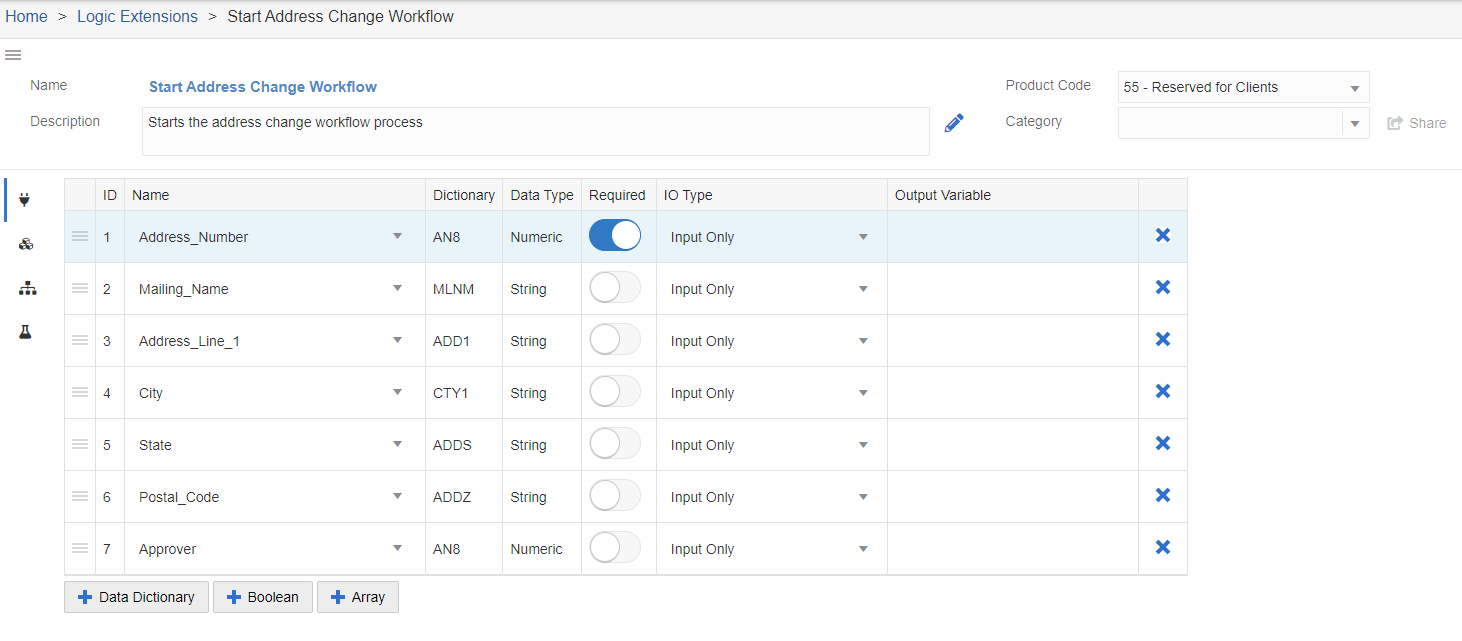
- Click the + Data Dictionary button.
- In the Data Dictionary window, enter AN8 in the Alias field and then click the + icon.
- In the Name Column, click on the default name “AddressNumber” and change it to Address_Number.
- Toggle Required on for Address_Number.
- Click the + Data Dictionary button and in
the Data Dictionary window enter
MLNMin the Alias field and then click the + icon. - In the Name Column, update the name to Mailing_Name.
- Click the + Data Dictionary button and in
the Data Dictionary window enter
ADD1in the Alias field and then click the + icon. - In the Name Column, update the name to Address_Line_1.
- Click the + Data Dictionary button and in
the Data Dictionary window enter
CTY1in the Alias field and then click the + icon. - Click the + Data Dictionary button and in
the Data Dictionary window enter
ADDSin the Alias field and then click the + icon. - Click the + Data Dictionary button and in
the Data Dictionary window enter
ADDZin the Alias field and then click the + icon. - In the Name Column, update the name to Postal_Code.
- Click the + Data Dictionary button and in
the Data Dictionary window enter
AN8in the Alias field and then click the + icon. - In the Name Column, update the name to Approver.
- Ensure that your data structure looks like the image below:
- Click Save.
- Click the Logic icon to access the design area.
- Click the + icon between the Start and End and select Workflow from the Action menu. The system displays the Workflow panel on the right.
- In the Workflow panel, enter
Start Workflow Processin the label field andStart the ADDRESSCHG Workflowin the description field. - In the Workflow field, click the Search icon to search for ADDRESSCHG and select the workflow from the Workflow List window. After you select the workflow, the Key Data Structure and Additional Data Structure sections are displayed to create the mappings.
- Under Key Data Structure section on the right, click the Edit icon next to Parameter Mapping column to open the Workflow Parameter Mapping window.
- Toggle Input on for mnAddressNumber and select Address_Number
from the Data Structure column on the right.
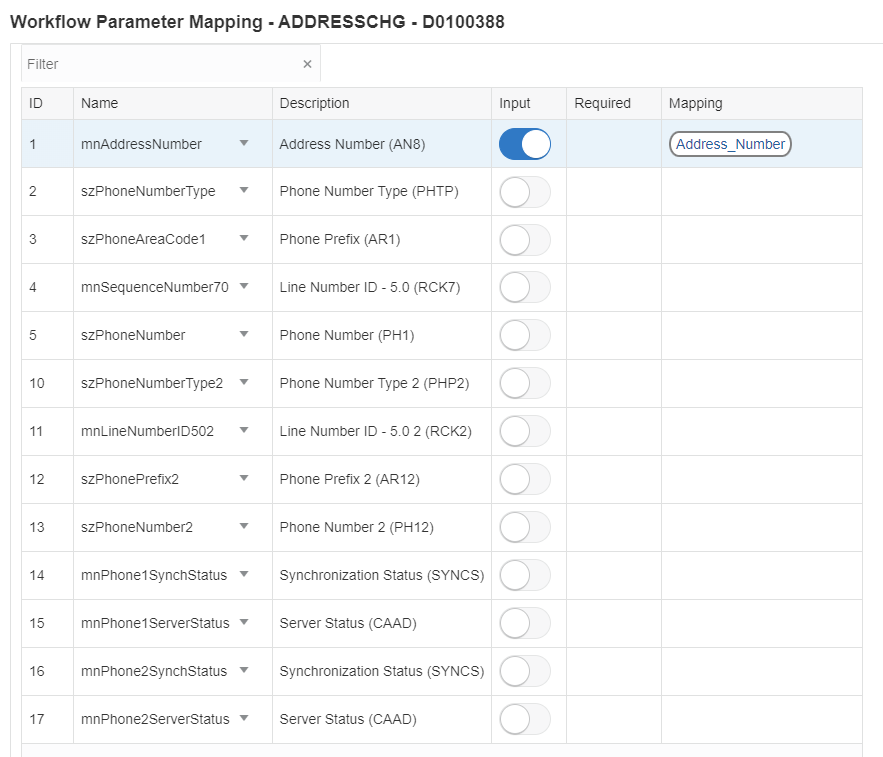
Key Data Parameter Mapping mnAddressNumber is the only data item you need to map for the key data structure.
- Close the Workflow Parameter Mapping window and click the triangle to collapse the Key Data Structure section.
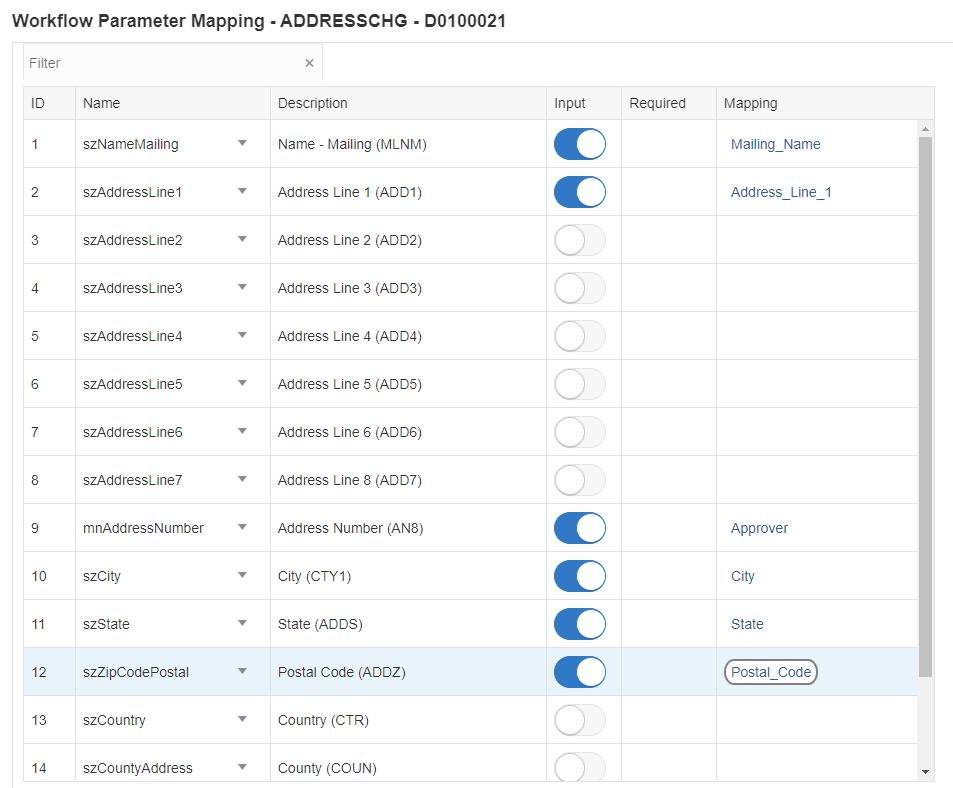
- Under Additional Data Structure section on the right, click the Edit icon next to Parameter Mapping column to open the Workflow Parameter Mapping window.
- Toggle Input on for szNameMailing and select Mailing_Name from the Data Structure column on the right.
- Toggle Input on for szAddressLine1 and select Address_Line_1 from the Data Structure column on the right.
- Toggle Input on for mnAddressNumber and select Approver from the Data Structure column on the right.
- Toggle Input on for szCity and select City from the Data Structure column on the right.
- Toggle Input on for szState and select State from the Data Structure column on the right.
- Toggle Input on for szZipCodePostal and select Postal_Code from the Data Structure column on the right.
- Close the Workflow Parameter Mapping window.
- Click Save.
Your logic extension is now configured to start the workflow and pass the required data items to it. Next you will attach this logic extension to a button on a form extension on the Address Book Revision form that will initiate the workflow and subsequently the orchestration and notification for the change in supplier address.
 Creating
a Form Extension to Launch the Logic Extension
Creating
a Form Extension to Launch the Logic Extension
In the previous tasks you created:
- An orchestration to automatically update a mailing address.
- A notification to alert subscribers that a mailing address has been changed.
- A workflow to send an approval message to an approver, and subsequently to invoke the orchestration and notification.
- A logic extension to initiate the workflow process.
The final piece is to create a form extension with a custom button that will launch the logic extension. This is the action or “event” that will ultimately start the workflow process.
- Sign in to EnterpriseOne test environment.
- Access Address Book application (P01012) from the fast path.
- Enter
3090above the Address Number grid and click Find. - Select the record and click Select. Address Book Revision form opens.
- Click the Mailing tab.
- Click the Form Extension icon in the top-right corner.
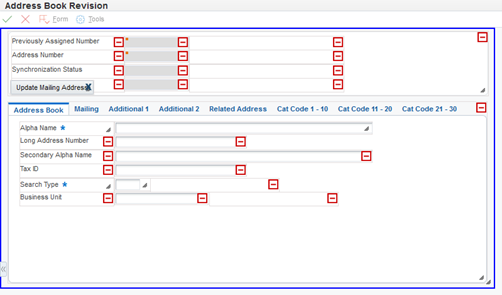
- Click and drag the Add Button on to the Address Book Revision form and place it below the Synchronization Status field.
- Double click the button you added and update the name to Update Mailing Address.
- Click Associate Orchestrations link on the Form Extension Manager. Associate Orchestrations window pops up.
- In the Associate Orchestrations window, click the Logic Extensions tab.
- Click inside the Control field to activate the cursor and then click the Update Mailing Address button you created.
- Click the drop-down list in the Event field and select Button Clicked to update the Event in the Associate Logic Extension with Event section.
- Click Next.
- Click the drop-down menu and select Start Address Change Workflow from the list.
- Click Next.
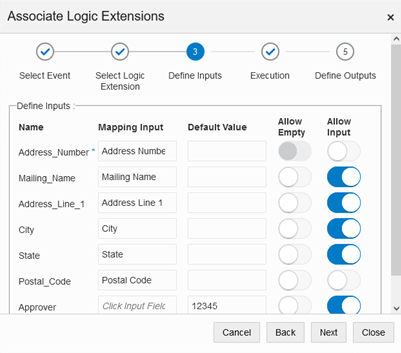
- In the Define Inputs section, for Address_Number row, click the Mapping Input column and then click the Address Number field on the Address Book Revision form. Be sure to click the gray field next to the “Address Number” label and not the label itself.
- The remaining inputs will be mapped from fields on the Mailing tab, so click the Mailing tab on the Address Book Revision form to show the fields on that tab.
- Click to place the cursor inside the Mailing_Name field in the Mapping Input column. Then click the Mailing Name field on the Address Book Revision form. Be sure to click on the field and not the “Mailing Name” label.
- Toggle Allow Input on.
- For Address_Line_1 row, click the Mapping Input column and then click the Address Line 1 field on the Address Book Revision form. Toggle Allow Input on.
- For City row, click the Mapping Input column and then click
the City field on the Address Book Revision form. Toggle Allow
Input on.
Note: You can drag the Associate Logic Extensions window out of the way if it is covering any of the fields on the Address Book Revision form.
- For State row, click the Mapping Input column and then click the State field on the Address Book Revision form. Toggle Allow Input on.
- For Postal_Code row, click the Mapping Input column and then click the Postal Code field on the Address Book Revision form. Toggle Allow Input on.
- The value for Approver cannot be mapped from any fields on the Address Book Revision form. You will provide that as an input when you click the Update Mailing Address button. For Approver row, toggle Allow Input on. In the Default Value field enter the Address Book number that is associated with your user ID. The workflow approval message will go to the EnterpriseOne Work Center mailbox for this Address Book number.
- Click Next.
- On the step 4, Execution, click Next.
- On the step 5, Define Output, click Save.
- Click Close to close the Associate Logic Extension window.
- Click Save in the Form Extension Manager and then click X to close the Form Extension Manager.
 Testing
the Workflow Process
Testing
the Workflow Process
In this task, you will start the workflow using the logic extension. This will in turn invoke the orchestration and send a notification to the subscriber.
- In JD Edwards EnterpriseOne test environment, access P01012 from the fast path.
- Enter
3090above the Address Number grid and click Find. - Select the record and click Select. Address Book Revision form opens.
- In Address Book Revision form, click the newly created button Update Mailing Address. A pop-up window to enter inputs opens.
- To start the workflow, change the values for Mailing_Name, Address_Line_1, City, State, and Postal_Code.
- Enter the address number of the user responsible for approving the request in the Approver field. For this OBE you will be the approver, so verify that the default value is the Address Book number associated with your user ID.
- Click OK. This starts the workflow and sends a message for approving the change in the mailing address.
- Close the Address Book Revision form.
- Click your username and navigate to Manage Notifications and click Message Center.
- In the Work Center tab, expand the Priority Mail section.
- Click to open the message with the subject line Request for Approval: Supplier Address Change. Notice that the message body comes from the workflow message template you created earlier, and the text substitution variables, like &1 and &2, have been substituted with your inputs.
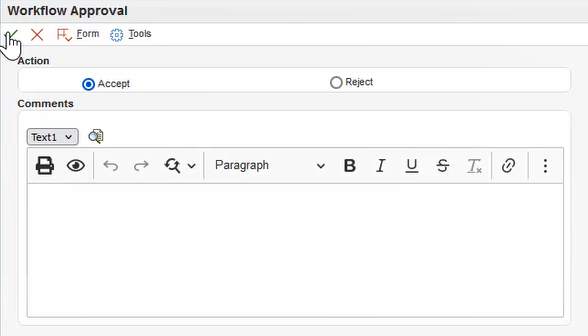
- Click the Workflow Approval link in the bottom of the message. Workflow Approval form opens.
- In the Action section, ensure that Accept is selected.
- Click OK. The Workflow Approval form closes automatically.
- Close the Work Center.
- Access the Access Address Book application (P01012) again from the fast path.
- Enter
3090above the Address Number grid and click Find. - Select the record and click Select. Address Book Revision form opens.
- Click the Mailing tab to verify the changes you made to the Address Line 1, City, State, and Postal Code are updated.
- In the EnterpriseOne menu bar, notice that the Notification List icon indicates that you have received a new notification. Click the icon to open the Notification List.
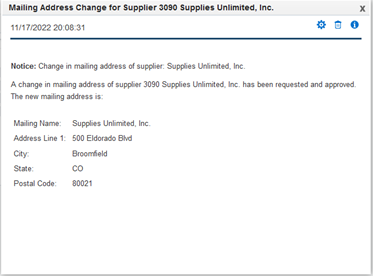
- Open the notification “Mailing Address Change for Supplier 3090”. Notice that this notification contains the message you created with variables, ${Address_Number}, ${Mailing_Name} and so on, substituted with your inputs. Anyone who subscribes to this notification will receive this message.
 Summary
In this Oracle by Example, you learned how to:
- Record a process to create a form request and an orchestration to change the mailing address for an Address Book number.
- Create a notification with a message indicating a change of address and subscribe to it.
- Create a workflow process that includes steps to:
- Send an approval message to an approver.
- Upon approval, launch the orchestration to change the address.
- Launch the notification for change of address.
- Create a logic extension that starts the workflow process.
- Create a form extension with a custom button that launches the logic extension; thereby starting the workflow process.
- Test the workflow by:
- Pressing the custom button and providing changed address information.
- Receiving the approval message in Work Center and approving it.
- Verifying that the orchestration automatically made the address change.
- Receiving a notification message about the changed address.
Want
to Learn More?
- “Using Orchestration Tasks (Release 9.2.7)” in the Workflow Tools Guide.
- “Adding Tasks to a JD Edwards EnterpriseOne Workflow Process” in the Workflow Tools Guide.