 Connecting
to OCI Object Storage
Connecting
to OCI Object Storage  Before You Begin
This 45-minute Oracle by Example (OBE) shows you how to create Connections and Connectors for OCI Object Storage.
What Do You Need?
To perform the steps in this OBE, you must have generated API Keys and gathered important information needed to configure Oracle Cloud Infrastructure (OCI) connections in Orchestrator.
 Creating
a Connection for Object Storage Service
Creating
a Connection for Object Storage Service
- On the Orchestrator Studio Home page, click the Connections icon.
- On the Connections side panel, click the New button and select REST from the drop-down list.
- On the Connection design page, complete these
fields:
- Name - Enter
OCI OBJECT STORAGE. - Description - Enter a description if desired.
- User/Role - Enter the user or role that will be authorized to run the originating orchestration. The user can be an EnterpriseOne user, role, or *PUBLIC.
- Environment - Enter the environment where the orchestration runs.
- Name - Enter
-
On the Service Information tab, enter the URL for accessing the OCI services in the Endpoint field.
For example, the object storage URL in the Phoenix region is:
https://objectstorage.us-phoenix-1.oraclecloud.com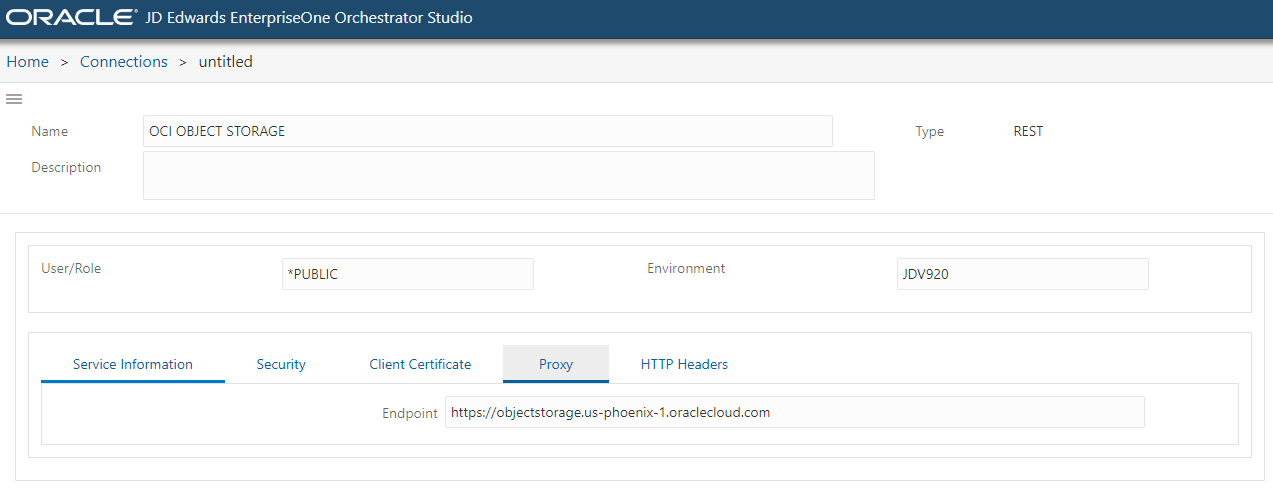
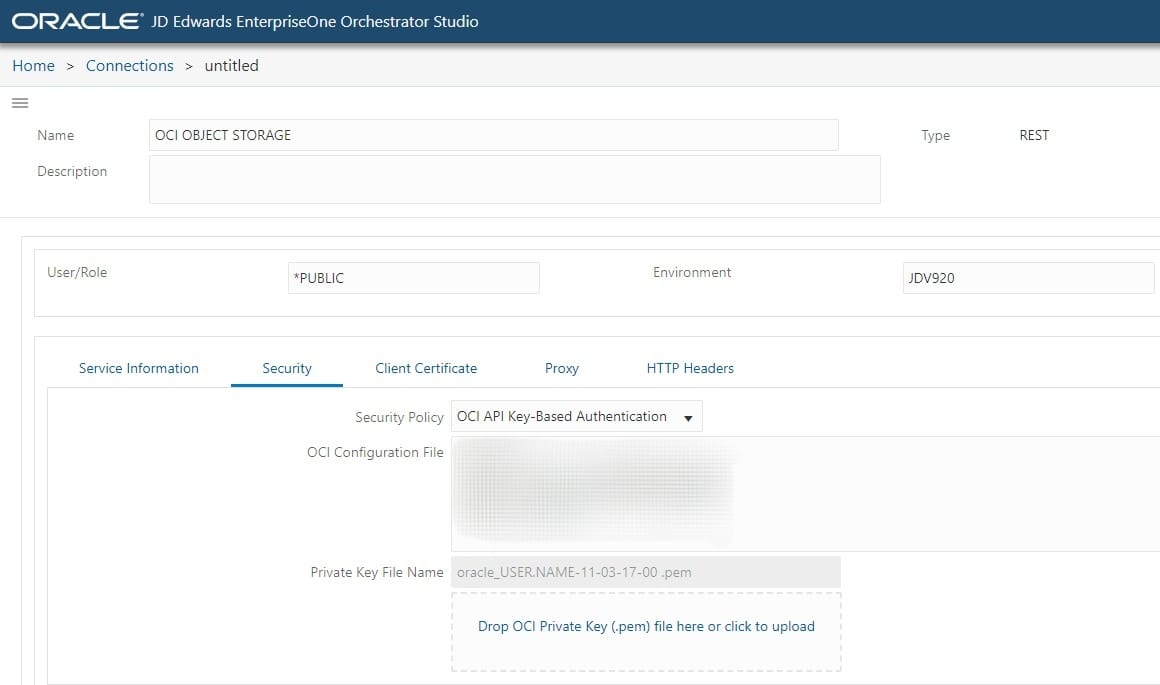
Service Information - Click the Security tab and from the Security
Policy drop-down list, select the OCI API Key-Based
Authentication.
- In the OCI Configuration File field, copy and paste the OCI configuration file details from your OCI API Key.
- In the Private Key File Name field, drag the OCI
private key (.pem) file from your system and drop it on
the field name. Alternatively, you can click and then
upload the key file.
Security
- Enter proxy information on the Proxy tab if necessary for your network configuration.
- Click Save.
 Creating
a Connector to Create a Bucket in OCI Object Storage
Creating
a Connector to Create a Bucket in OCI Object Storage
- On the Orchestrator Studio Home page, click the Connectors icon.
- Click the New button and select REST.
- On the Connector page, complete the following
fields:
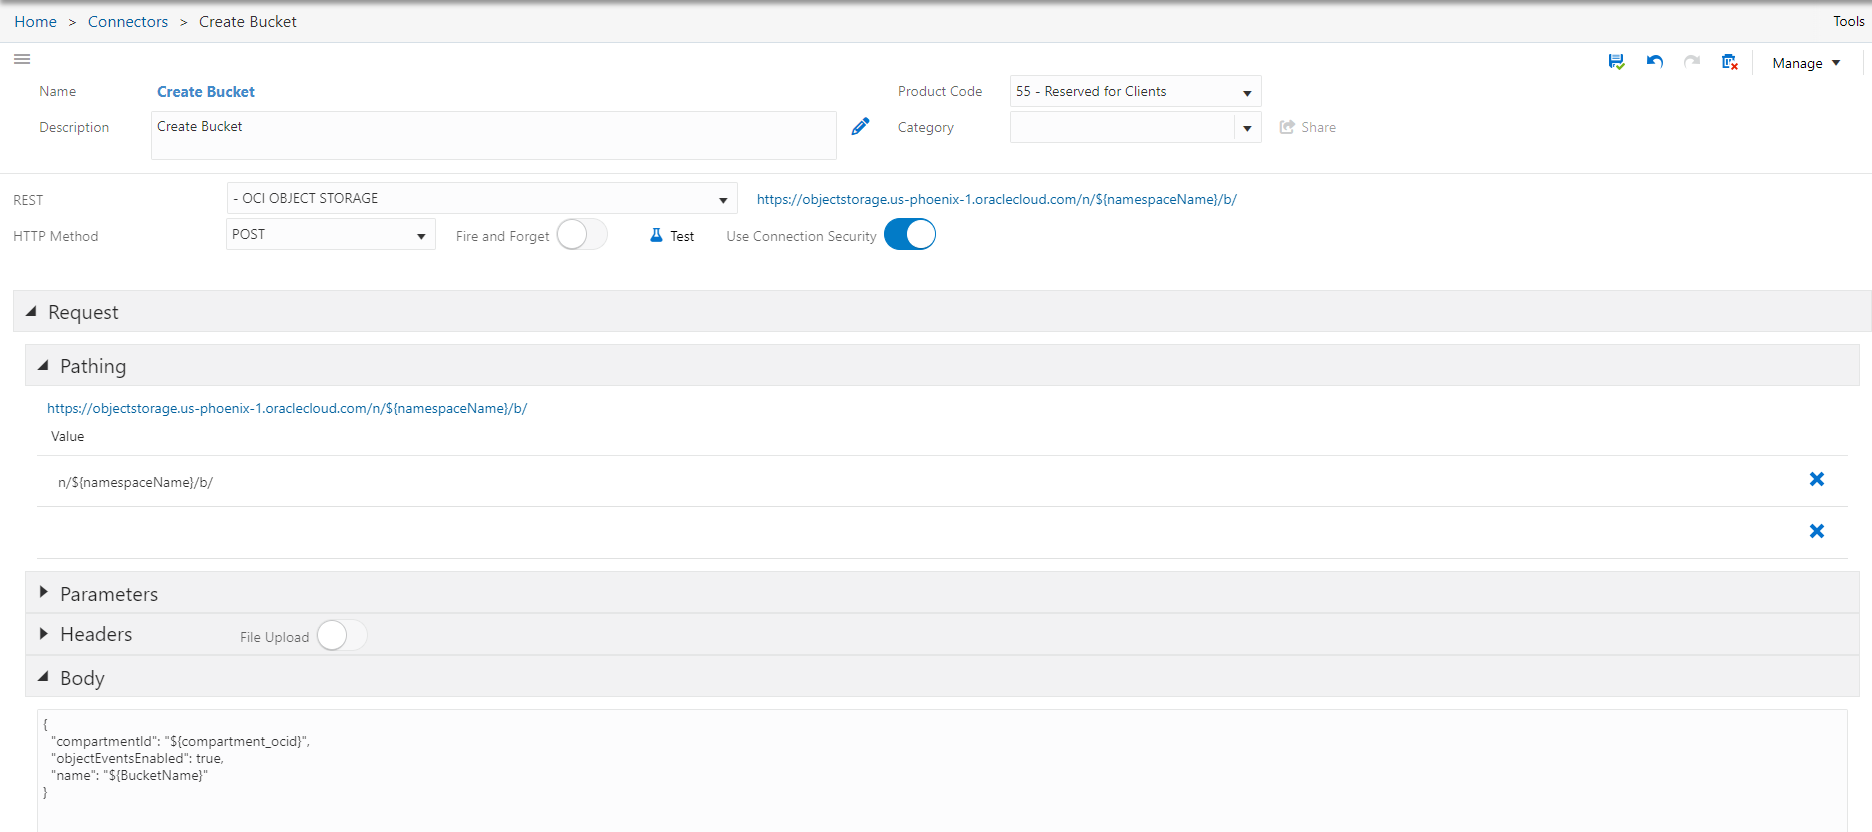
- Name -
Create Bucket. - Enter Short Description - Enter a description if desired.
- Name -
- From the REST drop-down list, select the connection (OCI OBJECT STORAGE), which you have created in the previous step.
- Change the HTTP Method to POST.
- Expand the Pathing section and in the Value grid,
build the path to the REST service endpoint by entering the
following value in the first row:
n/${namespaceName}/b/
After entering these values, the service path displayed above the Value grid should look like this:
https://objectstorage.us-phoenix-1.oraclecloud.com/n/${namespaceName}/b/ - In the Headers section keep the File Upload option off.
- In the Body section enter the following:
 {

 "compartmentId": "${compartment_ocid}",

 "objectEventsEnabled": true,

 "name": "${BucketName}"

 }
Body Section
- In the Body section enter the following:
- Expand the Response section and then expand the Output
subsection.
- Enable the Include Response Status option.
- Change the default variable name to:
httpstatus.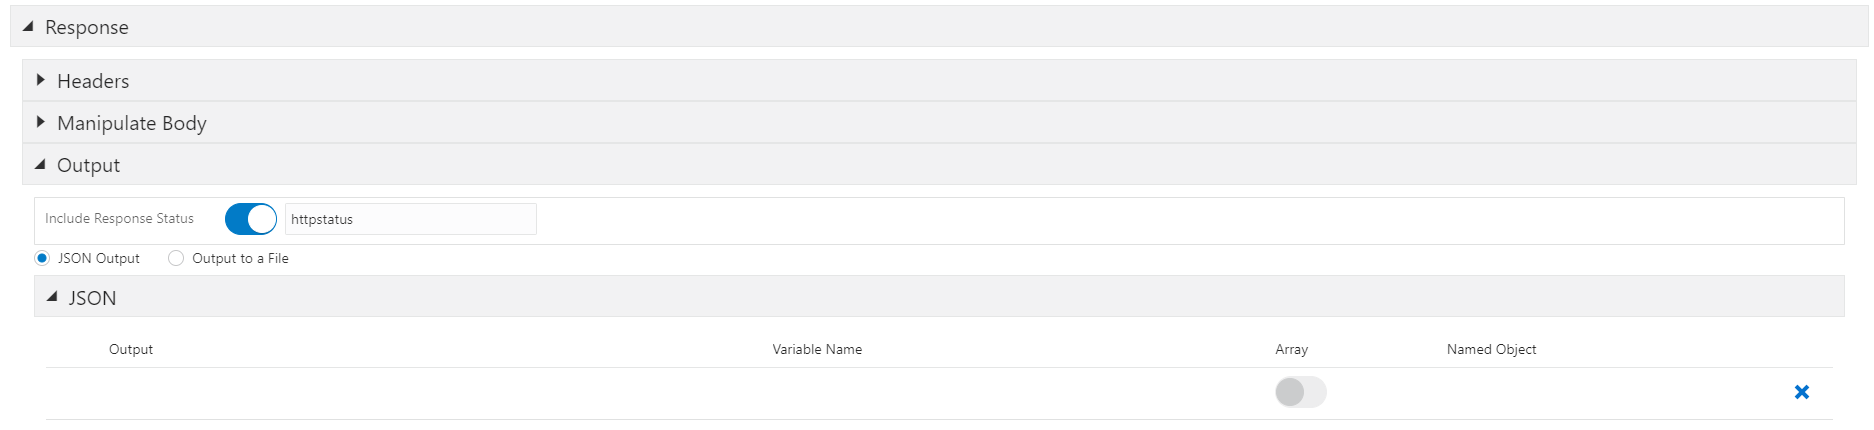
Include Response Status
- Save the connector.
 Creating
a Connector to Upload the Image in OCI Object Storage
Creating
a Connector to Upload the Image in OCI Object Storage
- On the Orchestrator Studio Home page, click the Connectors icon.
- Click the New button and select REST.
- On the Connector page, complete the following
fields:
- Name -
PUT Object File. - Enter Short Description - Enter a description if desired.
- Name -
- From the REST drop-down list, select the connection (OCI OBJECT STORAGE) which you have created in the previous step.
- Change the HTTP Method to a PUT.
-
Expand the Pathing section and in the Value grid, build the path to the REST service endpoint by entering the following value in the first row:
n/${namespaceName}/b/${bucketName}/o/${objectName}After entering these values, the service path displayed above the Value grid should look like this:
https://objectstorage.us-phoenix-1.oraclecloud.com/n/${namespaceName}/b/${bucketName}/o/${objectName} - In the Headers section,
- Enable the File Upload option. The Binary Body option is enabled by default.
- Add a key for Accept with value
application/json.
- In the File section,
- Select the File option.
- Do not change the default values for Source File
Name (${filename}) and Use Temporary File
Location (checked).

File Section
- Expand the Response section and then expand the Output
subsection.
- Enable the Include Response Status option.
- Change the default variable name to:
httpstatus.
- Save the connector.
 Creating
a Connector to Delete the Image in OCI Object Storage
Creating
a Connector to Delete the Image in OCI Object Storage
- On the Orchestrator Studio Home page, click the Connectors icon.
- Click the New button and select REST.
- On the Connector page, complete the following
fields:
- Name - Enter
OCI Delete Object. - Enter Short Description - Enter a description if desired.
- Name - Enter
- From the REST drop-down list, select the connection (OCI OBJECT STORAGE) which you have created in the previous step.
- Change the HTTP Method to a DELETE.
-
Expand the Pathing section and in the Value grid, build the path to the REST service endpoint by entering the following value in the first row:
n/${namespaceName}/b/${bucketName}/o/${objectName}After entering these values, the service path displayed above the Value grid should look like this:
https://objectstorage.us-phoenix-1.oraclecloud.com/n/${namespaceName}/b/${bucketName}/o/${objectName} - Leave the defaults in Parameters, Header, and Body
sections blank.
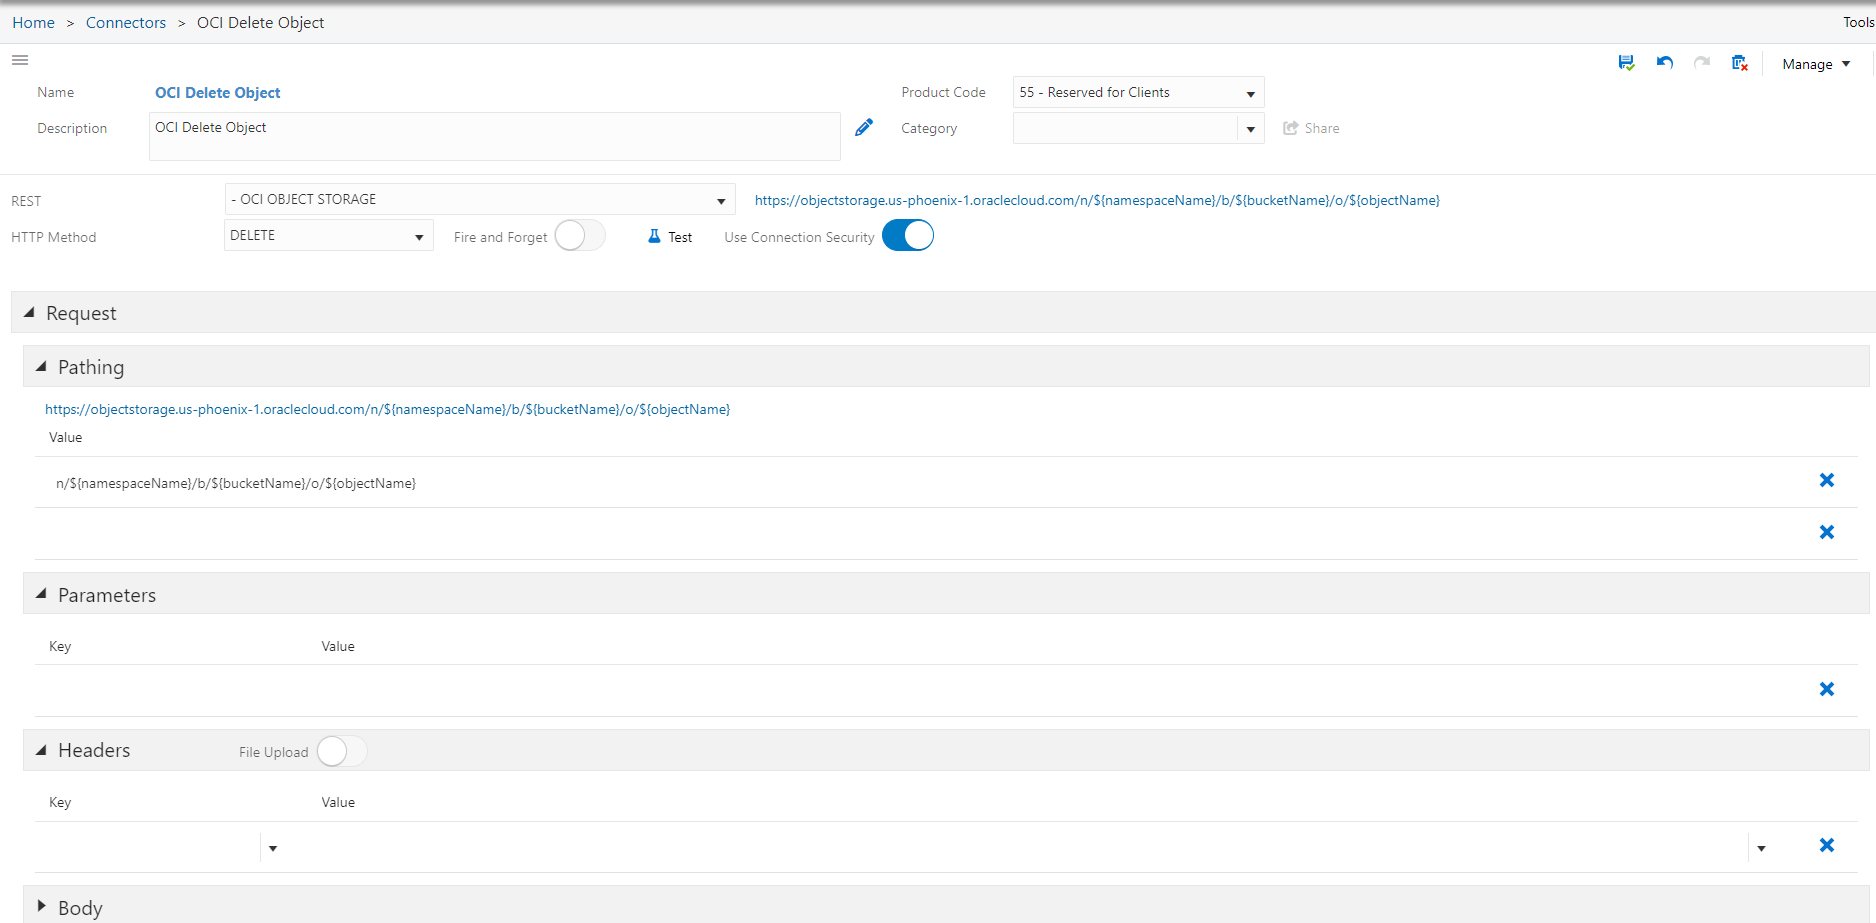
OCI Delete Object - Expand the Response section and then expand the Output
subsection.
- Enable the Include Response Status option.
- Change the default variable name to:
deleteStatus.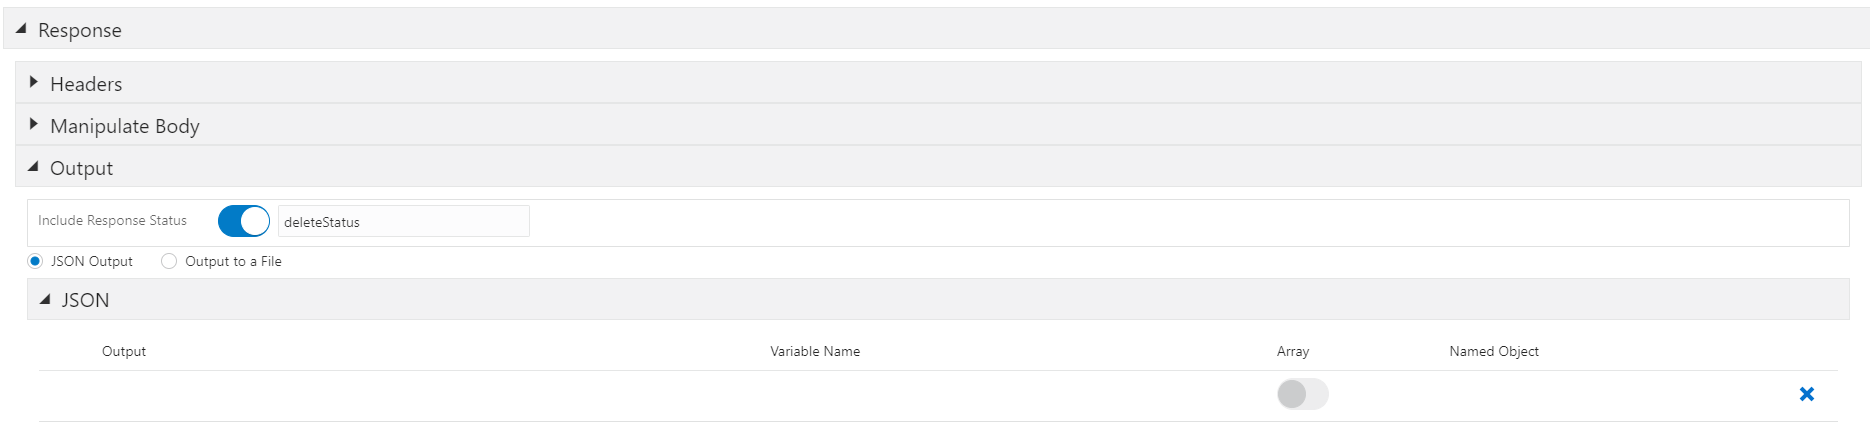
Output
- Save the connector.
 Creating
a Connector to Delete a Bucket in OCI Object Storage
Creating
a Connector to Delete a Bucket in OCI Object Storage
- On the Orchestrator Studio Home page, click the Connectors icon.
- Click the New button and select REST.
- On the Connector page, complete the following
fields:
- Name -
Delete Bucket. - Enter Short Description - Enter a description if desired.
- Name -
- From the REST drop-down list, select the connection (OCI OBJECT STORAGE) which you have created in the previous step.
- Change the HTTP Method to a DELETE.
-
Expand the Pathing section and in the Value grid, build the path to the REST service endpoint by entering the following value in the first row:
n/${namespaceName}/b/${bucketName}/After entering these values, the service path displayed above the Value grid should look like this:
https://objectstorage.us-phoenix-1.oraclecloud.com/n/${namespaceName}/b/${bucketName}/ - Leave the defaults in Parameters, Header, and Body sections blank.
- Expand the Response section and then expand the Output
subsection.
- Enable the Include Response Status option.
- Change the default variable name to:
httpStatus.
- Save the connector.