Before You Begin
Purpose
This Oracle By Example (OBE) describes how to use Repeating/Optional Forms in an Orchestration Form Request.
Time to Complete
45 minutes.
Background
Previously, an orchestration Form Request required the designer to know the exact sequence of forms that would run at runtime. However, many JD Edwards EnterpriseOne applications repeat forms or skip forms based on user input or selections in a grid.
By selecting the Repeating/Optional Form option, you can build a single form request that supports forms that might open multiple times, or not at all, depending on runtime conditions.
In this OBE, you will use the Repeating/Optional Form option to address the following:
- Release all lines on a blanket order.
- Release all lines on a blanket order using an array to control the quantity released for each line.
- Release specific lines and quantities across multiple blanket orders.
- Create a sales order that may include kit items and configured items.
What Do You Need?
To perform the steps in this OBE, you will need:
Access to a JD Edwards EnterpriseOne environment with Tools Release 9.2.26.2 or later. JD Edwards EnterpriseOne Trial Edition running on Oracle Cloud Infrastructure is suitable, but you can use any environment with the proper Tools release.
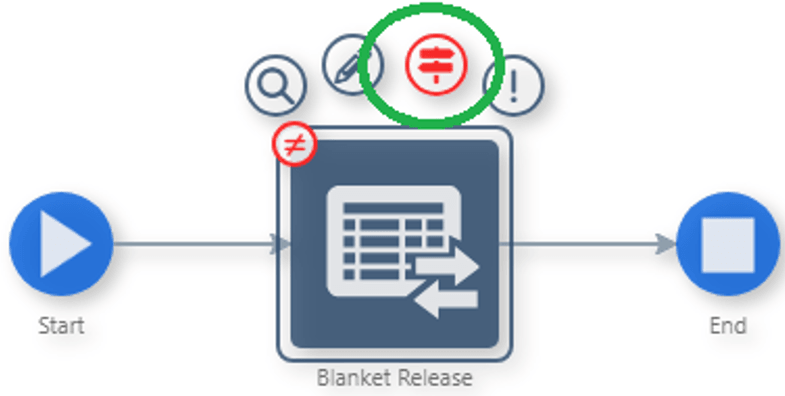
Task 1: Release All Lines on a Blanket Order
For this and the next tasks, you need blanket orders that you can release. In this task, you create two blanket orders and then record a process to release blanket order lines. Because the Order Release form opens once for each selected line, you update the Form Request to use a Repeating/Optional Form so the orchestration can run successfully regardless of how many lines are selected.
A. Create Two Blanket Orders
- Sign in to the EnterpriseOne web client.
- From the EnterpriseOne Home page, click Navigator, and enter P4310 ZJDE0006 in Fast Path.
- On Work With Order Headers, click Add. The Order Detail form appears.
- Enter the following values:
- Supplier: 3090
- Branch/Plant: 30
- Click Ok.
- In the grid, add three lines with the following details:
- Item Number: 210, 220, 230
- Quantity Ordered: 100 for each line
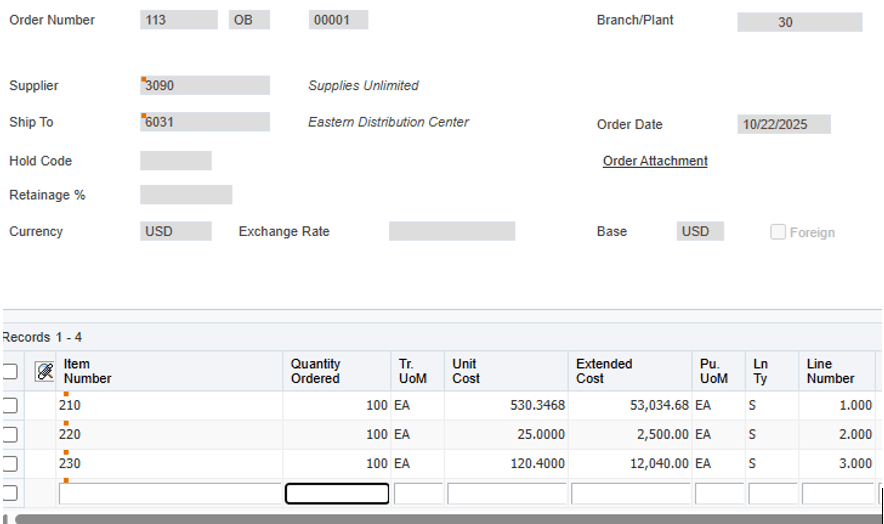
Create Two Blanket Orders - Click OK to save the order and note the Order Number you created.
- Create a second blanket order by repeating steps 3–7 with the
following changes:
- Use the same Supplier (3090) and Branch/Plant (30).
- Add two lines for Item 210 and 220, each with Quantity Ordered 100.
- Note the Previous Order Number.
B. Record the Release Process Using Process Recorder
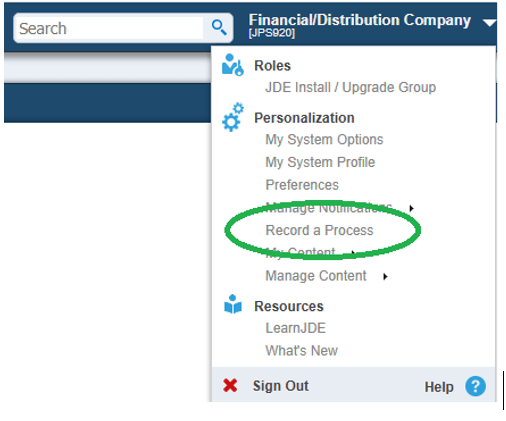
- Return to the EnterpriseOne Home page.
- From the user menu (top right), click Record a Process
to open Process Recorder.
Record the Release Process - In the Process Recorder window, click Start.
- Use Navigator to open P43060 (Work With Order Release program).
- Enter the Order Number for the first
(three-line) blanket order and click Find.
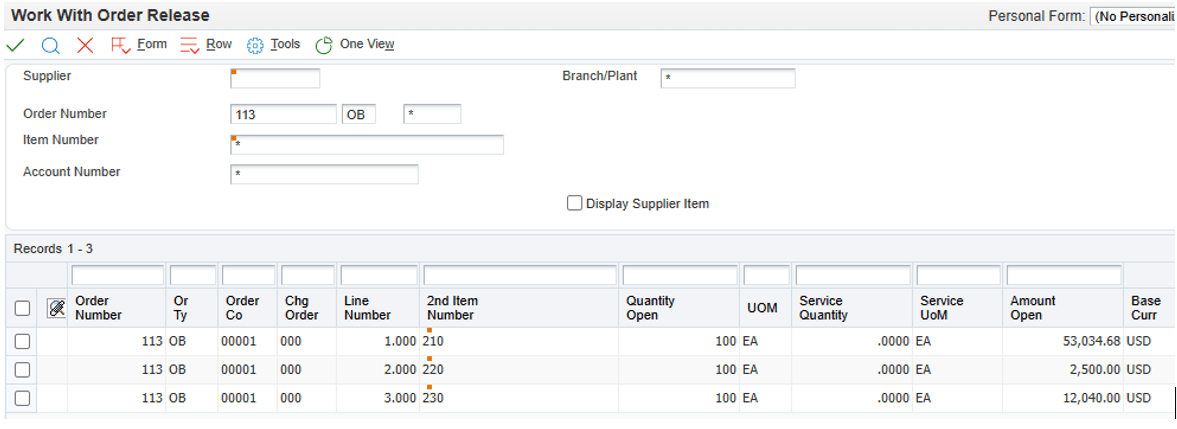
Enter the Order Number - Select all the rows by checking the top left check box in the grid header.
- Click Select (green check icon). For each selected row, the system opens the Order Release form.
- For each occurrence of the Order Release
form:
- Override Release Qty to 1.
- Click OK.
- Note: If you do not override Release Qty, the system releases the full quantity.
- After you close the last Order Release form and return to Work With Order Release form, click Form and select Generate Order(s). The system displays the results in Generated Purchase Orders.
- In Process Recorder, click Return Values.
- On Generated Purchase Orders, click the Order Number column heading in the grid to return the generated purchase order number.
- In Process Recorder, click Resume.
- Click Close to exit the Generated Purchase Orders form.
- Click Close to exit Work With Order Release and return to the Home page.
- In Process Recorder, enter Blanket Release in the Name field, click Save, and close Process Recorder.
C. Update a Form Request with Repeating/Optional Form
- Open Orchestrator Studio.
- On the Orchestrator Studio Home page, click the Form Requests tile.
- In the left panel, search for and select the Blanket Release process. If it does not appear, click Refresh.
- In the top form segments, locate the Order Release form. The recorded process includes one Order Release occurrence for each line you selected. In this example, three lines were selected, so three Order Release occurrences were recorded.
- Delete any additional occurrences of the Order Release
form so that only one remains (keep one occurrence and delete the
rest):
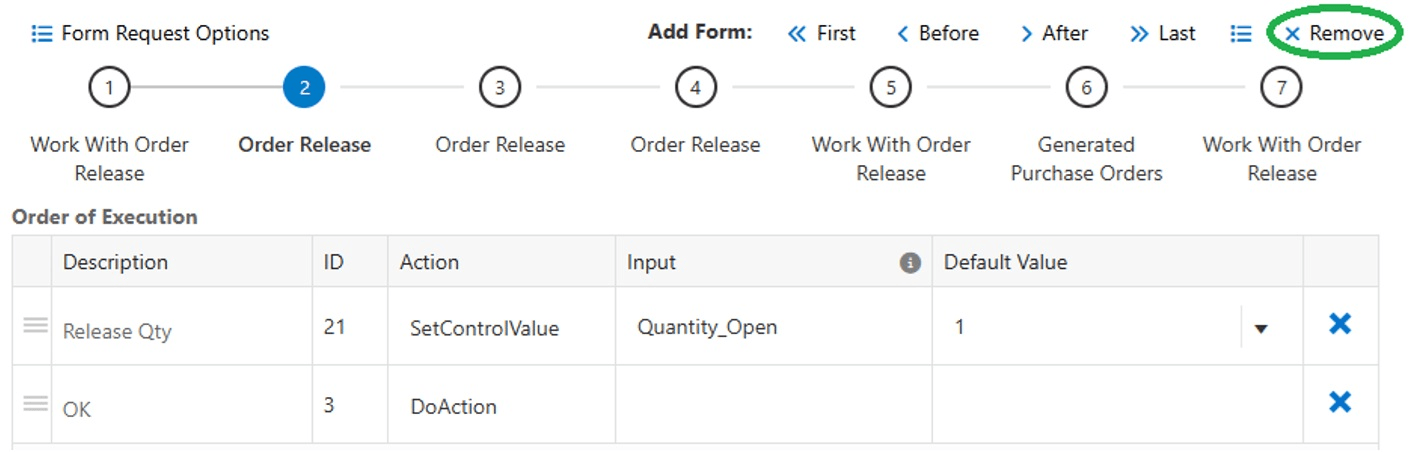
Remove Order Release - Select an Order Release step, click Remove, and click OK to confirm. It does not matter which occurrence you delete, but only one occurrence of Order Release should remain.
- Repeat until only one Order Release step remains.
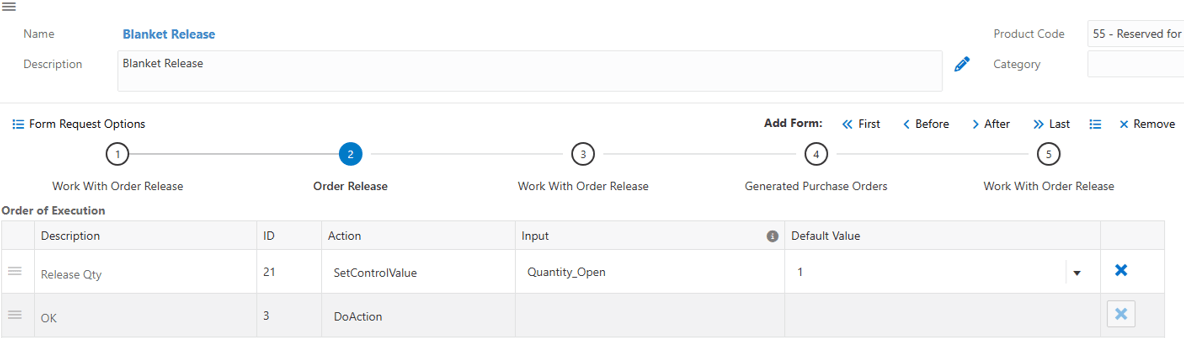
Order Release - Select the remaining Order Release step. Click the Form Details button next to the Remove button.
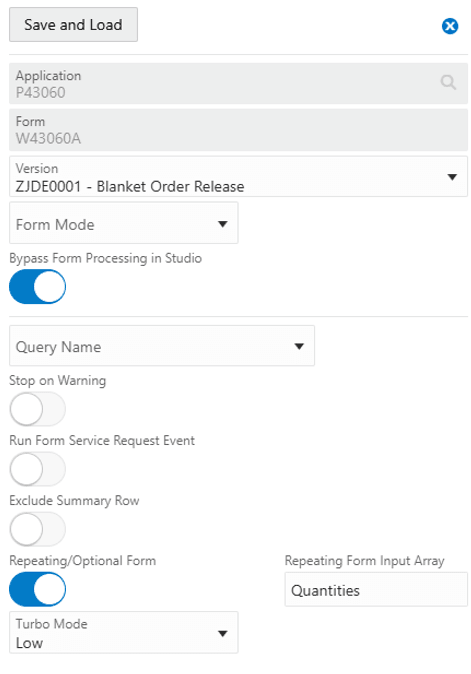
- Enable Repeating/Optional Form and click Save and Load.
- On the Order Release form, rename the input variable for Release Qty to Release_Qty (instead of Quantity_Open).
- Click Save to save the form request.
D. Create and Test the Orchestration
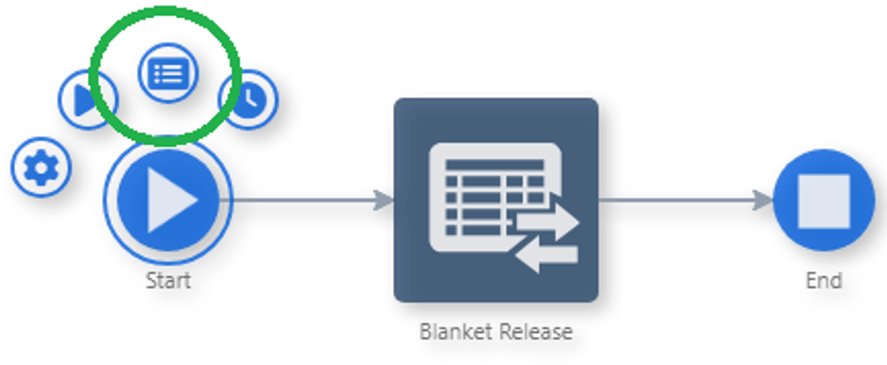
- From the Manage menu, click Create Orchestration.
- Click Save to save the orchestration.
- Run the orchestration:
- Double-click the Start node or select the node and click Run Orchestration.
- In the inputs, enter the following values:
- Order_Number: the order number for the three-record blanket order
- Release_Qty: 2
- P43060_Version: leave blank
- Click Run and note the Order Number
returned in the response.
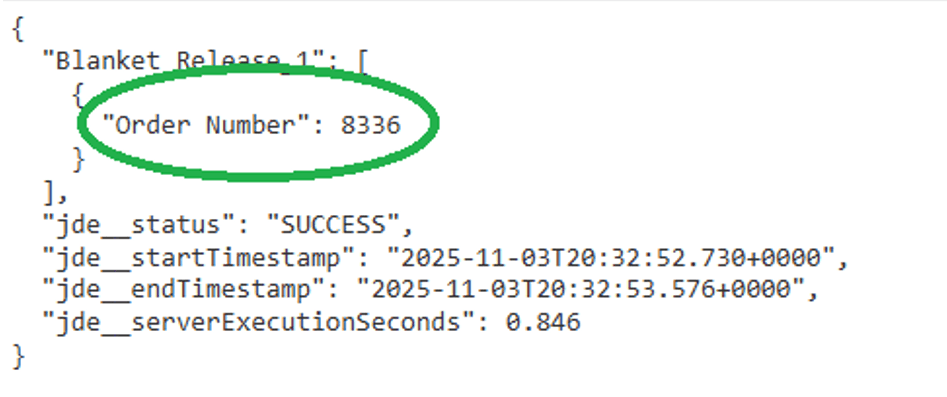
Order Number
E. Verify the Results
- In the EnterpriseOne web client, use Navigator to open P4310.
- Enter the purchase order number returned in the response and click Find.
- Select the order in the grid and click OK.
- On the Order Header form, click OK.
- On the Order Detail form, verify the
following:
- The order includes three lines.
- Each line has a quantity of 2 (or the value you passed in Release_Qty).
- To confirm the source blanket order, scroll right and review Orig Order and Original Line No.
- Repeat the procedure described in sections D and E using the second blanket order and verify that the generated purchase order includes the expected lines and quantities.
Task 2: Release All Lines on a Blanket Order Using an Array to Control the Quantity Released for Each Line
In the previous task, the orchestration used a single input value to control the quantity released for every blanket order line. In this task, you update the form request and orchestration inputs to pass an array of quantities so you can release a different quantity for each line.
A. Update the Form Request to Use a Repeating Form Input Array
- Open Orchestrator Studio and navigate to Form Requests.
- In the left panel, select the Blanket Release form request created in the previous task.
- In the top form segments, select the Order Release
form and click Form Details
 .
.
- In the Form Details window, enter the
following value:
- Repeating Form Input Array: Quantities
- This enables you to pass an array named Quantities that contains the variable inputs for this form. In this task, Release_Qty is the only field in the array.
- Click Save and Load, and then click Save to save the form request.
B. Update the Orchestration Inputs and Fix the Mapping
- Return to the Orchestrator Studio Home page, and then navigate to Orchestrations.
- Select the Blanket Release orchestration created in the previous task.
- Select the Start node, and then click Inputs
and Values:
Inputs and Values - In Inputs list, click the X at the end of the Release_Qty row to remove the input.
- Click the curser on the orchestration page.
Note: The Blanket Release step displays a Broken Mappings badge because the input Release_Qty, which was previously in use, has been deleted.
Broken Mappings - Select the Blanket Release step, and then click the Transformations icon.
- In the Transformations panel, click Add Inputs to Orchestration, and then click Auto Map. This recreates the Release_Qty input as part of the Quantities array.
- Click Save to save the orchestration.
C. Test the Orchestration
- Select the Start node, and then click Run Orchestration.
- Enter a blanket order number for Order_Number.
- Next to Quantities, click Array Inputs.
- In the Array Inputs popup, enter a quantity
for each line of the blanket order.
Note: After entering a quantity, click outside the input field to add a new entry row.
- If you enter fewer quantities, the default quantity is applied to the remaining rows.
- If you enter more quantities, the extra values are ignored.
- Click Run.
- Using the Order Number returned in the response, open the generated order in P4310 and inspect the order lines and quantities.
Task 3: Release Specific Lines and Quantities Across Multiple Blanket Orders
In this task, you build an orchestration that releases multiple blanket order lines, one line at a time. You configure two consecutive forms in a single form request to run repeatedly based on an input array. The orchestration accepts an array that contains Order Number, Line Number, and Release Quantity, enabling you to release a specific quantity from specific lines across multiple blanket orders before generating purchase orders.
A. Copy the Existing Form Request
- Open Orchestrator Studio and navigate to Form Requests.
- Select the Blanket Release form request created in the previous tasks.
- From the Manage menu, click Save As.
- In the Save As window, enter the following
values:
- New Name: Line Blanket Release
- New Description: Line Blanket Release
- Click OK.
B. Configure the Work With Order Release Form to Repeat by Array Input
- In the top form segments, select the Work With Order Release form (first option).
- Click Form Details .
- Enable Repeating/Optional Form.
- In Repeating Form Input Array, enter Blanket Lines.
- Click Save and Load.
C. Add a Line Number QBE Filter and Update Grid Selection Behavior
- Confirm Work With Order Release is still selected in the top form segments.
- In Available Actions, expand Work With Order Release – QBE.
- Locate Line Number (ID 37) and click Add Action (+).
- In Order of Execution, select the new Line Number row (typically the last row added), and reposition it as the second action in the sequence.
- In Order of Execution, remove any Select All Rows actions. Select each Select All Rows action and click Delete (X).
- In Available Actions, expand Work With Order Release – Grid.
- Locate Select Row and click Add Action (+).
- In Order of Execution, update the Select
Row action:
- Clear Select_Row from the Input column.
- Set the Default Value to 1.
- Filter by Order Number and Line Number, the grid should return a single row after Find.
- Reorder the actions so Select Row runs between
Find and Select.
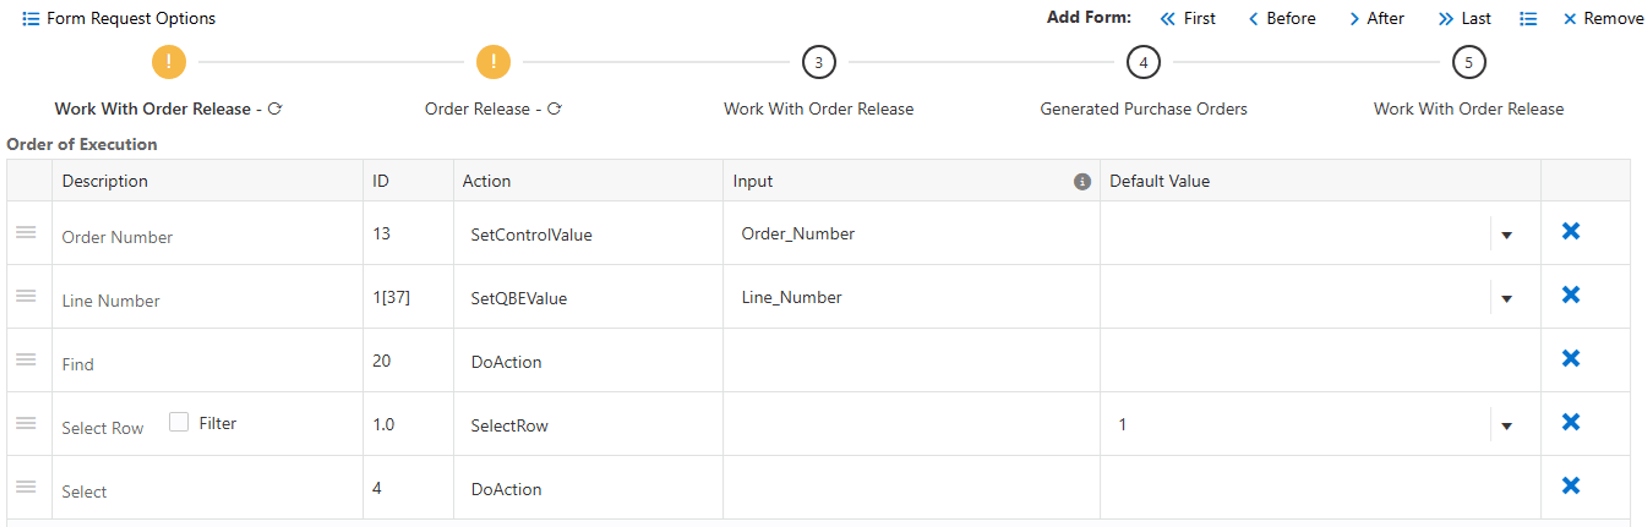
Update the Select Row Action
D. Configure the Order Release Form to Use the Same Input Array
- In the top form segments, select Order Release (second option).
- Click Form Details
- Set Repeating Form Input Array to Blanket Lines (to match the first form).
- Click Save and Load.
- This enables you to pass a single array that includes Order Number, Line Number, and Quantity.
- At runtime, the first two forms run once, consecutively, for each row in the Blanket Lines array. After the array is processed, the form request continues to generate the purchase order.
- Click Save to save the form request.
E. Create and Test the Orchestration
- From the Manage menu, click Create Orchestration.
- Click Save to save the orchestration.
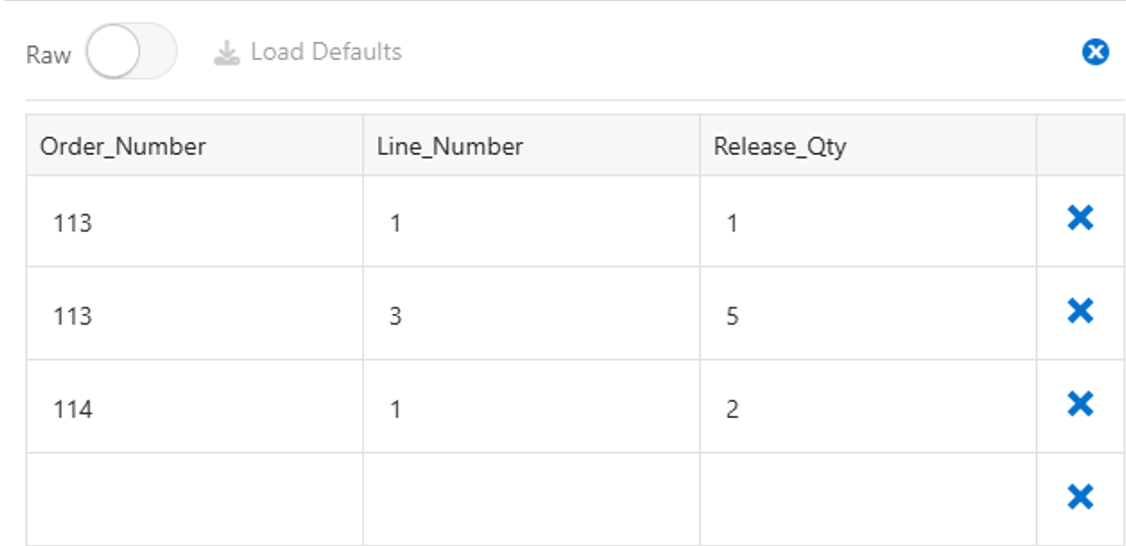
- From Run Orchestration, locate the Blanket Lines input and click Array Inputs.
- Add multiple rows to the array using valid combinations from your test blanket orders (Order Number + Line Number + Quantity), and close the window.
- Click Run.
- In the response, confirm the generated Order Number contains the expected released line information.
Task 4: Create a Sales Order That May Include Kit and Configured Items
In this task, you record and build an orchestration that creates a sales order containing any combination of regular, kit, and configured items. When you add a kit item, the Kit Selection form opens. When you add a configured item, a configurator form opens. For this task, you accept the default configuration for both kits and configured items.
A. Record the Process to Create a Sales Order
- Sign in to the EnterpriseOne web client.
- From the user menu (top right), click Record a Process to open Process Recorder.
- In the Process Recorder window, click Start.
- Use Navigator and enter P42101 in Fast Path.
- Click Add (+ icon).
- On the Order Header, enter the following values:
- Sold To: 4244
- Branch/Plant: 30
- In the grid, enter the first line:
- Item Number: 2400
- Branch/Plant: 30
- On the Order Header, click the Order Summary tab. Switching header tabs removes focus from the grid and prompts the grid values to be processed.
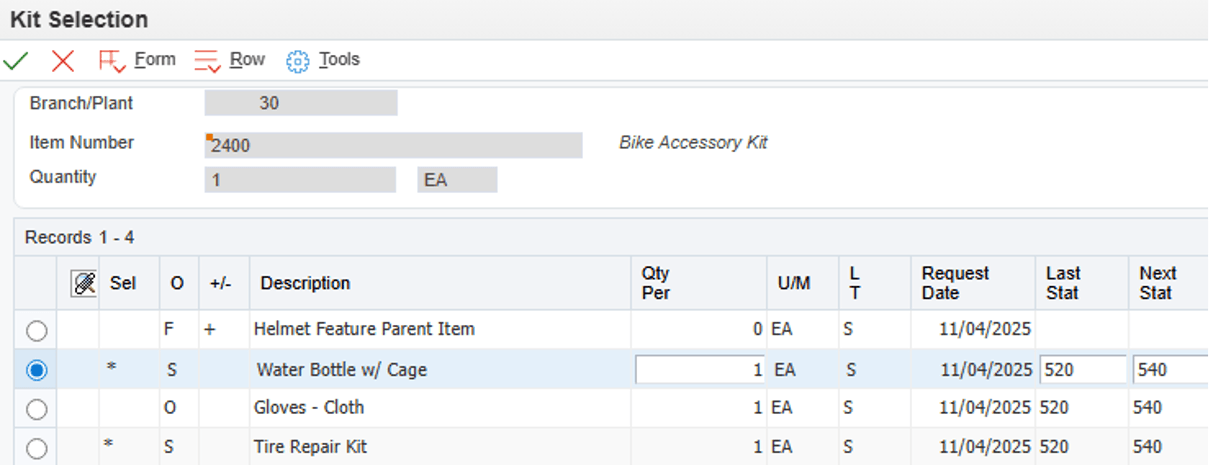
- When the Kit Selection window opens, click OK to accept the default kit configuration.
- Add a second line in the grid:
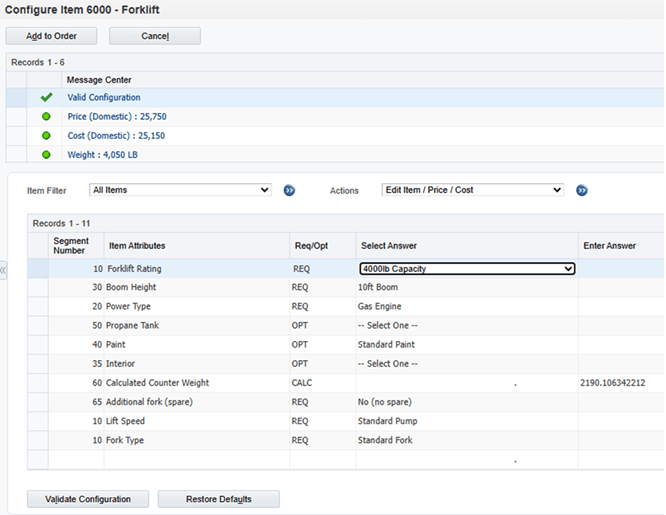
- Item Number: 6000
- Branch/Plant: M30
- Note: If you receive an error, confirm that Branch/Plant is M30 (not 30).
- Exit the row. The configurator window opens.
- Click Validate Configuration.
- Click Add to Order.
- When you return to the sales order, select the Sales Order Header tab.
- In the Process Recorder window, click Return Values, and then select the field that contains the order number to capture it.
- In the Process Recorder window, click Resume.
- Click Submit and Close to save the order.
- On Manage Existing Order, enter the captured order number in the Order Number filter field, and click Find.
- In the Process Recorder window, click Return Values.
- In the grid, select the following columns by clicking each
column heading:
- Order Number
- Line Number
- 2nd Item Number
- Description 1
- In the Process Recorder window, click Resume.
- Close Manage Existing Order (X icon) to stop the recording.
- In Process Recorder, enter Add Sales Order with Kits and Config Items for the Name, click Save, and close Process Recorder.
B. Update the Form Request to Handle Optional/Repeating Forms
- In Orchestrator Studio, navigate to Form Requests.
- In the left panel, select Add Sales Order with Kits and Config Items.
- In the top form segments, locate the second occurrence of the Enter
New Order form (fourth option) and remove it.
- Select the form, click Remove, and click OK to confirm.
- This second occurrence was recorded because the Kit Selection window opened after you entered the first line.
- At runtime, the orchestration adds all lines through the array passed to the first Enter New Order form, and the kit/configurator forms open only as needed.
- Configure the Kit Selection form as
repeating/optional:
- Select Kit Selection in the segment.
- Click Form Details.
- Enable Repeating/Optional Form.
- Click Save and Load.
- Configure the configured item form as repeating/optional:
- Select Parent Form – Configured Item Revisions in the segment.
- Click Form Details.
- Enable Repeating/Optional Form.
- Click Save and Load.
C. Ensure the Variable Created to Store the Order Number Is Used to Fetch Order Details
- Select the next form in the form segments (fifth option).
- In the grid Action
 column, click the button to view the returned OrderNumber
variable.
column, click the button to view the returned OrderNumber
variable. - Note the exact returned variable name (for example, OrderNumber).
- Select the sixth form in the segment and locate the Order Number field mapping.
- Change the Input value from Order_Number
to the returned variable name (for example, OrderNumber).
- This ensures the form request immediately finds the order that was just created.
- Click Save to save the form request changes.
D. Create and Test the Orchestration
- From Manage, click Create Orchestration.
- Click Save to save the orchestration.
- Test the orchestration using Run Orchestration.
- Enter the following header inputs:
- Long_Address_Number_Sold_To: 4244
- HdrBusinessUnit: 30
- Next to the line input array (for example, GridIn_188_20_2),
click Array Inputs.
- Note: It is recommended to rename the variables created by Process Recorder before creating the orchestration.
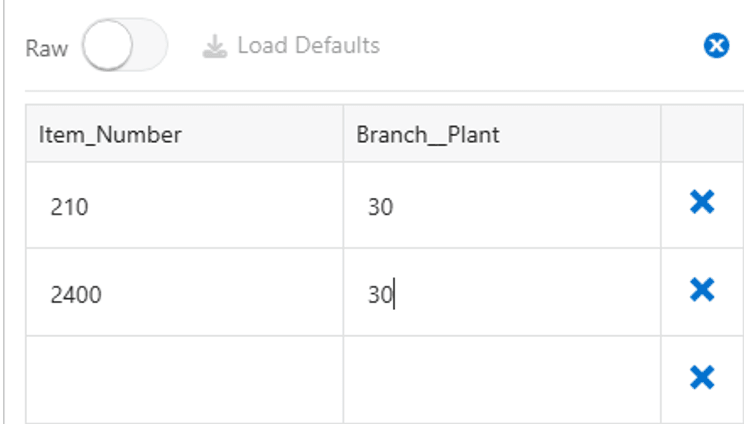
- Test with a regular item only:
- Add one row with Item_Number 210 and Branch_Plant 30.
- Close the Array Inputs window and click Run.
- Leave OrderNumber and P42101_Version blank.
- Verify the response displays a single-line sales order (no kit or configurator forms were required).
- Test with a kit item:
- Click Array Inputs again.
- Add a second row with Item_Number 2400 and Branch_Plant 30.
- Close the window and click Run.
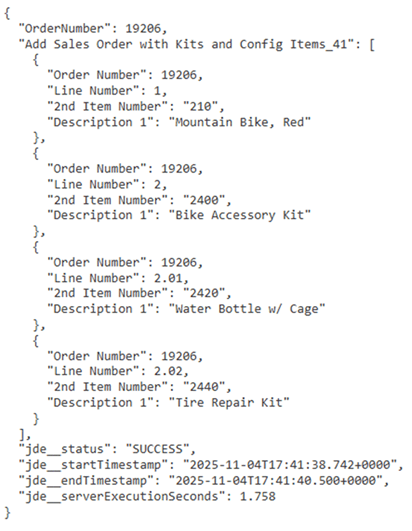
- Verify the order includes the two input items plus the
default kit component lines.
- For kit item 2400, lines such as 2.01 and 2.02 are the default kit components.
Order
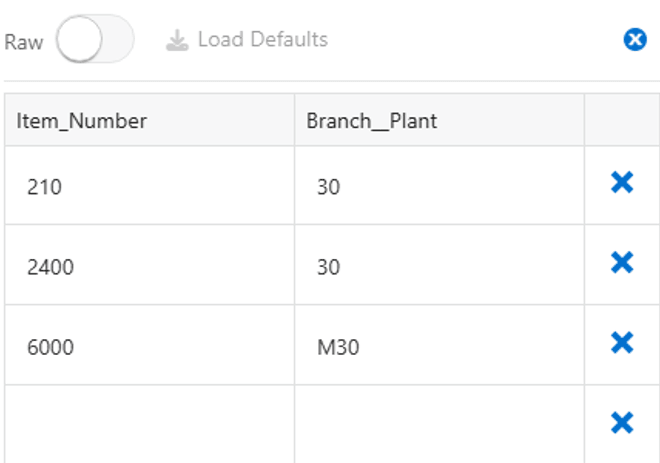
Array Inputs - Test with a configured item:
- Add the configured item to the array input (in addition to the prior items).
- Run the orchestration.
- Verify the order includes the prior lines and additional configured item lines (for example: 3, 3.001, 3.002, 3.003, 3.004).
Adding the Configured Item - Modify the input array to include any combination of regular, kit, and configured items, and confirm the sales order lines returned in the response.
Conclusion
In this Oracle-by-Example you learned how to use the Repeating/Optional Form option in a Form Request to indicate that a specific form might repeat any number of times, or perhaps not at all. In the case of releasing lines from a blanket purchase order, you could control the quantity of items being released for each line on the order independently. In the case of creating a sales order with items that may or may not be configured or kit items, the form request could iterate over the intervening configured item and kit forms. In this way, the Repeating/Optional Form option gives you the capability to automate EnterpriseOne applications that iterate over forms an undetermined number of times.
Using Repeating and Optional Forms in an Orchestration Form Request
G54986-01
2026
Copyright © 2026, Oracle and/or its affiliates.