Running the JD Edwards EnterpriseOne Platform Pack Installer for the IBM i
The user profile you specify during the Platform Pack install must not be limited by network security. Most of the Platform Pack install is done through commands and JAVA code that uses TCP\IP to send work between various IBM i service jobs. To find out whether there are network security limitations in place:
-
Enter the WRKREGINF command.
-
Page down to the QIBM_QZ* entries which are for the IBM i Access Host Servers.
-
Use Option 8 on any of these to see if an exit program is in place.
In addition, a Platform Pack installer failure can occur if any of the RSTxxx commands have been changed from the IBM defaults relative to the environments in which they can run.
To run the JD Edwards EnterpriseOne Platform Pack Installer for the IBM i Enterprise Server:
-
Log on to the Microsoft Windows machine where you will be running the Platform Pack installer for IBM i. If you follow the recommendation, this will be the JD Edwards EnterpriseOne Deployment Server.
Caution:Ensure that the Administrator account name that you use does not contain any special characters.
-
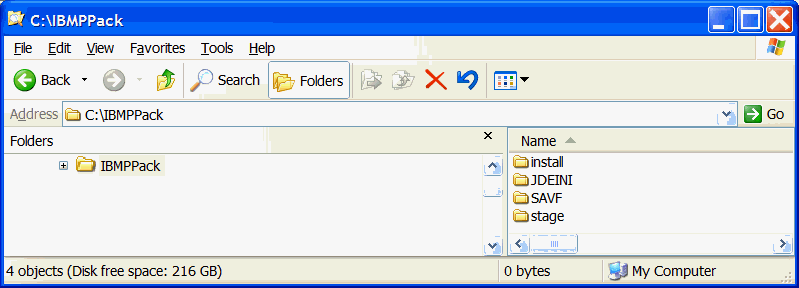
Create a folder into which you will copy the two .zip files that comprise the Platform Pack image. For example, the folder might be named:
c:\IBMPPack -
Extract the two zip files within the root of the folder created above. Using the example in this guide, a correctly extracted structure is:
-
Locate the
jt400.jarandutil400.jarfrom the location where you installed IBM i Access for Windows. For example, the location might be:c:\Program Files\IBM\Client Access\jt400\libNote:Because IBM Access Client solution does not ship the
util400.jar, you will be able to find this file on the IBMi machine in a location similar to this:/QIBM/ProdData/OS400/jt400/lib -
Copy these two
.jarfiles to this structure in your install image:..\stage\ext\jlib -
In the above extracted structure, locate the
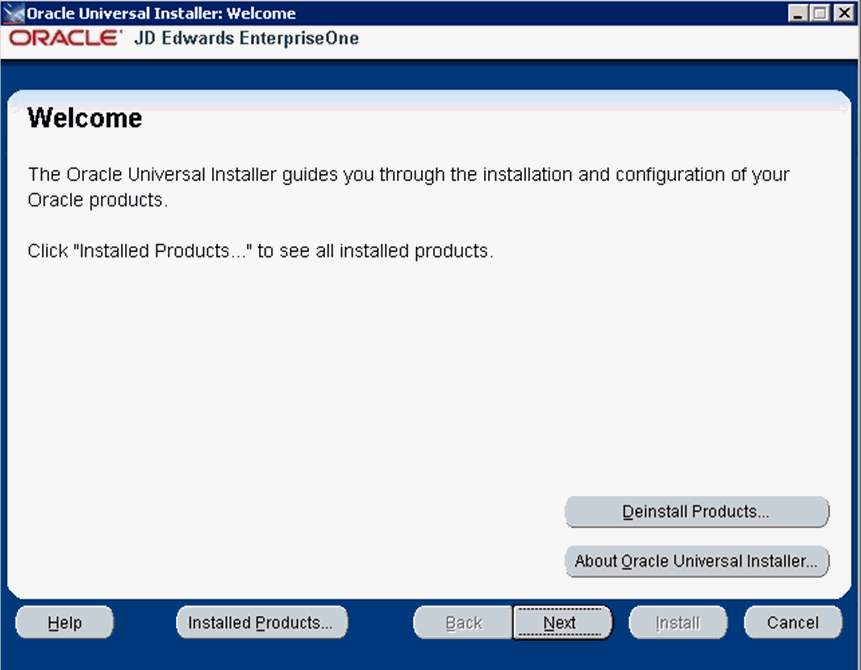
setup.exefile under the\installsubdirectory, right-click on it, and select Run as Administrator.Note:The Oracle Universal Installer takes a few minutes to start up.
-
On Welcome, click the Next button.

-
On Select Installation Type, choose your installation type:
-
Custom
In most cases this is the mode you should choose for Upgrades.
This mode is recommended for experienced users, choose this setup type if you wish to complete the Platform Pack installation by specifying the installation of a subset of pre-defined environments.
Tip:If you choose Custom installation, continue with the steps below in this task which immediately follow.
-
Full
Choose this setup type if you wish to complete the Platform Pack installation with no further specifications. This installation option includes the required JD Edwards EnterpriseOne files for the Prototype and Pristine environments.
-
Click the Next button.
-
-
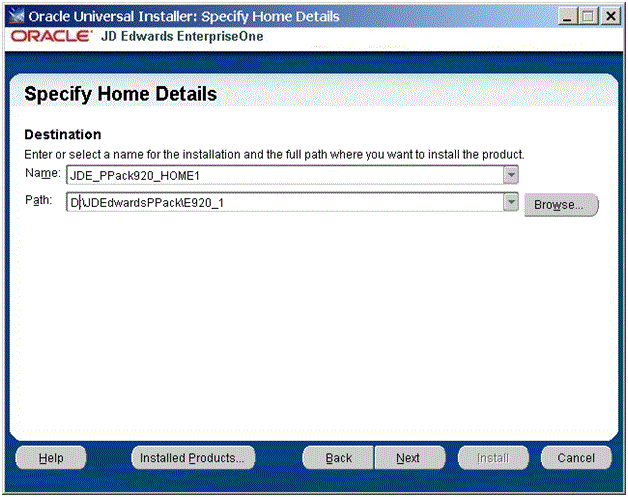
On Specify Home Details, complete these fields:
-
Name
Enter a unique name for the JD Edwards EnterpriseOne Platform Pack installation. For example:
JDE_PPack920_HOME
By default, the installer populates the values on this screen with _1 suffix. The _1 suffix can be removed, if desired. The actual value between Name and Path need not be consistent. It is only used by the Oracle Universal Installer.
If desired, change the install location from the c: drive. During the installation process itself, only a small amount of disk space is required on the Microsoft Windows machine for the Oracle Inventory for this install and a few temporary text files like
jde.ini. -
Path
Enter the drive and directory where you want the installer files installed on your Deployment Server (from where you are running the Platform Pack installer). For example:
Z:\JDEdwardsPPack\E920This process will store files directly related to the OUI installer (for example, the OUI inventory) in this location. This does not affect where libraries and paths are created on the IBMi.
-
-
Click the Next button.
-
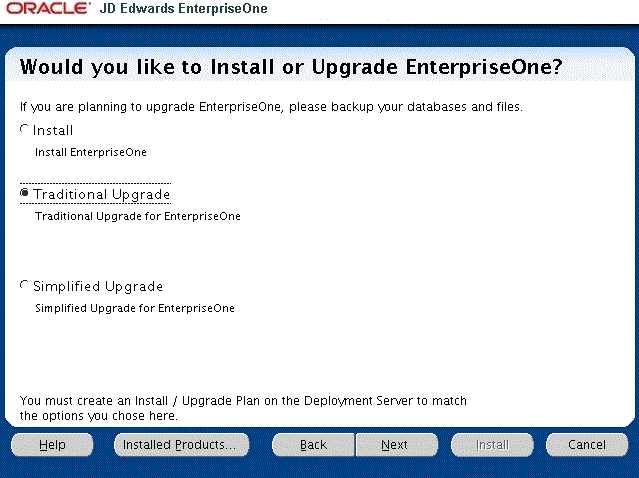
On Would you like to Install or Upgrade EnterpriseOne?, choose whether you want to install or upgrade JD Edwards EnterpriseOne. The list below describes each run mode.
-
Install
This selection installs Central Objects and Business Data / Control Tables for the selected environments.
Note that the installer checks for the existence of the Business Data and Control Tables libraries and will not proceed if any of these libraries already exist:
-
DV920
-
PD920
-
PY920
-
TESTDTA
-
PRODDTA
-
CRPDTA
-
TESTCTL
-
PRODCTL
-
CRPCTL
-
-
Traditional Upgrade
In this mode, the JD Edwards EnterpriseOne Platform Pack Installer checks for the existence of the Business Data and Control Tables libraries which are prerequisites to an upgrade of JD Edwards EnterpriseOne. F
Caution:You should always back up all databases that you want to preserve.
-
Simplified Upgrade
In this mode, the JD Edwards EnterpriseOne Platform Pack Installer checks for the existence of the Business Data and Control Tables libraries which are prerequisites to an upgrade of JD Edwards EnterpriseOne. The Simplified Upgrade only replaces identifies and replaces only specific standard JD Edwards EnterpriseOne objects that have changed between from Applications Release 9.0 Update 2 or Release 9.1 to Applications Release 9.2.
Caution:You should always back up all databases that you want to preserve.
-
-
Click the Next button.
If you chose the Full installation type, the Available Products screen will not display; you can skip to the Step 15.
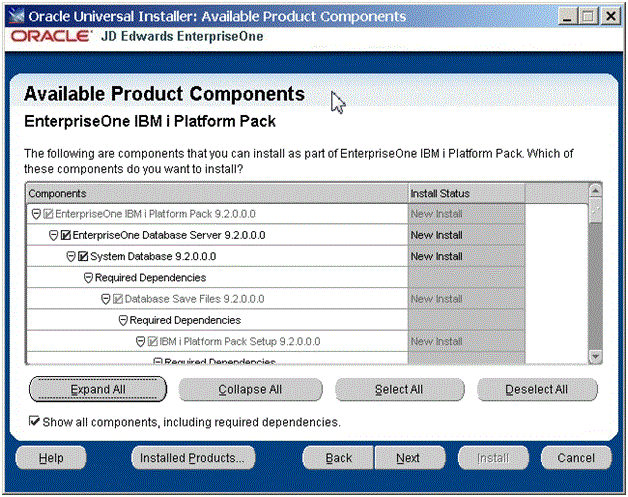
If you chose the Custom installation type, the Oracle Universal Installer displays a list of available JD Edwards EnterpriseOne product components, as shown in the example below:
 Tip:
Tip:Use the scroll bar to on the right hand side of the screen to view the complete list of available components. This is shown in the following screen sample.
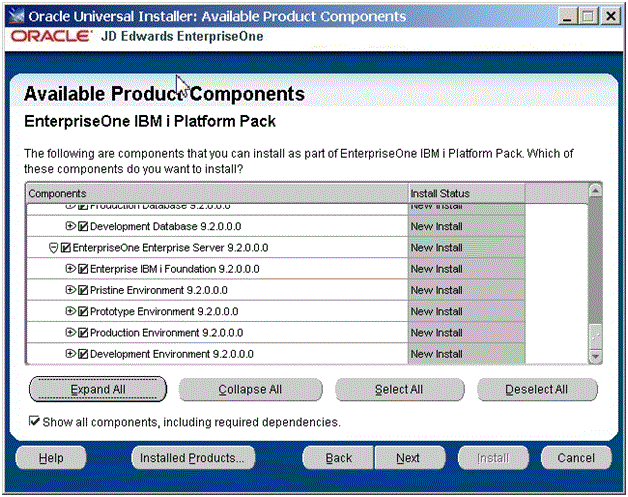
On Available Product Components, select from these choices:
JD Edwards EnterpriseOne Database Server
-
System Database
Note:This selection includes mandatory system files. If you do not select this box, the JD Edwards EnterpriseOne Platform Pack Installer will select this component. Likewise, if you rerun the JD Edwards EnterpriseOne Platform Pack Installer to add an environment it will check to ensure that this component is already installed. Also if rerunning, you will not be given an option to install the environment in a different ORACLE_HOME.
-
Production Databases
-
Prototype Databases
-
Development Databases
-
Pristine Databases
JD Edwards EnterpriseOne Enterprise Server
-
JD Edwards EnterpriseOne Foundation
Note:This selection includes system files. You must choose this feature for all initial installations of the Enterprise Server. If you do not select this feature, the JD Edwards EnterpriseOne Platform Pack Installer automatically selects it for installation.
-
ES Production
-
ES Prototype
-
ES Development
-
ES Pristine
Note:For Upgrades, you should always select the Pristine environment. Otherwise, Table Conversions may not process correctly.
-
-
After you have verified your selection of components, click the Next button.
-
Click the Next button.
-
On IBM i Server and User Profiles, complete these fields:
-
IBM i Server Name
Enter the name of the IBM i machine.
-
Install Profile
Enter QSECOFR or another user on the host that has *ALLOBJ *SECADM *SAVSYS *IOSYSCFG *JOBCTL rights.
-
Install Password
Enter the password for the Install Profile you specified in the preceding field.
-
JDE Admin Group Profile
Enter the name of the admin group default. For example, JDEADMIN.
-
JDE End User Group Profile
Enter the name of the end user group profile. For example, JDEUSER.
-
JDE Secure Password
This password allows you to change the password for users created on the IBM i. The default creates user profiles with password = user (for example, JDE JDE). If this violates the password rules on your IBM i machine, supply a secure password that will pass your password rules, then change the INI files and change the JD Edwards EnterpriseOne security definitions using JD Edwards EnterpriseOne applications P980001 and P98OWSEC before starting services.
Leaving this as the default password, will allow the JD Edwards EnterpriseOne services to be started immediately after the installation.
-
Confirm JDE Secure Password
Leave this as the default unless the Secure Password has been entered.
-
-
Click the Next button.
-
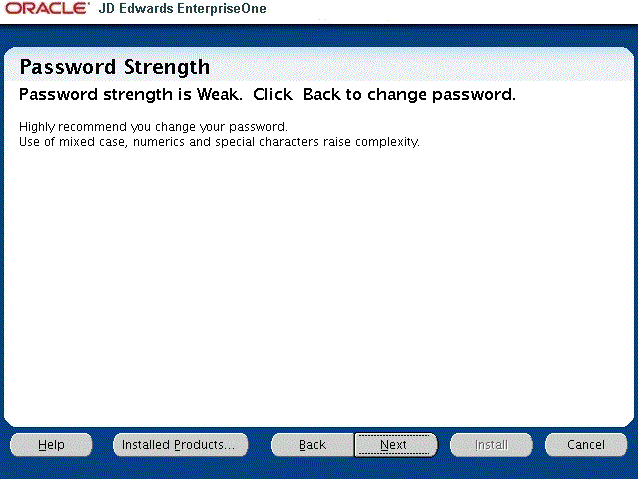
The installer displays the Password Strength panel if you have either chosen a weak password, or accepted the default password.
Note:The installer program does not force you to change your password for a Weak value.
-
Click the Next button.
-
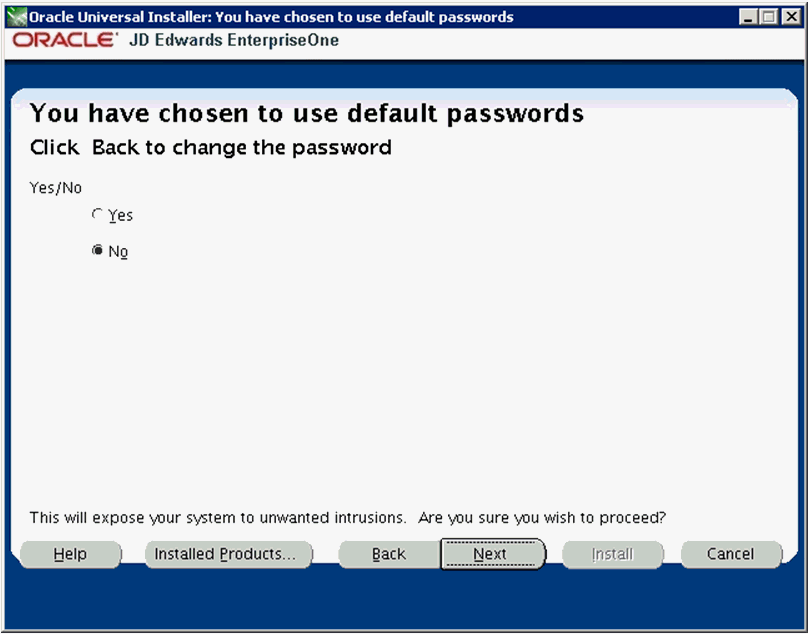
If you chose to use the default passwords, the installer presents the above screen as a security precaution. It is important to note the security implication when you agree to proceed with the installation using the default password values that are required and specified in the preceding screen. These values are only required to complete the installation after which it is strongly recommended that you immediately change these passwords after installation.
To ensure you understand and agree to these terms, the installer defaults to a No value. In order to proceed and successfully complete the installation, you must explicitly change the value from No to Yes, as shown below:
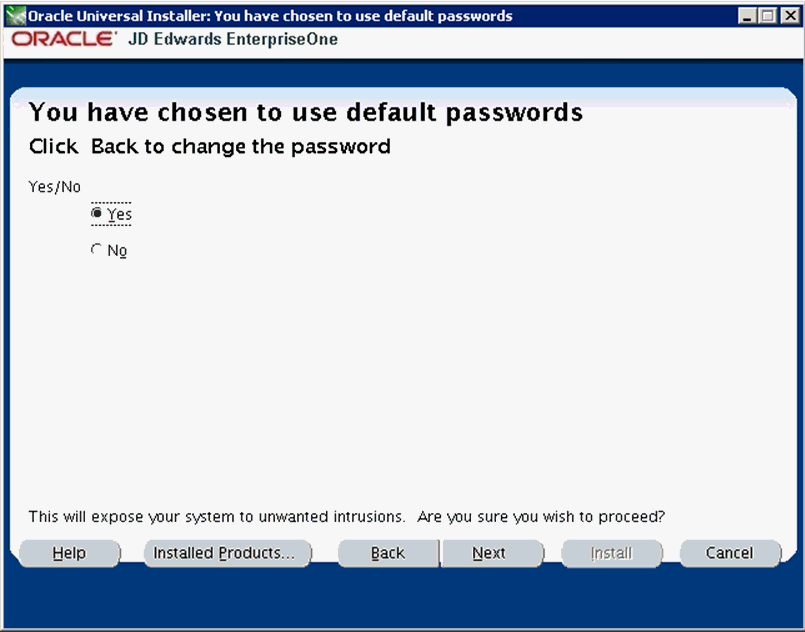 Caution:
As noted on this screen, by choosing Yes you are acknowledging that by accepting the default passwords (which is required to completed the install) you are exposing your system to potential security concerns. As previously noted, after installation you should immediately change the passwords on your installed system.
-
Click the Next button.
If the installer begins with no errors, you can proceed to the Step 21. Otherwise, refer to the next section of this guide entitled: Troubleshooting the Platform Pack Installation.
If all specified conditions are valid, the installer displays the Summary screen.
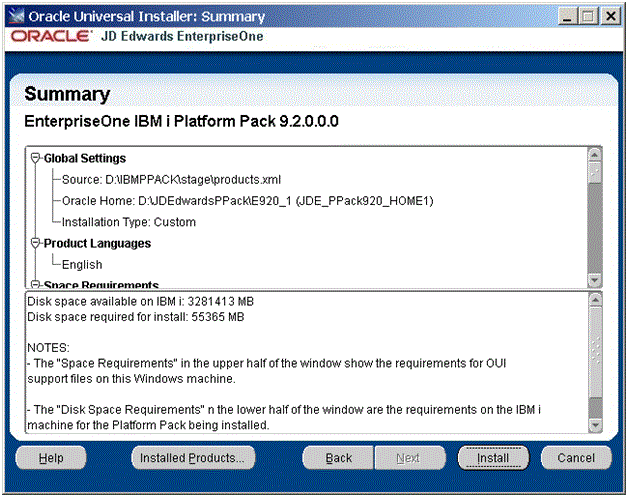
-
On Summary, in the top half of the screen review your selections and in the bottom half of the screen review the NOTES, which detail the disk space requirements for OUI support files and also for the Platform Pack being installed on the IBM i machine.
-
Click the Install button.
As the installer runs it displays the Install progress, as shown in the following example.
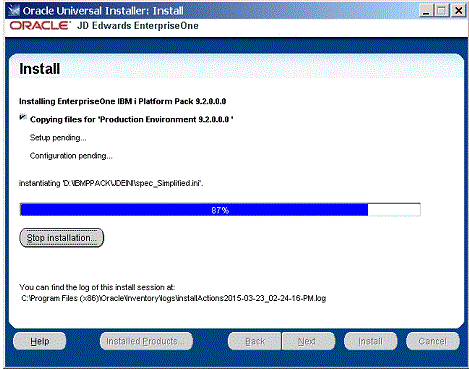
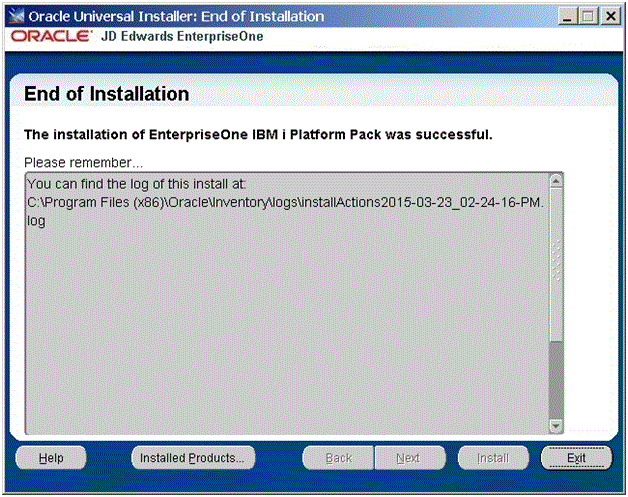
After the installation is complete, the following End of Installation screen is displayed.
-
On End of Installation, verify the installation of the EnterpriseOne Platform Pack was successful.
Review the Please remember ... portion for the installer log file location. The log file name is specified with the date and stamp when the installer ran. For example:
c:\Program Files
                        (x86)\Oracle\Inventory\logs\installActions2011-09-14_03-40-11-PM
.log -
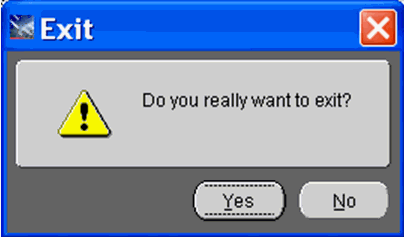
Click the Exit button to exit OUI.
-
On Exit, click the Yes button.