File
Selector for Orchestrations Launched from an EnterpriseOne Page
Before You Begin
This 45-minute tutorial shows how to create an EnterpriseOne
page to launch an orchestration that accepts a file as input and
an orchestration that provides a file as output. First you will
create an orchestration that receives an image file as input,
and uses a form request to attach the image to a work order in
JD Edwards EnterpriseOne. Additionally, you will learn how to
create another orchestration that builds a CSV file of the
records from a query on a form and return that as the output of
the orchestration.
In this tutorial you will:
Record a work order using the Process Recorder, create an
orchestration that accepts a file as input, and add an
attachment step to the orchestration.
Build an EnterpriseOne page with a button to call the
orchestration and provide file input.
Create another orchestration to generate CSV files and
return them as orchestration output.
Add a button to your EnterpriseOne page to launch that
orchestration and download the file.
Background
An orchestration is a powerful automation tool to simplify
business processes. And one of the easiest and most effective
ways to put that power to use is to allow users to launch
orchestrations right from EnterpriseOne pages. Using
orchestrations, many business processes and transactions can be
simplified into a few simple inputs.
Starting with Tools Release 9.2.7, you can define
orchestrations to receive files as input or return files as
output. You can perform several operations by using a file
received as input to an orchestration, such as uploading the
file as an attachment in JD Edwards EnterpriseOne.
You can also define an orchestration that is configured to
provide files in its output; this feature also lets you download
those files to your local desktop.
What Do You Need?
To perform the tasks in this tutorial, you must have:
Installed JD Edwards EnterpriseOne Applications Release 9.2
with Tools Release 9.2.7 or later.
Enabled the Composite feature and set up UDO security in
EnterpriseOne. For more information, see: "Managing UDO
Feature Security" and "Managing UDO Action Security" in the JD
Edwards EnterpriseOne Tools Security Administration Guide.
Enabled Process Recorder, which is also enabled through UDO
Feature Security and Action Security.
Recording the Work Order Creation Process
Note: This task relies on EnterpriseOne demo
data. You can use other data available in your system to enter a
work order to perform this task.
Sign in to the EnterpriseOne web client. You can access the
EnterpriseOne web client from the Orchestrator Studio home
page or from the Tools drop-down menu on any of the pages.
From the Fast path access Search for Equipment Work Orders
(P13700) application.
On the EnterpriseOne page, click the drop-down menu next to
your user name and select Record a Process.
In the Process Recorder window, click the Start
button.
Click Add icon in the Search for Equipment
Work Order application.
Note: If you see S/WM Service Provider Info Missing
form error in Add Work Order, refer solution in Doc ID
2707754.1.
Complete the below fields based on data available in your
system:
Equipment Number = 34711
Customer Number and Site Number will be auto populated
on selecting Equipment Number
Failure Description = Broken Equipment
Click Save and Exit.
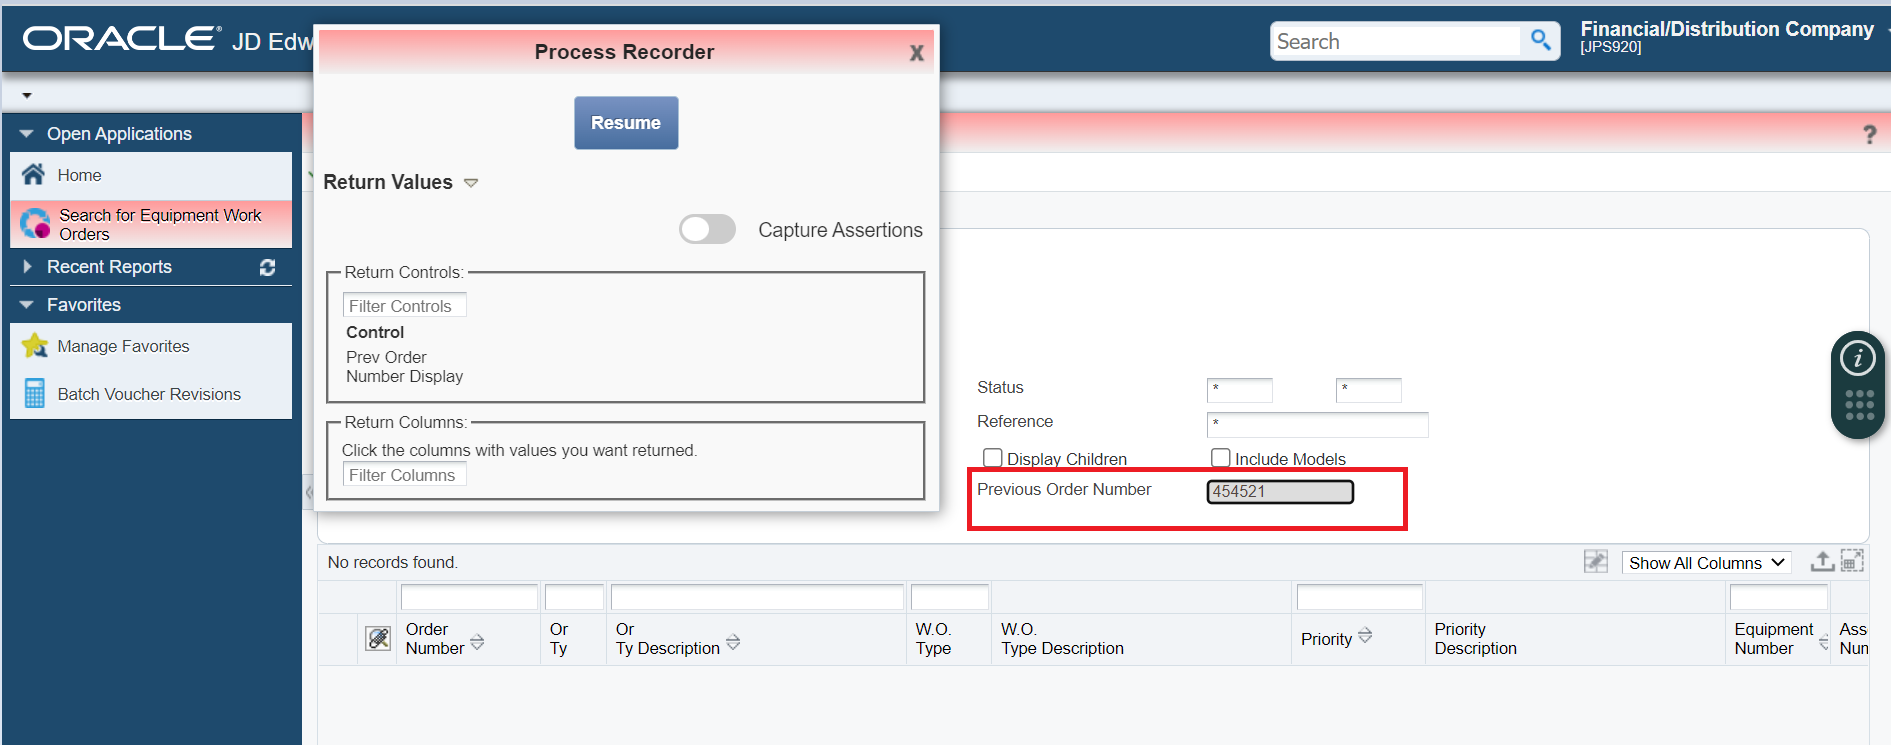
Click Return Values in the Process Recorder window.
Click Previous Order Number
Note: You might have to move the Process
Recorder window to see these fields. Click and drag the title
bar to move it.
Process
Recorder - Return Values
Click Resume in the Process Recorder
window.
Click Stop in the Process Recorder window
and enter a name:
Name = Report Broken Equipment
Click Save.
Click the X icon to close the Process Recorder
window.
Creating
an Orchestration Using the Form Request
In this task, you will understand how to create an
orchestration that performs order entry in JD Edwards
EnterpriseOne. The orchestration created in this section will
be used by the orchestration that receives the broken
equipment image file as an input and attach it to the work
order.
Log in to Orchestrator Studio.
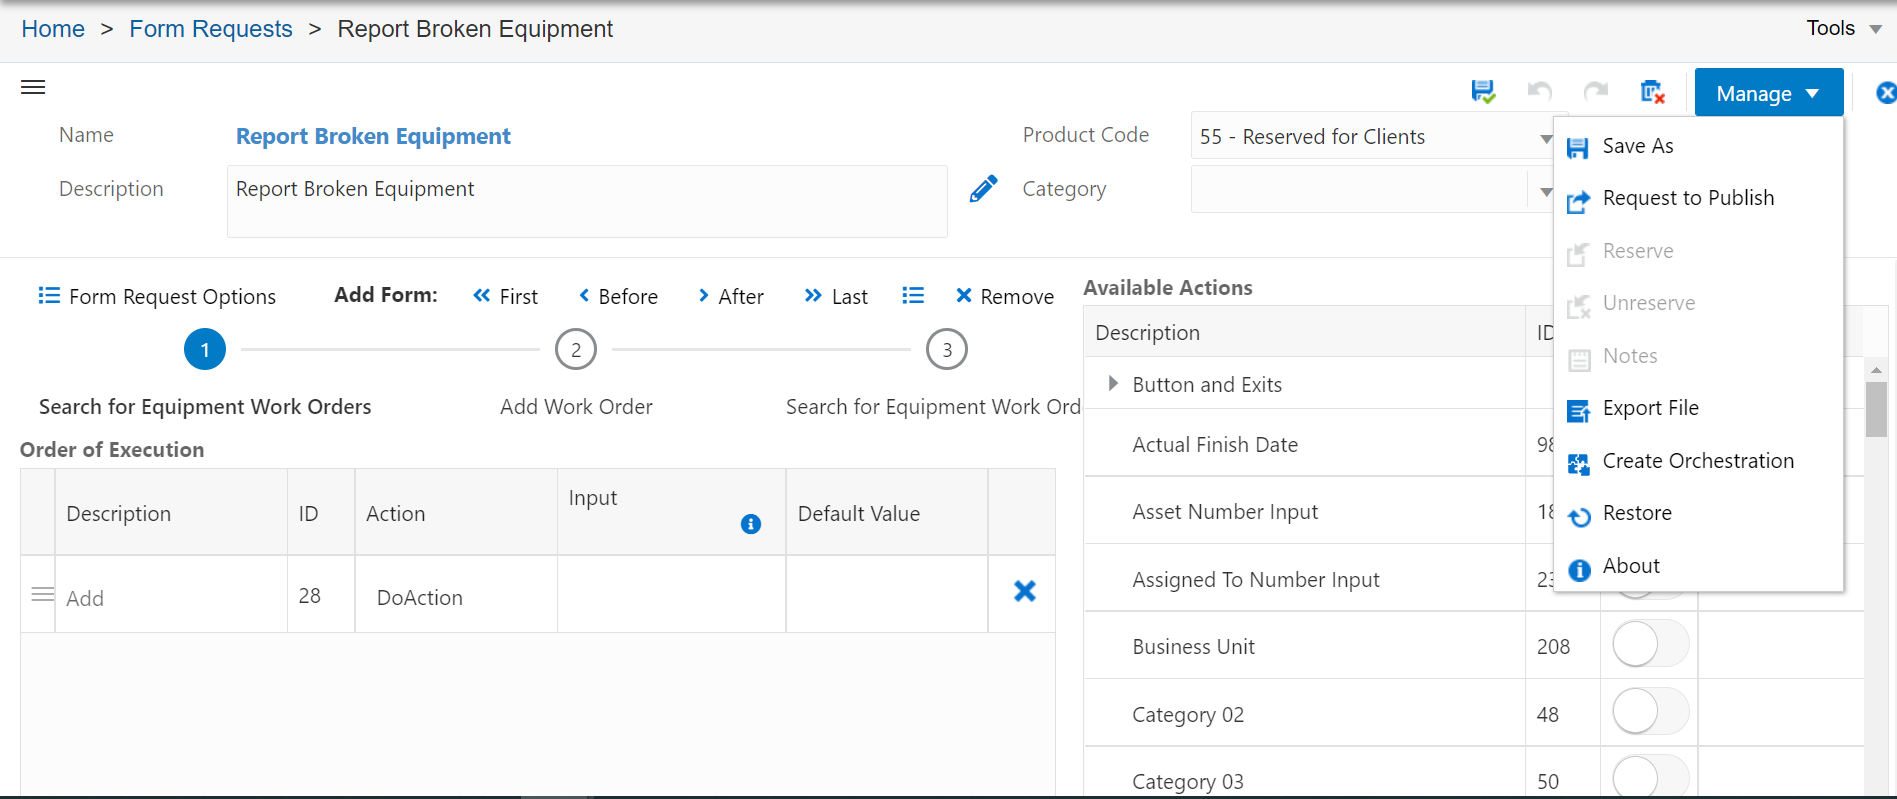
Click Form Requests.
Select the Report Broken Equipment form
request in the left panel.
The Report Broken Equipment form request opens, showing you all
the forms and steps you took when you recorded the process.
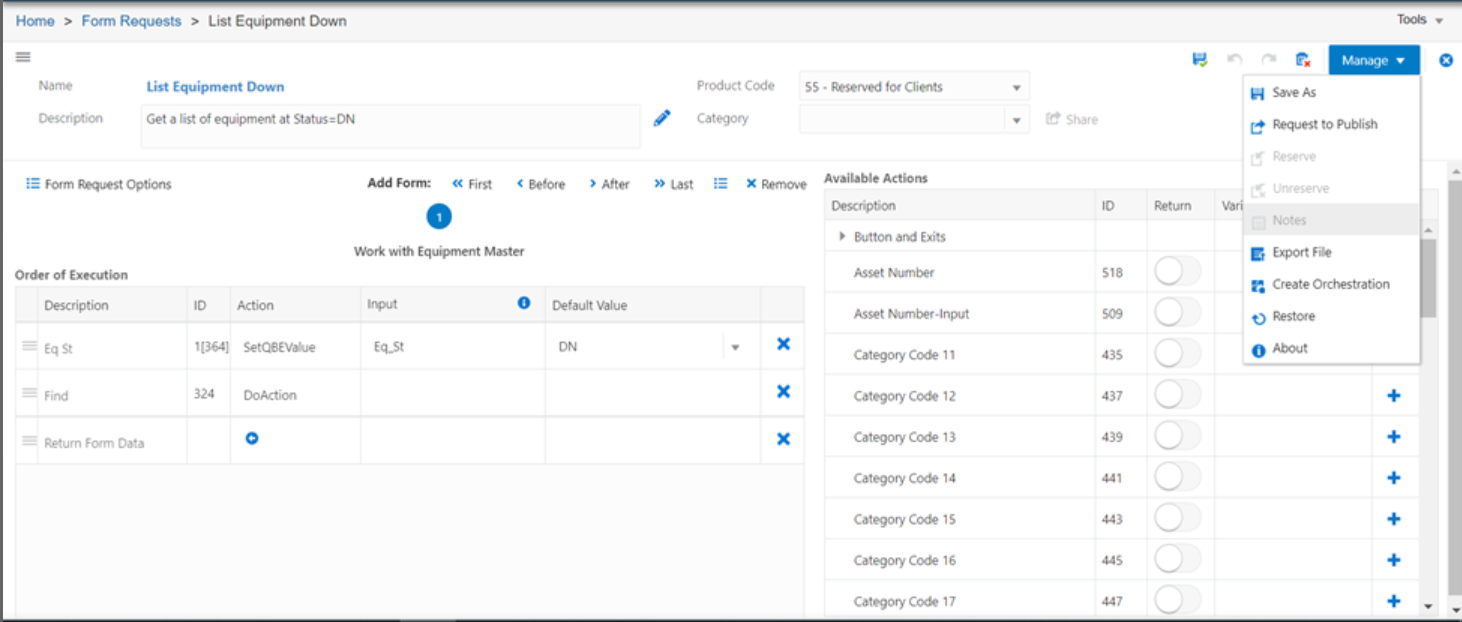
Click step 2 in the train: Add Work Order.
Change the Input values of Asset Number_ASII to Equipment
Number, and change Problem_ISSUE to Problem Description for
better identification of Inputs. Add
Work Order
Click Save.
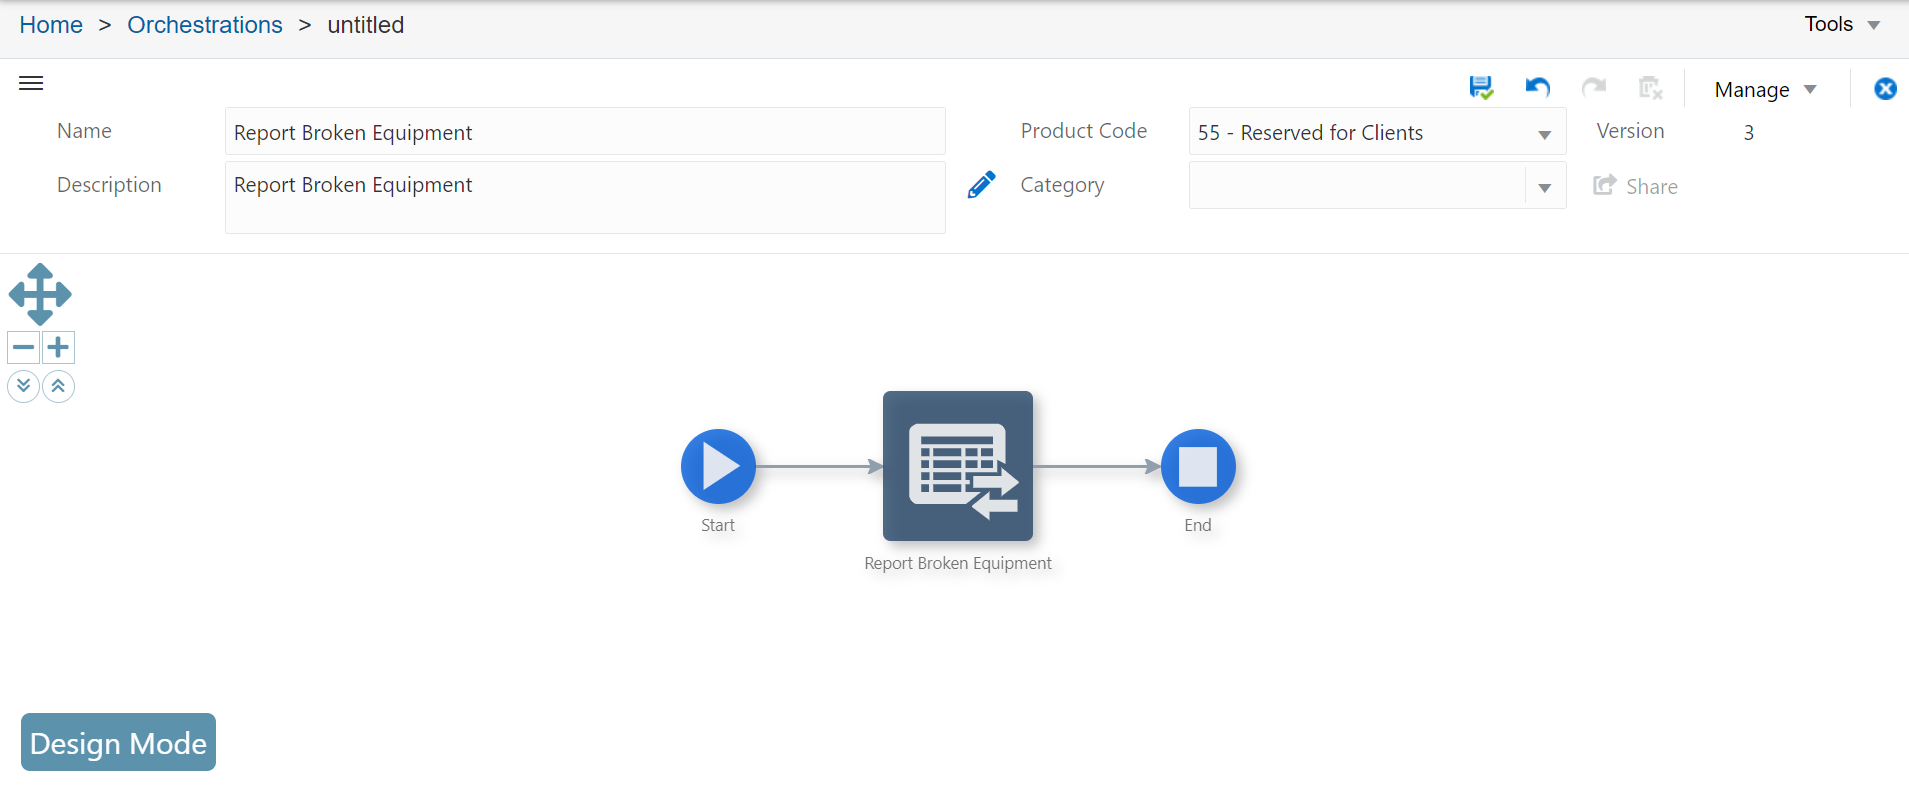
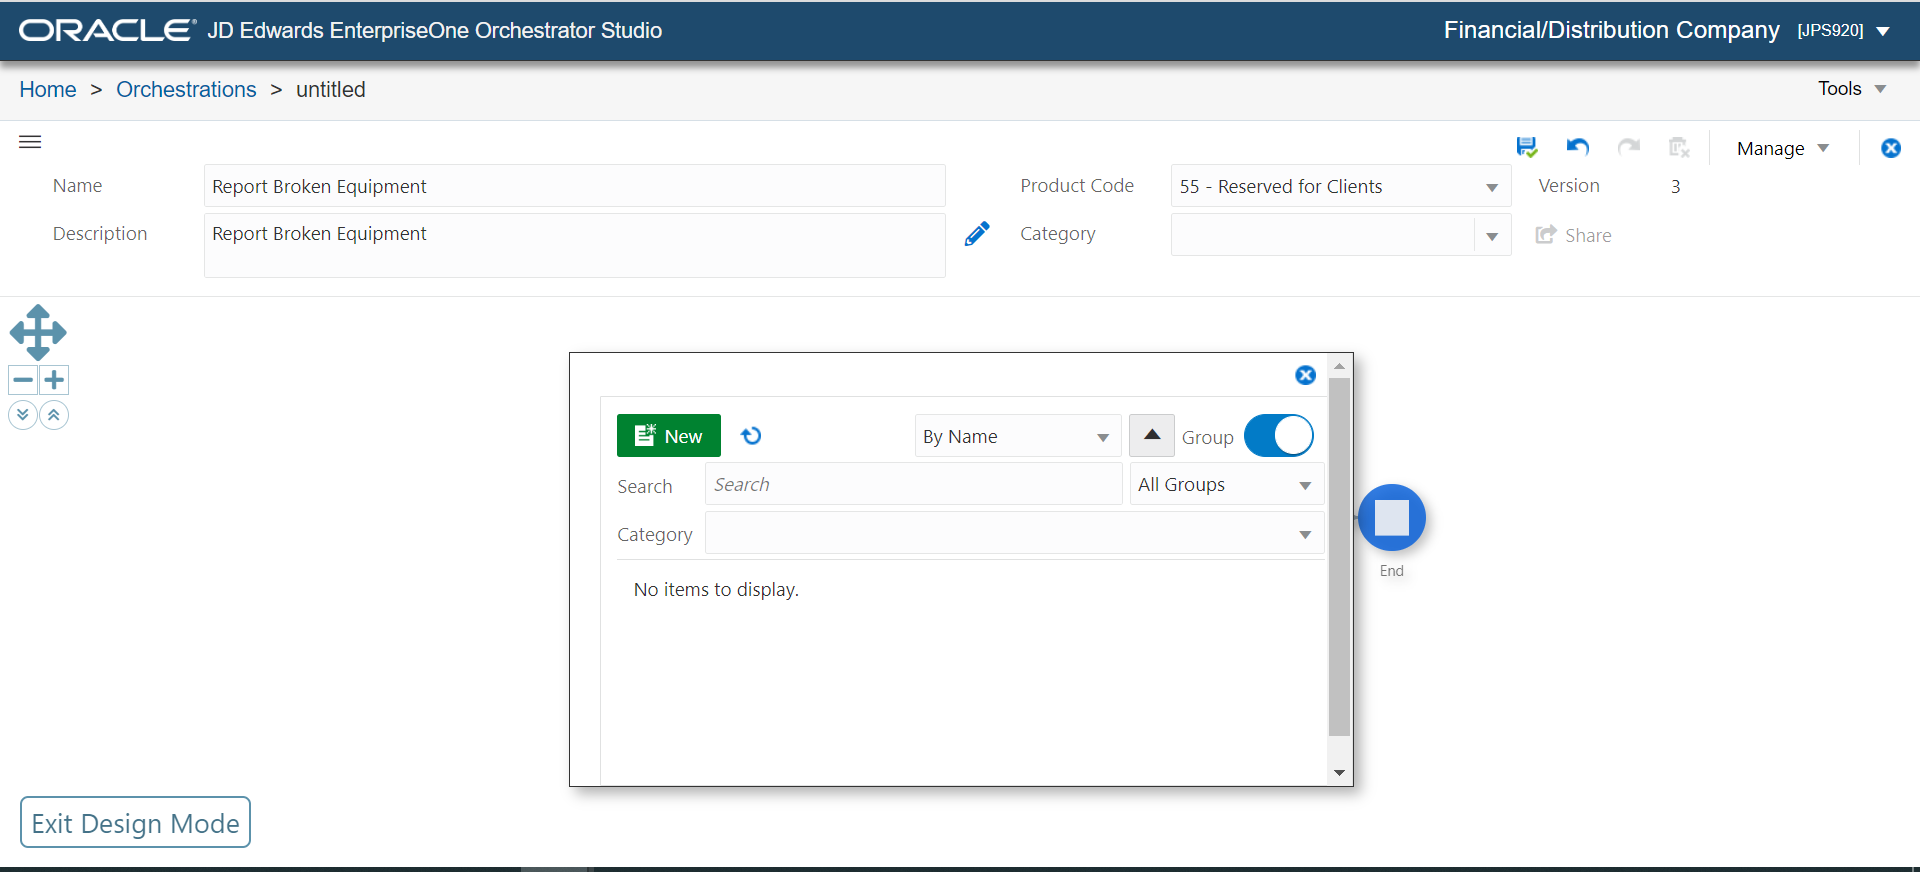
From the Manage menu, select Create Orchestration.
The system creates an orchestration with inputs,
transformations, and outputs to call the form service request. Create
Orchestration
Click the Start icon, and then click the
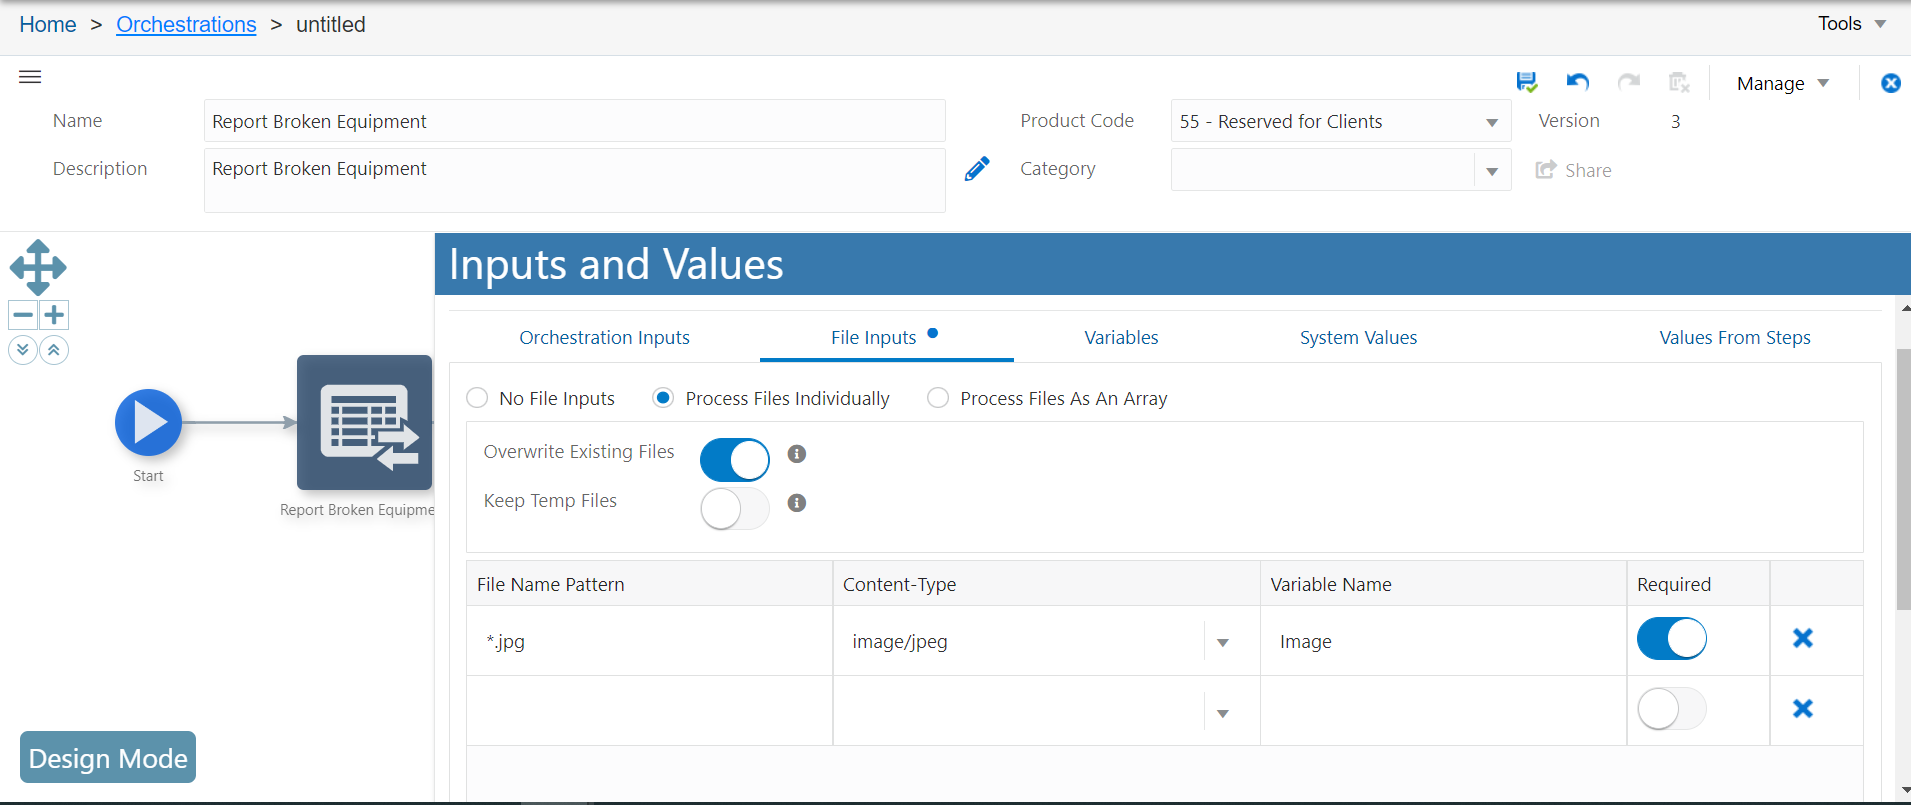
Inputs and Values icon.
In the Inputs and Values window, click File Inputs,
and select Process Files Individually option
.
Configure the file input as shown in below screen shot.
Click anywhere outside the Inputs and Values window to close
the window.
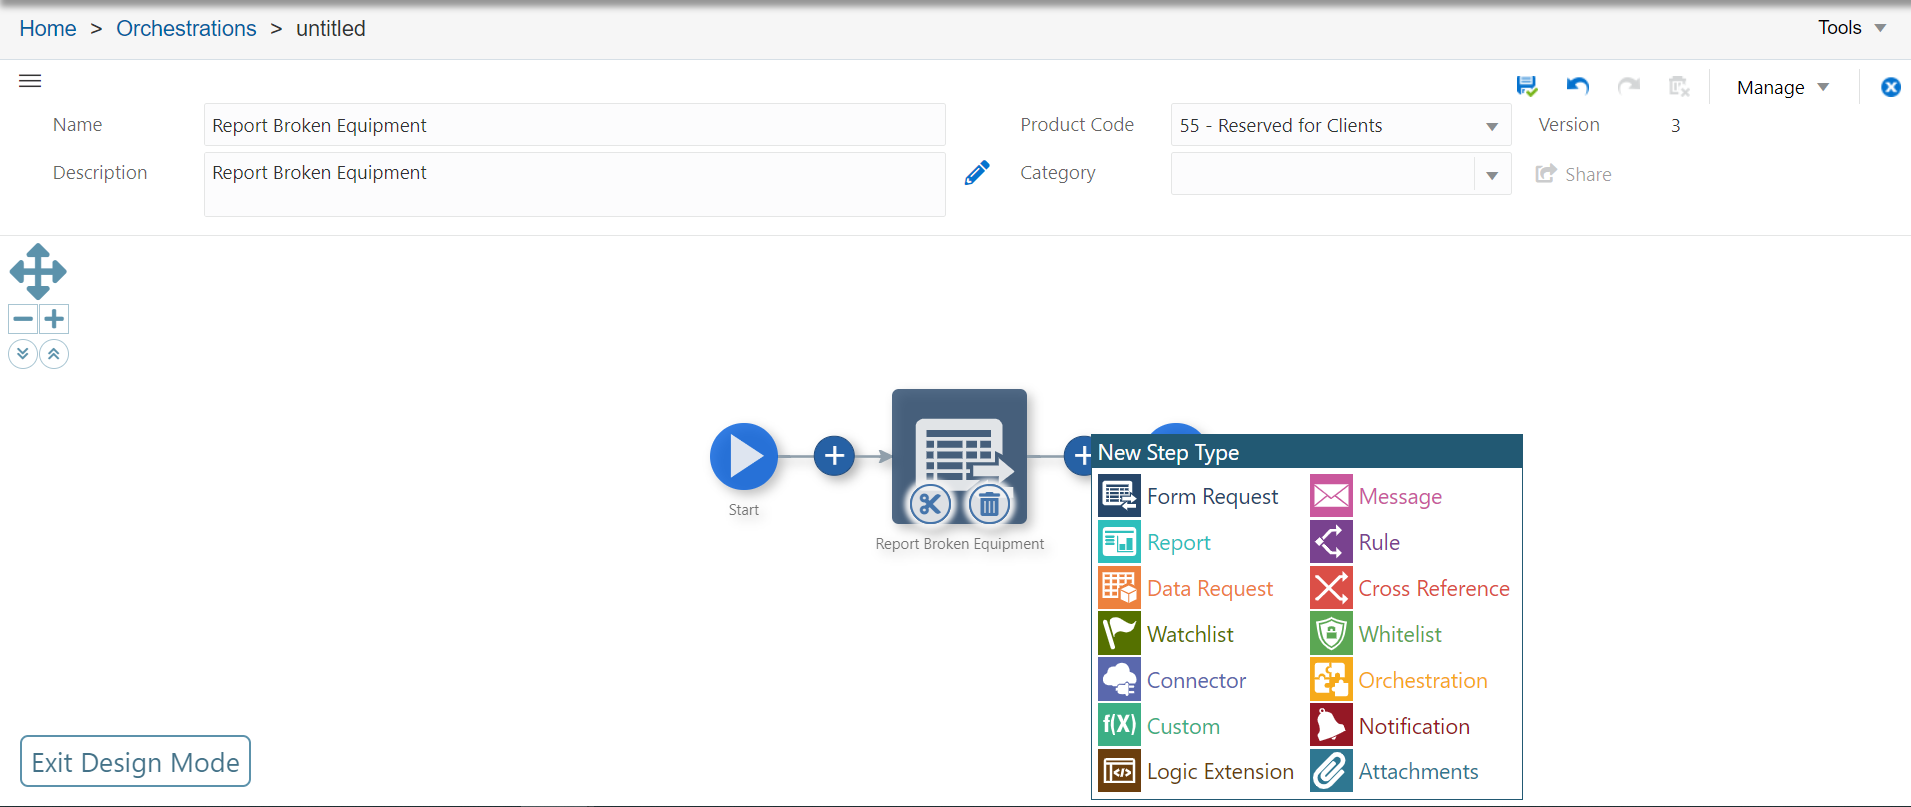
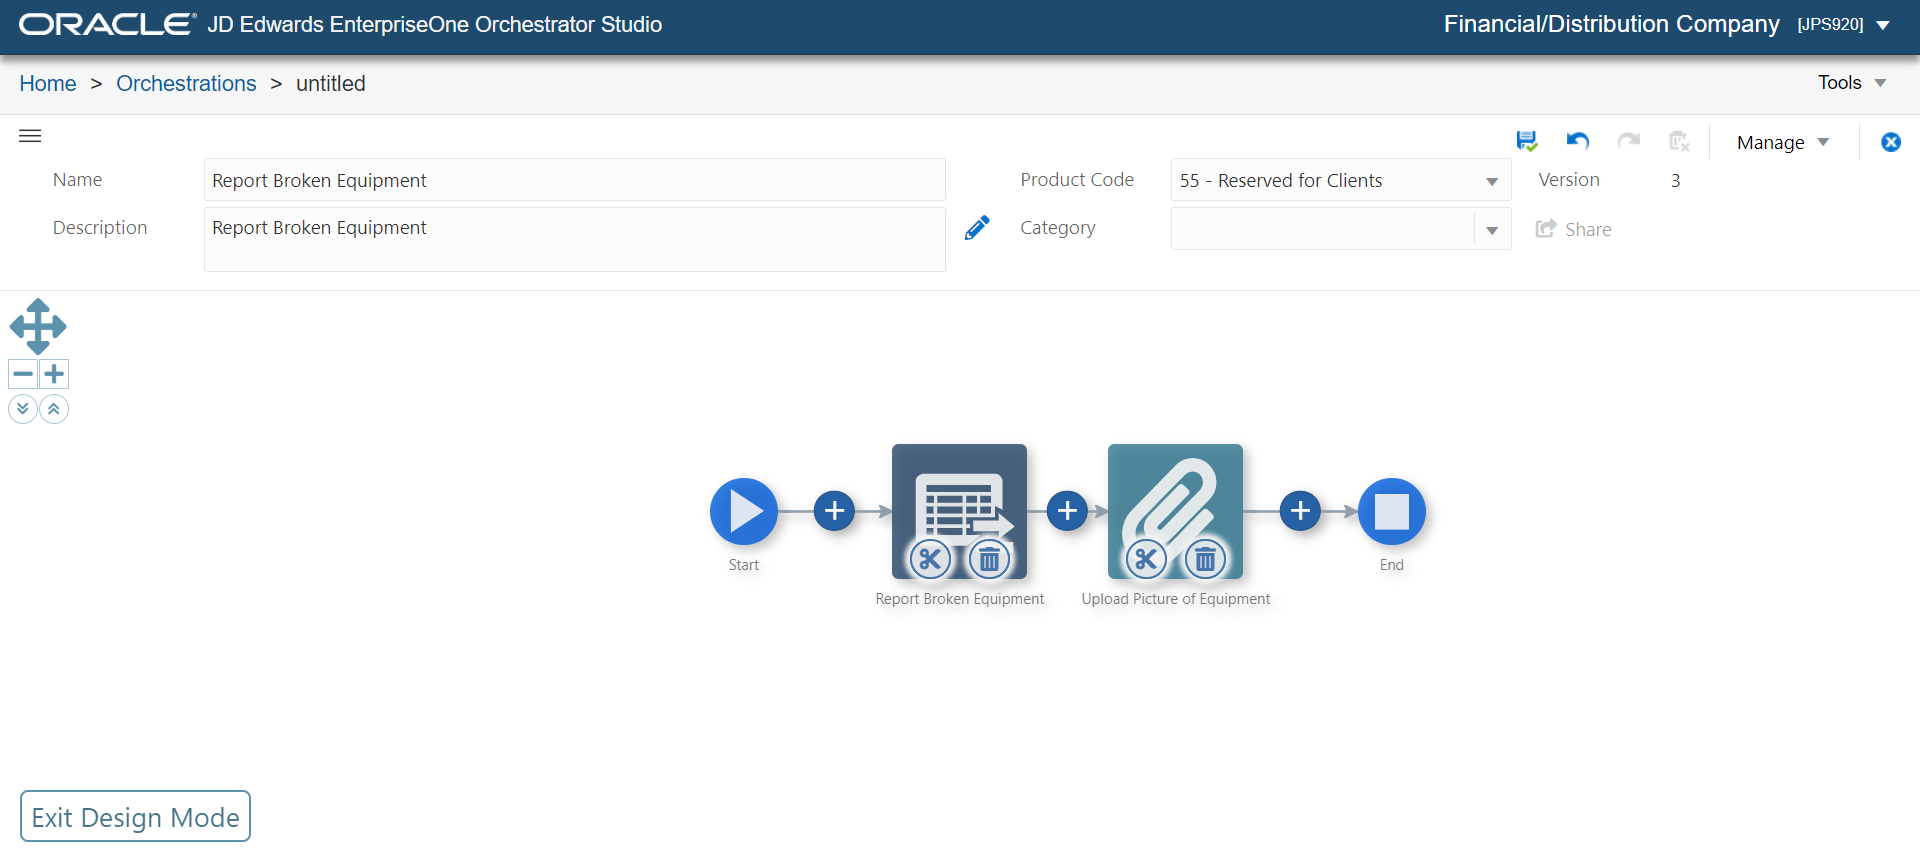
Click Design Mode button on the bottom left corner
of the window and click Add icon to the right of the
Report Broken Equipment form request. Select Attachments.
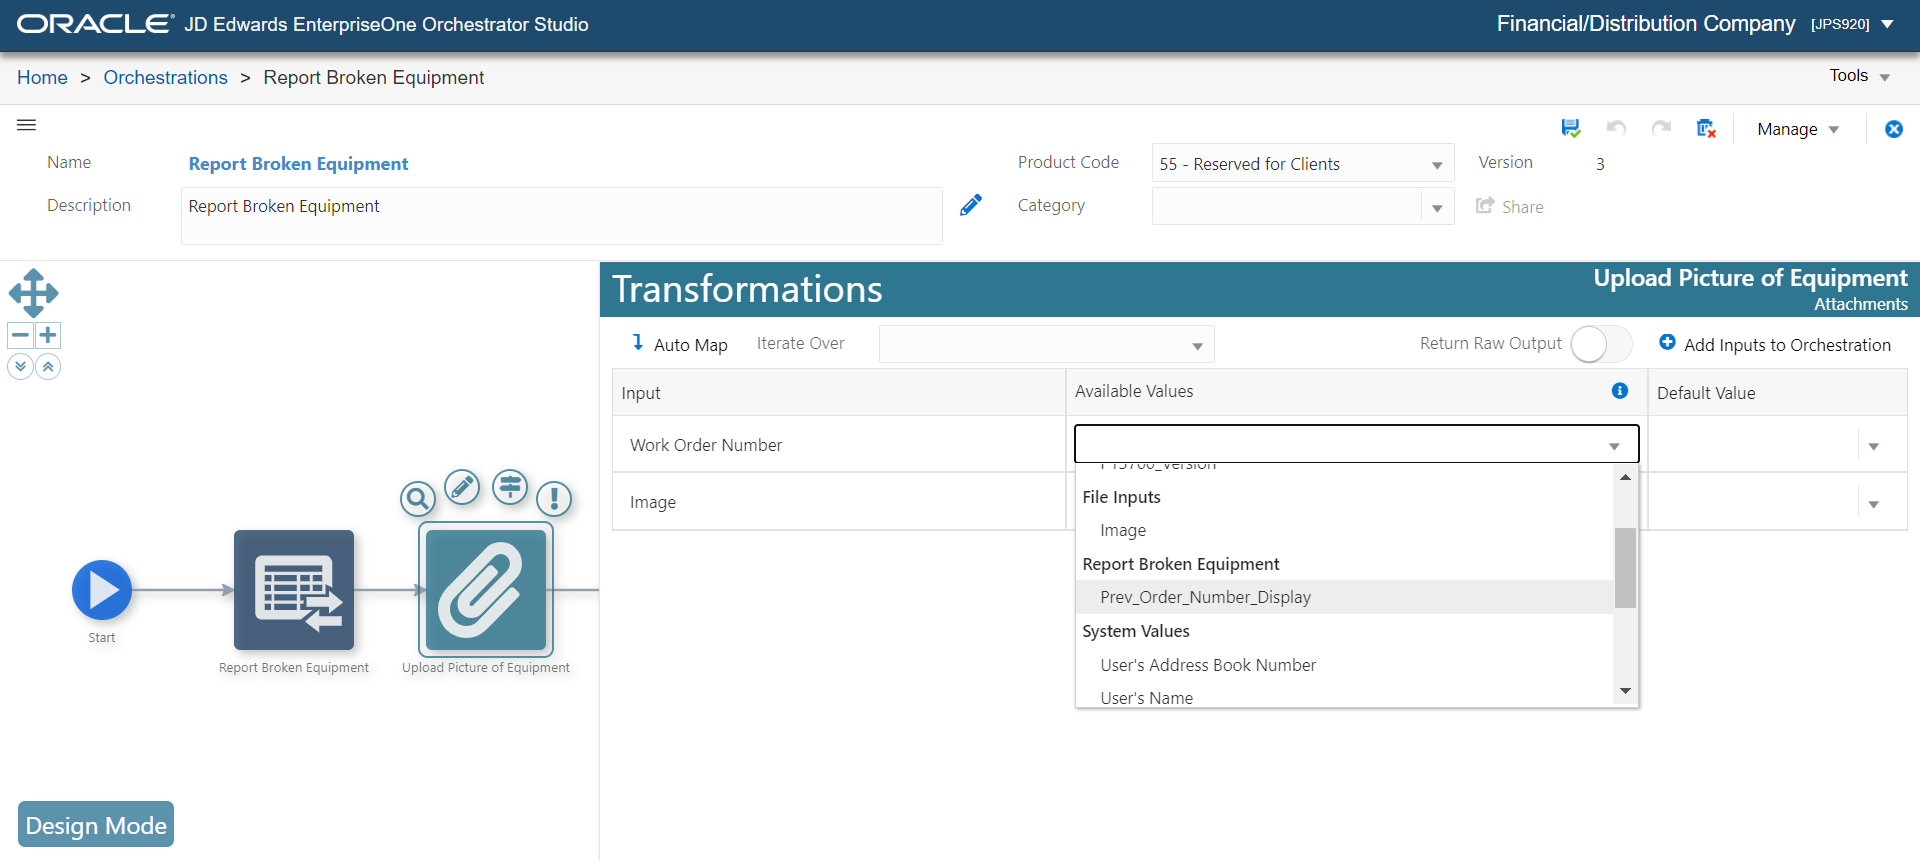
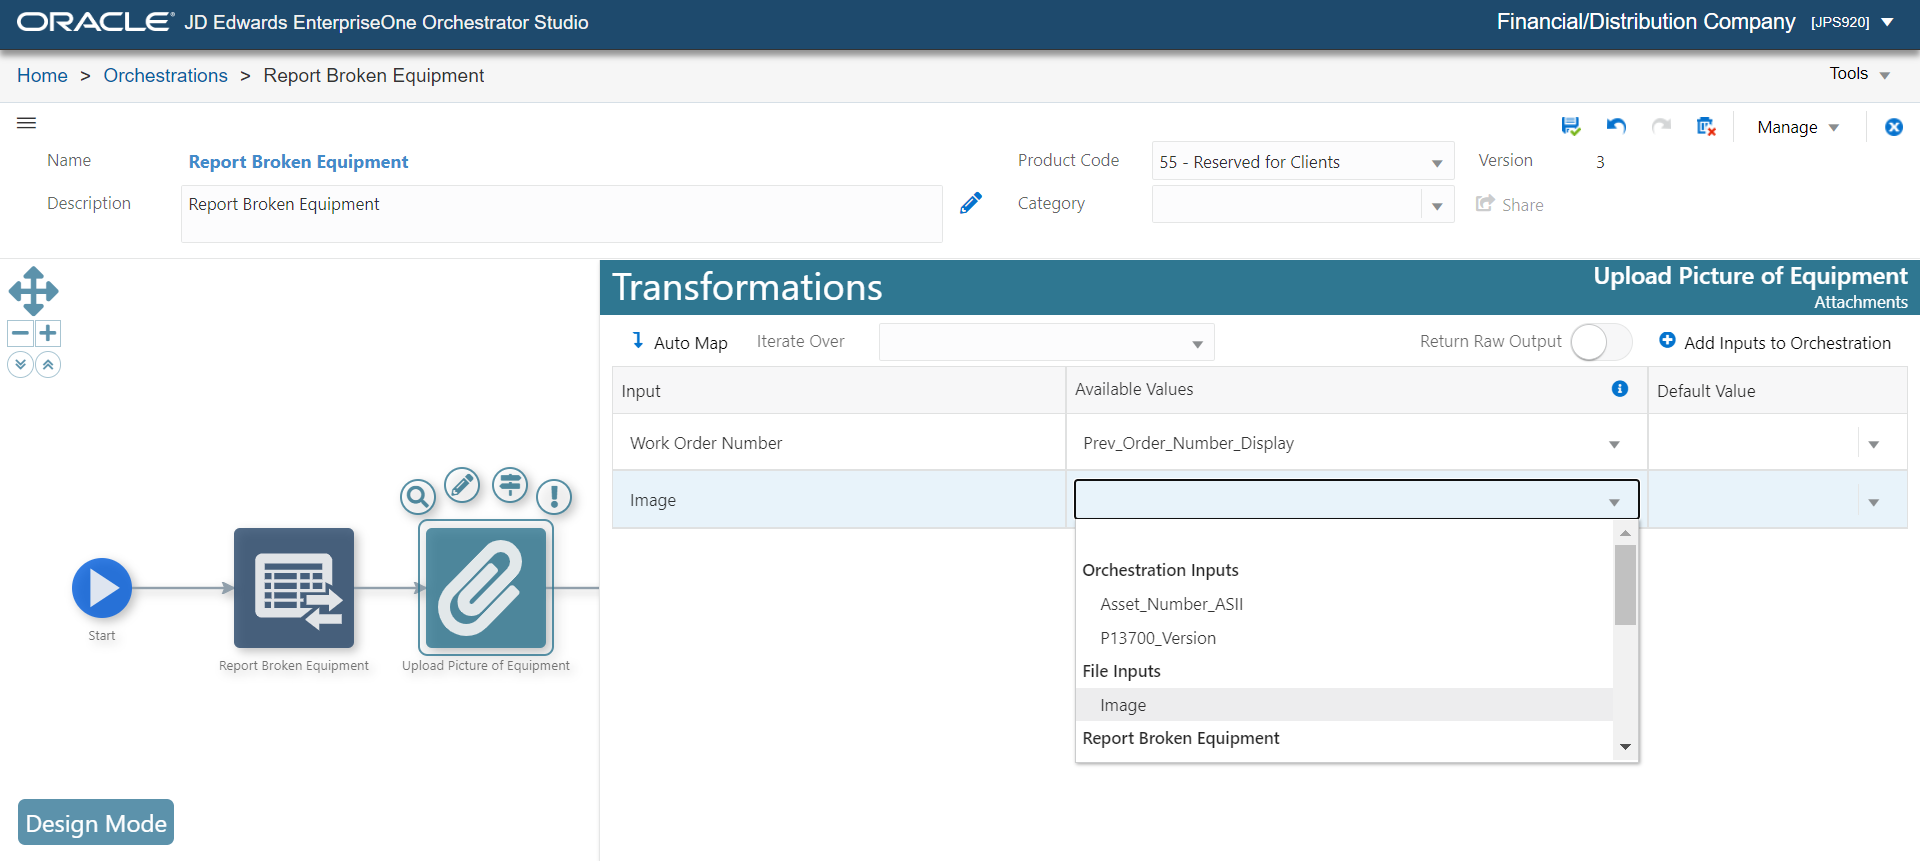
Click the Upload Picture of Equipment Attachment and
click the Transformations icon, and then Select Prev_Order_Number_Display
from the Available Values drop-down menu for the Work Order
Number input.
Click the End icon and click Outputs and
Assertions.
In the Outputs and Assertions window, enable the Prev
Order Number Display.
Save the orchestration.
Call
the Orchestration from an EnterpriseOne Page and Provide File
Input
This task involves calling the orchestration created previously
from an EnterpriseOne page.
Please complete the following steps:
Associate an Orchestration with a Designer Pane Tile
Sign in to the EnterpriseOne web client. You can access the
EnterpriseOne web client from the Orchestrator Studio home
page or from the Tools drop-down menu on any of the pages.
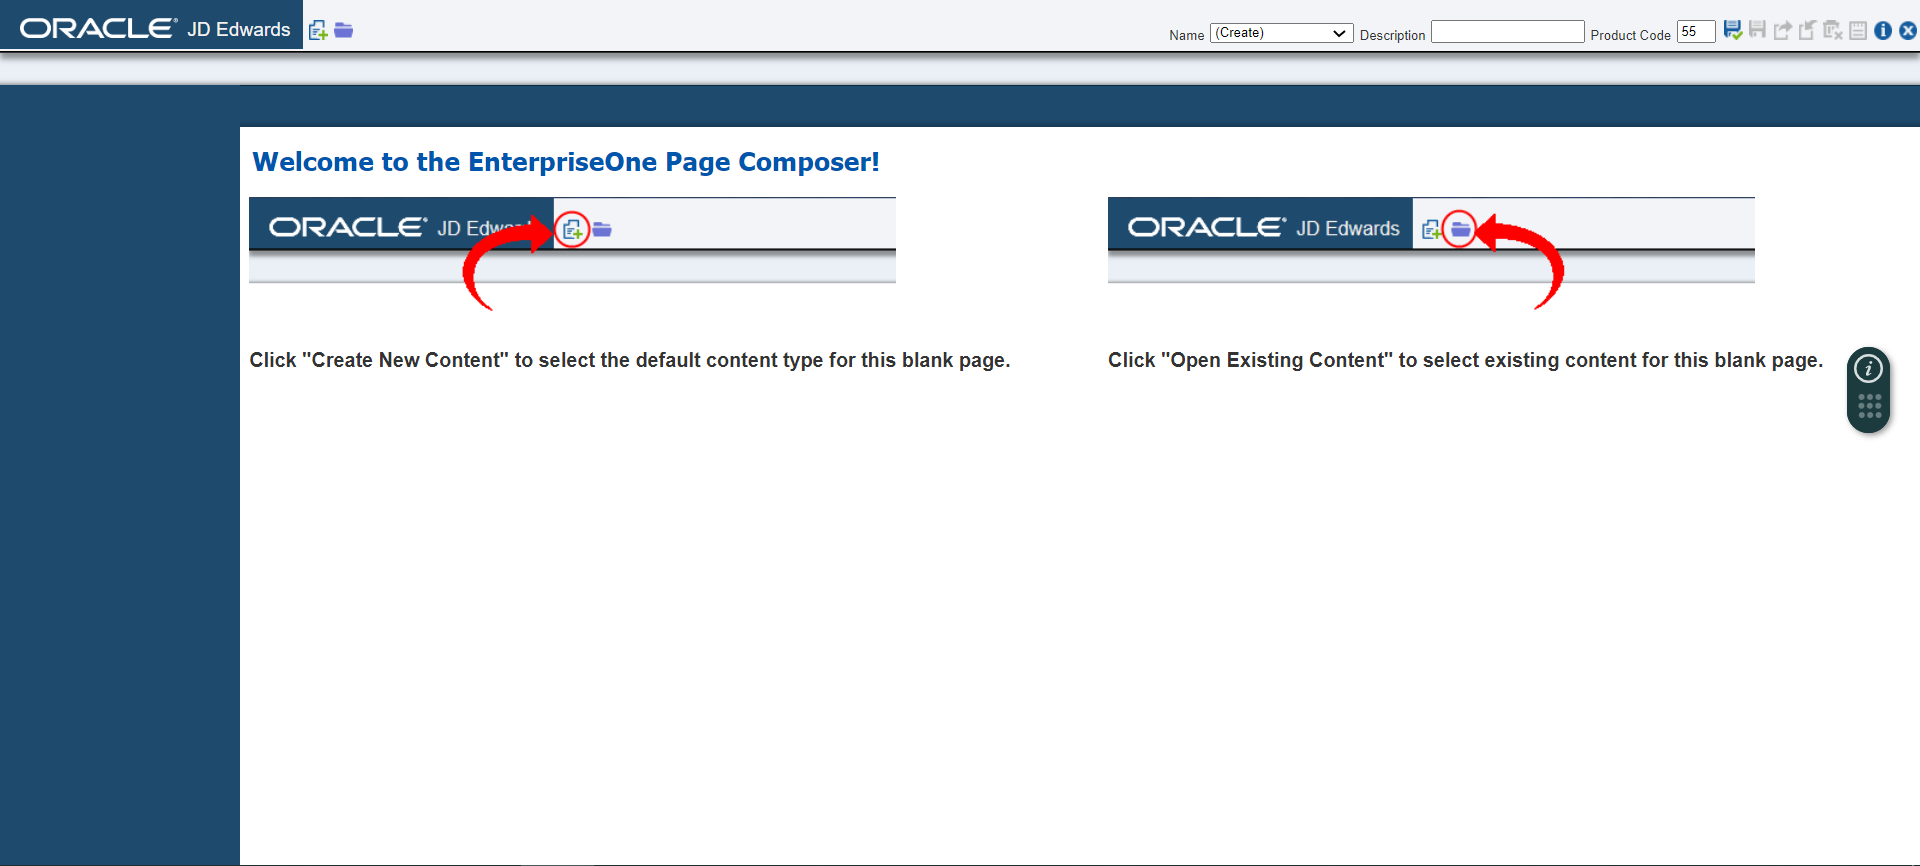
Close any applications that you may have open. On the
EnterpriseOne page, click the drop-down menu next to your user
name in the upper-right corner, click Manage Content
under the Personalization category, and then click Composed
Pages.
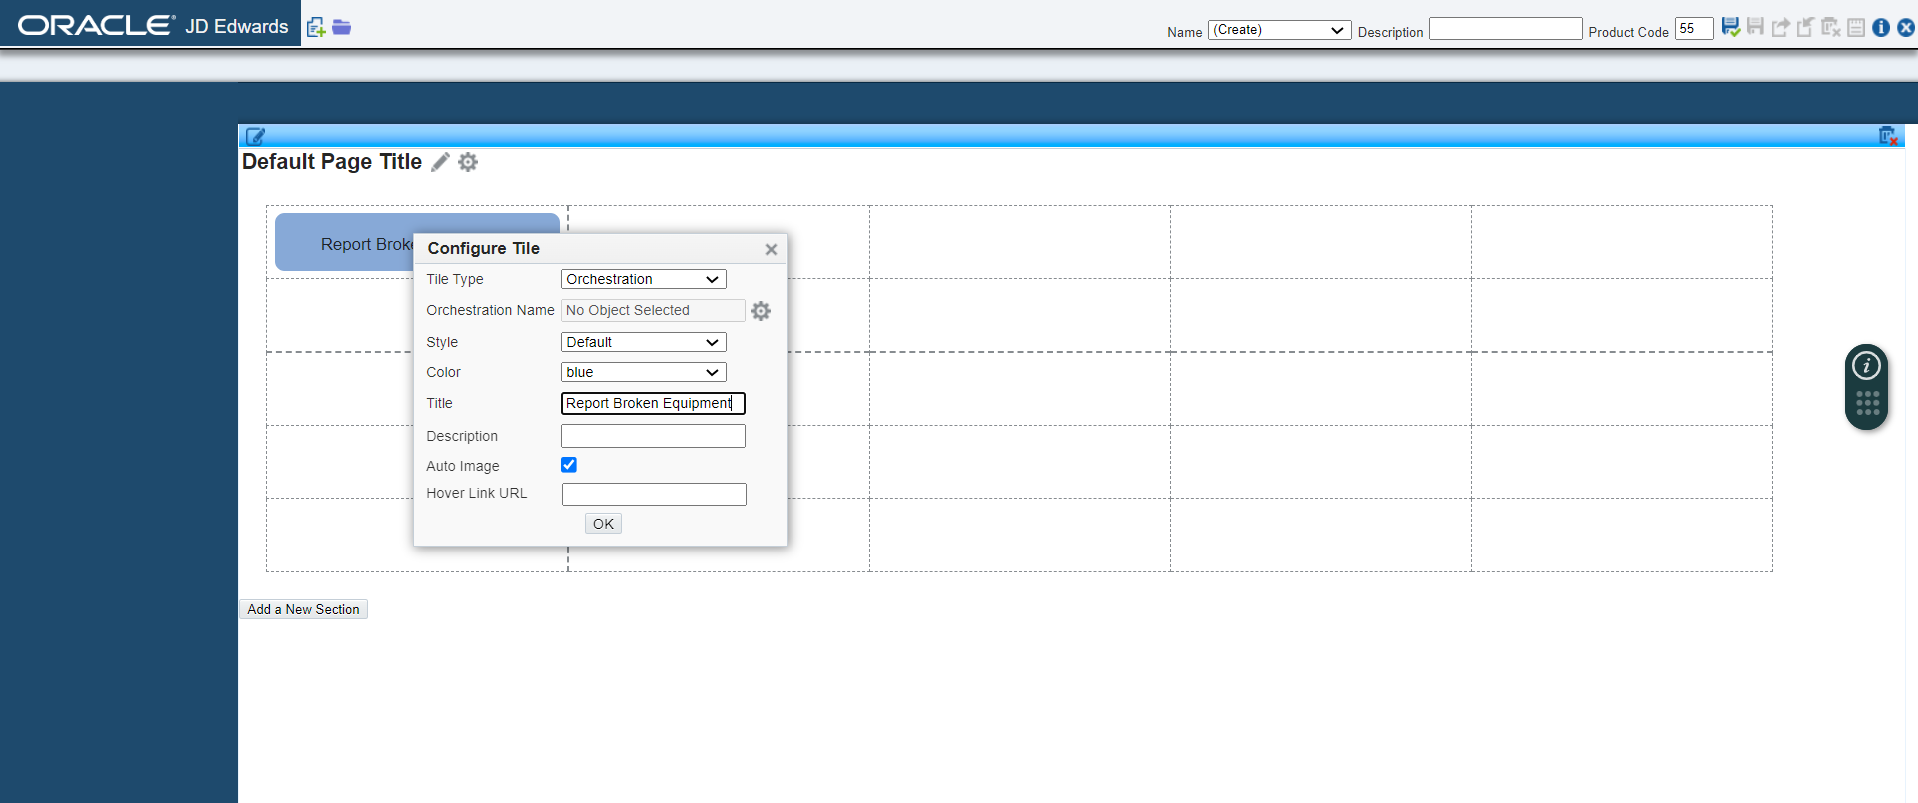
Click the settings icon next to the Orchestration Name
field.
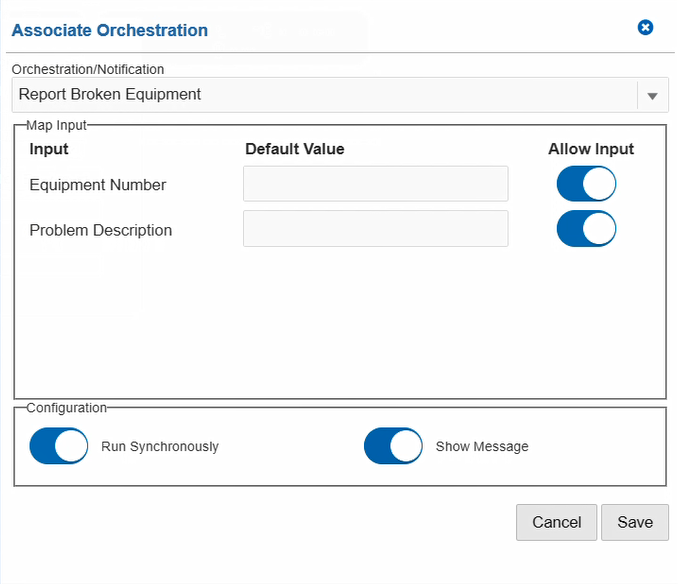
The Associate Orchestration popup window is displayed. In
the Orchestration drop-down list, select the Report Broken
Equipment orchestration from the list.
Ensure that the Allow Input options are toggled On for
the Equipment Number and Problem Description inputs. This will
allow the user to specify these inputs when the orchestration
is run.
Enable the Run Synchronously toggle button to run the
orchestration in the synchronous mode.
Enable the Show Message toggle button to display the
success message defined for the orchestration in the
Orchestrator Studio.
Click Save to save the EnterpriseOne Page. Provide a
name for your composed page, such as Report Broken Equipment.
Click OK.
Click Close.
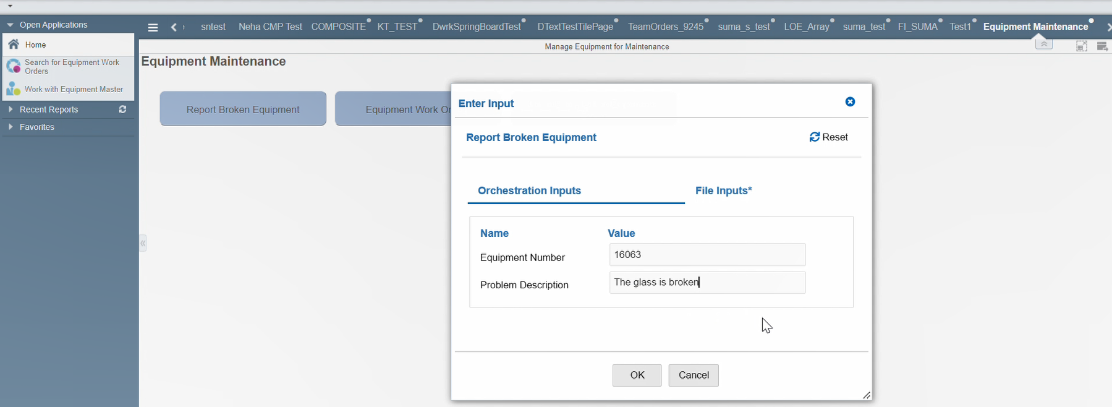
Now click the Report Broken Equipment tile. The Enter Input
popup window is displayed.
In the Orchestration Input tab, provide inputs for the
Equipment Number and the problem Description as the
orchestration inputs. Use a short Problem Description such as
“The glass is broken.” Make a note of the exact Problem
Description you input; you will search for it later. If you
see an input for P13700_Version you can leave that blank.
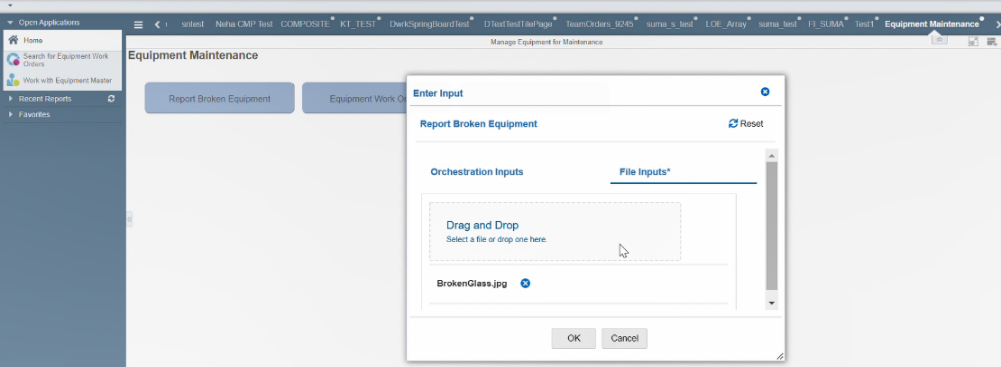
Because the orchestration is configured to accept a file as
input, the EnterpriseOne page automatically presents the File
Inputs tab. In the File Inputs tab, Upload the image file of
the broken Equipment that will be stored as an attachment to
the work Order. The file you choose must match the file name
pattern that you specified on the Orchestration Inputs in
Exercise 1, step 8: *.jpg. You can choose any JPEG image from
your local file system that has a file extension of .jpg.
Click OK.
The orchestration is executed and the the Work Order is
generated with the file you selected as an attachment. Successful
Execution of the OrchestrationNote: You can specify a custom success message such as
the one shown above in Orchestrator Studio in the
Orchestration Outputs and Assertions page in the Messages tab.
Click OK.
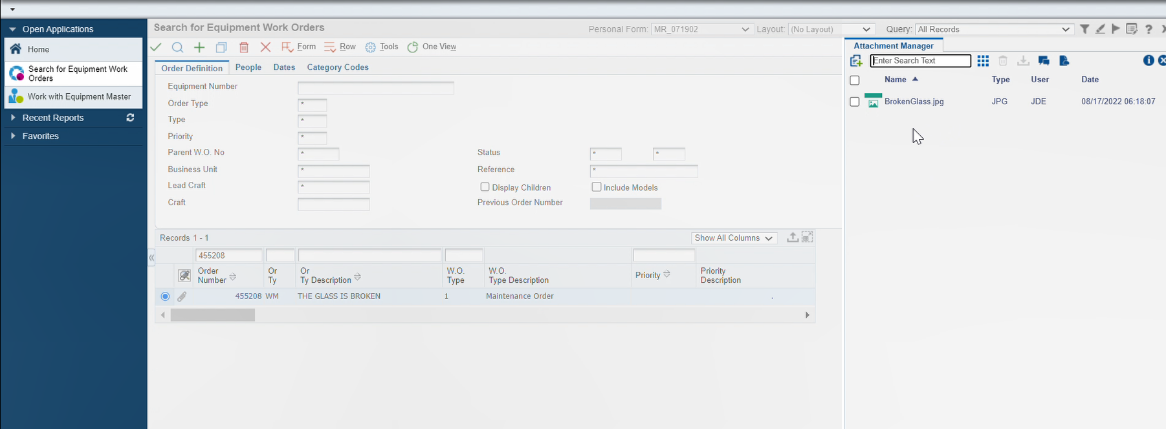
Now, Let’s check our work order. From the Fast path access
Search for Equipment Work Orders (P13700) application. In the
grid query by example row, enter the Problem Description you
input in step 16 in the Or Ty Description column. Use
all uppercase letters, such as THE GLASS IS BROKEN. Click Find.
Note that an order number has been created with the
Description you provided in the orchestration input, and the
file uploaded as the orchestration input has also been
attached to this order.
Click the attachment Icon to access the Attachment Manager;
you can see the uploaded image.
Created an orchestration that accepts a file as an input
and uploads that file as an attachment to a work order.
Created an EnterpriseOne page with a tile that launches
that orchestration.
Used that tile to launch the orchestration and pick a file
from your local file system as input to the orchestration.
Creating an Orchestration to Generate CSV Files
and Return Them As Orchestration Output
In this task, you will define an orchestration that generates
a list of equipment at the status of Down and provides that
list in its output by generating a CSV file, and returns the
file as the orchestration output. This feature also lets you
download those files to your local desktop.
Creating the Service Request
Sign in to the EnterpriseOne web client. Close any
applications you may have open. On the EnterpriseOne page,
click the drop-down menu next to your user name and select Record
a Process.
In the Process Recorder window, click the Start
button.
Using the fast path access the Equipment Master (P1701)
application.
In Equipment Status column (highlighted in the screen
shot) set value as DN (Down Status) and click Find.
Click Return Values in the Process Recorder
window.
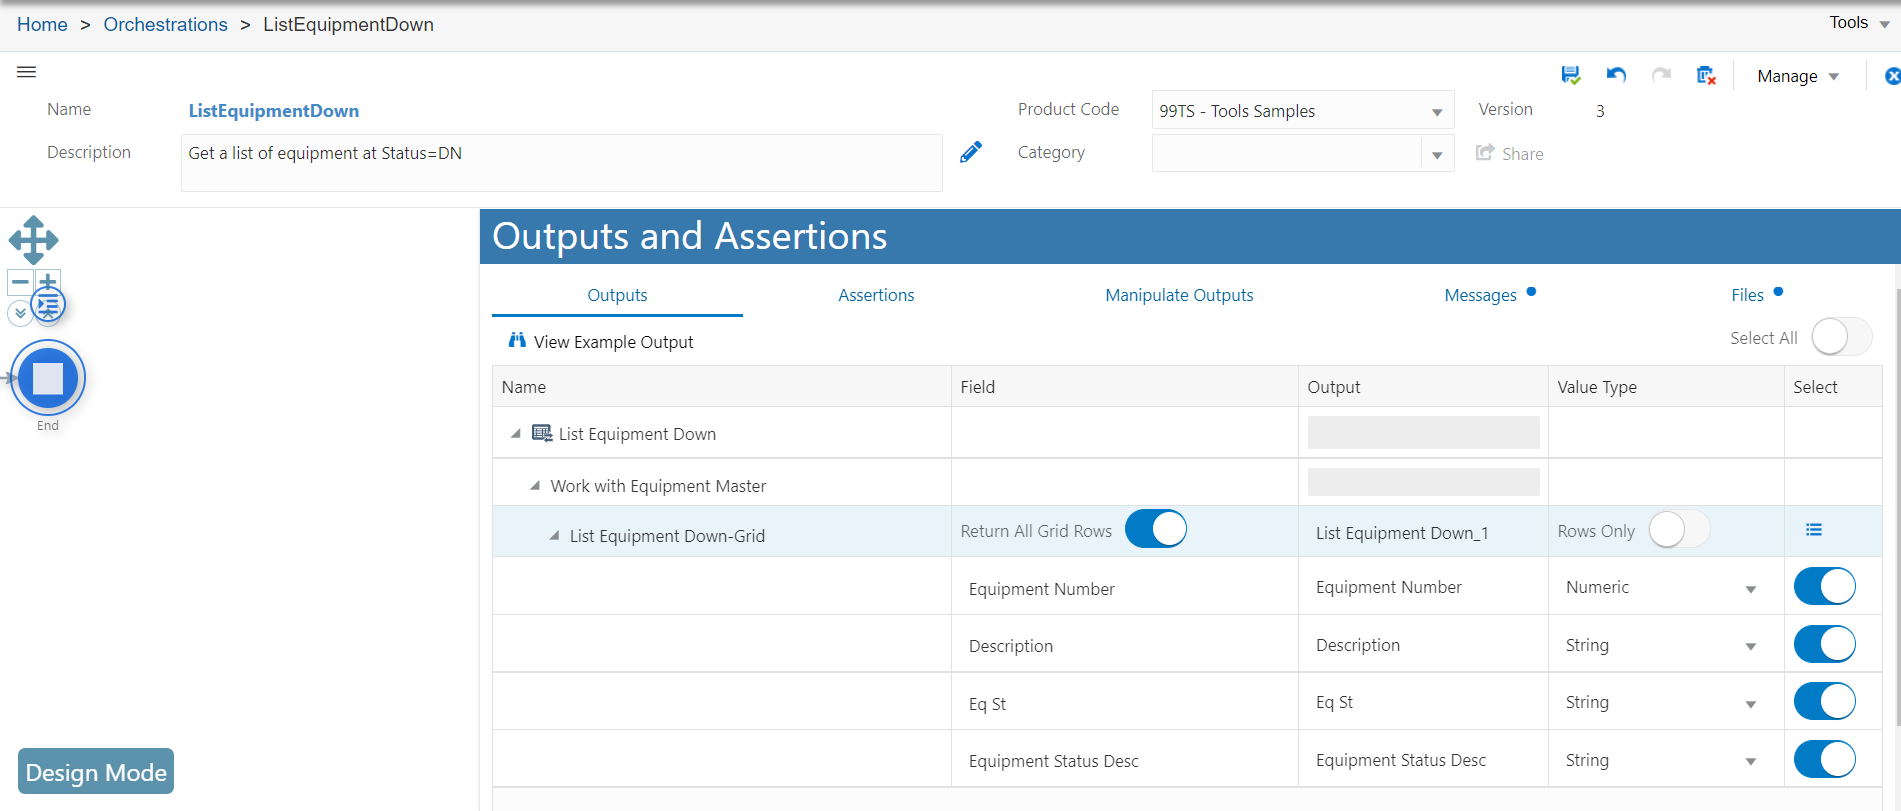
Notice that the cursor changes to an arrow. Click the
following grid column headings to select them as return
values: Equipment Number, Description, Eq St, Equipment
Status Desc. As you click each one, notice that it is
added to the Return Columns box in the Process Recorder
window. Note: You might have to move the Process Recorder
window to see these columns. Click and drag the title bar to
move the window.
Click the End icon and select Output and
Assertions.
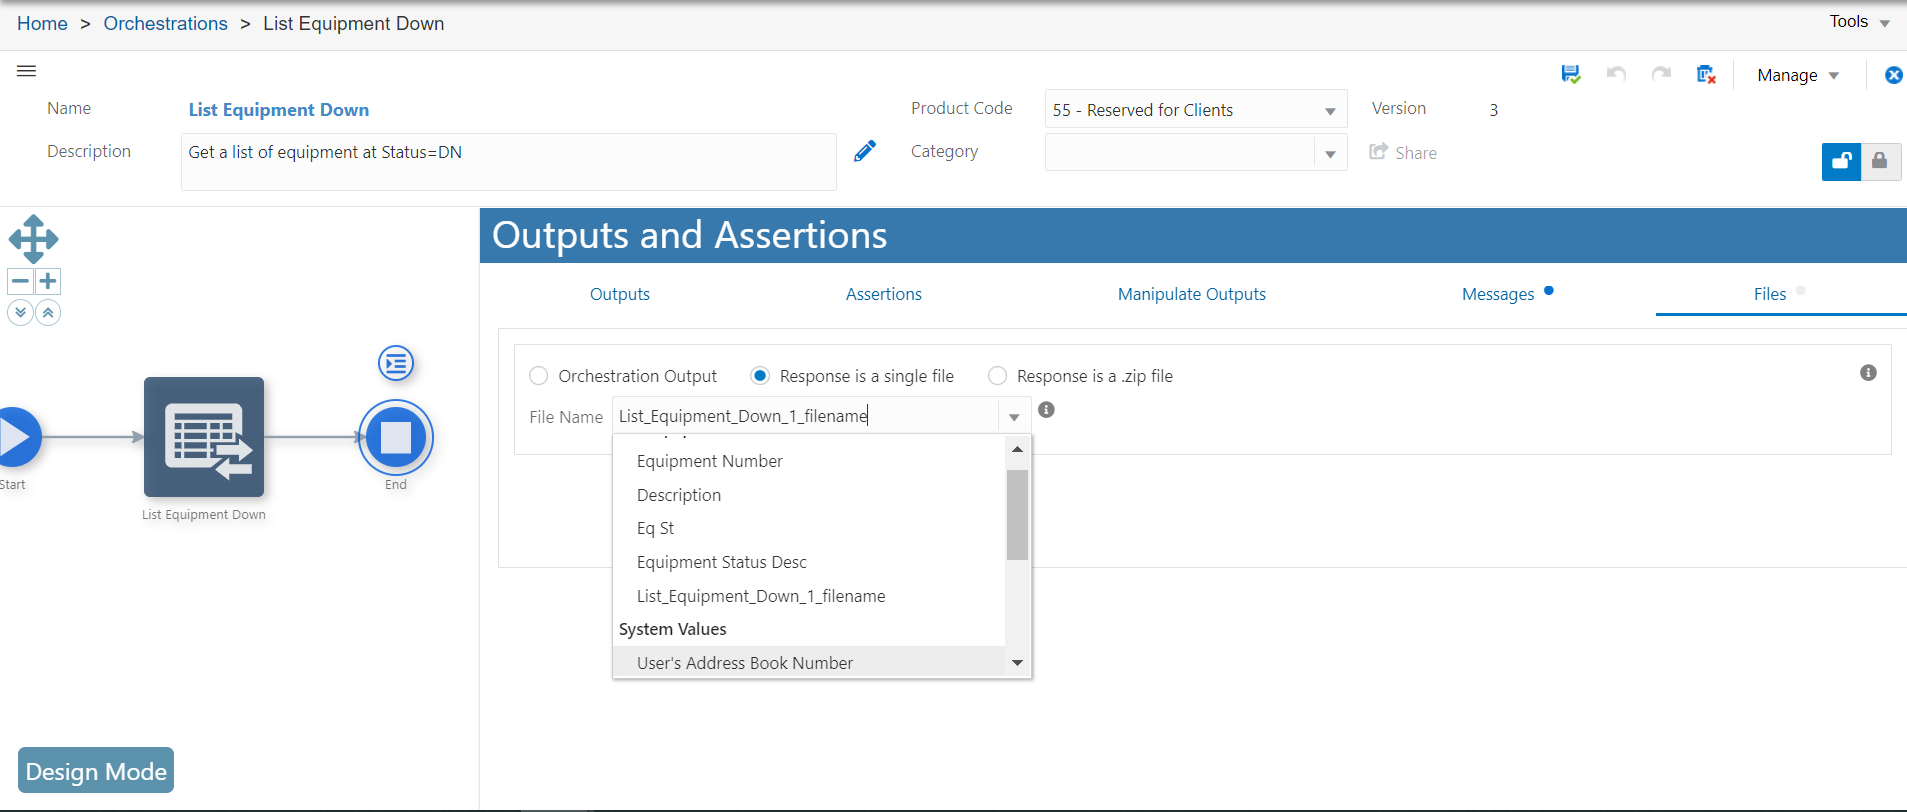
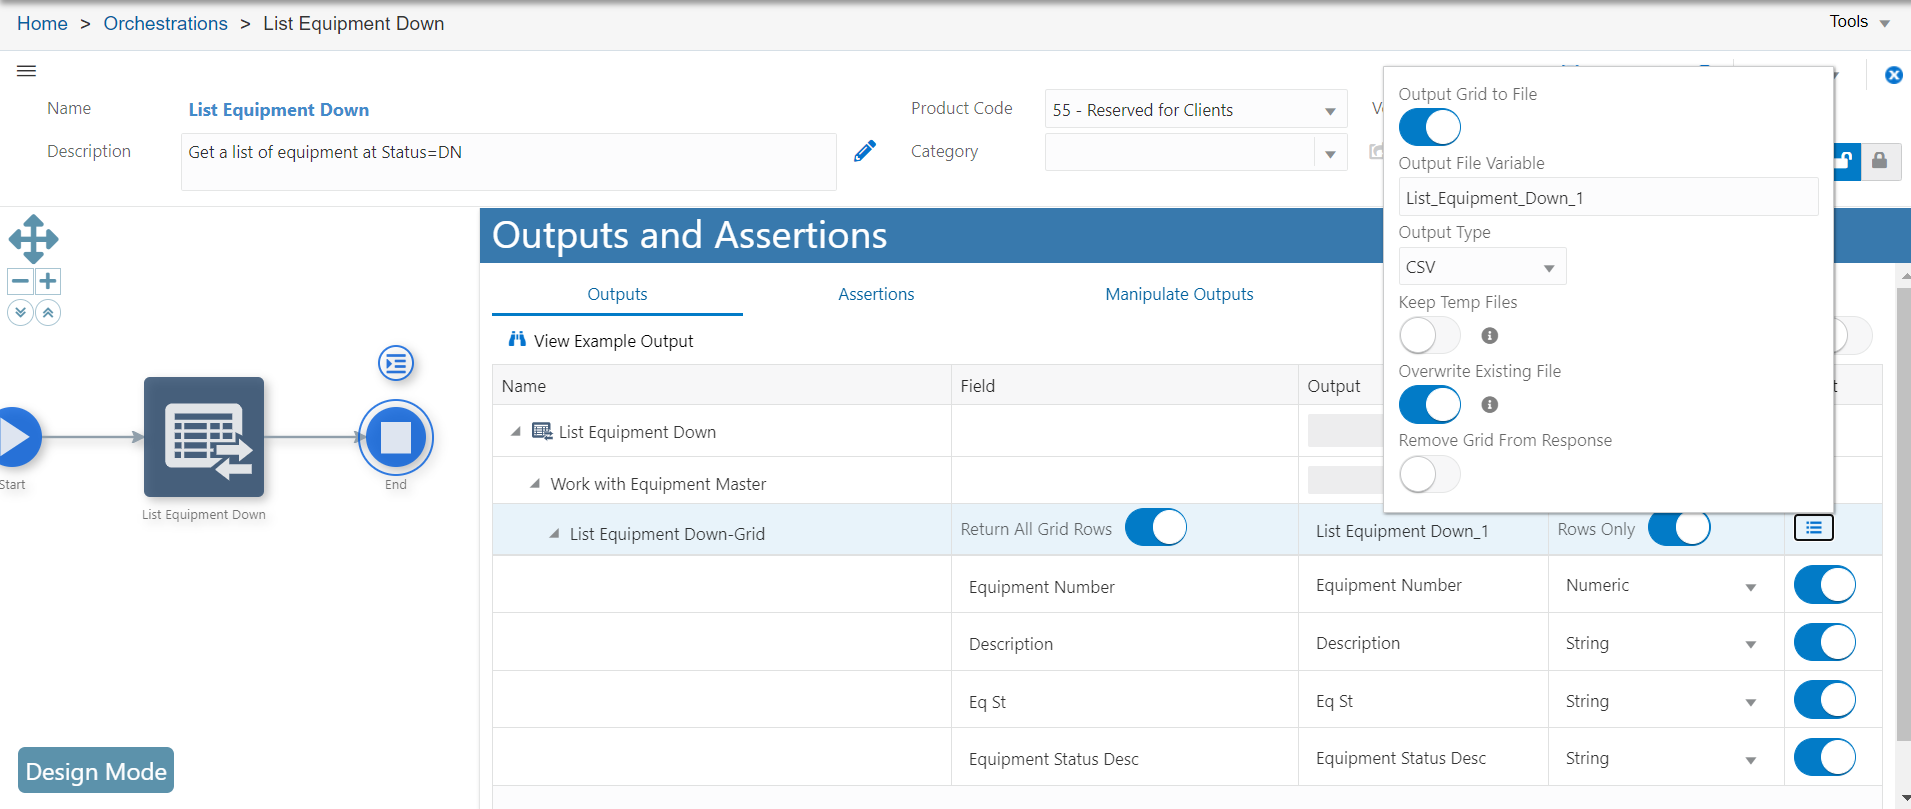
Click the Files Tab in Outputs and Assertions and
select Response is a single File option and select
List_Equipment_Down_1_filename from the File Name drop-down
menu. Click Save. Output
and Assertions - Select File Name
You have now created an orchestration that gets a list of
equipment at Status = DN (Down) and includes a CSV
file of that list in its output.
Call
the Orchestration from an EnterpriseOne Page and Receive the
File Output
This task involves calling the orchestration created
previously from an EnterpriseOne page. Please complete the
following steps:
Associate the Orchestration with a Designer Pane Tile
If you are still signed in to the EnterpriseOne web
client, sign off and sign back in. You need to do this to
refresh your access to the new user-defined object
(orchestration) you created in Orchestrator Studio in the
previous exercise.
Navigate to the EnterpriseOne page you created in the
previous exercise. On that EnterpriseOne page, click the
drop-down menu next to your user name in the upper-right
corner, click Manage Content under the Personalization
category, and then click Composed Pages.
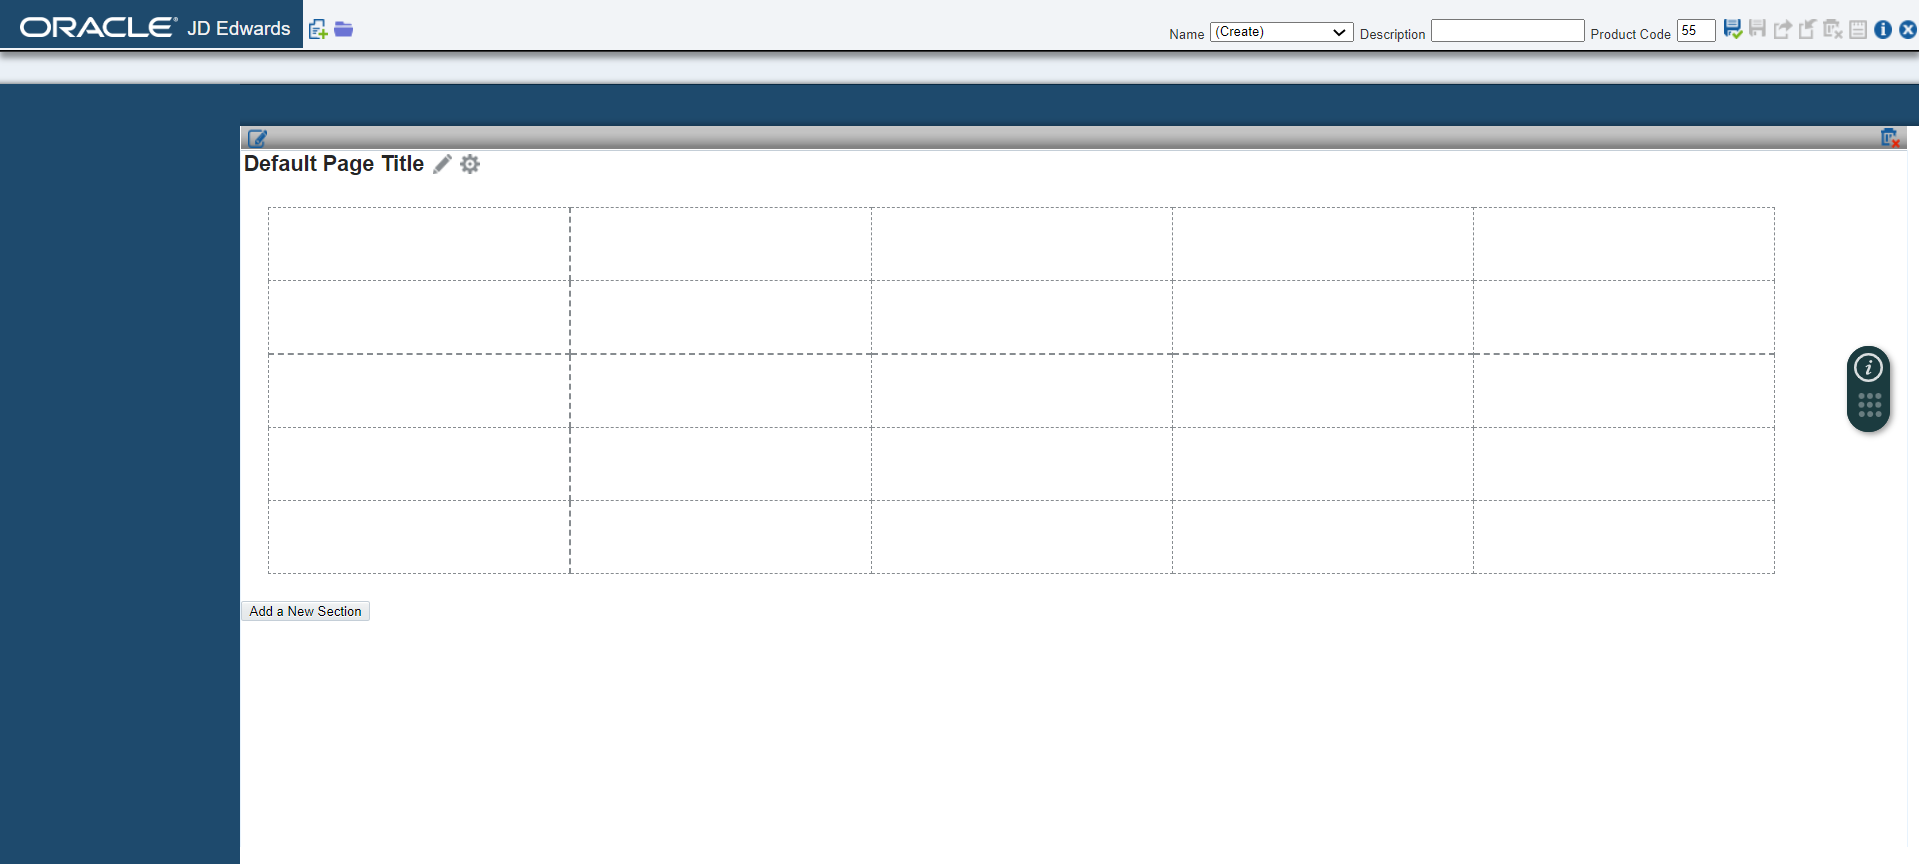
Your EnterpriseOne composed page opens in edit mode.
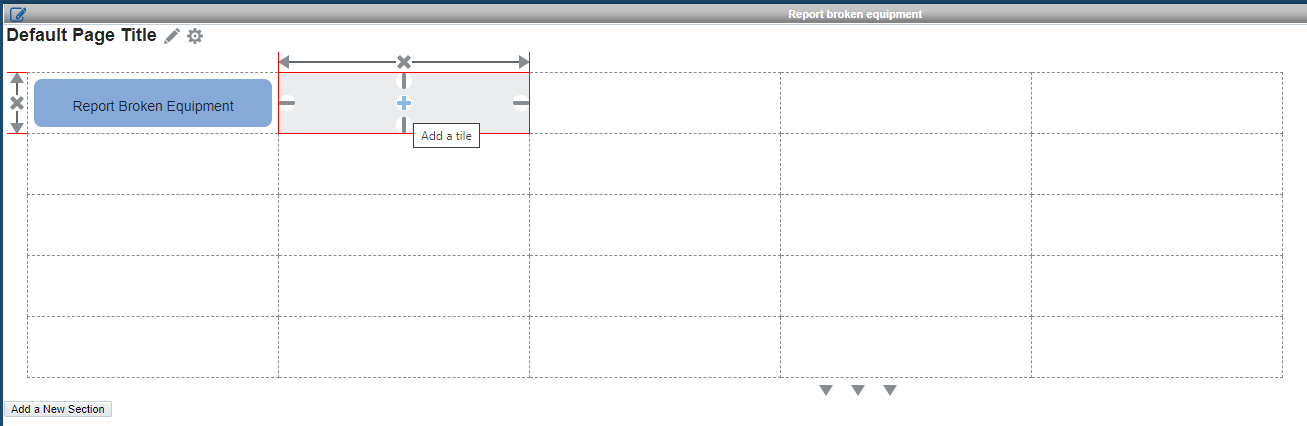
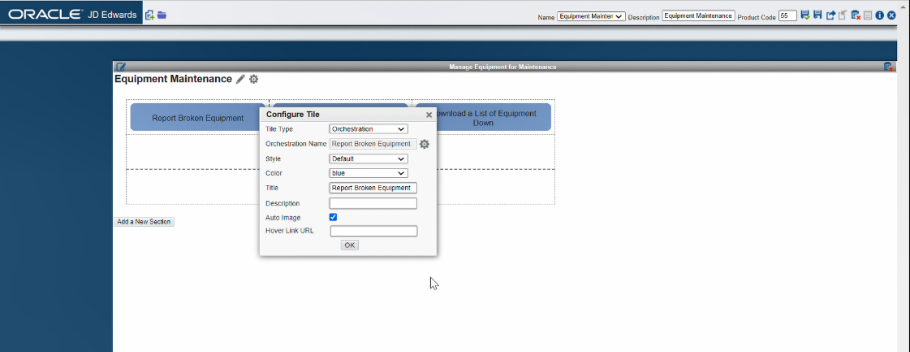
Click the Add a Tile (+) icon to add a new tile
next to the tile you created in the previous exercise: Add
a Tile icon in Designer Pane
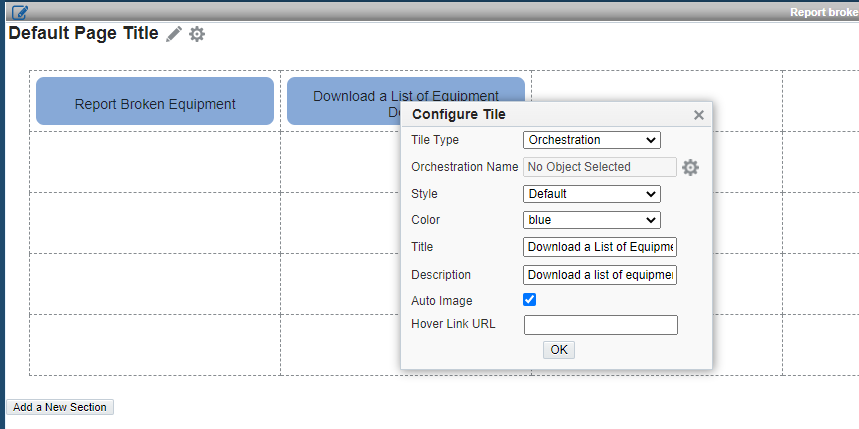
In the Configure Tile dialog box, complete the following
setup:
Click the settings icon next to the Orchestration Name
field.
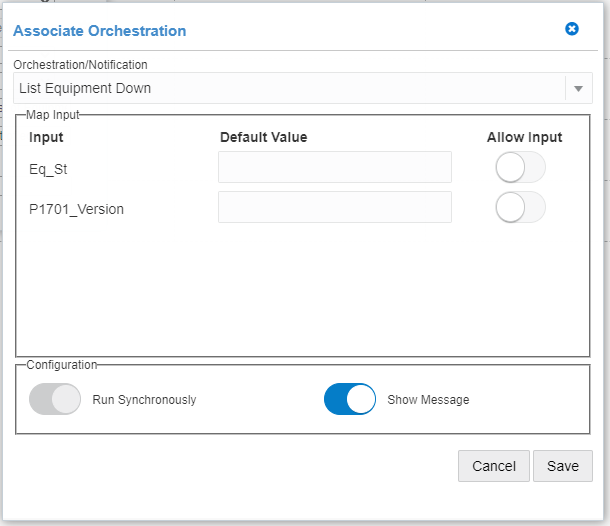
The Associate Orchestration popup window is displayed. In
the Orchestration drop-down list, select the List Equipment
Down orchestration from the list. Note: If you don’t see List Equipment Down in the
list of orchestrations, sign out of EnterpriseOne and sign
back in.
This orchestration requires no inputs; it simply creates a
list of all equipment at Status = DN. Therefore, you can
turn the Allow Input options off for all inputs.
Enable the Show Message toggle button to display the success
message defined for the orchestration in the Orchestrator
Studio (Define Messages tab in in the Outputs and Assertions
window). List Equipment
Down Orchestration
Click Save.
Click OK in the Configure Tile dialog box.
Click Save to save the EnterpriseOne Page.
Click Close.
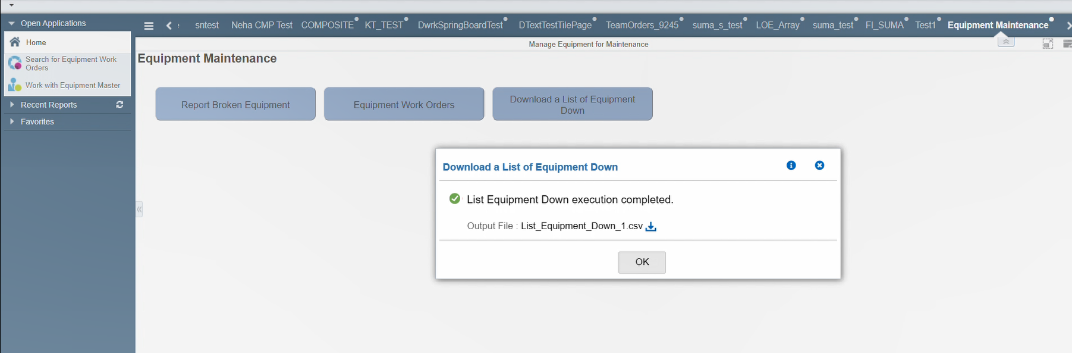
Now click the Download a List of Equipment Down tile.
Because there are no inputs, the orchestration runs
automatically and shows the following window when it
completes: Download CSV
File Note: You can specify a custom success message in
Orchestrator Studio in the Orchestration Outputs and
Assertions page in the Messages tab.
Click Download File to download the CSV file. The
file is downloaded to your browser’s download location.
The file will be downloaded to the browser default
download directory.
Note: A confirmation message will appear if you close
the output pop-up without downloading the file.
Confirmation
Message
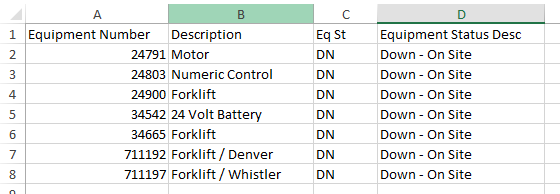
Open the downloaded CSV file and verify the list of
Equipments with Down Status. Downloaded CSV File
Launching orchestrations from EnterpriseOne pages is one of
the easiest and most effective ways to put the power of
orchestrations to use. Now that we can select file inputs and
receive file outputs, we have even more opportunities to
automate business processes.
 File
Selector for Orchestrations Launched from an EnterpriseOne Page
File
Selector for Orchestrations Launched from an EnterpriseOne Page Before You Begin
 Recording the Work Order Creation Process
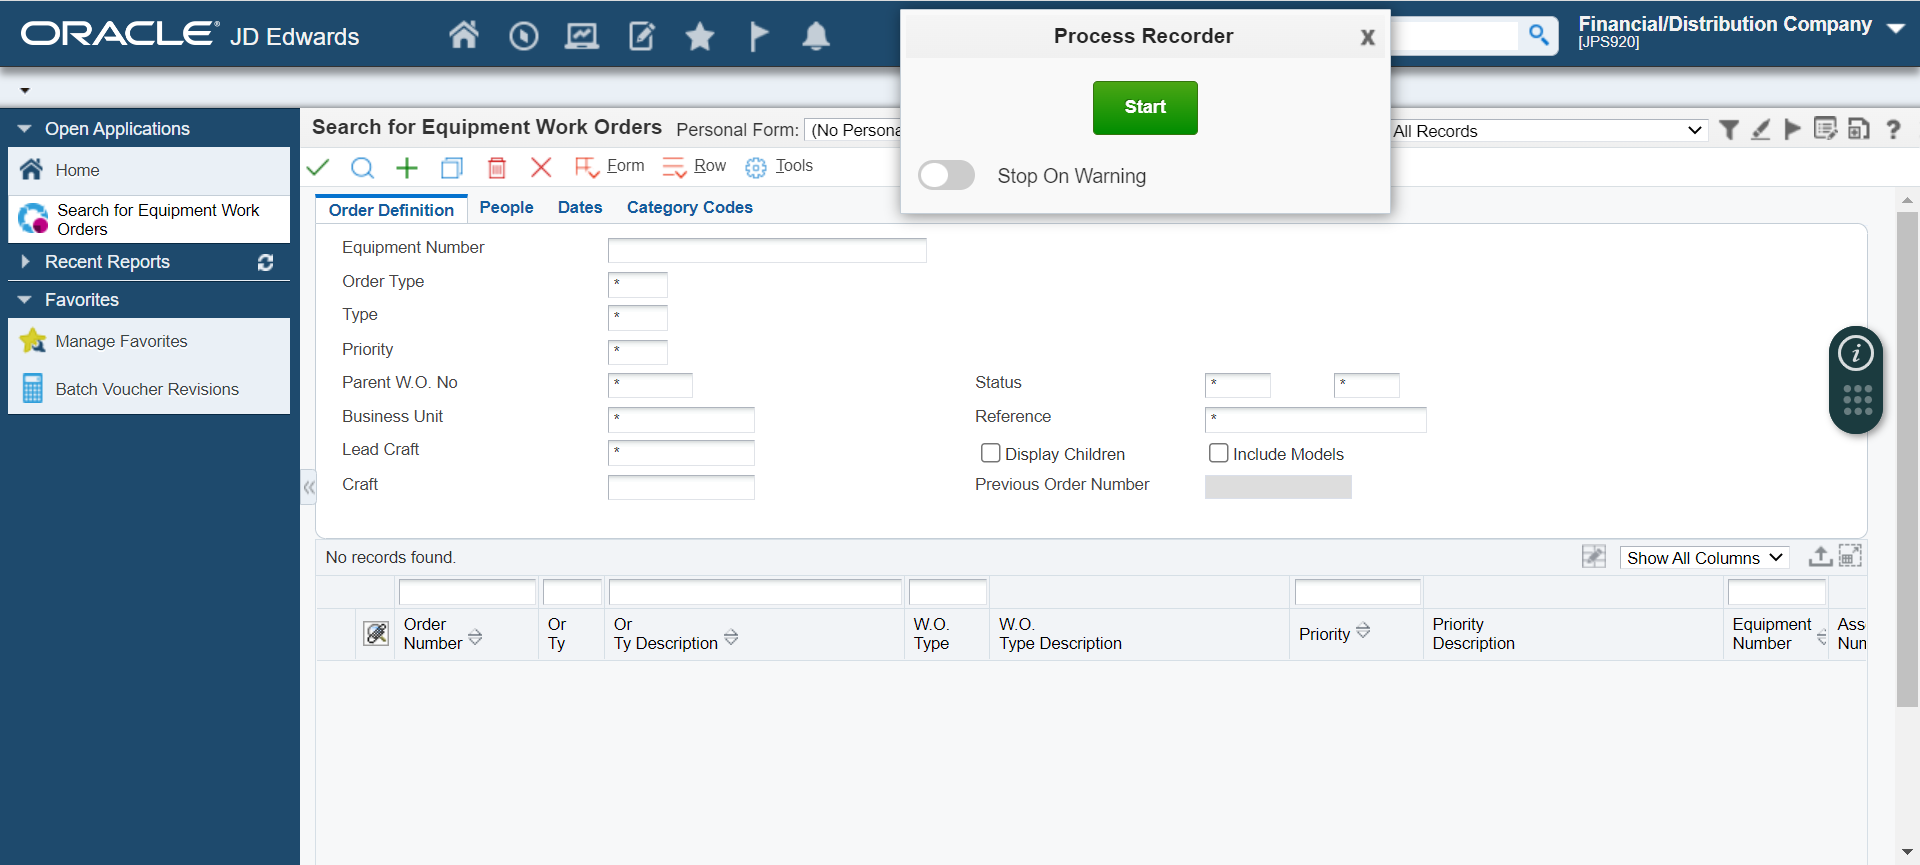
 Creating
an Orchestration Using the Form Request
Creating
an Orchestration Using the Form Request 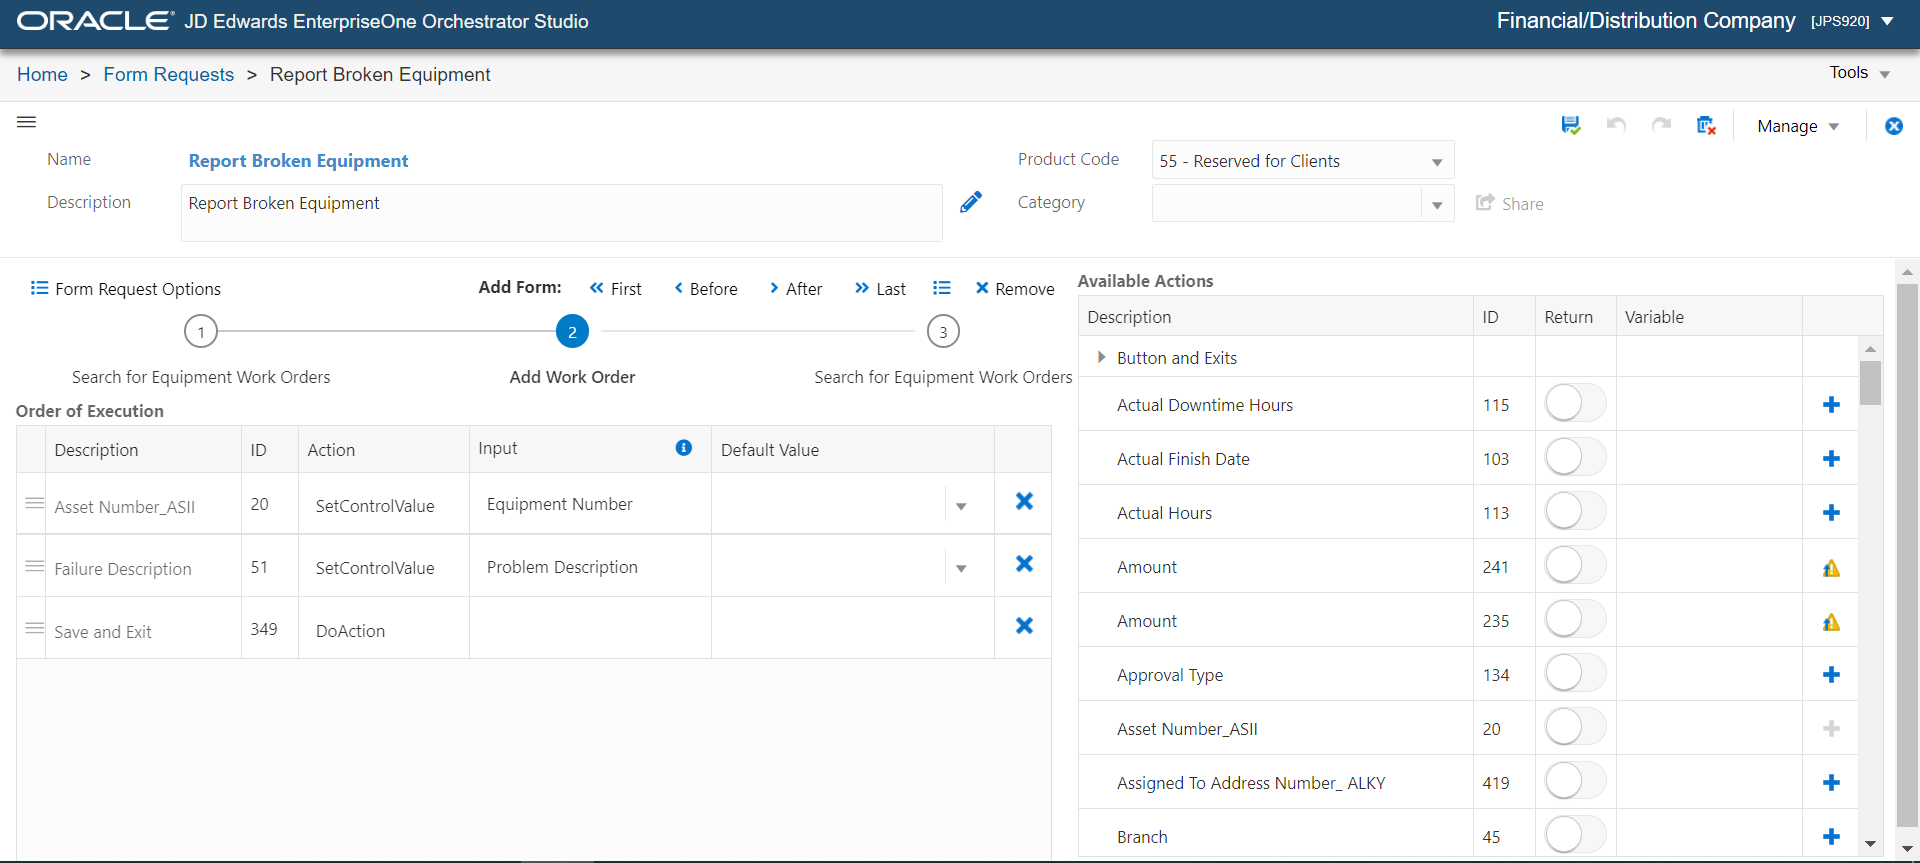
 Call
the Orchestration from an EnterpriseOne Page and Provide File
Input
Call
the Orchestration from an EnterpriseOne Page and Provide File
Input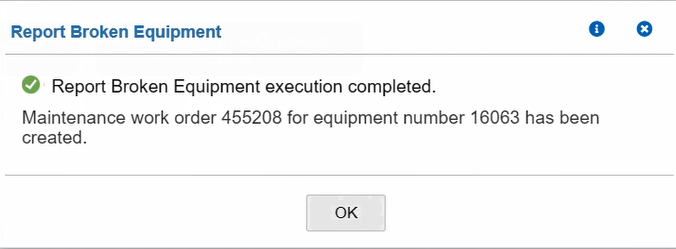
 Creating an Orchestration to Generate CSV Files
and Return Them As Orchestration Output
Creating an Orchestration to Generate CSV Files
and Return Them As Orchestration Output

 Call
the Orchestration from an EnterpriseOne Page and Receive the
File Output
Call
the Orchestration from an EnterpriseOne Page and Receive the
File Output