Installing IBM HTTP Server Plug-ins for WebSphere Application Server
With the IBM HTTP Server or Microsoft Internet Information Services (IIS) successfully installed, the final portion of the WebSphere Application Server installation is to install WebSphere Plug-ins.
Prior to installing WebSphere Plug-ins, it is recommended to ensure the IBM HTTP Server services (Apache) or Microsoft IIS services are not already running.
To install WebSphere Plug-ins:
Insert the WebSphere Application Server Supplement CD, Version 7.0
(32-bit)or extract the downloaded image (if you haven't done so already).Run the install executable in the plugin directory. For example:
cd Z:\dump\was7_windows\sup1\plugin
Z:\dump\was7_windows\sup1\plugin > install.exe
mount /cdrom
cd /cdrom
./plugin/install.sh
Note: The syntax of the mount command can vary by platform, and is not required for Sun platforms.
On the Welcome screen, you can deselect all "learning" options and click the Next button to begin the wizard.

On Software License Agreement, review the License Agreement and choose an option to accept or decline.
Click the Next button to continue (not available if license agreement is not accepted).

On System Prerequisites Check, the installer performs a verification of system requirements.
After the installer indicates the check was successful, click the Next button to continue.


On Select the Web server to configure, select only one of the following radio buttons:
IBM HTTP Server V7
Miscrosoft Internet Information Service V7
Miscrosoft Internet Information Service V6
Note: All plug-in binaries are installed, but only the selected Web server will be configured.Click the Next button to continue.

On Select installation scenario, if your WAS server is located on the same machine on which you are installing, select this radio button:
WebSphere Application Server machine (local)
If your WAS server is located on a different machine than the one on which you are running the installer, select this radio button:
Web server machine (remote)
Click the Next button to continue.


On Web server plug-ins installation location, enter a directory. The default directory is:
z:\IBM\HTTPServer\Plugins/opt/IBM/HTTPServer/PluginsFor example:
/u01/IBM/HTTPServer/PluginsClick the Next button to continue.


On Installation location of WebSphere Application Server V7.0, enter a directory. For example:
z:\IBM\WebSphere\AppServer/u01/IBM/WebSphere/AppServerClick the Next button to continue.


On Select the existing IBM HTTP Server httpd.conf file, enter a directory path. For example:
z:\IBM\HTTPServer\conf\httpd.conf/u01/IBM/HTTPServer/conf/httpd.confNote: This field is not available for IIS.You must also specify the Web Server port. Typically you can accept the default value of 80 for the both the IBM HTTP and Microsoft IIS servers.
Note: The plug-ins installer directly modifies the IBM HTTP Server configuration file with the information you specify on this screen.Click the Next button to continue.


On Specify a unique Web Server definition name, enter the name of your IBM HTTP or Microsoft IIS Server to allow the WebSphere Administration Console to administer the IBM HTTP or Microsoft IIS Server configuration and status.
On Specify a unique Web Server definition name, enter the name of your IBM HTTP to allow the WebSphere Administration Console to administer the IBM HTTP configuration and status.
Typically you can accept the default value of webserver1.
Tip: In order to avoid confusion in installations with multiple web servers on multiple ports, it is good practice to use the following naming convention:webserver<port_number>For example, the namewebserver80indicates the webserver is on port 80.Click the Next button to continue.


On Web Server plugin-cfg.xml file, you can accept the default location for the
plugin-cfg.xmlfile.Click the Next button to continue.


The installation wizard detects the default profile (such as AppSrv01) that does not have a Web server defined. Click the Next button to continue.


On the Summary screen, click the Next button to begin the installation.
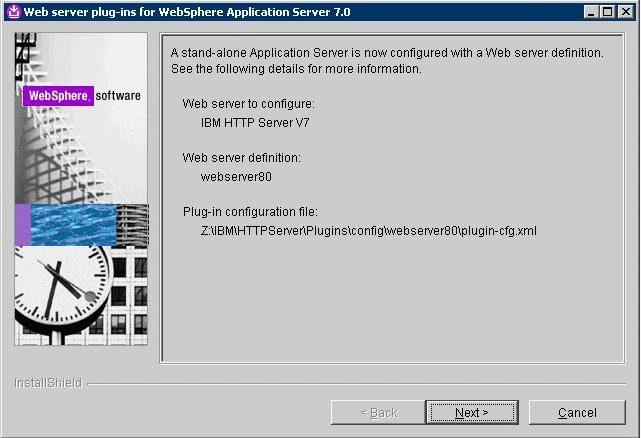

The installation wizard shows that a Web server definition is created for the default Application server profile (such as AppSrv01).
Click the Next button to proceed.
The installation wizard launches a web browser with more detailed information about the Plug-ins road map. You can close the browser at any time or return to the installation wizard.


On the completion screen, click Finish to exit the WebSphere Plug-ins installation wizard.