 Building
a Full Package in Net Change Mode
Building
a Full Package in Net Change Mode Before You Begin
This
60-minute Oracle-by-Example (OBE) shows you how to run a full
package build with optimized performance using the net change
mode.
In this OBE, you will:
- Assemble a full package build.
- Activate the assembled package for an optimized build.
- Initiate the full package build.
- Set the processing option to always run the full package build in net change mode.
Background
Starting with Tools Release 9.2.9, the the EnterpriseOne package build application enables System Administrators to alter the full package build, to only compile functions that are updated since the last active full package build.
The enhanced full package build process uses the source files from the original active package as its base, and only builds business functions, Named Event Rules (NER), and tables that have changed since the last active package build.
On activating the full package build in net change mode, it takes considerably lesser time than the normal full package build.
Prerequisite
To build a full package in net change mode, you should have applied the latest JD Edwards EnterpriseOne Planner ESU.
 Assembling
a Full Package Build
Assembling
a Full Package Build
To assemble for a full package build:
- Access JD Edwards EnterpriseOne system on the web client.
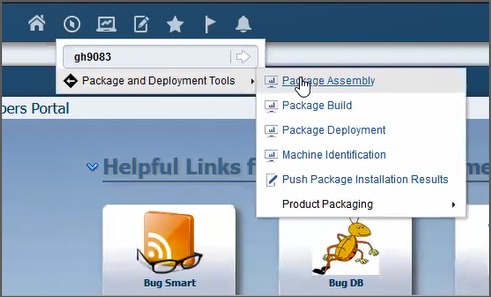
- Enter GH9083 in the Fast Path and press Enter.
- From System Administration Tools, select the Package
and Deployment Tools menu, Package
Assembly.
Package Assembly Form Navigation - On the Work With Packages form, click Add.

Work With Packages Form - Add - On the Package Assembly form, enter the
Package Name, Path Code, and Description fields.
Note: The name of the package cannot be longer than eight characters.- Package Name: For example, enter
DV920FY. - Path Code: For example, enter
DV920. - Description: Enter a description for the package.

Package Assembly Form - Package Name: For example, enter
- On Package Type Selection, select Full, and click Next.
- Select the Build Business Services checkbox if you are building business services packages for a business services server.
- Click OK. The Work With Packages
form displays the package record in the grid.

Work With Packages Form
 Activate
the Assembled Full Package
Activate
the Assembled Full Package
After assembling, to activate the assembled full package build:
- In the Work with Packages form, click the
Package Status button of the assembled
package to change the status of the package from Inactive
to Active.

Work With Packages Form - Package Active Status - Click Define Build from the Row menu.

Work With Packages Form - Define Build - In the Package Build Revision form, access
the Business Function Options tab and select
the Build Net Change Objects Only checkbox.

Package Build Revision Form - Click OK.
- In the Server Selection form, to select a
server, select one or more of the available servers. A check
mark indicates your selection.

Server Selection Form - Click
 .
. - Click OK.
- In the Work With Package Build form,
select the package and select Active/Inactive from
the Row menu or click the Active Status of
the package in the grid to change the status to Active.

Work With Package Build - Package Active/Inactive Status
 Initiate
the Full Package Build
Initiate
the Full Package Build
To initiate the full package build:
- In the Work With Package Build
form, select the package and click Submit Build
from the Row menu.

Work With Package Build Form - In the Printer Selection form, select the
printer and click OK. The system initiates
the build. The full package build takes considerably less time
than the normal full package build.

Printer Selection - After the build is complete, review the package build status
in the Package Build Detail pane (Work With
Package Build form) and verify if all the package components
were built successfully or if the build has ended in an error.

Work With Package Build - Package Build Detail 
Work With Package Build - Package Build Detail - To verify the build logs, access the Deployment Server and
Deployment Client logs from the system.

Server Package Build Log 
Client Package Build Log - To verify the Server Package Build and Client
Package Build reports, access them from the Submitted
Job Search program.

Submitted Job Search

Server Package Build Report

Client Package Build Report
 Setting
Processing Option to Run Full Package Build in Net Change Mode
Setting
Processing Option to Run Full Package Build in Net Change Mode
To set the processing option to always run an optimized full package build:
- Access the processing options for the Package Build
program – P9621W.

Package Build Program Processing Option Navigation
- Set the value in Net Change for Full Package
field to
1.
Package Build - Processing Options - Click OK.