Introduction
This Oracle by Example (OBE) provides instructions to migrate your JD Edwards EnterpriseOne 9.2 data from an on-premises system with SQL server database to Oracle Cloud.
In this OBE, you will:
- Run the export script on the on-premises database server.
- Run the UBEs manually on the on-premises deployment server.
- Run the import script on the database server on the One-Click instance.
- Run the UBEs manually on the deployment server on One-Click instance.
- Complete the post migration tasks.
Time to Complete
Migration time can vary and may take several hours, based on the number of tables and the size of the data being imported.
Background
Oracle Cloud enables you to migrate Applications 9.2 on-premises environment to Oracle Cloud (One-Click).Before starting the migration process, make sure all traditional objects are checked in for the path code you plan to migrate. Project information will not be migrated to the One-Click instance. User Defined Objects (UDOs) that are reserved to a real project, will be moved to your default project at the end of the migration process.
To migrate JD Edwards EnterpriseOne to Oracle Cloud for Microsoft SQL Server on Windows, the on-premises environment must be running Tools Release 9.2.1 or later with Applications 9.2. After the migration is complete, your your migrated environment will be on the same applications release as the rest of your One-Click installation.
Supported on-premises environment:
- EnterpriseOne Tools Release 9.2.1 and later
- EnterpriseOne Applications Release 9.2
- SQL Server database on Windows
Prerequisites
Before the migration, ensure that:
- The on-premises environment is on Applications 9.2 and Tools Release 9.2.1 or later.
- A full package build is completed, populating the repository tables.
- You have provisioned PS920 on the Oracle cloud enterprise server, and have the services running against PS920. The system overwrites the target environment (for example, DV920) for the first migration.
- One-Click is on 9.2.8 with UN8 or later.
- Old packages are cleaned up to speed up the migration process.
What do You Need?
To perform the steps in this OBE, you must have:
- A subscription to Oracle Cloud. You must be a user with the Compute Operations role. For more information, see How to Begin with Oracle Compute Cloud Service Subscriptions in Using Oracle Compute Cloud Service.
- Verified the database size in the One-Click instance is large enough for the import and that database configuration/parameters are validated or tuned for your business needs (for example: maximum extend and extend size parameters).
- Created a JD Edwards EnterpriseOne Multi Tier Deployment on Oracle Cloud One-Click instance. See the Multi Tier or One-Click Provisioning OBEs for more information.
- Downloaded JDE_9.2_Migration_Utility_9.2.26_for_Windows_SQL.zip
from the Oracle Update Center.
The JDE_9.2_Migration_Utility_9.2.26_for_Windows_SQL.zip contains:
- Export folder with export scripts (move this folder to the on-premises database server.)
- Import folder with import scripts (move this folder to the database server on the Oracle One-Click instance.)
Task 1: Running the Export Script on the On-Premises Database Server
The export script backs up the databases on the
on-premises database server. The backup files can then be moved to
the database server on the One-Click instance.
- Before starting, run the Work with Software Updates program
(P96470) on the on-premises deployment server. As this application
starts, it synchronizes the ESU history between
System – 920andSystem Local. After the process is complete, you can close the application. - Navigate to where you downloaded the export files on the
on-premises satabase server (for example:
C:\SQL_scripts). - Extract the SQL script file JDE_9.2_Migration_Utility_9.2.26_for_Windows_SQL.zip.
- Open the export folder and edit the sql_setvar_exp.ini
file with these settings.
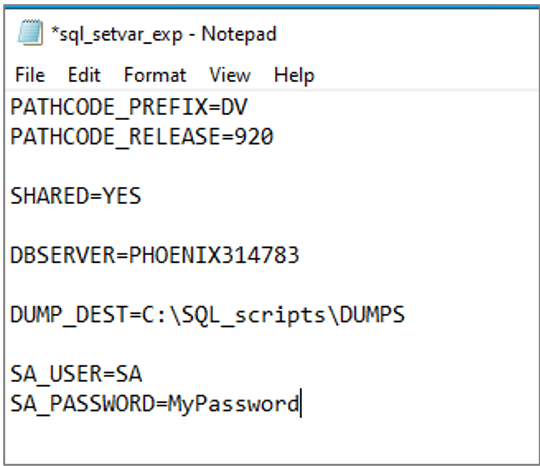
sql_setvar_exp.ini File
Field Description PATHCODE_PREFIX The prefix of the preferred source path code to export. Example, enter DV.
Valid values arePY,PD, andDVPATHCODE_RELEASE The path code release to export. Enter 920.SHARED Export the shared database. Enter YESto export the shared databaseJDE920. This only needs to be done once for migration.DBSERVER The name of the SQL Server instance. DUMP_DEST The full path to the folder where you want to store the database backup files. Enter c:\SQL_scripts\DUMPS.
*Ensure the directory exists*
SA_USER The System Administrator. Use SA.SA_PASSWORD The password for SA_USER.
- Save and close sql_setvar_exp.ini.
- Navigate to the folder where the scripts are saved. For example,
c:\SQL_scripts. - Start PowerShell. Navigate to the directory where the scripts
are saved. Run the
jde_exp_sql.ps1.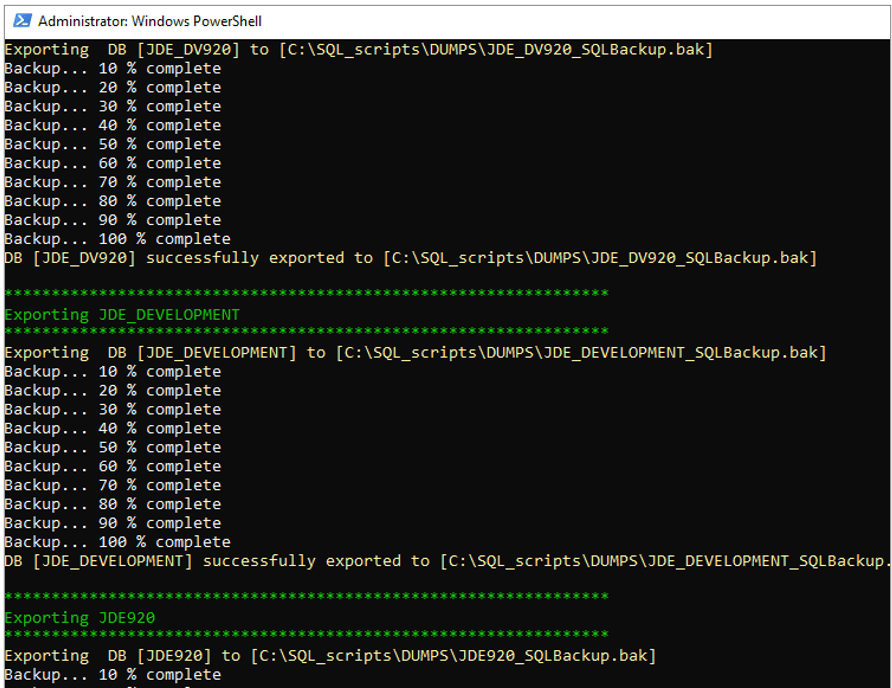
jde_exp_sql.ps1 - The script posts updates to the command screen. All updates are
copied to the log. Verify the log for errors and if successfully
completed is found in all generated log files.
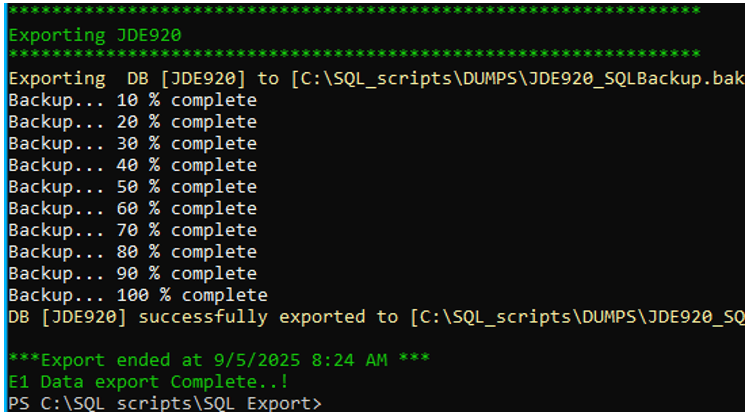
jde_exp_sql.ps1 Note:
The output logs from the process are in the folder above the scripts. For example,c:\SQL_Scripts\. - Verify that the backup
files were successfully created in the specified location. - Transfer the backup files to a folder on the database server of the One-Click instance for importing in a later step.
Task 2: Running the UBEs on Your On-Premises Deployment Server
- Run the R98403XA versions on the on-premises deployment
server to copy system tables including ESU tables ((F9670,
F9671, and F9672) and Object Librarian tables.
- XJDE0002 copies the system tables including the ESU tables ((F9670, F9671, and F9672).
- XJDE0003 copies Object Librarian. Do not change the data selection.
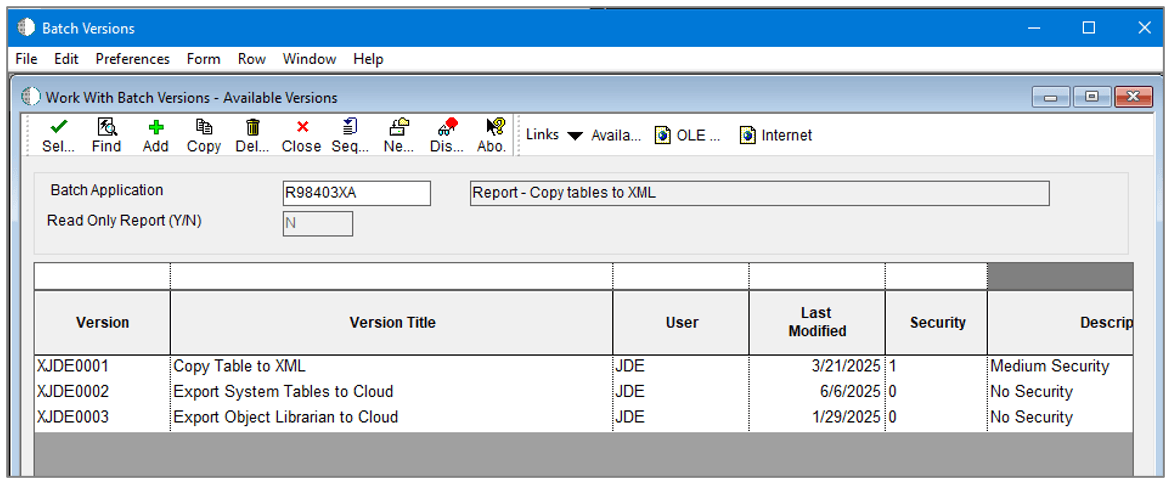
R98403XA Report- Copy tables to XML - After running the UBE versions, verify that all the XML files exist in the target directory. Also verify the PDF reports for errors, if any.
- For all versions, change the target XML Path in the
processing options, if you want to store the XML files in a
different location.
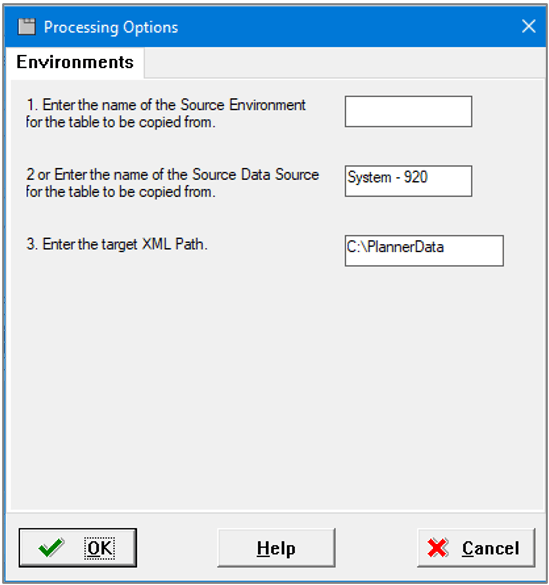
R98403XA Processing Options - R98403XA, XJDE0002 copies a subset of system tables
(Security, Media Objects, and ESU history).
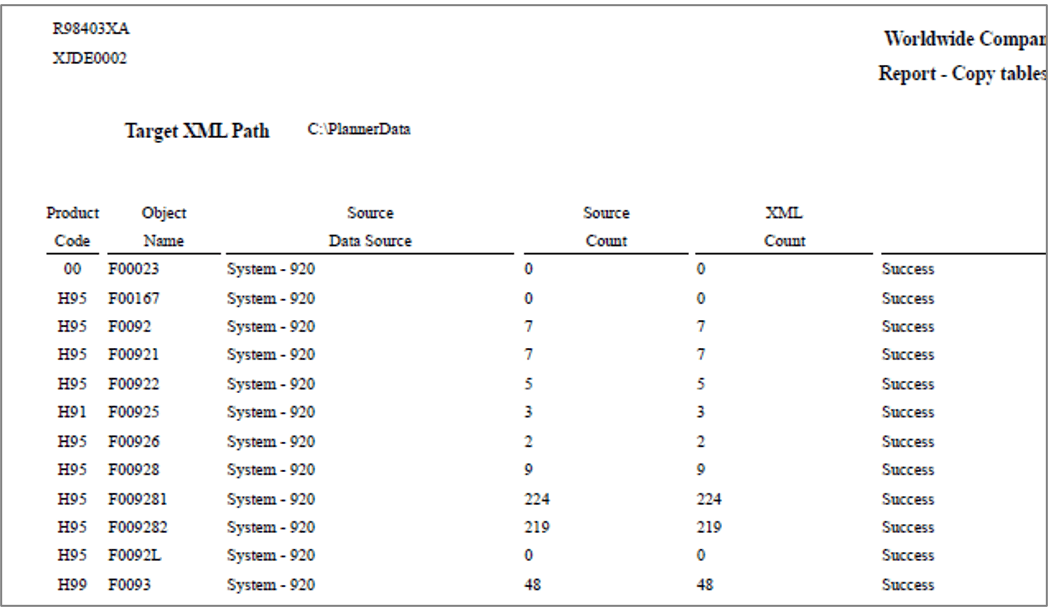
R98403XA XJDE0002 Report - R98403XA, XJDE0003 copies a subset of Object Librarian
tables to the target XML path specified in the processing options,
c:\PlannerData. Copying the Object Librarian ensures that the data for custom objects are copied (ADD mode). The database scripts do not copy the on-premises object librarian to Oracle cloud.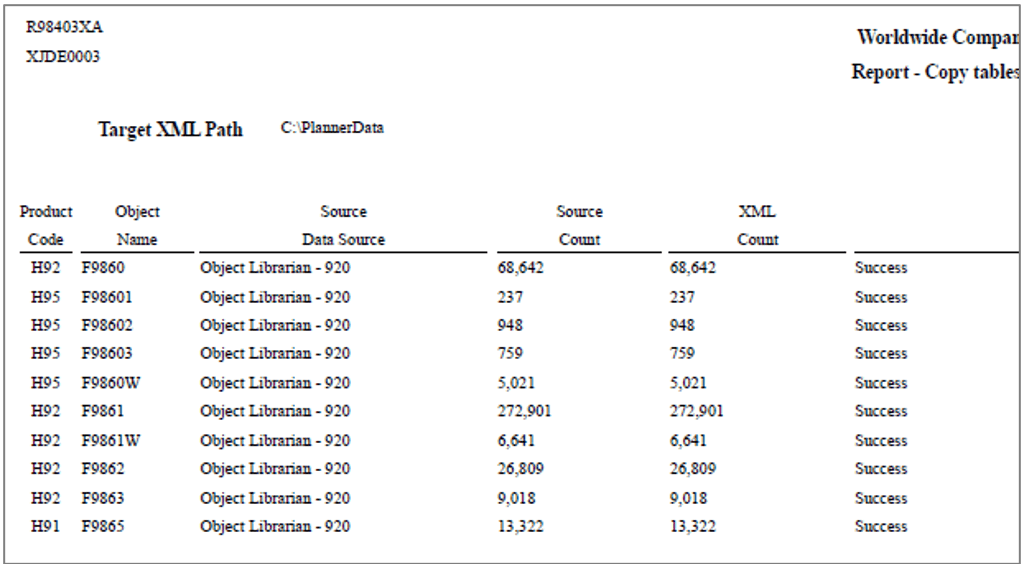
R98403XA XJDE0003 Report - Compress/zip the
c:\PlannerDatafolder from where the object librarian and system data was copied. - Copy
PlannerData.zipto the Oracle cloud deployment server and extract the data.
Task 3: Running the Import Script on Oracle Cloud Database Server
After running the on-premises export script on the database server, run the import script on the Oracle cloud database server.
The jde_exp_sql.ps1 script imports data from the
backup files (generated by the export script) into the database
server on the Oracle cloud service.
- Copy the scripts and backup files directory to your cloud database server.
- Navigate to the SQL import folder, for example
c:\SQL_scripts\. - Open the import folder and edit the sql_setvar_imp.ini
file.
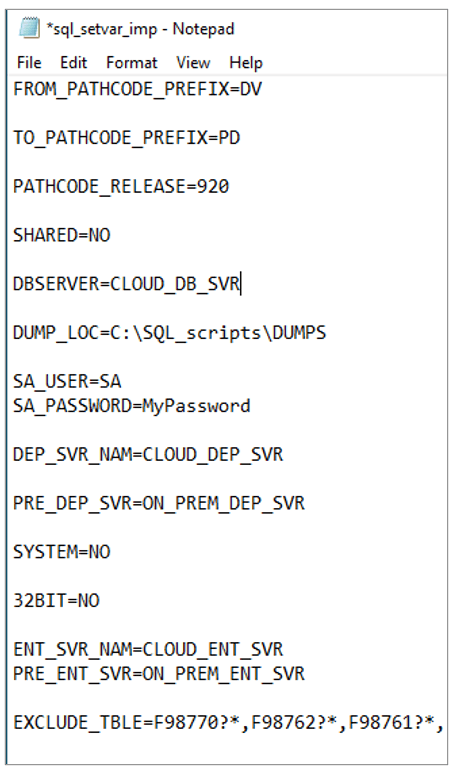
The sql_setvar_imp.ini file
Field Description FROM_PATHCODE_PREFIX The prefix of the path code you exported on the on-premises database server. Enter DV.
Valid values arePY,PD, andDV.TO_PATHCODE_PREFIX The prefix of the target path code on Cloud database server. Enter DV,PY, orPD.
Can be the same or different fromFROM_PATHCODE_PREFIX.PATHCODE_RELEASE
Enter 920. Do not change.
SHARED Enter YESto import data dictionary. EnterNOif you do not want to copy the data dictionary. You only need to import the data dictionary once.DBSERVER Enter the SQL instance name. DUMP_LOC The full path to the folder where you copied the database backup files. Example, C:\SQL_scripts\DUMPS.
SA_USER The database user with system administrator privileges. Example, SA. SA_PASSWORD The password for SA_USER. Enter the system administrator password.
DEP_SVR_NAM The name of the Oracle Cloud Deployment Server in uppercase.
PRE_DEP_SVR The name of the on-premises Deployment Server in uppercase.
SYSTEM Enter YESto update machine names in tables inJDE920.
32BIT Whether the old on-premises server is in 32-bit. Enter YESorNO.ENT_SVR_NAM The new Cloud Enterprise Server name. Match the case as the name in the SY920.F9650table.
PRE_ENT_SVR The old on-premises Enterprise Server name. Match the case as the name in the SY920.F9650table in the on-premises Enterprise Server.
EXCLUDE_TBLE Names of the tables to be excluded (for example, F98770*, F98762*, and F98761*).
Do not change the table exclusion list. - Start PowerShell and navigate to the folder where the scripts
are saved. For example,
c:\SQL_scripts\. - Run the
jde_exp_sql.ps1. - The script posts updates to the command screen. All updates are
copied to the log. Check the output logs for errors and if successfully
completed is found in all generated log files.
Note:
The SQL import script runs much slower than the export script as it copies the tables one at a time. The logs are in the folder above the scripts. For example,c:\SQL_Scripts.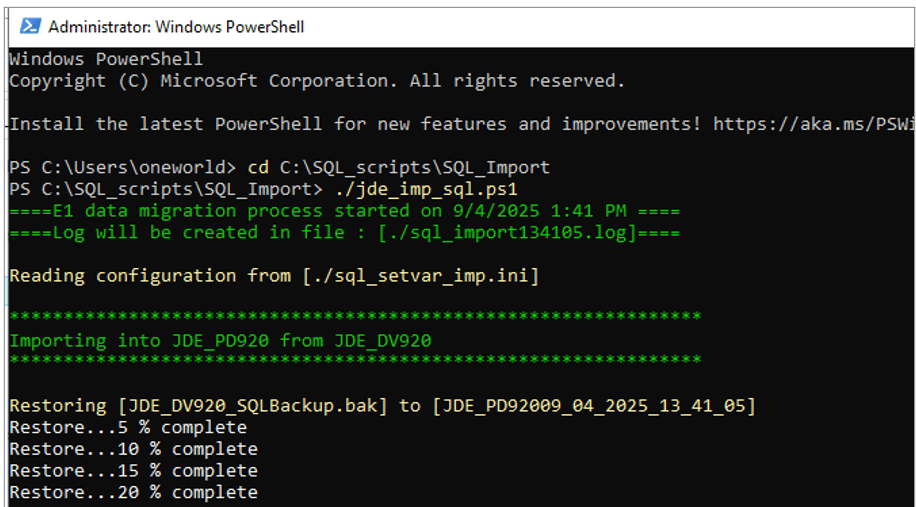
jde_exp_sql.ps1 - If a cross path code import is performed, you will see this
message.

jde_exp_sql.ps1 - Then the script starts copying the individual table.
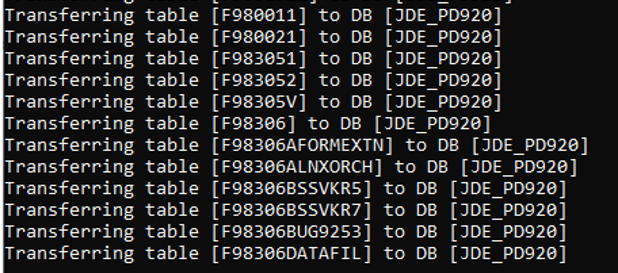
jde_exp_sql.ps1
Task 4: Running the UBEs on Oracle Cloud Deployment Server
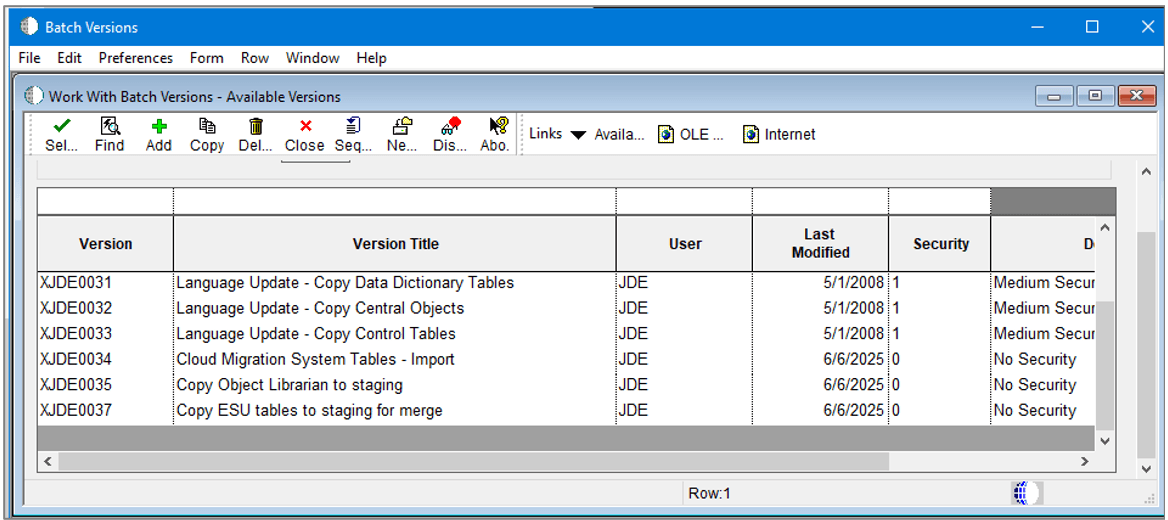
On the Oracle cloud deployment server, run the R98403XB versions to copy the data from on-premises to cloud. Do not change the data selection on each version and verify the PDF reports.
- Run the R98403XB versions on the Oracle cloud deployment
server to copy the data from on-premises to the Oracle cloud
deployment server.
- R98403XB, XJDE0034 copies system objects in ADD mode. Note that this process does not copy OCM mappings, environment definitions, and ESU history.
- R98403XB, XJDE0035 copies a subset of Object Librarian tables to Data Dictionary Local, as input to the Object Librarian Merge R98605.
- R98403XB, XJDE0037 copies the ESU history tables to Data Dictionary Local, as input to the ESU History Merge R96723.
R98403XA Report- Copy tables to XML - Change Enter the XML
Data
                Path
processing option value for each of these versions to the location where you copied the PlannerData from your on-premises Deployment Server.
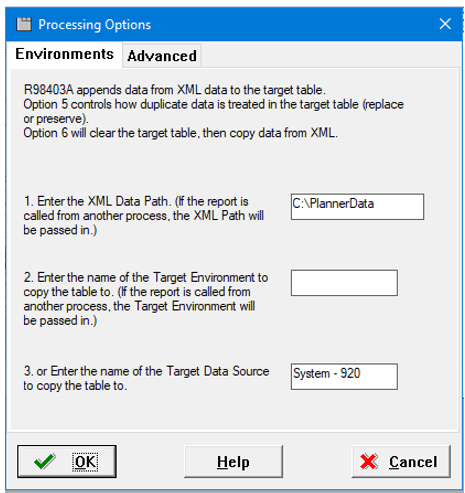
R98403XA Processing Options - Verify the PDF files to ensure that the copy process was successful.
- Run the UBE R98605 - Merge OL records from On-Prem To
One-Click.
- R98605 deletes the F9861, F98602, F98603, F9861W rows for target path code.
- Copies the F9861,
F98602, F98603, F9861W rows for source path code from the
on-premises Deployment Server and substitutes the target path
code and target deployment server. For example, copy
PD920toDV920orDV920toDV920. - Copies the F9860, F9860W, F98601, F9862, F9863, F9865 rows in APPEND mode for custom objects found in F9861 for the source path code.
- Adds
the missing F9860W row for each F9861W.
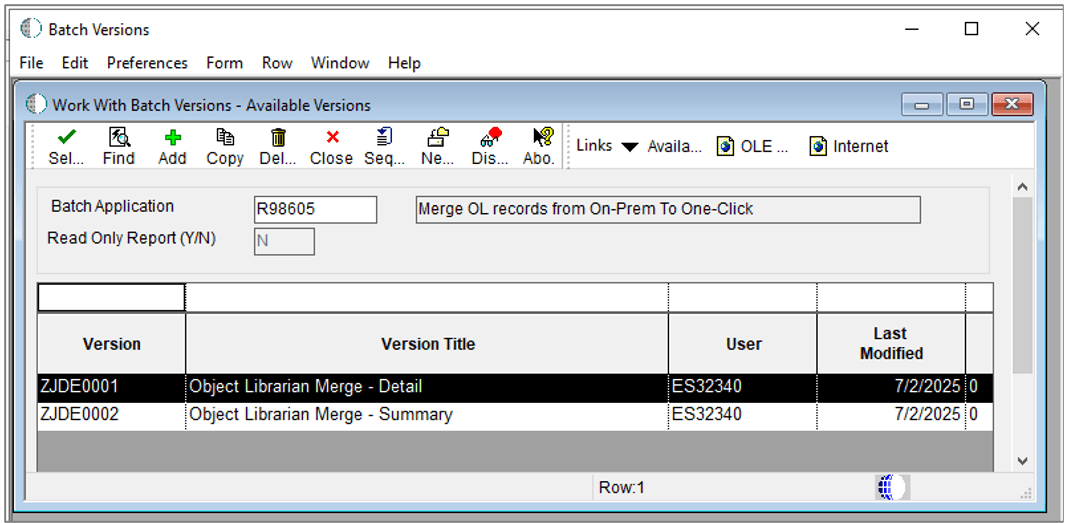
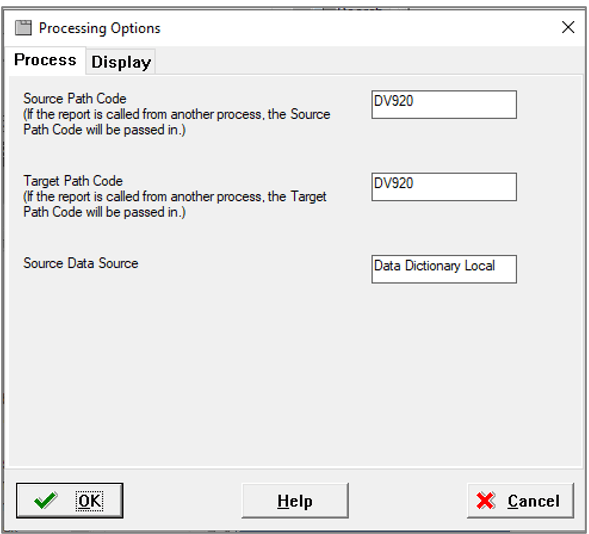
R98605 - Merge OL records from On-Prem To One-Click - Verify the processing options. Do not change the Source Data
Source value.
R98605 Processing Options - Process Tab Summary/Detail field -
1only displays the row counts.0also lists all the object rows that were copied.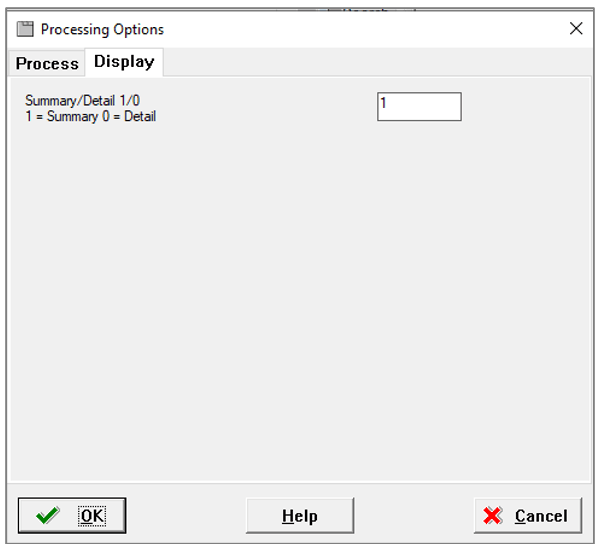
R98605 Processing Options - Display Tab - Review the Summary and Detail reports.
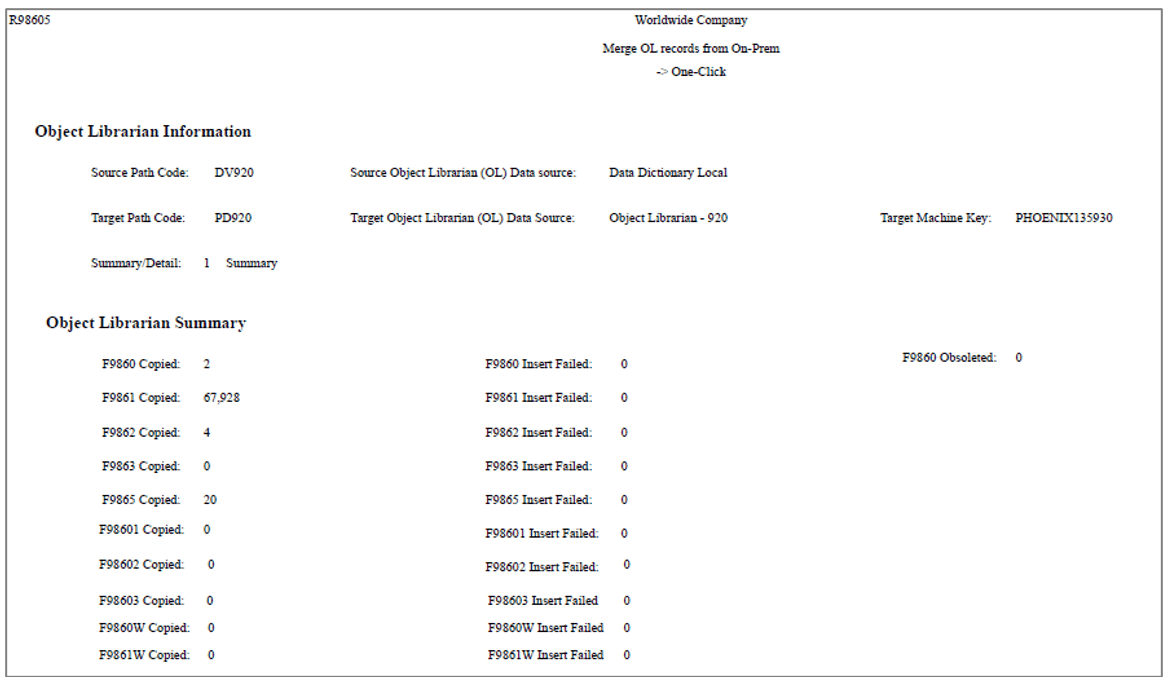
R98605 Summary Report Detail (
0) lists all objects that have been copied and displays the row counts.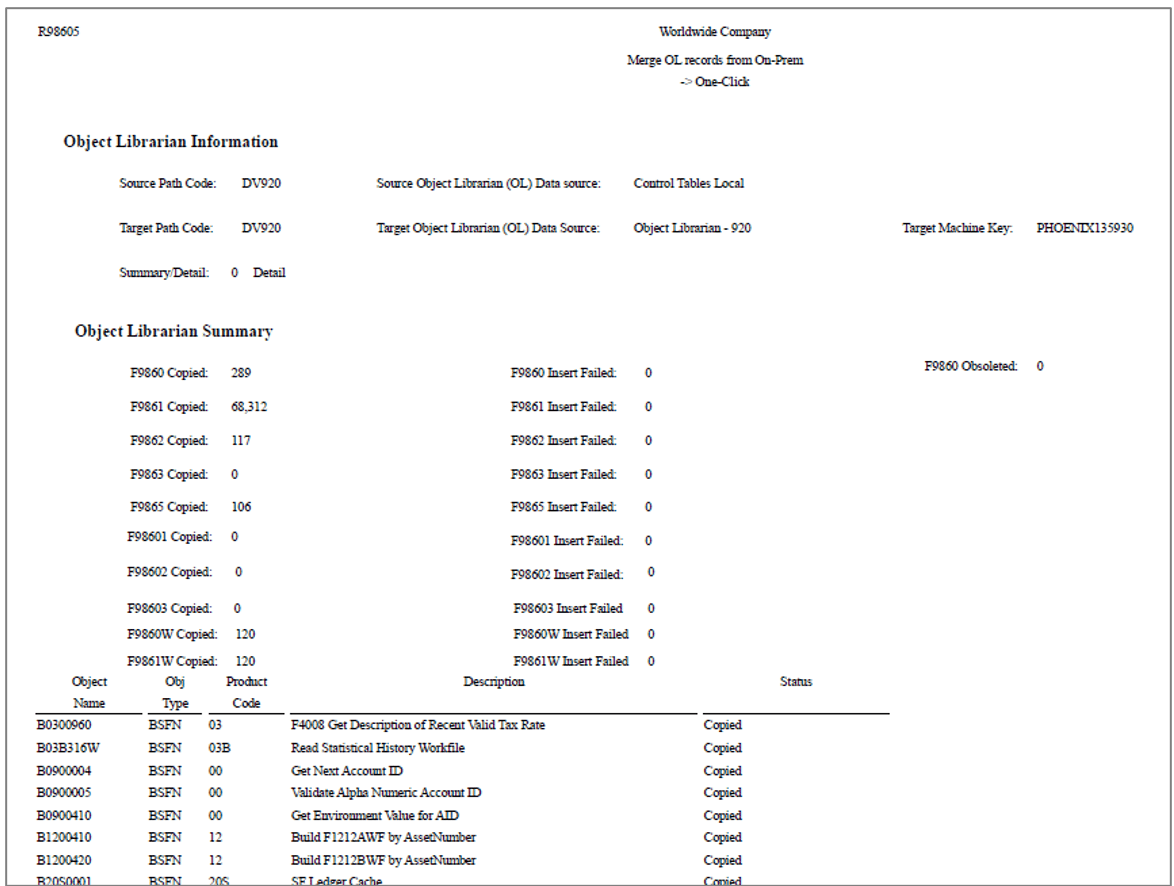
R98605 Detail Report - Run the UBE R96723, ZJDE0002 in Final mode. It copies ESU history to System Local and System - 920. ZJDE0001 is the same report in Proof Mode and does not perform any updates. Proof Mode only displays row counts that would be inserted in Final Mode.
- Deletes F9671 in System Local / System - 920 for target environment.
- Copies F9671 for source environment, substituting target environment. (For example PD920 -> DV920 or DV920 –> DV920).
- Deletes F9672 in System Local / System - 920 for target path code.
- Copies F9672 for source path code, substituting target path code. (For example PD920 -> DV920 or DV920 –> DV920).
- At
this point the ESU history for the target environment / path
code matches the on-premises Central Objects that were
exported and imported.
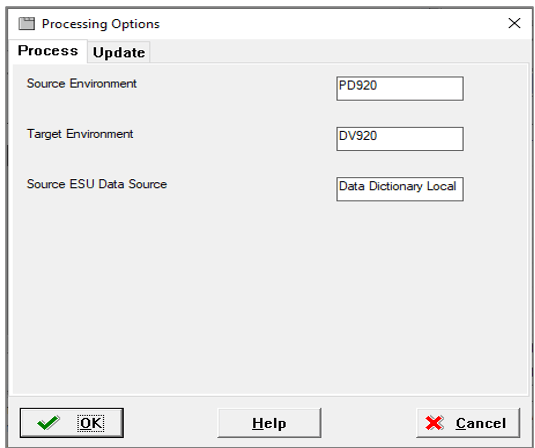
- In the processing options for R96723, change the Source
Environment to the environment you want to copy from and
Target Environment to where you want to copy the data. Do
not change the Source ESU Data Source value or the data
selection.
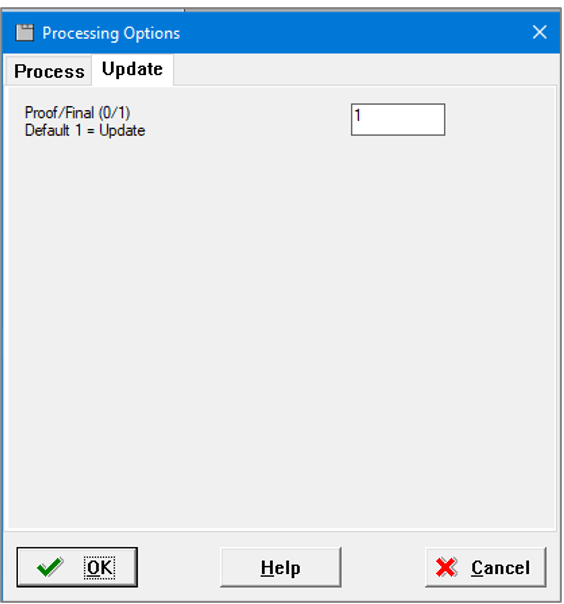
R96723 Processing Options - Process Tab - Proof mode does not update the tables but displays the row
counts. Final mode does the inserts.
R96723 Processing Options - Update Tab - Review the R96723 - Copy ESU History Move and Improve report.
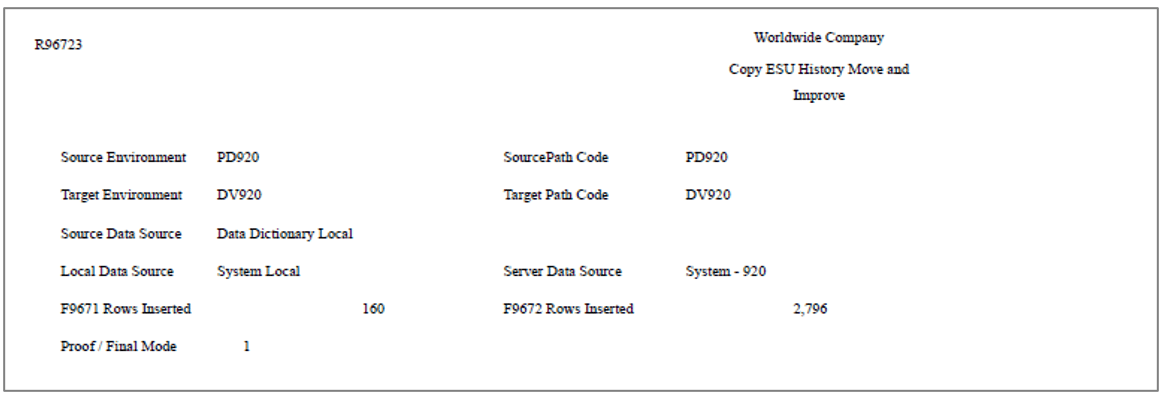
R96723 - Copy ESU History Move and Improve Report
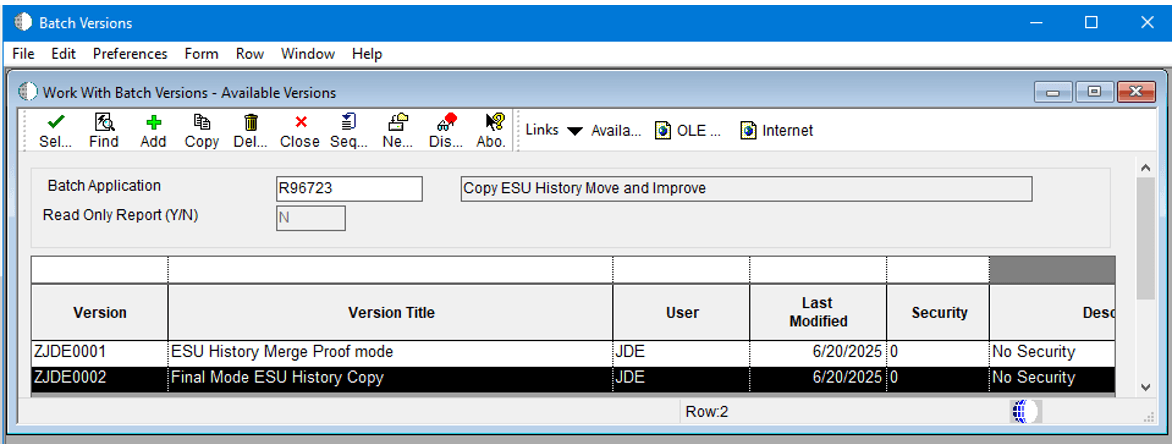
The R96723, ZJDE0002 UBE:
Post Migration Tasks
After running all the scripts and UBEs:
- Deploy the following to the target path code on the Oracle
cloud database server:
- Latest Planner Update to the target path code, if not installed.
- Latest Tools Roll-up ESU.
- UN9 update or whichever update matches the rest of your Oracle Cloud (One-Click) installation (this is equivalent to doing a E920 to E920 Simplified Upgrade).
- Run the Special Instructions and Table Conversions for UN9 update.
- Security/Password Reset
Sign in to DEP920 on the deployment server, and change the passwords for any new security overrides.P98LPSECforF98OWSECandP980001for System UsersF98OWPU. Look for the security override for Server Map from the on-premises enterprise server and delete the row. For example,<OnPrem>- 920 Server Map.
Note:
The passwords in theF98OWSECandF98OWPUrows that were copied in APPEND mode, likely have the wrong password (different site key or different hashing algorithm). - Build and deploy a full package to the target path code. The package build will not work if there are any security overrides with invalid passwords.
- You can now change the
jde.inion the enterprise server so that services can run using the migrated environment.
Related Links
More Learning Resources
For more learning resources, visit the LearnJDE.
For product documentation, visit JD Edwards on Oracle Help Center.
Migrating JD Edwards EnterpriseOne to Oracle Cloud for Microsoft SQL Server on Windows
G45211-01October 2025
Copyright © 2025, Oracle and/or its affiliates.