Performing Post Installation for the Deployment Server
This section shows you how to perform post installation for the Deployment Server.
After you successfully provision all the Servers using the One-Click Provisioning Console, you must build packages on your Deployment Server.
Prerequisite
The complete Visual Studio product (which includes the runtime, the compiler, and associated tools) must be purchased and licensed from Microsoft.
- JD Edwards EnterpriseOne Applications Release 9.2 requires runtime libraries and the full product for Visual Studio.
General
The Deployment Server that is deployed by the Provisioning Server includes all the required third-party products including a JDK, E1Local Oracle database, and the EnterpriseOne database client. If you will be performing package builds, refer to the subsection entitled: Package Build Considerations.
Accessing the Deployment Server
You can access your Deployment Server using Microsoft Windows Remote Desktop Protocol (RDP).
- For One-Click Provisioning, you will need the Public IP address of the Deployment Server and the password.
- For Infrastructure Provisioning, you will need to connect as described in the section entitled "Connecting to a Windows Host in a Private Network Through the Bastion Host".
For information regarding the Public IP address, refer to the section of this Learning Path entitled: Accessing the JD Edwards EnterpriseOne Servers Using Their Public IP Addresses.
The password for the Deployment Server was assigned when you input values in the Deployment Server Instance screen in the preceding sections of this Learning Path that are titled: Orchestrate a Quick Start Deployment Plan. If you followed the recommendation, this password should be recorded on the Pre-Install Worksheet.
Package Build Considerations
In order to build packages on your Deployment Server, you will need to:
- Install Microsoft Windows Visual Studio and Windows SDK
- Update Visual Studio Version in the jde.ini File
- Refresh CNC Data in JDEPLAN
- Build a New Client Package
- Build a New Server Package
Install Microsoft Windows Visual Studio and Windows SDK
The One-Click Provisioning Server delivers a Deployment Server to Windows 2022 Standard with most of the software already installed with the exception of Microsoft Windows Visual Studio and Microsoft Windows Software Development Kit (SDK). Refer to the JD Edwards Deployment Server Certification page for current updates on supported software versions and software prerequisites. The Certification page can be accessed through the Oracle Support Portal:
https://www.oracle.com/support/index.html
The Visual Studio runtime libraries (which are partial products with no development tools) for each supported release of Visual Studio are freely available from the Microsoft Download Center. The complete Visual Studio product (which includes the runtime and the compiler and associated tools) must be purchased and licensed from Microsoft.
As of the general availability of JD Edwards EnterpriseOne One-Click Provisioning for Tools Release 9.2, the following versions and associated links and navigation are valid.
- Visual Studio 2022 Full ProductNote: You need Visual Studio 2022, which is a licensed product from Microsoft, if you plan on building packages on the Deployment Server.
- Microsoft Software Development Kit (SDK) for Windows 11Note: Although the SDK download is labelled as Microsoft Windows 11, the same download is applicable to both Windows Client 11 and Windows Server 2022. This SDK is specifically required for any Microsoft Windows-based machine that is building JD Edwards EnterpriseOne packages.
Windows Software Development Kit Version 10.0.22621.0
https://msdn.microsoft.com/en-us/windows/downloads/sdk-archive
Update Visual Studio Version in the jde.ini File
Ensure that you set the correct version of Visual Studio in the
[JDE_CG} section of the jde.ini file on the
Deployment Server. For details, refer to this document on Oracle Technology Network
(OTN) for instructions:
- Understanding the Development Client Installation
- Installing Compiler, Linker, and Software Development Kit (SDK)
- Updating the jde.ini File
Refresh CNC Data in JDEPLAN
The ESU process has changed to include automatic generation of OCM mappings and tables for tables that are not in Business Data. In order for this process to work correctly, you must update the CNC information in JDEPLAN before applying any Tools-related ESUs. Also if you have multiple Enterprise Servers, Database Servers, or both, you must perform this procedure in order to synchronize data between the System and Planner pathcodes before you proceed further.
- Sign into JDEPLAN.
- Run R9840C, and copy system/planner information
from: System – 920
to: Planner – 920
Note: R9840C will copy any missing CNC from System to Planner. -
Run R98403A, choosing version XJDE0004, for syncing the data from System – 920 to Planner – 920 database.
-
Change the Data Selection to F98611.
-
Change the Processing Options as follows:
- Source Data Source = System – 920
- Target Data Source = Planner – 920
- Proof Mode = 1
- Replace Duplicates = Y
- Clear Table = N
Using these processing options, running the R98403A will add any missing data source definitions in JDEPLAN with the correct definitions from System – 920.
Build a New Client Package
You must build a new Client package in order to obtain source files for the path code and to build future update packages against.
Due to space considerations on the D:\ drive, you will need to move
the D:\Software directory and all of its contents to the
C:\ drive or another computer. For example:
- Add a new directory under the
C:\drive labeled:C:\SoftwareBKUP - Copy the
D:\Softwaredirectory (and all its contents) to theC:\SoftwareBKUPdirectory. - Delete the
D:\Software directory.
Complete the following steps to build a full package by following the standard procedure to build a full package with the following important distinctions.
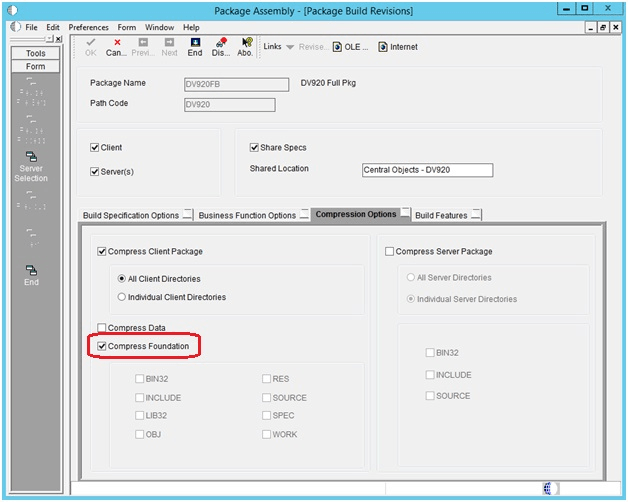
- On the last screen of the Build Definition, on Package Assembly – [Package Build Revisions], select the Compression Options tab.
- Ensure the Compress Foundation check box is selected. This is required to
recompress the system folder on the Deployment Server to create a new systemcomp
directory that includes a JRE. This JRE is required for use by the Development
Client.
https://support.oracle.com/epmos/faces/DocumentDisplay?id=1950295.1
Build a New Server Package
As a best practice it is strongly recommended that you build a new server package. For multiple Enterprise Server environments, the procedures in this section are mandatory.
On Package Build, Package Build Revisions, in addition to the normal compression options, you must select these additional options during the package build process for any full package:
- Compress Server Package
- All Directories
