Orchestrating the Advanced Plan Using the Oracle Database Server
This section shows you how to orchestrate an Advanced Deployment Plan using the Oracle Database Server.
You can orchestrate a Deployment Plan using the Advanced mode, which enables you to:
-
Modify and add servers to an existing Orchestration that was created using the Quick Start wizard.
- Create a new Orchestration with no guidance from a wizard. Unlike the Quick Start wizard, the Advanced mode will not guide you through the required sequence of machines to satisfy dependencies of the configuration. For example, the allowable pathcodes for an Enterprise Server are dependent on the schemas previously selected for the Database Server.
Prerequisites
- Configured the administrator passwords for the WebLogic Server and the Server Manager Console in the Configure section of the JD Edwards One-Click Provisioning Console.
-
Before orchestrating an Advanced Deployment Plan, the recommended practice is to first orchestrate a basic Deployment Plan using the Quick Start mode. The Quick Start procedure is documented in the section "Orchestrating the Quick Start Plan Using the Oracle Database Server" of this Learning Path. After this Quick Start orchestration is created, you can use the Advanced mode to modify, delete, or add additional server instances.
Alternatively, experienced users, who are aware of the required sequence of creation and the interdependencies, can use the Advanced Mode to create an orchestration from start.
Orchestrating the Advanced Plan Using the Oracle Database Server
The required sequence of adding instances to an orchestration and the rules related to the machines and pathcodes are as follows:
- Database Server
You can create five database instances if you select one schema per instance.
- Enterprise Server
One or many Enterprise Servers can be created. At least one Enterprise Server must be created with selected pathcodes available from the schemas that were selected for the Database Server. An Enterprise Server must be configured before you can add HTML Servers. If multiple Enterprise Servers are deployed, at least one must be configured as a Logic Server per pathcode. Additional Enterprise Servers can be added to an Orchestration and they can be deployed after your initial plan is deployed.
-
Web Servers
HTML Server. Web Servers include the JD Edwards EnterpriseOne HTML Server. There are two types of HTML Servers: Standard JAS and Dedicated HTML for AIS.
One to many HTML Server instances can be created and each will be associated with one specific pathcode that is available on the Enterprise Server. Additional HTML Servers can be added to an Orchestration and they can be deployed after your initial plan is deployed.
Refer to the Fundamentals section of this Learning Path for a description of each type of HTML Server.
AIS Server. Another type of Web Server for JD Edwards EnterpriseOne is the AIS Server, which must be installed and configured along with a Dedicated HTML Server for AIS.
Zero to many AIS Server instances can be created and each will be associated with a specific HTML Server instance. Additional AIS Server instances can be added on to your plan and deployed after your initial plan is deployed.
Important:If you do not specify at least one AIS Server, the full functionality of certain JD Edwards EnterpriseOne applications will not be available. If you used the Quick Start mode to configure a basic environment, the workflow required the inclusion of this server.
Important:You cannot specify a single HTML Server instance to also support an AIS Server; that is, you cannot combine two servers in the same instance. You must create a separate instance for each AIS Server.
-
AIS Servers
You can either create or not create an AIS Server. Multiple AIS Server instances can be created and each will be associated with a specific HTML Server instance. Additional AIS Server instances can be added to your plan and deployed after your initial plan is deployed.
Important:If you do not specify at least one AIS Server, the full functionality of certain JD Edwards EnterpriseOne applications will not be available.
Important:You cannot specify an HTML Server instance to support an AIS Server. You must create a separate instance for each AIS Server.
- Deployment Server
A single Deployment Server can be created and all the pathcodes can be selected regardless of the pathcodes selected for your runtime servers.
Note:For any orchestration created or modified using the Advanced Mode Deployment Plan, you can click the Options function from the menu bar to change your global settings or to reset your settings (that is, to delete your configuration details, global settings, and orchestration data).
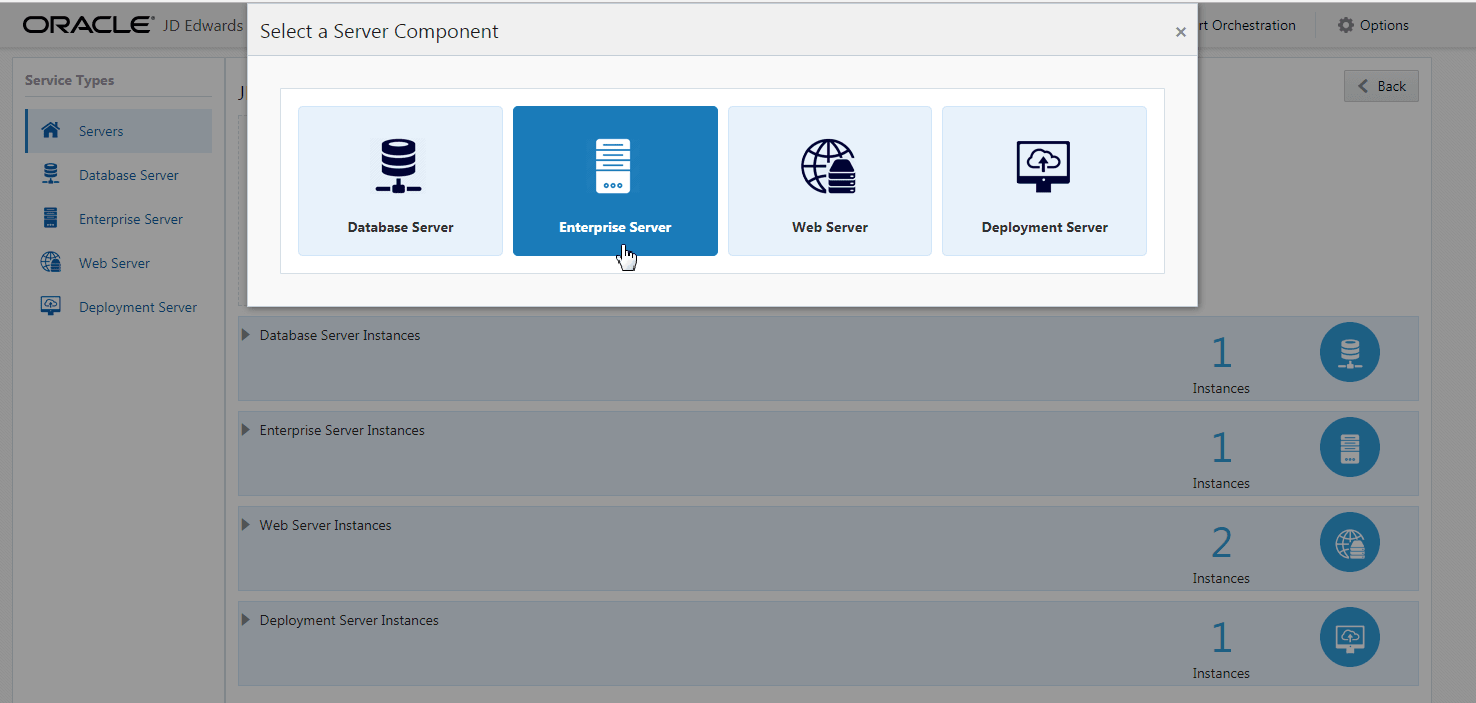
To use the JD Edwards Provisioning Console to orchestrate and deploy an Advanced Deployment Plan:
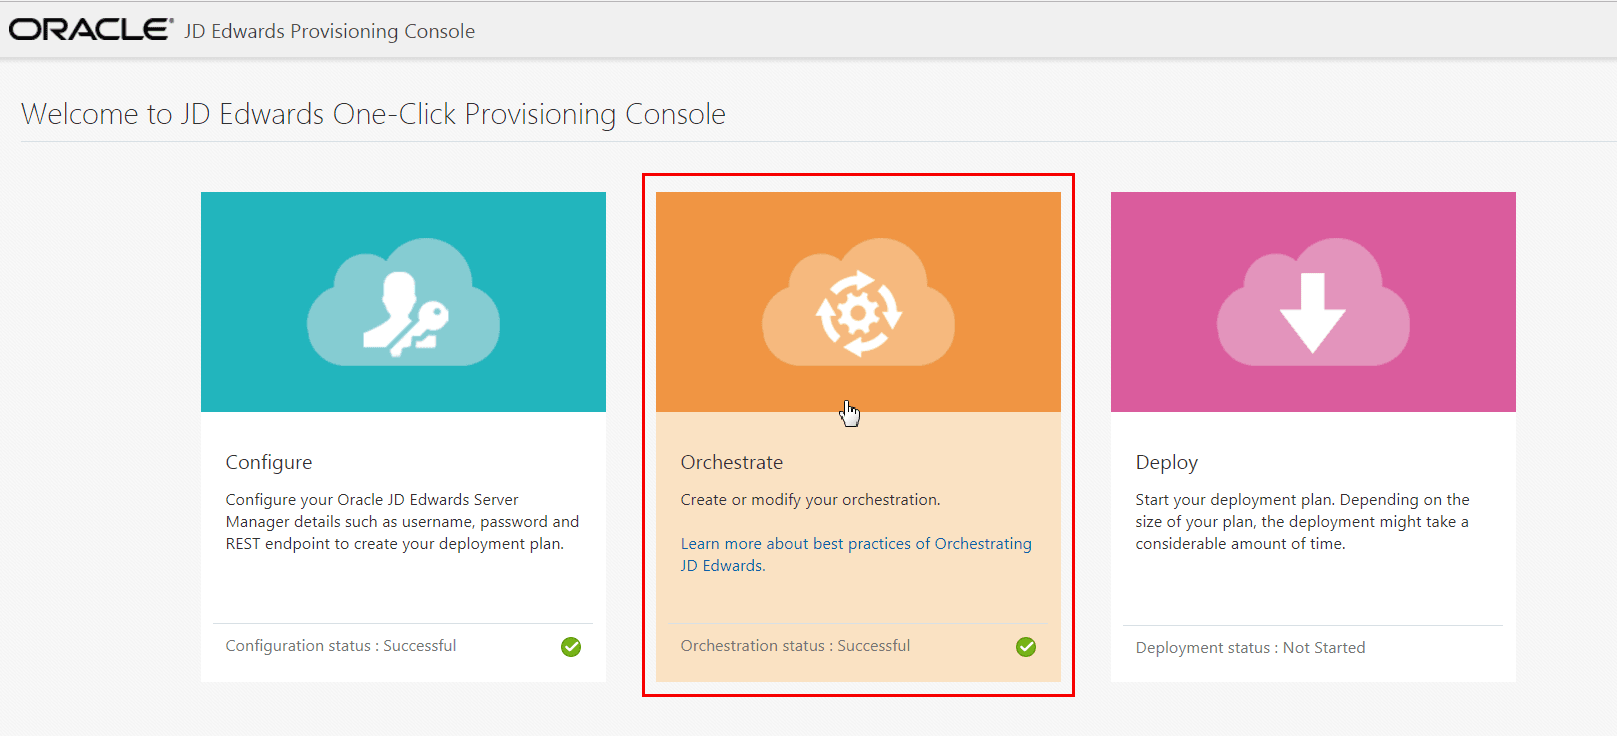
On the JD Edwards Provisioning Console page, click the Orchestrate icon.
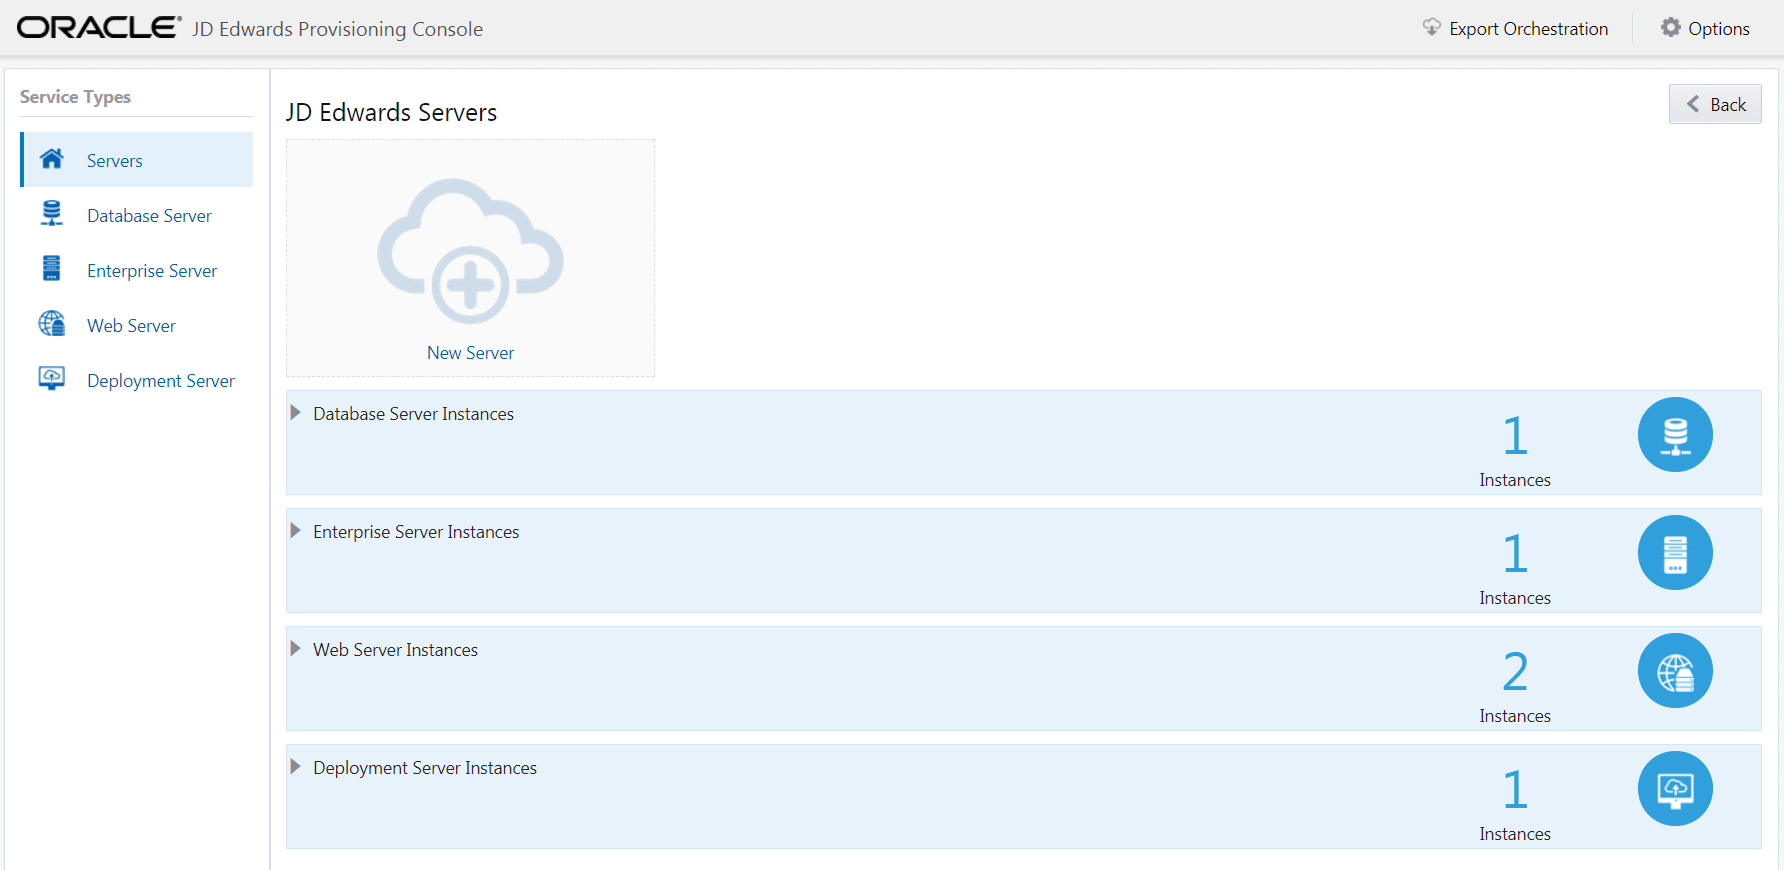
On the JD Edwards Servers page, click the instance of an existing server, or click the New Server icon to add a new JD Edwards service. Alternatively, you can select the desired server from Service Types on the left tab, and then click New Server to add a new server.
 Note:
Note:The remainder of this procedure includes steps to either add (where allowed) or modify (existing) these instances:
- Database Server
- Enterprise Server
- Web Server (for example, HTML and AIS Servers)
- Deployment Server*
* The Provisioning Console will not allow you to add more than one of these server types because only one server of this type is supported per deployment.
Database Server
You can create five database instances if you select one schema per instance. For example, if you select Development and Shared schemas for an instance, you can create three more database instances. For one deployment instance, you can have a maximum of five schemas distributed across one or many database instances.
You can provision the Database Server instance with the available schemas as required. The following schemas are available for the database instance:
- Development
-
Shared (required)
- Prototype
- Production
- Pristine
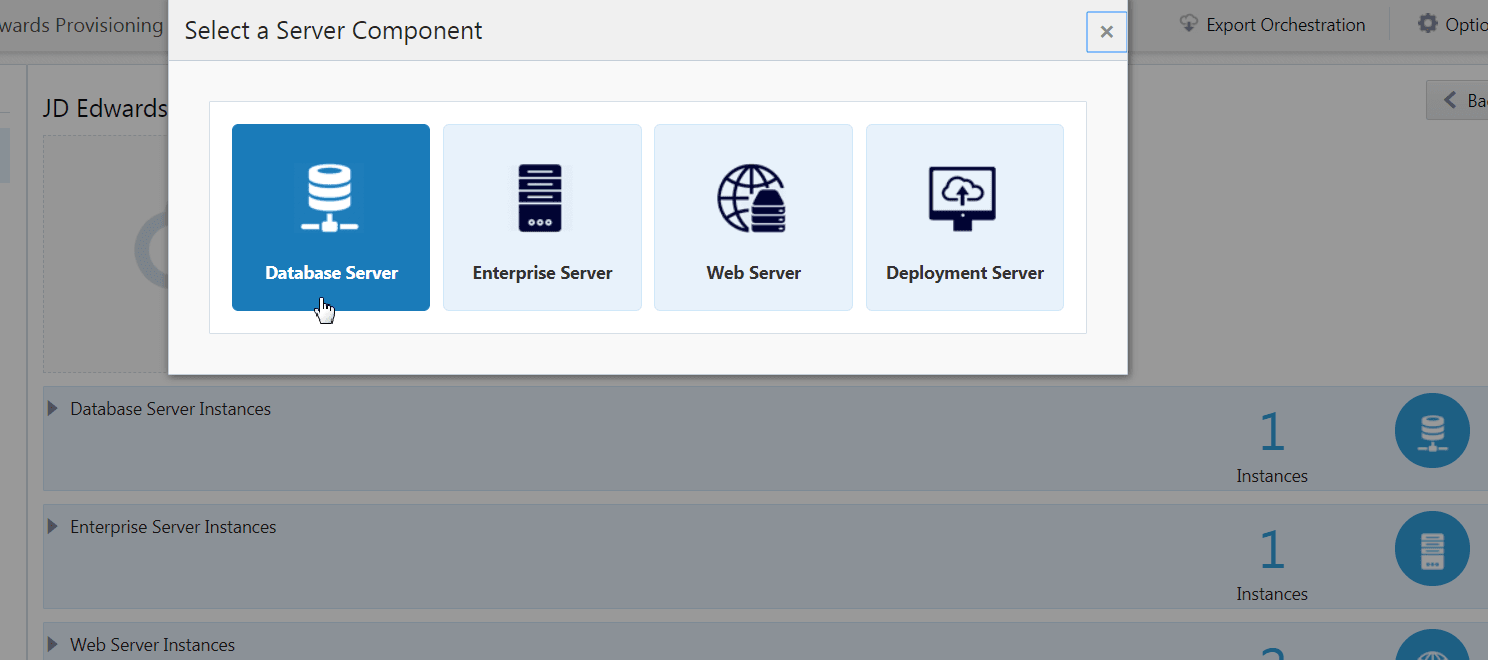
To add a Database Server instance:
- Click the New Server icon and select Database Server from the
Select a Server Component window.
-
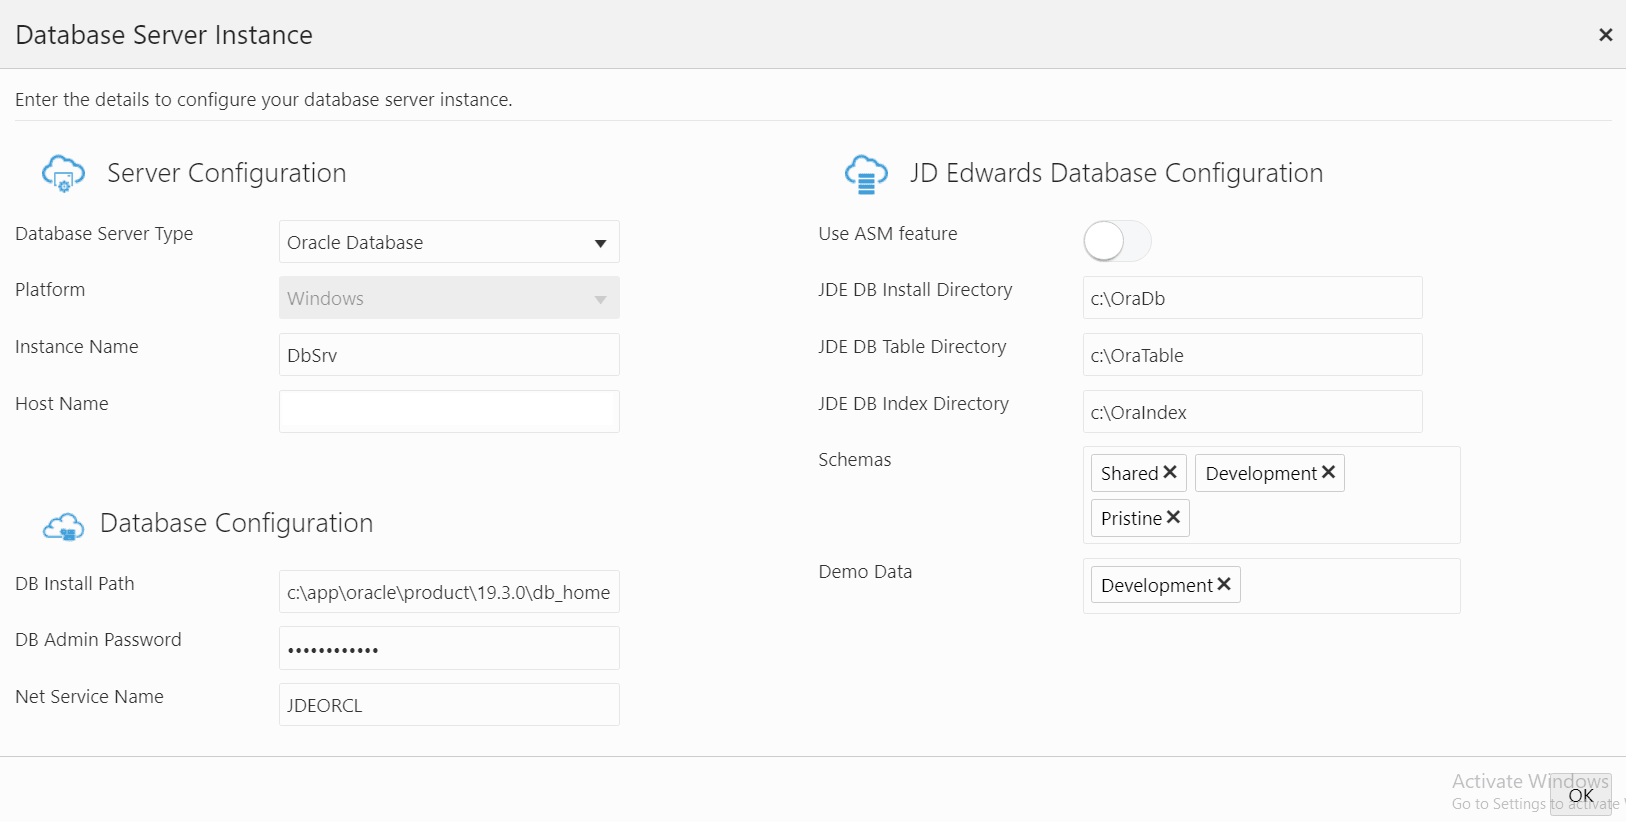
On Database Server Instance page, complete the following fields to create and configure the Database Server instance.
Important: You must enter the same password for this Windows Server that you previously specified in the section of this OBE entitled: Logging in to the Windows VM.Server Configuration
-
Database Server Type
Select the Database Server Type as Oracle Database. The server types available are: Oracle Database and SQL Server.
-
Platform
This field is disabled and is automatically populated as Windows.
-
Instance Name
Create an instance name for your database instance.
-
Host Name
Enter the host name.
Database Configuration
-
DB Install Path
Enter the path of the directory where you have installed the Database Server components.
-
DB Admin Password
Enter the password of the database administrator.
Note:JD Edwards EnterpriseOne One-Click Provisioning supports only these special characters for the Oracle database admin password:
Underscore (_) Pound Sign (#) Hypen (-) -
Net Service Name
Enter the Net Service Name. See Finding DB Unique Name, Oracle SID, and Service Name.
JD Edwards Database Configuration
-
Use ASM feature
Enable this option if required.
-
JDE DB Install Directory
Enter the installation path.
Path Rules: All the directories in the specified path must preexist, except the last directory in the path. The name of the last directory must be unique. One-Click validation checks that the parent directory exists. The child directory is created by One-Click using the name provided in the input. If there are sub folders leading to the child directory, they must be created manually. For example, if the specified JDE DB Install directory is
C:\JDEdwards\DBInstallPath, thenC:\JDEdwardsis the parent directory and it must be created manually.DBInstallPathis the child directory and should not be created manually, One-Click uses the name provided in the input and creates it. -
JDE DB Table Directory
Enter the path to install the table data.
Path Rules: All the directories in the specified path must preexist, except the last directory in the path. The name of the last directory must be unique. One-Click validation checks that the parent directory exists. The child directory is created by One-Click using the name provided in the input. If there are sub folders leading to the child directory, they must be created manually. For example, if the specified JDE DB Table directory is
C:\JDEdwards\Table, thenC:\JDEdwardsis the parent directory and it must be created manually.Tableis the child directory and should not be created manually, One-Click uses the name provided in the input and creates it. -
JDE DB Index Directory
Enter the path to install the indexes.
Path Rules: All the directories in the specified path must preexist, except the last directory in the path. The name of the last directory must be unique. One-Click validation checks that the parent directory exists. The child directory is created by One-Click using the name provided in the input. If there are sub folders leading to the child directory, they must be created manually. For example, if the specified JDE DB Table directory is
C:\JDEdwards\Index, thenC:\JDEdwardsis the parent directory and it must be created manually.Indexis the child directory and should not be created manually, One-Click uses the name provided in the input and creates it. -
Schemas
Click the Schemas field and select the schemas you want from the auto-suggest. The schemas available are: Shared Development Prototype Production and Pristine with Demo Data.
Note: It is mandatory to add the Shared schema. If you do not add the Shared schema, the message "You must select Shared schema" is displayed.Important: t this point you should ensure that you specify all the schemas you might use. The schemas you install on the Database Server can be deployed only once. This information is specified on the Provisioning Console. After the configuration is deployed, you can use the Provisioning Console to programmatically add additional schemas. Demo Data
Click the Demo Data field and select the demo data available from the auto-suggest. Demo data will be available depending on the schema selected. For example, if you select the schema as Development, the Development demo data will be available.
You should now be able to view multiple instances of the Database Server.
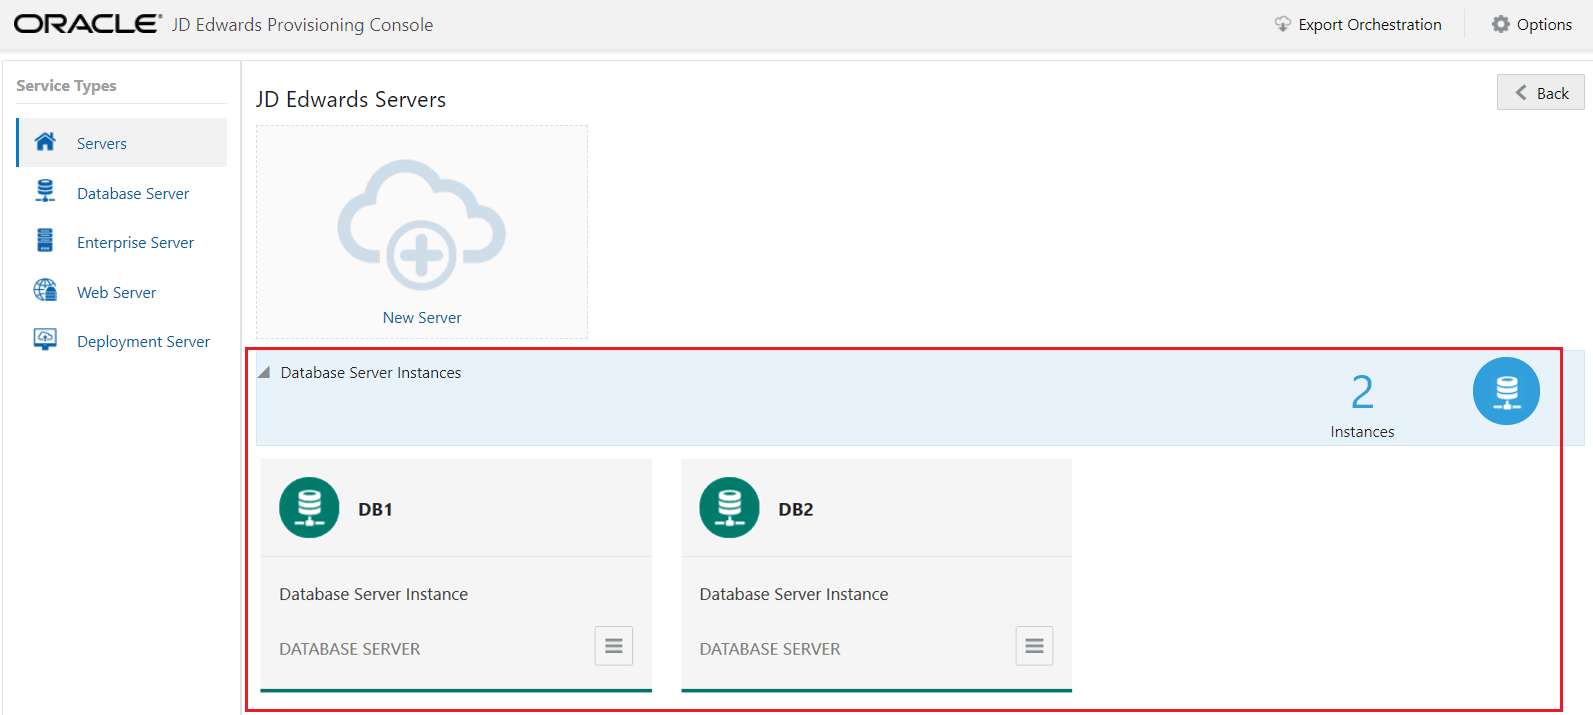
-
- Click View from the Application Options menu to view the existing
configuration for the Database Server. To modify the instance configuration,
select the Edit option from use the Application Options menu and
choose.Important:
The Provisioning Console for One-Click Provisioning allows you to edit the schemas and demo data settings for an existing Database Server post-deployment.

- To delete the instance, select the Delete option from the Application Options menu.
Enterprise Server
You can define any number of Enterprise Server instances. If you want only one Enterprise Server, you should define it to run both Logic and Batch. If you want to define multiple Enterprise Servers, at least one must be a Logic Server per pathcode.
To add an Enterprise Server:
- Click the New Server icon and select Enterprise Server from the Select a
Component window.
- On Enterprise Server Instance page, complete these fields to create and
configure the Enterprise Server instance.
Server Configuration
-
Platform
This field is disabled and it is automatically populated as Windows.
-
Instance Name
Create an instance name for the Enterprise Server. The conditions to set the instance name are displayed in the tooltip when you click the field.
-
Host Name
Enter the host name.
Oracle JDBC Driver Details
The Oracle JDBC driver is required for connectivity between the Enterprise Server and the Oracle database server.
Click the Browse button to select the location for each of the required components for the Oracle JDBC driver. For example:- odbc8.jar
- ons.jar
- ucp.jar
Note: Refer to Oracle Certifications for the version of the supported driver and associated components.Enterprise Server Preferences
-
Installation Drive
Enter the Installation Drive.
-
Server Type
Select one or both of the available server types for this Enterprise Server.
Single Enterprise Server. If you are deploying only a single Enterprise Server, select both Logic and Batch.
Multiple Enterprise Servers. If you are deploying multiple Enterprise Servers, at least one must be specified as a Logic server per pathcode. The others can be specified as Batch servers.
-
Pathcodes
Click the Available Pathcodes field and select the pathcodes required from the auto-suggest. The four available pathcodes are: Development, Prototype, Pristine, and Production.
Important: It is a good practice to select pathcodes that correlate to the schemas you selected for the Database Server. The Provisioning Console programmatically enforces this correlation. If you select pathcodes on the Enterprise Server that are a superset of the database schemas you selected, the Enterprise Server will not be able to access the data required to function correctly. The pathcodes you choose to install on the Enterprise Server can only be deployed once, which is specified at this point in the Provisioning Console.You can use the Provisioning Console to programmatically add additional schemas after deploying the orchestration.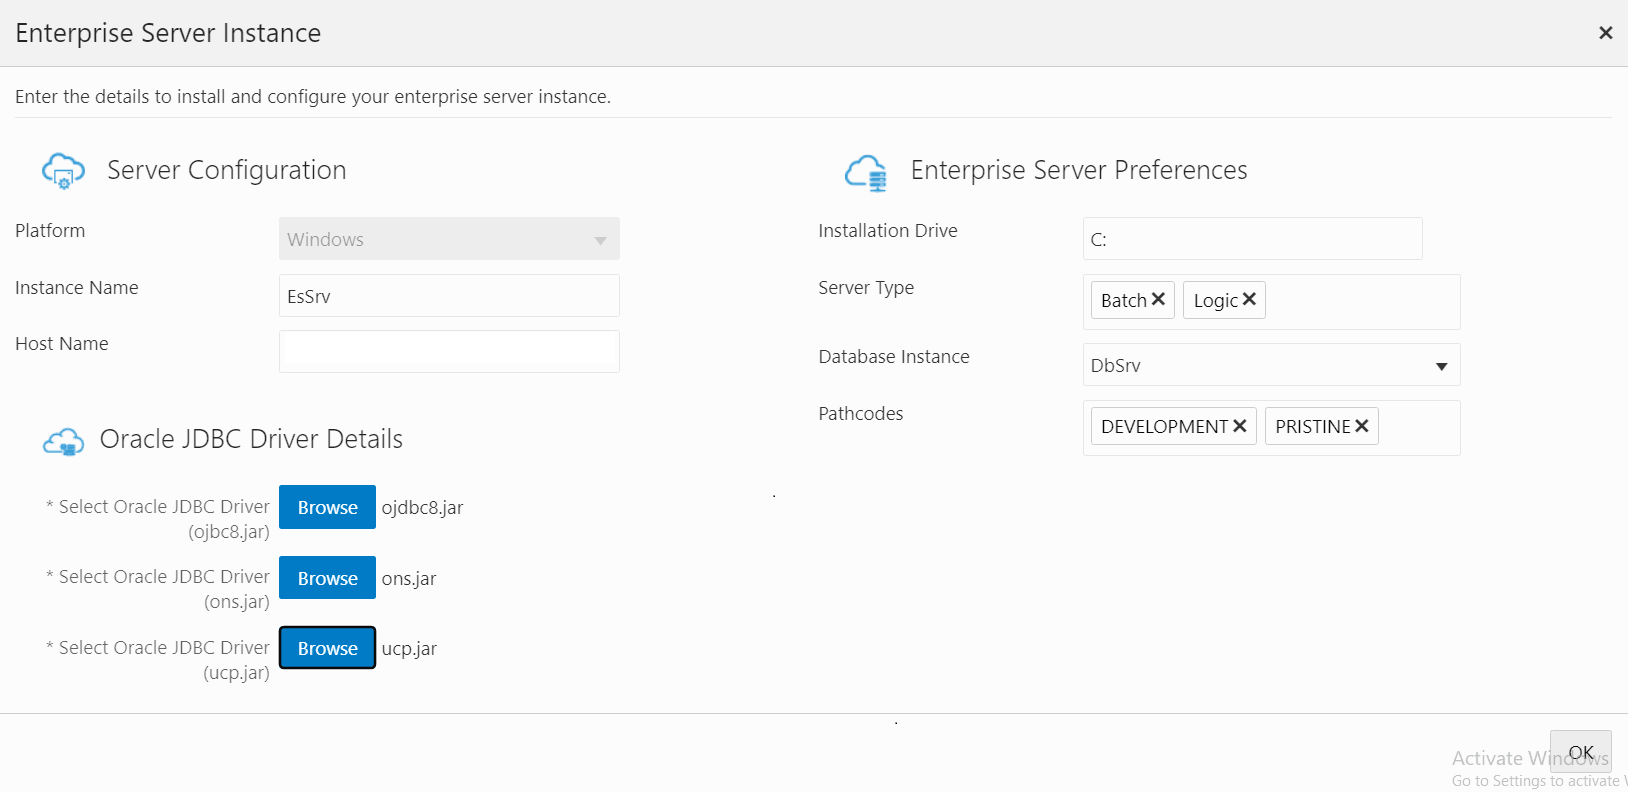
-
- You should now be able to view multiple instances of the Enterprise
Server.
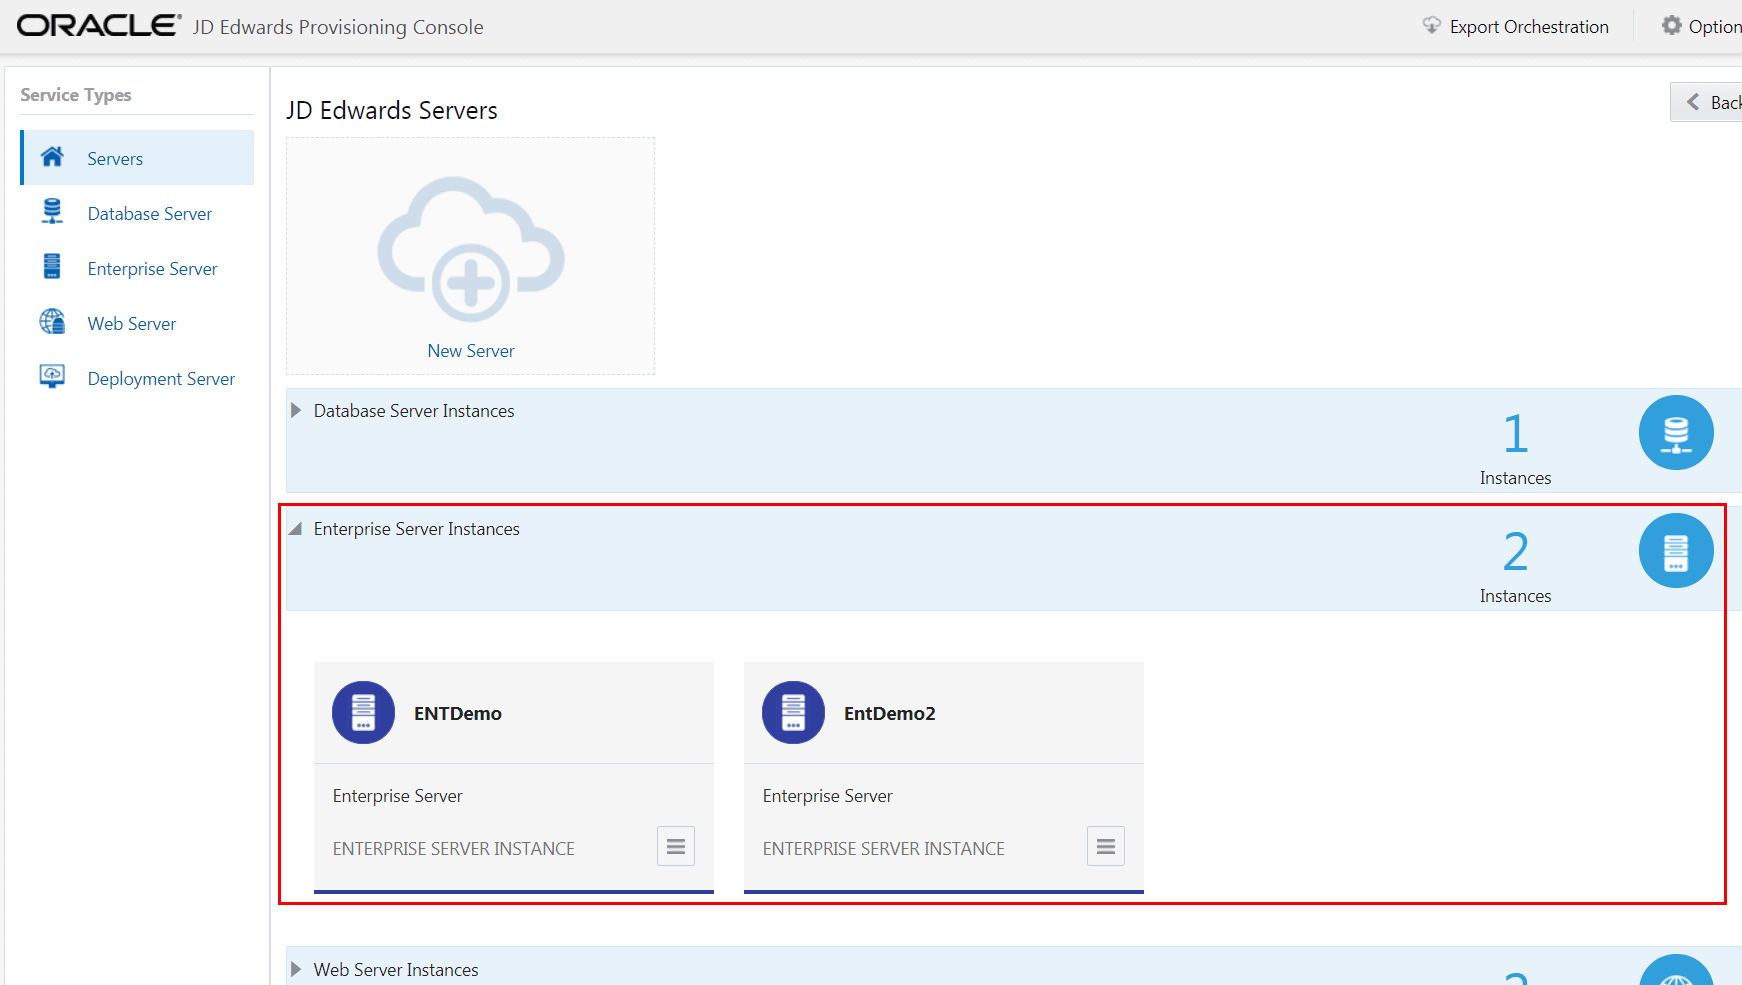
- If an Enterprise Server exists, click View from the Application Options
menu to view the existing configuration for the Enterprise Server. the instance
configuration, select the Edit option from the action menu. Use the
Clone option to clone the Enterprise Server instance.
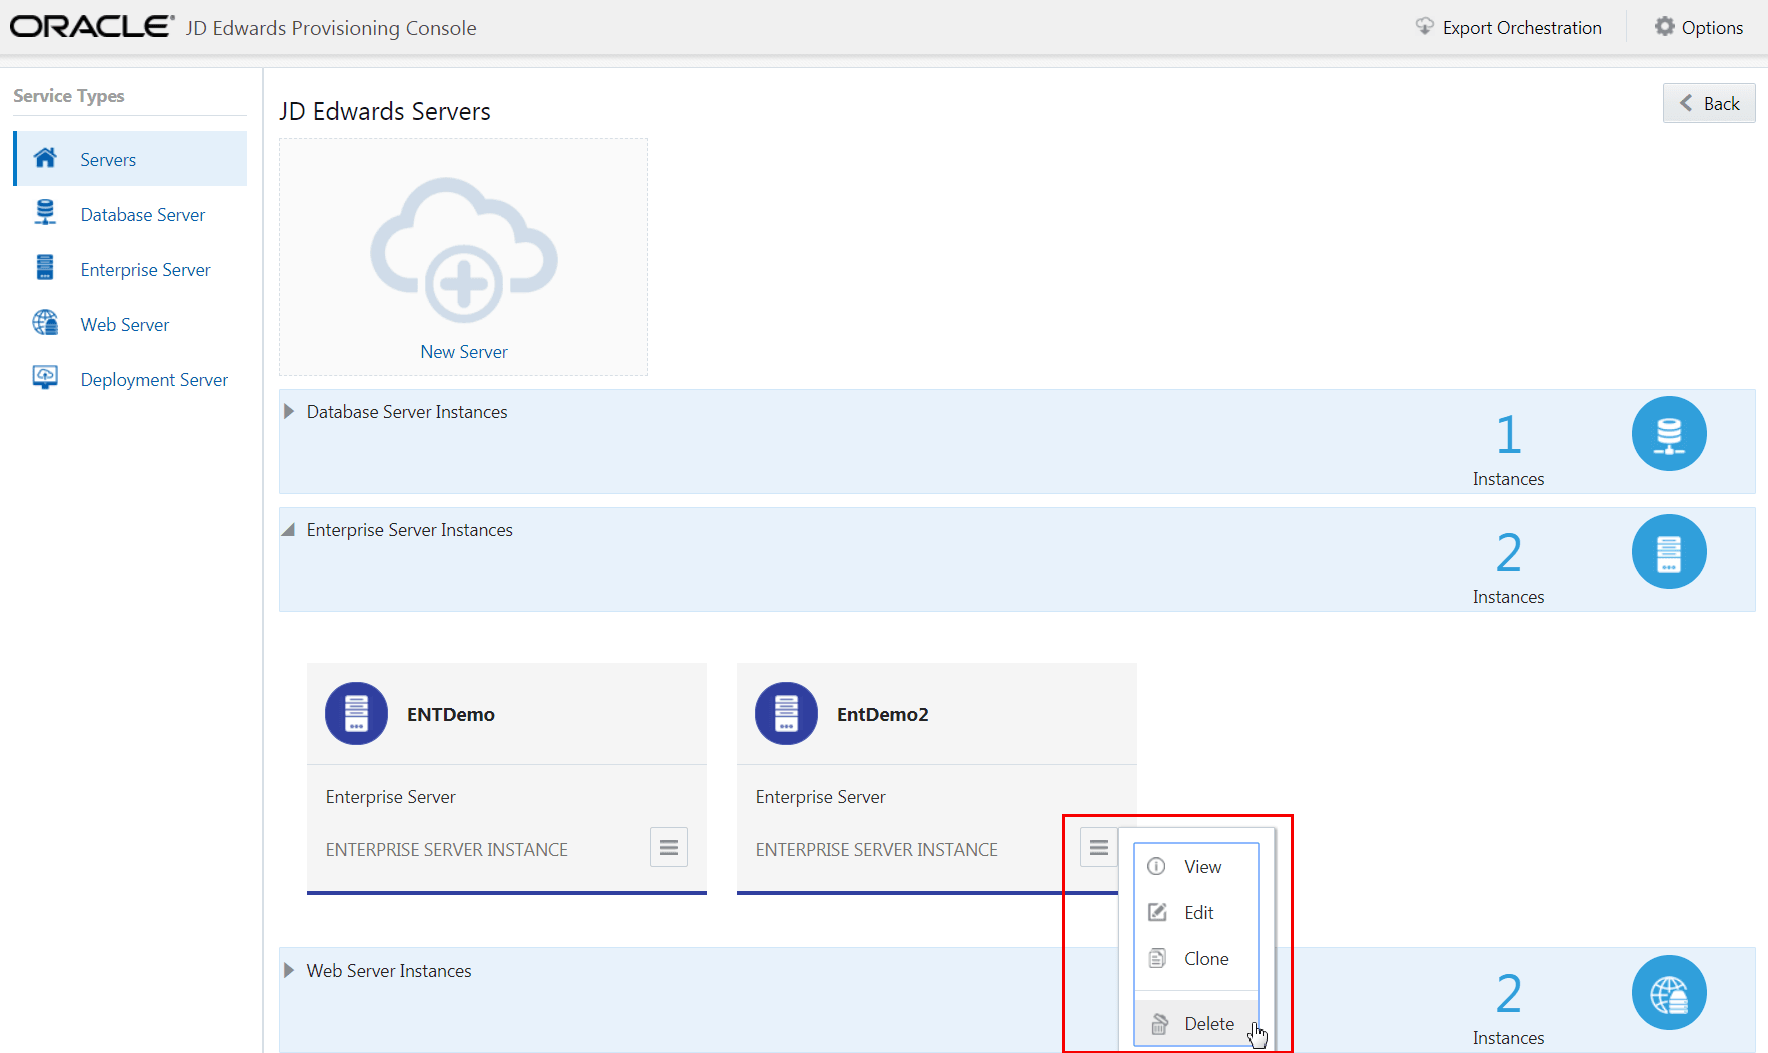
- To delete the instance, select Delete from the Application Options menu.
Web Server
The instance type for Web Servers can be any of the servers available from the Type drop-down list; however, you must have configured at least one configured HTML Server prior to creating an associated AIS instance.
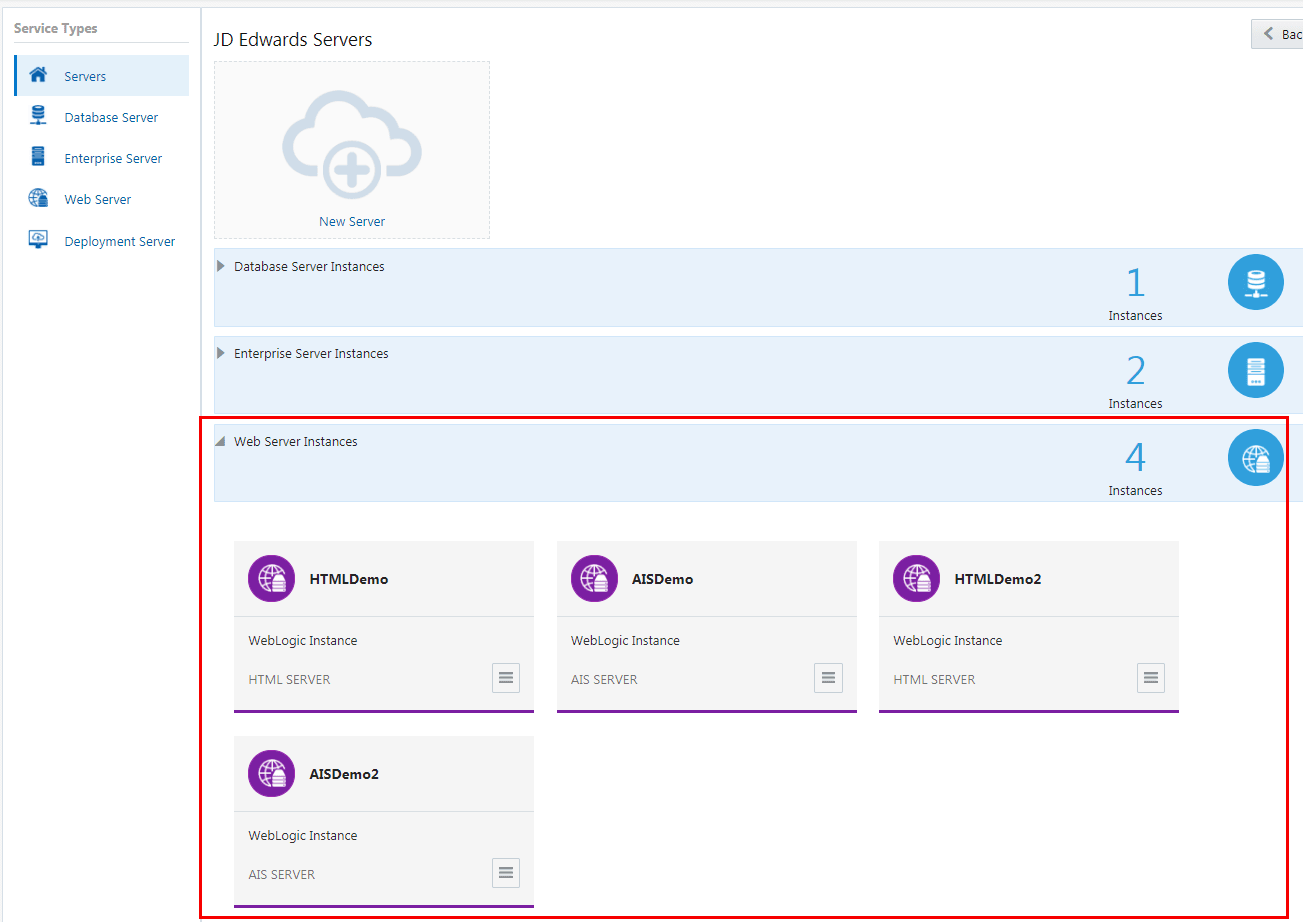
You can define any number of Web Server instances.
To add or modify a Web Server instance:
- Select the service type for the Web Server.
- To create a new Web Server, click the New Server icon and then the Web Server icon.
-
To view an existing Web Server, click View from the Application Options menu. To modify the instance configuration, select the Edit option from the action tab. You will need enter the values for your installation for each of these Web Server types:
- HTML Server (Dedicated HTML Server for AIS)
- Application Interface Services (AIS) Server
- Standard JAS Server
Important: For a description of each HTML server type (Dedicated for AIS or Standard), refer to the Fundamentals section of this Learning Path.Important: Because multiple Web Server instances can run on the same WebLogic Server, you must specify a different port for each instance. -
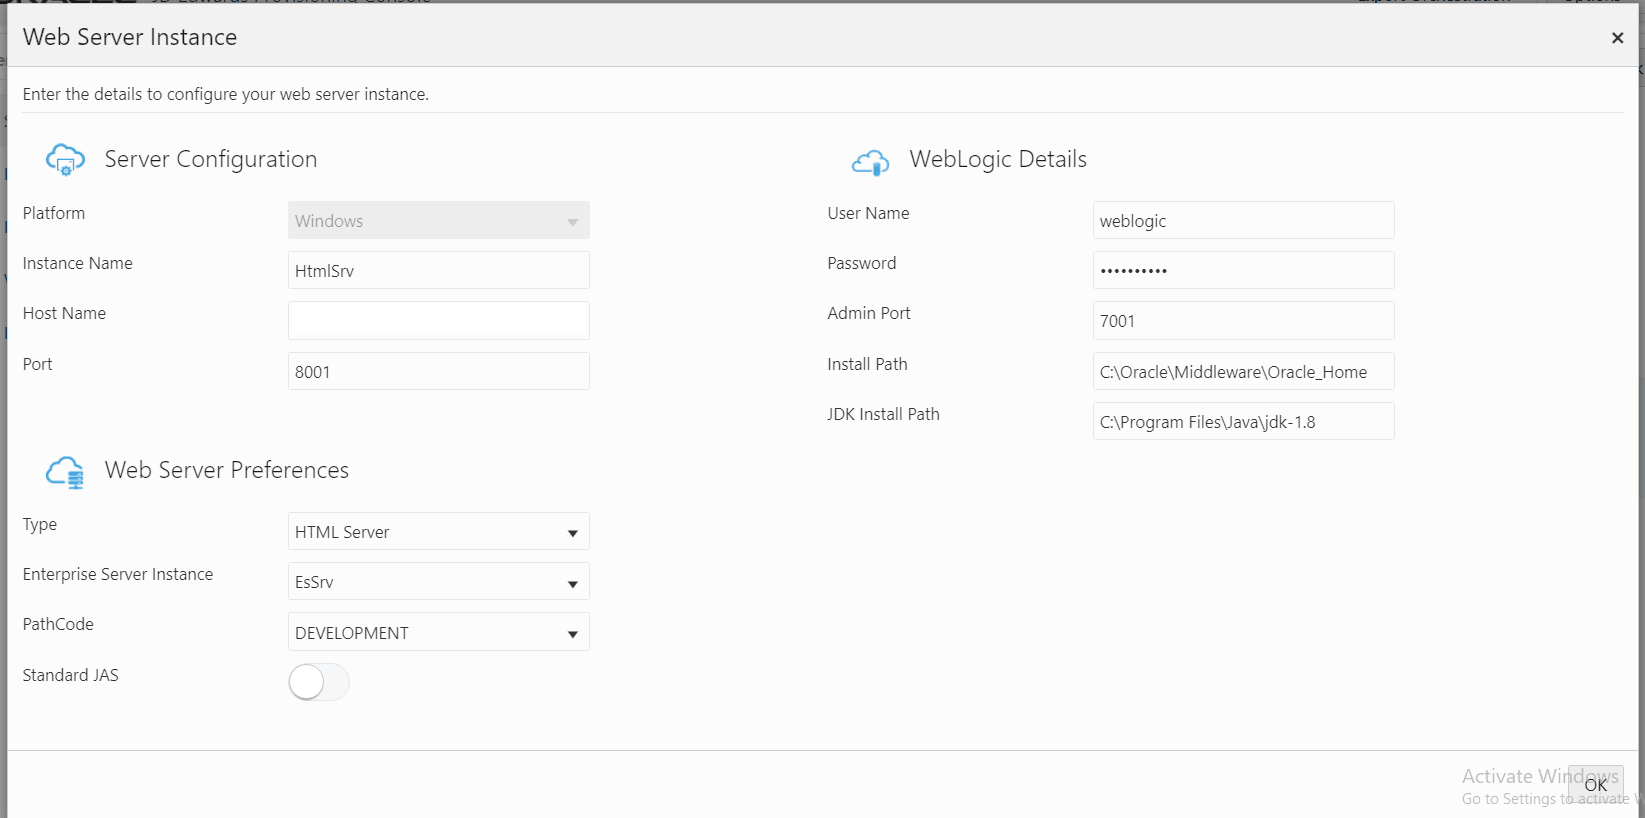
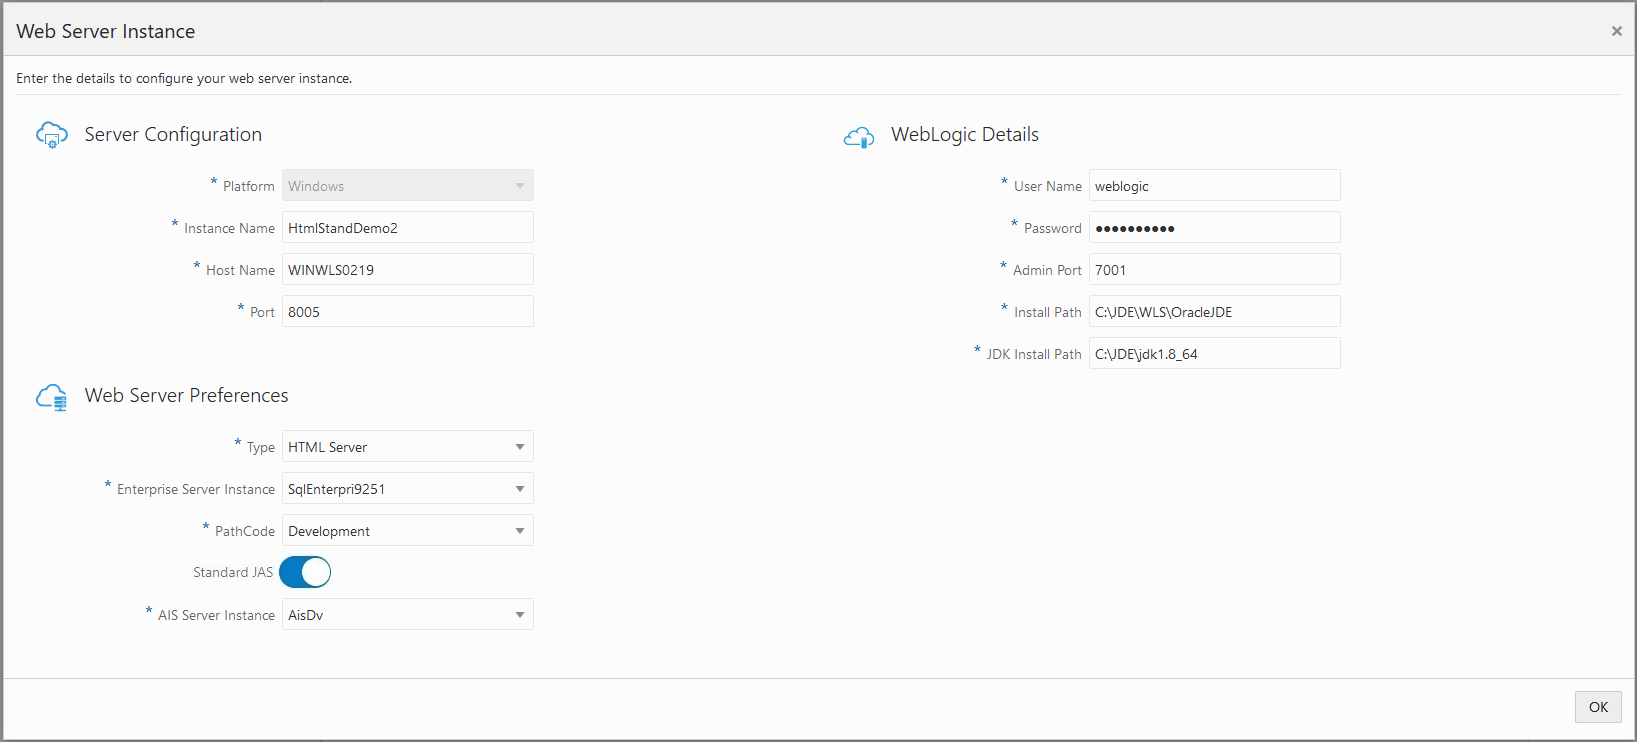
On the JD Edwards HTML Server page, complete these fields to create and configure the HTML Server instance.
Server Configuration
-
Platform
This field is disabled and is automatically populated as Windows.
-
Instance Name
Create the name of the HTML sever instance.
-
Host Name
Enter the Fully Qualified Domain Name (FQDN) if the DNS service is enabled.
Otherwise, enter only the host name that is configured in the host machine.
-
Port
Enter a unique (available) port number for this server which will use an SSL connection. This port number must be between 1024 and 65535. This port number is used by HTTPS to create a container and deploy the web component. For whichever port number you enter here, ensure that the port for one less is also available. This is, if you specify port 8081, you must also ensure that port 8080 is available.
Important:For each SSL port that you open in the firewall, you must also open a companion port for use by non-SSL access required for the Server Manager. The value for the companion port must be a numeric value that is one less than that specified for the SSL port. For example, if you specify a port value of 8081 for SSL, in the firewall you must also open a port one less than that value; For example, if you specify a port value of 8081 for SSL, in the firewall you must also open the port 8080. For more information, refer to the section "Enable Inbound Ports in the Firewall" of the OBE "Performing Common Setup for All Microsoft Windows Servers" in this Learning Path.
Web Server Preferences
-
PathCode
Select the required pathcode from the drop-down menu.
WebLogic Details
-
User Name
Enter the user name.
-
Password
Enter the WebLogic Server password.
-
Admin Port
Enter the port number to access the WebLogic Administration Console.
-
Install Path
Enter the installation path of the WebLogic instance.
JDK Install Path
Enter the JDK installation path.
-
-
- Click the Next button. The system validates the inputs. If the validation is successful, the JD Edwards AIS Server page is displayed.
-
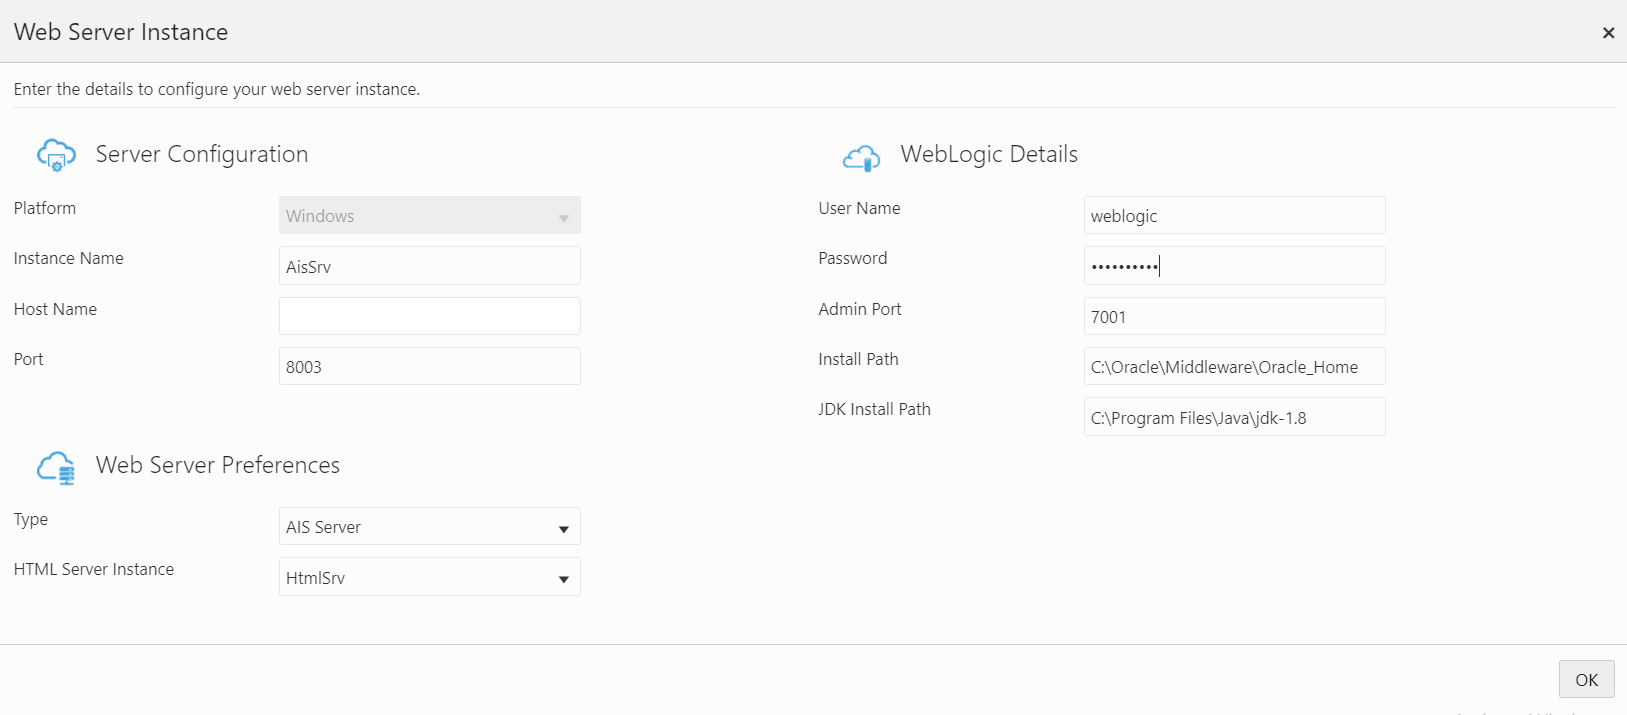
On the JD Edwards AIS Server, complete these fields to configure your AIS Server instance.
Server Configuration
-
Platform
This field is disabled and is automatically populated as Windows.
-
Instance Name
Create an instance name for the WebLogic Server.
-
Host Name
Enter the host name.
-
Port
Enter a unique (available) port number for this server that will use an SSL connection. This port number must be between 1024 and 65535. This port number is used by HTTPS to create a container and deploy the web component. For whichever port number you enter here, ensure that the port for one less is also available. That is, if you specify port 8081, you must also ensure that port 8080 is available.
Important:For each SSL port that you open in the firewall, you must also open a companion port for non-SSL access required for using the Server Manager. The value for the companion port must be a numeric value that is one less than that specified for the SSL port. For example, if you specify a port value of 8081 for SSL, in the firewall you must also open the port 8080. For more information, refer to the section "Enable Inbound Ports in the Firewall" of the OBE "Performing Common Setup for All Microsoft Windows Servers" in this Learning Path.
WebLogic Details
-
User Name
Enter the user name.
-
Password
Enter the WebLogic password.
-
Admin Port
Enter the admin port number.
-
Install Path
Enter the installation path of the WebLogic instance.
JDK Install Path
Enter the JDK installation path.
-
- Click the Next button. The system validates the inputs. If the validation is successful, the JD Edwards Deployment Server page is displayed.
-
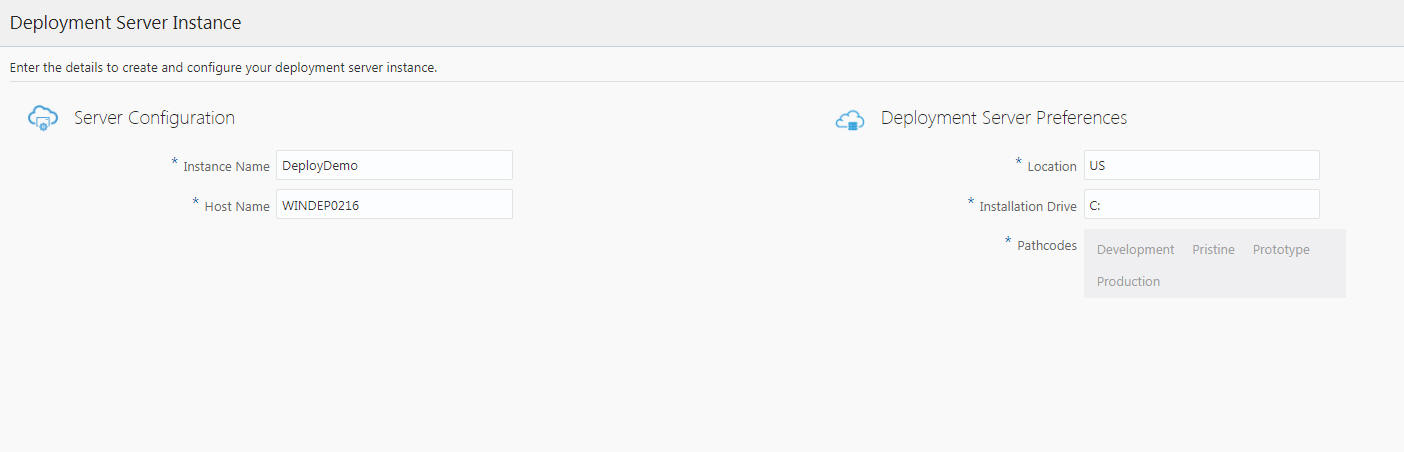
On the JD Edwards Deployment Server, complete these fields to create and configure your Deployment Server instance.
Server Configuration
-
Instance Name
Create an instance name for the Deployment Server instance. The conditions to set the instance name are displayed in the tool tip when you click the field.
-
Host Name
Enter the host name.
Deployment Server Preferences
-
Location
Enter the location.
This value is the base location for your JD Edwards EnterpriseOne machines. For example, typical values might be a city name (such as Denver or Austin), a geographical region name (such as US or India), or a general location name (such as Corporate).
-
Installation Drive
Enter the drive for the installation.
-
Pathcodes
This field is automatically populated.
-
- Click the Finish button.
- Verify that the Web Server instances you modified or added are displayed in the
JD Edwards Servers window.
- To delete any web instance, select Delete from the Application Options menu.
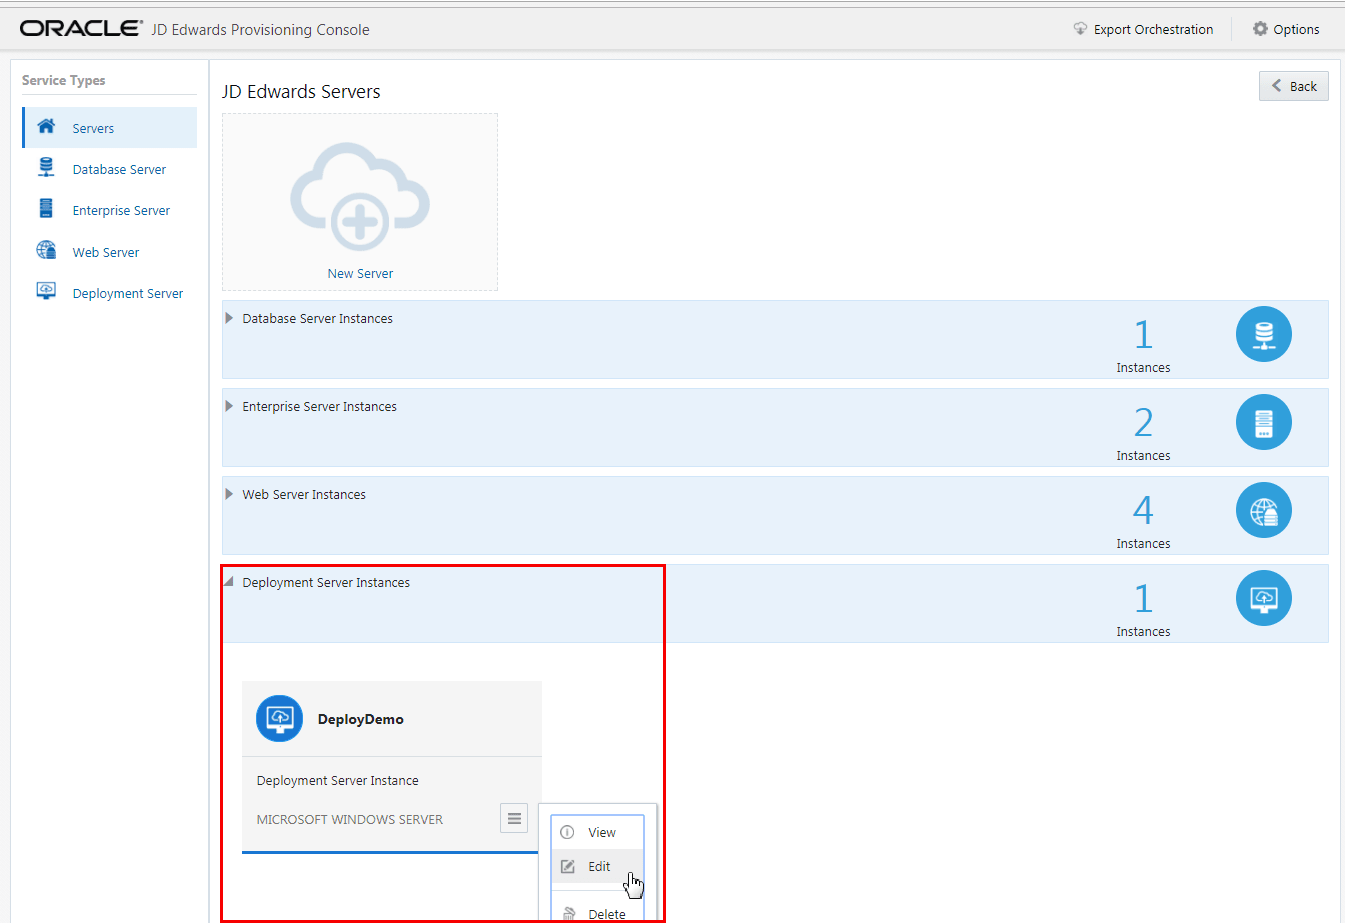
Deployment Server
You can use only one Deployment Server per deployment. If you attempt to add more
than one Deployment Server, the Provisioning Console displays an error.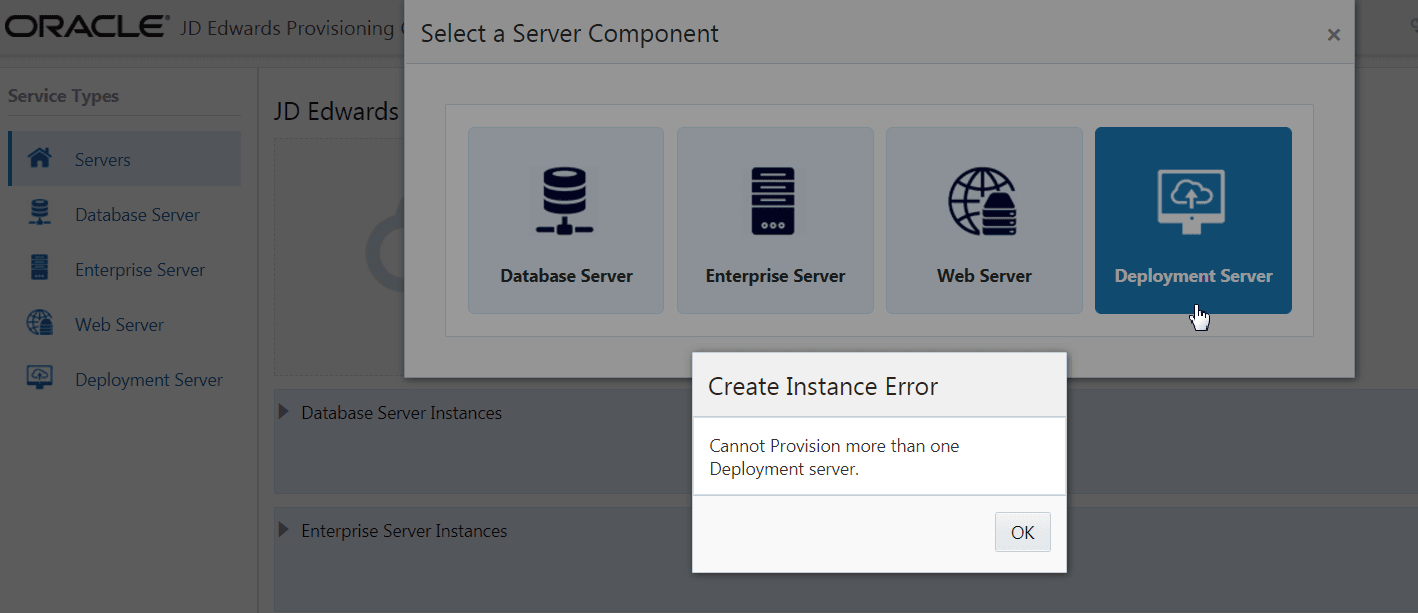
- On the JD Edwards Servers page, click the existing Deployment Server instance,
click the Application Options icon, and select Edit from the
Application Options menu.
-
On the JD Edwards Deployment Server, complete these fields to create and configure your Deployment Server instance.
Server Configuration
-
Instance Name
Create an instance name for the Deployment Server instance. The conditions to set the instance name are displayed in the tool tip when you click the field.
-
Host Name
Enter the host name.
Deployment Server Preferences
-
Location
Enter the location.
This value is the base location for your JD Edwards EnterpriseOne machines. For example, typical values might be a city name (such as Denver or Austin), a geographical region name (such as US or India), or a general location name (such as Corporate).
-
Installation Drive
Enter the drive for the installation.
-
Pathcodes
This field is automatically populated.
-
-
- Click the Finish button. A success message is displayed.
- Verify that the Deployment Server instance you modified is displayed in the JD Edwards Servers window.
- You can select the Delete option in the Application Options menu to
delete the Deployment Server instance. After you delete the existing Deployment
Server instance, you can click the New Server icon, and then select
Deployment Server from the Select a Component page to add a new Deployment
Server instance.Note: To deploy an orchestration, refer to the section "Deploying an Orchestration" of this Learning Path.