Orchestrating the Quick Start Plan Using the Microsoft SQL Server Database
This section shows you how to orchestrate a Basic Deployment Plan using the Quick Start mode.
Use the Quick Start mode in the JD Edwards One-Click Provisioning Console to create a Deployment Plan using the Microsoft SQL Server Database that includes all the core components of JD Edwards EnterpriseOne, which will be deployed exclusively on Oracle Cloud Infrastructure.
Prerequisite
- Configured the administrator passwords for the WebLogic Server and Server Manager Console in the Configure section of the JD Edwards One-Click Provisioning Console.
Orchestrating the Quick Start Plan Using the Microsoft SQL Server Database
To use the JD Edwards Provisioning Console to orchestrate and deploy the Quick Start plan using the Database Server Type as Microsoft SQL:
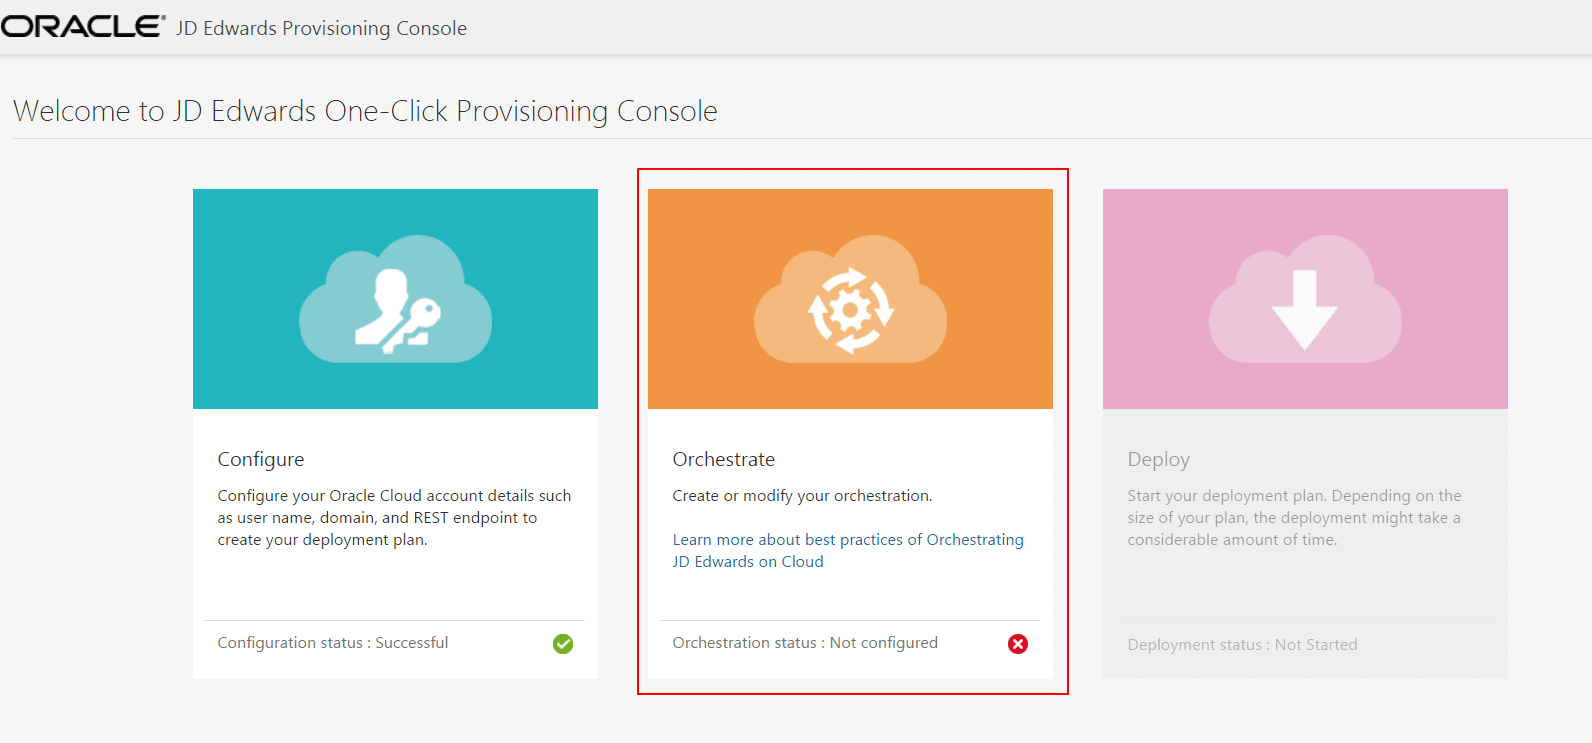
On the Welcome to JD Edwards Provisioning Console page, click the Orchestrate icon.
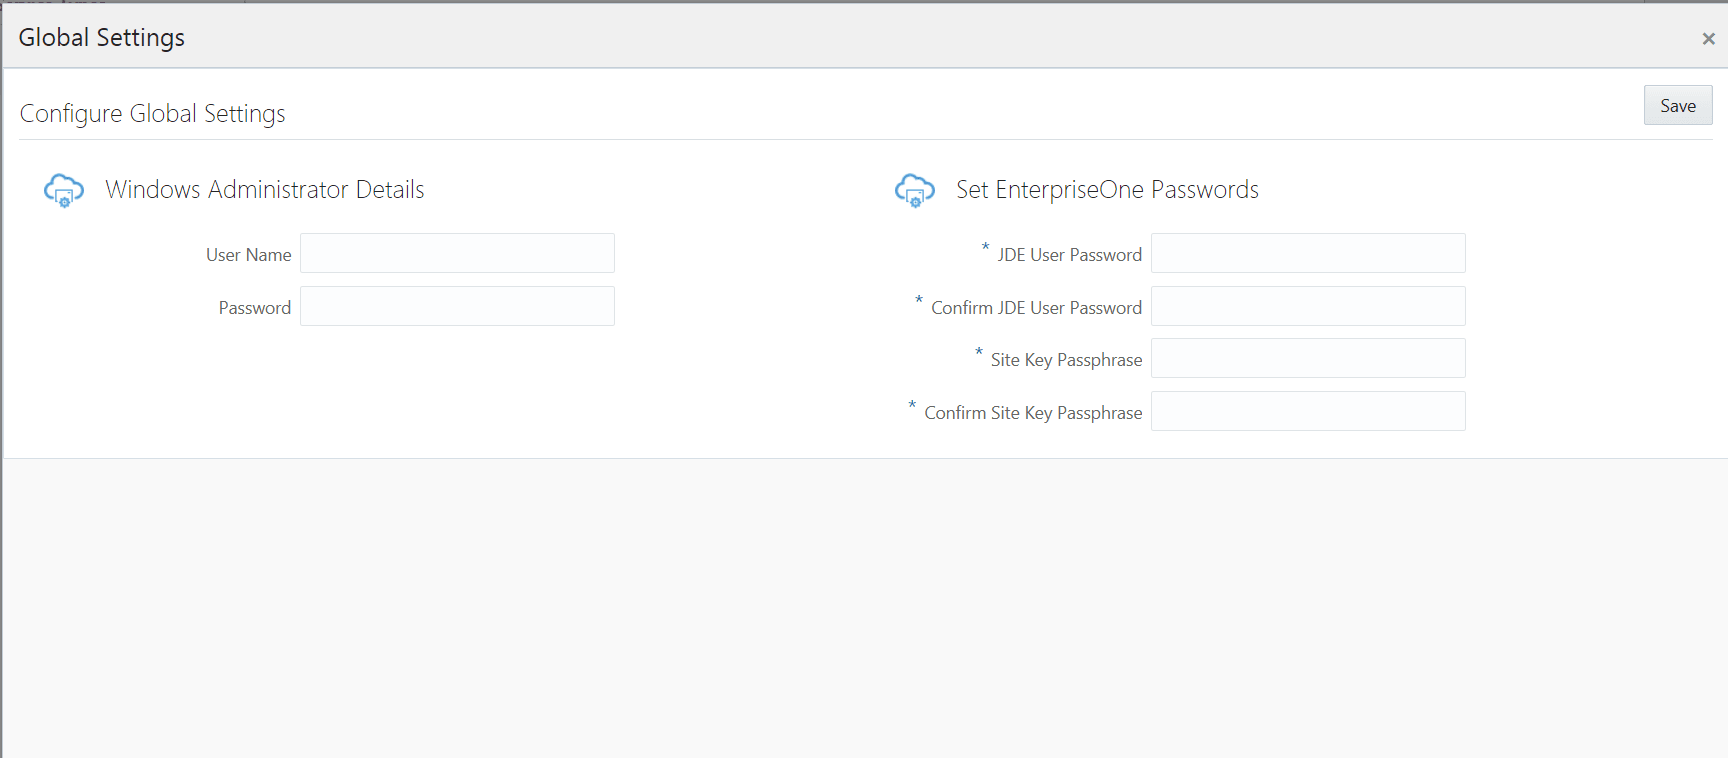
If this is the first pass through a JD Edwards One-Click Provisioning orchestration, the following Global Settings screen will appear first.
In the Windows Administrator Details section, enter the User Name and Password to access the Windows environment. All servers in the provisioning cycle must be configured with the same Microsoft Windows user name and credentials, where the user name must be opc. This common user must have administrator rights; that is, it must be part of the Administrator group.
Important:The password for the opc user is the same as the password you set when you created this user as described in the preceding section of this Learning Path entitled: "Performing Common Setup for All Microsoft Windows Servers". As described in that section, when you set the password it must have conformed to specific requirements of the One-Click Provisioning Console; else an error is given and you cannot proceed until the password conforms to the stated requirements. To reiterate, the password requirements are:
- Minimum of 12 characters
- Minimum of one lower case character
- Minimum of one upper case character
- Minimum of one numeric character
-
Minimum of one special character, where only these are supported:
Underscore (_)
At sign(@)
Tilde (~)
Exclamation point (!)
Number sign (#)
Percent sign (%)
Asterisk (*)
Plus sign (+)
Parentheses ()
Braces ({})
Brackets ([])
Period (.)
Question mark (?)
-
In the Set EnterpriseOne Passwords section, enter and then confirm these passwords:
-
JDE User Password
Create the password for JD Edwards EnterpriseOne. In support of the long password functionality provided by JD Edwards Tools Release 9.2.4.5, the password must be between 12 and 30 characters. It can contain only alphanumeric characters, and can only include this special character: _ (underscore).
-
Site Key Passphrase
Enter the passphrase for generating the site key. The passphrase must start with a letter, end with an alphanumeric character, must be between eightand 40 characters, and contain at least two uppercase letters, two lowercase letters, two numbers, and two underscore characters.
Tip: The conditions to set the passwords appear in the tooltip when you click the fields.Important:It is highly recommended that you keep a record of these critical passwords. If you have not already done so, you should ensure that these values are recorded on the Pre-Install Worksheet<you should record these values on the Preinstallation Worksheet>.
-
- Click the Save button to exit the Global Settings screen.
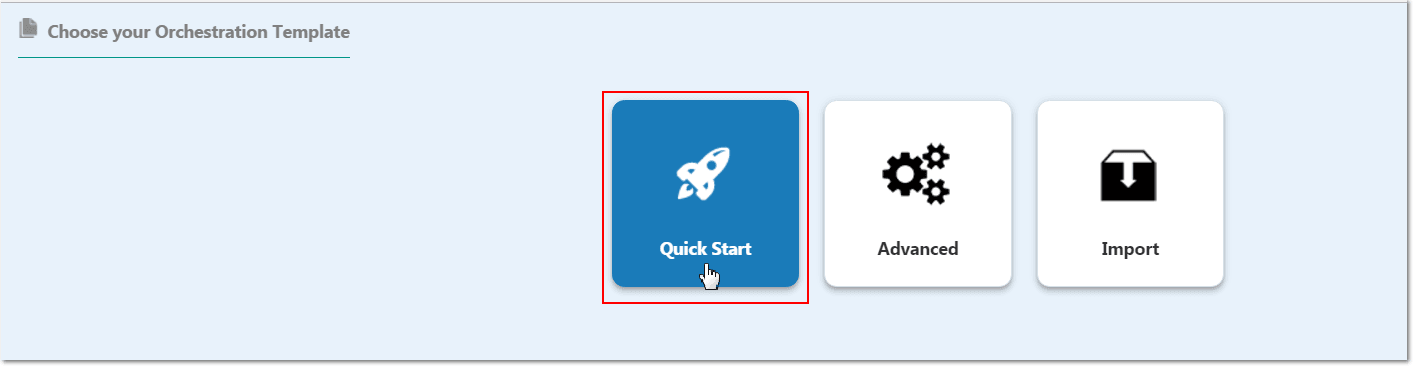
On the Choose your Orchestration Template window, click the Quick Start icon to create your Quick Start JD Edwards Deployment Plan.
Note:Refer to the applicable sections of this Learning Path for instructions on using the Advanced, Export, and Import orchestration functions.
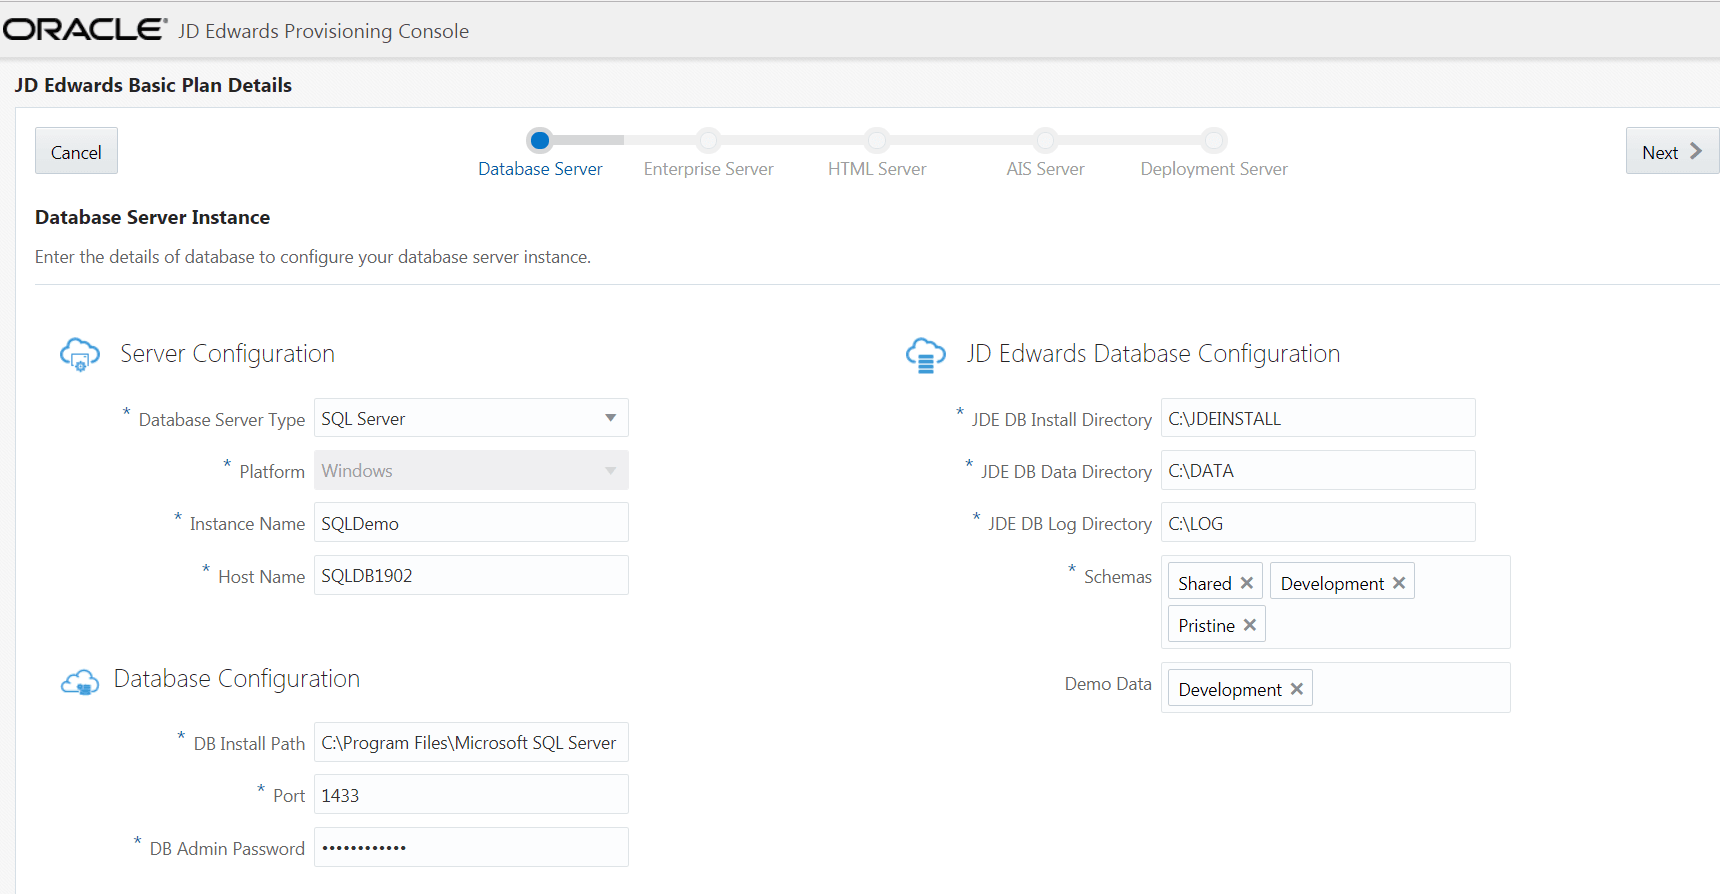
On the JD Edwards Database Server details page, complete these fields to create and configure the Database Server instance.
Important:You must enter the same password for this Windows Server that you previously specified in the section of this OBE entitled: Logging in to the Windows VM.
Server Configuration
-
Database Server Type
Select the Database Server Type as SQL Server. The server types available are: Oracle Database and SQL Server.
-
Platform
This field is disabled and it is automatically populated as Windows.
-
Instance Name
Create an instance name for your database instance.
-
Host Name
Enter the host name.
Tip:To determine a currently set host name, refer to the section "Retrieve a Host Name" of this Learning Path.
Database Configuration
-
DB Install Path
Enter the path of the directory where you have installed the SQL Server database components.
-
Port
Enter a unique port number.
-
DB Admin Password
Enter the password of the database administrator.
-
Note:JD Edwards EnterpriseOne One-Click Provisioning specifically supports only these special characters for the SQL Server database admin password:
Underscore (_)
At sign (@)
Tilde (~)
Plus sign (+)
Hyphen (-)
Asterisk (*)
JD Edwards Database Configuration
-
JDE DB Install Directory
Enter the installation path.
Path Rules: All the directories in the specified path must preexist, except the last directory in the path. The name of the last directory must be unique. One-Click validation checks that the parent directory exists. The child directory is created by One-Click using the name provided in the input. If there are sub folders leading to the child directory, they must be created manually. For example, if the specified JDE DB Install directory is
C:\JDEdwards\DBInstallPath, thenC:\JDEdwardsis the parent directory and it must be created manually.DBInstallPathis the child directory and should not be created manually, One-Click uses the name provided in the input and creates it. -
JDE DB Data Directory
Enter the path to install the table data.
Path Rules: All the directories in the specified path must preexist, except the last directory in the path. The name of the last directory must be unique. One-Click validation checks that the parent directory exists. The child directory is created by One-Click using the name provided in the input. If there are sub folders leading to the child directory, they must be created manually. For example, if the specified JDE DB Install directory is
C:\JDEdwards\Data, thenC:\JDEdwardsis the parent directory and it must be created manually.Datais the child directory and should not be created manually, One-Click uses the name provided in the input and creates it. -
JDE DB Log Directory
Enter the path to save the log files.
Path Rules: All the directories in the specified path must preexist, except the last directory in the path. The name of the last directory must be unique. One-Click validation checks that the parent directory exists. The child directory is created by One-Click using the name provided in the input. If there are sub folders leading to the child directory, they must be created manually. For example, if the specified JDE DB Install directory is
C:\JDEdwards\Log, thenC:\JDEdwardsis the parent directory and it must be created manually.Logis the child directory and should not be created manually, One-Click uses the name provided in the input and creates it. -
Schemas
Click the Schemas field and select the schemas you want from the auto-suggest text. The schemas available are: Shared, Development, Prototype, Production, and Pristine with Demo data.
Note: It is mandatory to add the Shared schema.Important:At this point, you should ensure that you specify all the schemas you might use. The schemas you choose to install on the Database Server can only be deployed once, which is specified at this point in the Provisioning Console. You can use the Provisioning Console to programmatically add additional schemas after deploying the orchestration.
-
Demo Data
Click the Demo Data field and select the available demo data from the auto-suggest text. Demo data will be available depending on the schema selected. For example, if you select the schema as Development, the Development demo data will be available.
-
- Click the Next button. Because you will be connecting to an existing Oracle Cloud Infrastructure database instance, the system validates all the inputs that are provided. If the validation is successful, the JD Edwards Enterprise Server page is displayed.
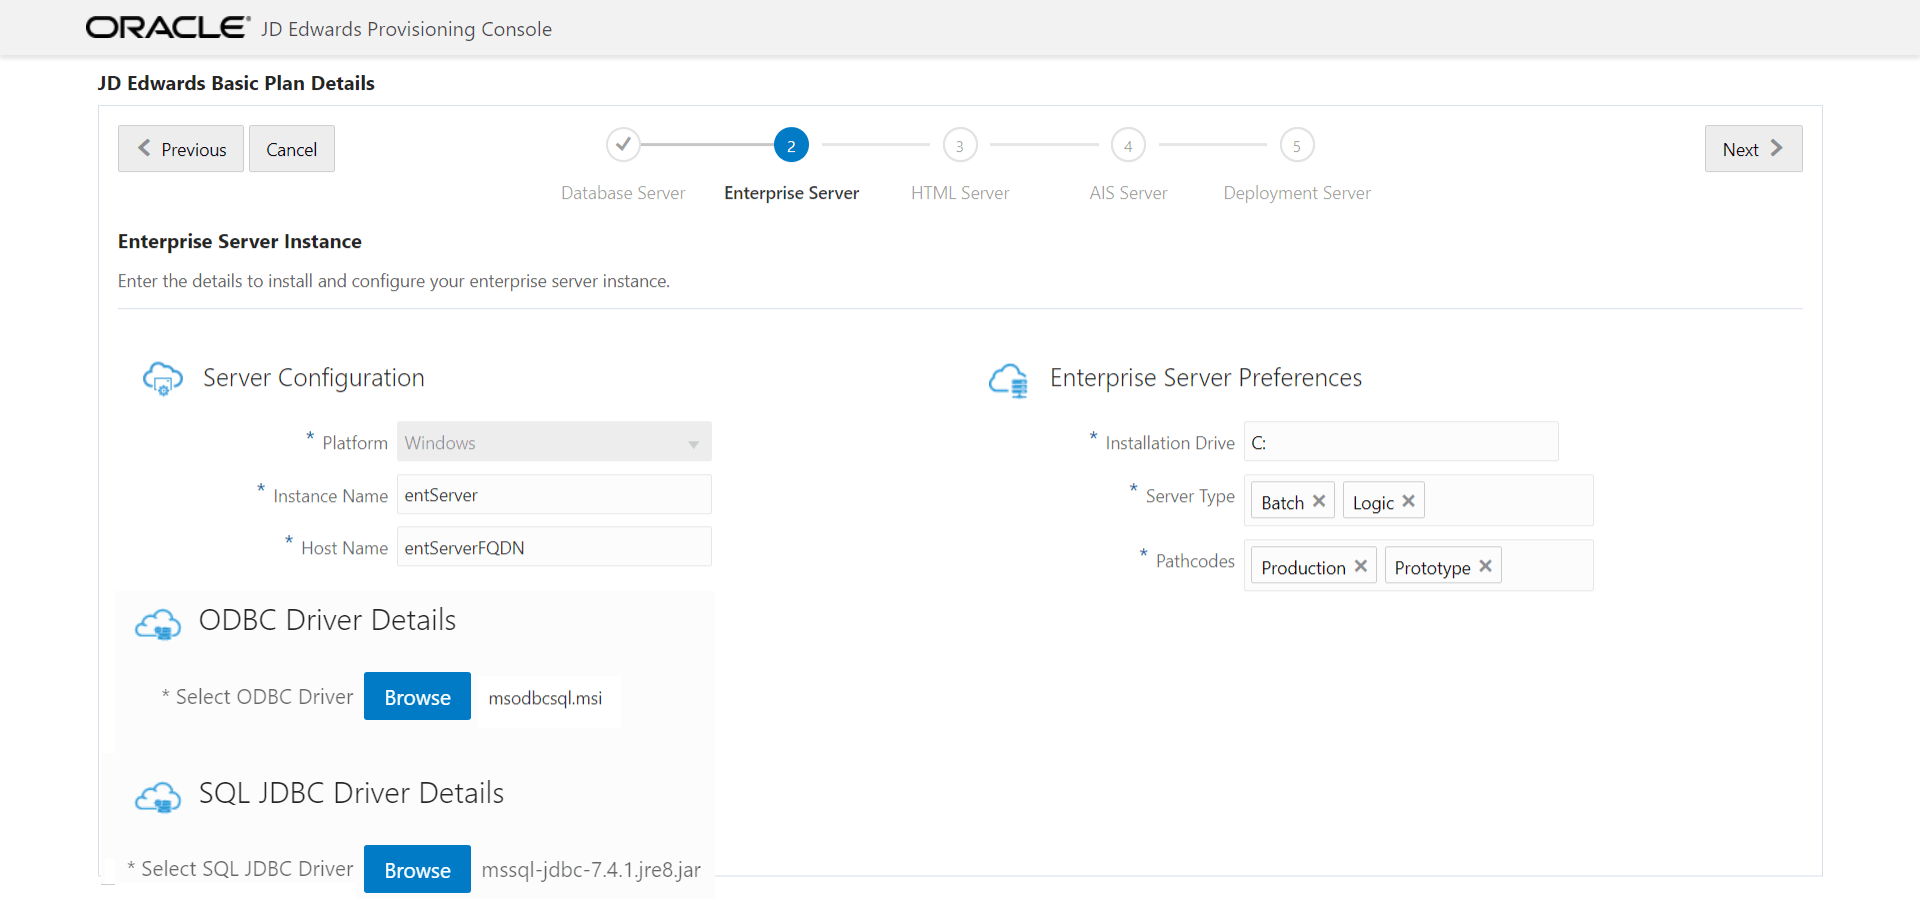
On the JD Edwards Enterprise Server details page, complete these fields to create and configure the Enterprise Server instance.
Server Configuration
-
Platform
This field is disabled and it is automatically populated as Windows.
-
Instance Name
Create an instance name for the Enterprise Server. The conditions to set the service name are displayed in the tooltip when you click the field.
-
Host Name
Enter the host name.
Tip:To determine a currently set host name, refer to the section "Retrieve a Host Name" of this Learning Path.
ODBC Driver Details
-
Select ODBC Driver
Browse and select the 64-bit ODBC driver that is used to connect to the SQL Database Server from the Enterprise Server. For example, msodbcsql.msi.
Refer to Oracle Certifications for the supported driver version.
SQL JDBC Driver Details
-
Browse and select the SQL Server JDBC driver that is required for connectivity between the Enterprise Server and the SQL Server database server. For example, mssql-jdbc-7.4.1.jre8.jar.
Refer to Oracle Certifications for the supported driver version.
Enterprise Server Preferences
-
Installation Drive
Enter the Installation Drive.
-
Server Type
Select one or both of the available server types for this Enterprise Server.
Single Enterprise Server. If you are deploying only a single Enterprise Server, select both Logic and Batch.
Multiple Enterprise Servers. If you are deploying multiple Enterprise Servers, at least one must be specified as a Logic server per pathcode. The others can be specified as Batch servers.
-
Pathcodes
Click the Available Pathcodes field and select the pathcodes required from the auto-suggest. The four available pathcodes are: Development, Prototype, Pristine, and Production.
Important:It is a good practice to select pathcodes here that correlate to the schemas you selected for the Database Server. The Provisioning Console programmatically enforces this correlation. If you select pathcodes on the Enterprise Server that are a superset of the database schemas you selected, the Enterprise Server will not be able to access the data required to function correctly. The pathcodes you choose to install on the Enterprise Server can only be deployed once, and these pathcodes need to be specified at this point in the Provisioning Console. After the configuration is deployed, you can use the Provisioning Console to programmatically add additional pathcodes.
-
- Click the Next button. Because you will be connecting to an existing Oracle Cloud Infrastructure database instance, the system validates all the inputs that are provided. If the validation is successful, the JD Edwards HTML Server Instance page is displayed.
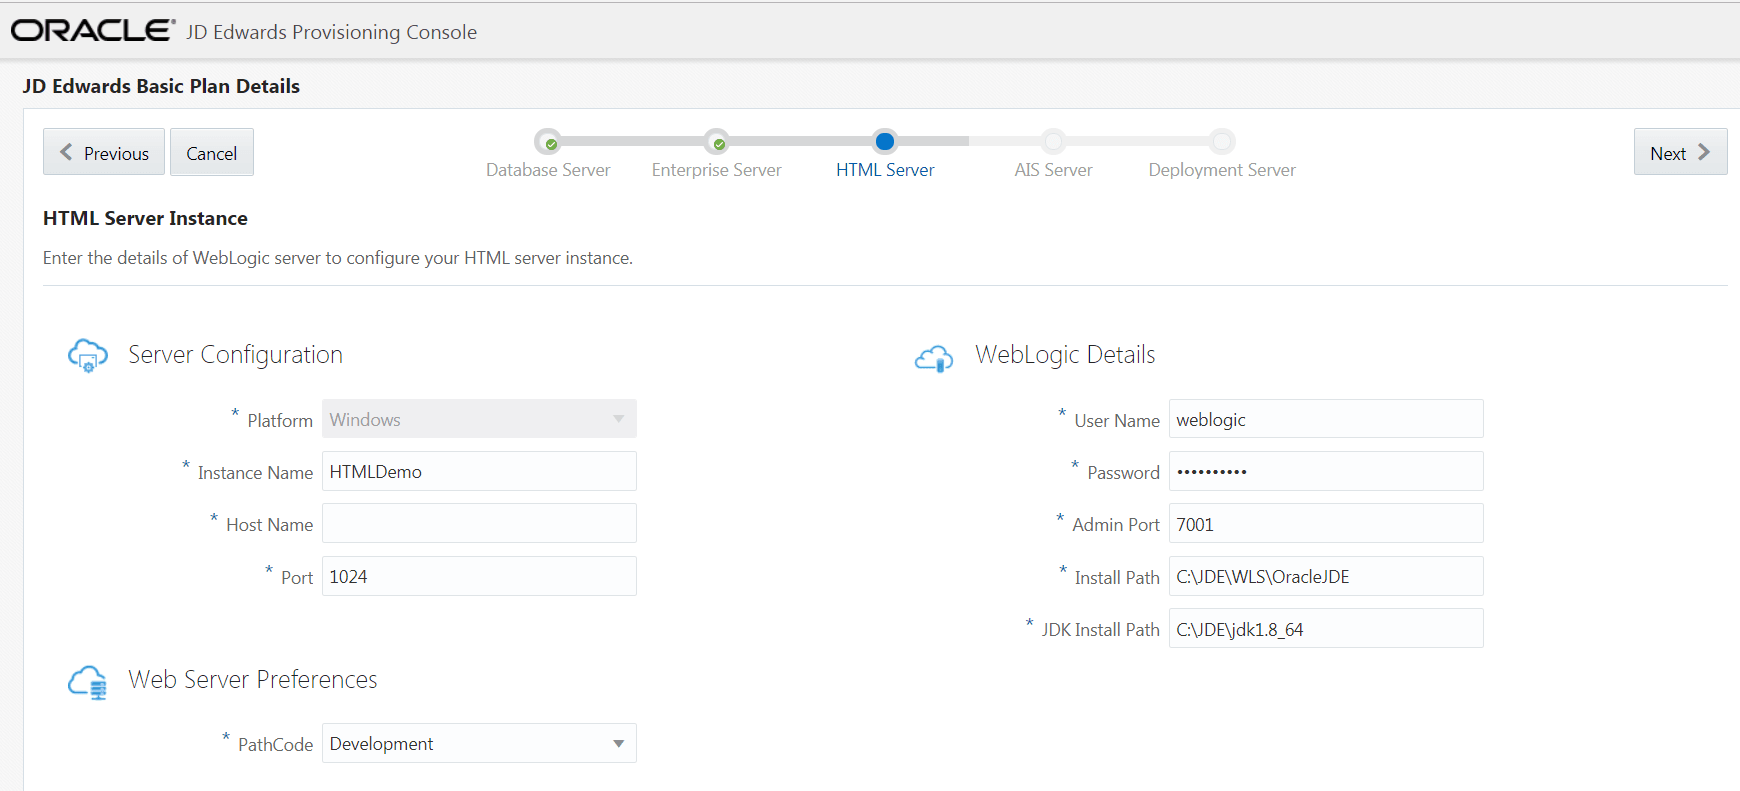
On the JD Edwards HTML Server details page, complete these fields to create and configure the HTML Server instance.
Server Configuration
-
Platform
This field is disabled and it is automatically populated as Windows.
-
Instance Name
Create the instance name of the HTML Server instance.
-
Host Name
Enter the host name.
Tip:To determine a currently set host name, refer to the section "Retrieve a Host Name" of this Learning Path.
-
Port
Enter a unique (available) port number for this server that will use an SSL connection. This port number must be between 1024 and 65535. This port number is used by HTTPS to create a container and deploy the web component. For the port number you enter here, ensure that the port for one less <ensure that the port number that is one less> is also available. That is, if you specify port 8081, you must also ensure that port 8080 is available.
Important:For each SSL port that you open in the firewall, you must also open a companion port for non-SSL access that is required for the Server Manager. The companion port must have a numeric value that is one less than the value specified for the SSL port. For example, if you specify a port value of 8081 for SSL in the firewall, you must also open a port one less than that value; in this case you must open port 8080. Refer to the subsection "Enable Inbound Ports in the Firewall" of the OBE "Performing Common Setup for All Microsoft Windows Servers" in this Learning Path.
-
PathCode
Create the instance name of the HTML Server instance.
WebLogic Details
-
User Name
Enter the user name.
-
Password
Enter the WebLogic password.
-
Admin Port
Enter the admin port number.
-
Install Path
Enter the installation path of the WebLogic instance.
-
JDK Install Path
Enter the JDK installation path.
Important:Each HTML Server can only support one pathcode. If you want additional HTML instances to support additional pathcodes, you should use the Advanced mode of the Provisioning Console. Refer to the section "Orchestrating the Advanced Deployment Plan Using the Microsoft SQL Server" of this Learning Path.
-
- Click the Next button. The system validates the inputs. If the validation is successful, the JD Edwards AIS Server page is displayed.
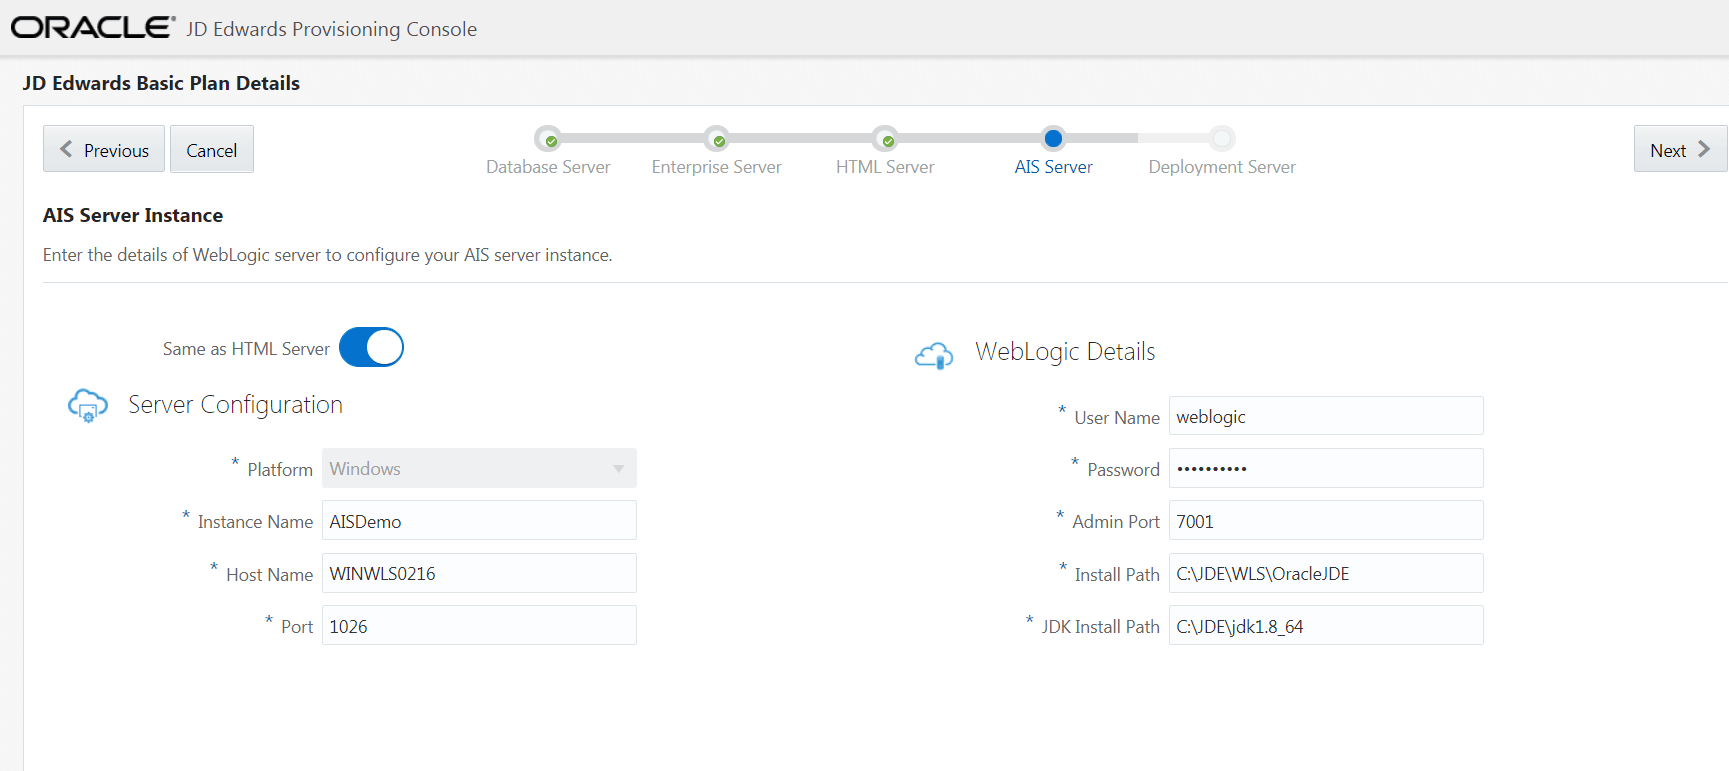
- On the JD Edwards AIS Server details page, complete these fields to configure
your AIS Server instance. Select the Same as HTML Server option if you want the
AIS Server to have the same configuration as the HTML Server.
Server Configuration
-
Platform
This field is disabled and it is automatically populated as Windows.
-
Instance Name
Create an instance name for the WebLogic Server.
-
Host Name
Enter the Host Name.
Tip:To determine a currently set host name, refer to the section "Retrieve a Host Name" of this Learning Path.
-
Port
Enter a unique (available) port number for this server that will use a <an>SSL connection. This port number must be between 1024 and 65535. This port number is used by HTTPS to create a container and deploy the web component.For the port numberyou enter here,ensure that the port number that is one less is also available. This is, if you specify port 8081, you must also ensure that port 8080 is available.
Important:For each SSL port that you open in the firewall, you must also open a companion port for non-SSL access required for the Server Manager. The companion port must have a numeric value that is one less than the value specified for the SSL port. For example, if you specify a port value of 8081 for SSL in the firewall, you must also open a port one less than that value; in this case you must open port 8080. Refer to the subsection "Enable Inbound Ports in the Firewall" of the OBE "Performing Common Setup for All Microsoft Windows Servers" in this Learning Path.
WebLogic Details
-
User Name
Enter the user name.
-
Password
Enter the WebLogic password.
-
Admin Port
Enter the admin port number.
-
Install Path
Enter the installation path of the WebLogic instance.
-
JDK Install Path
Enter the JDK installation path.
-
- Click the Next button. The system validates the inputs. If the validation is successful, the JD Edwards Deployment Server page is displayed.
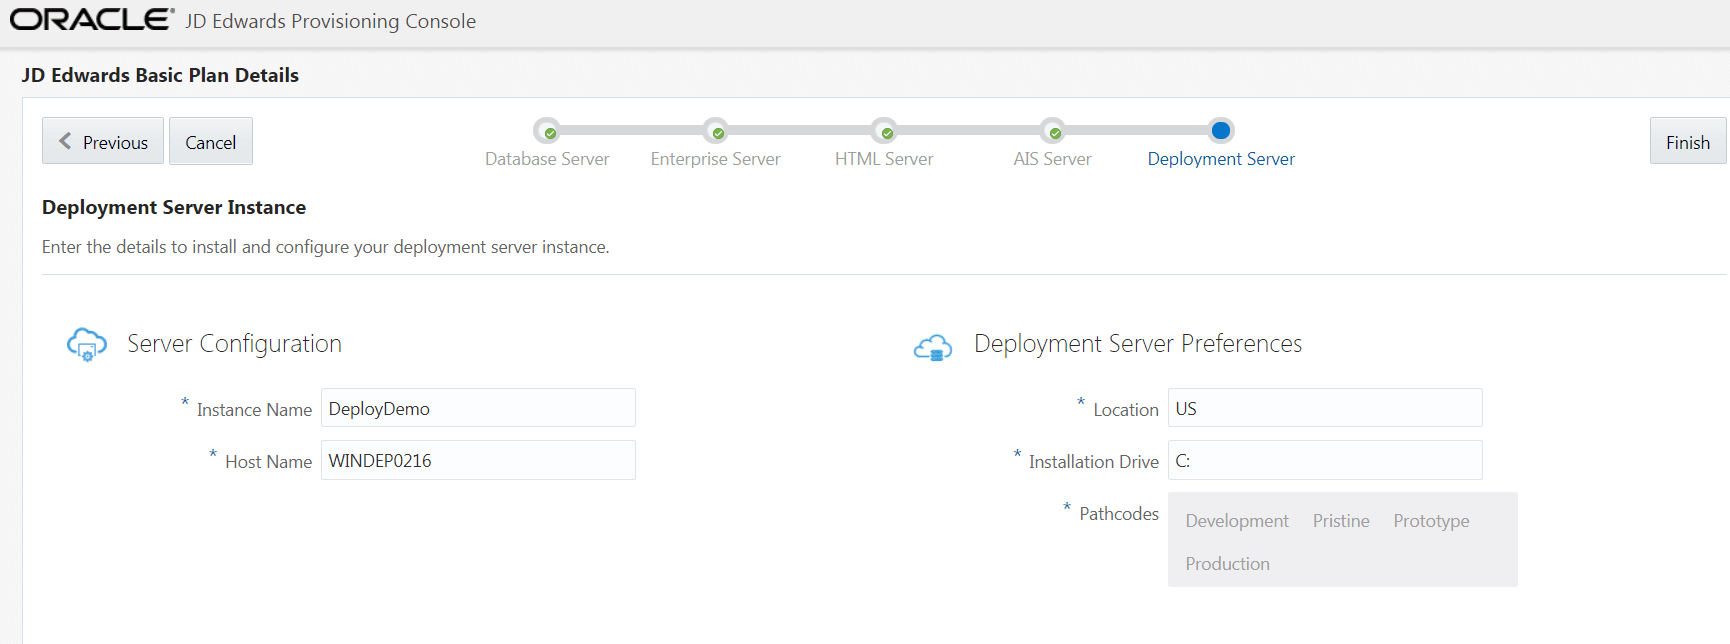
- On the JD Edwards Deployment Server details page, complete these fields to
create and configure your Deployment Server instance.
Server Configuration
-
Instance Name
Create an instance name for the Deployment Server instance. The condition to set the Service Name is displayed in the tooltip when you click the field.
-
Host Name
Enter the host name.
Tip:To determine a currently set host name, refer to the section "Retrieve a Host Name" of this Learning Path.
Deployment Server Preferences
-
Location
Enter the location.
This value is the base location for your JD Edwards EnterpriseOne machines. For example, typical values might be a city name (such as Denver or Austin), a geographical region name (such as US or India), or a general location name (such as Corporate).
-
Installation Drive
Enter the drive for the installation.
Pathcodes
This field is automatically populated.
-
Click the Finish button.
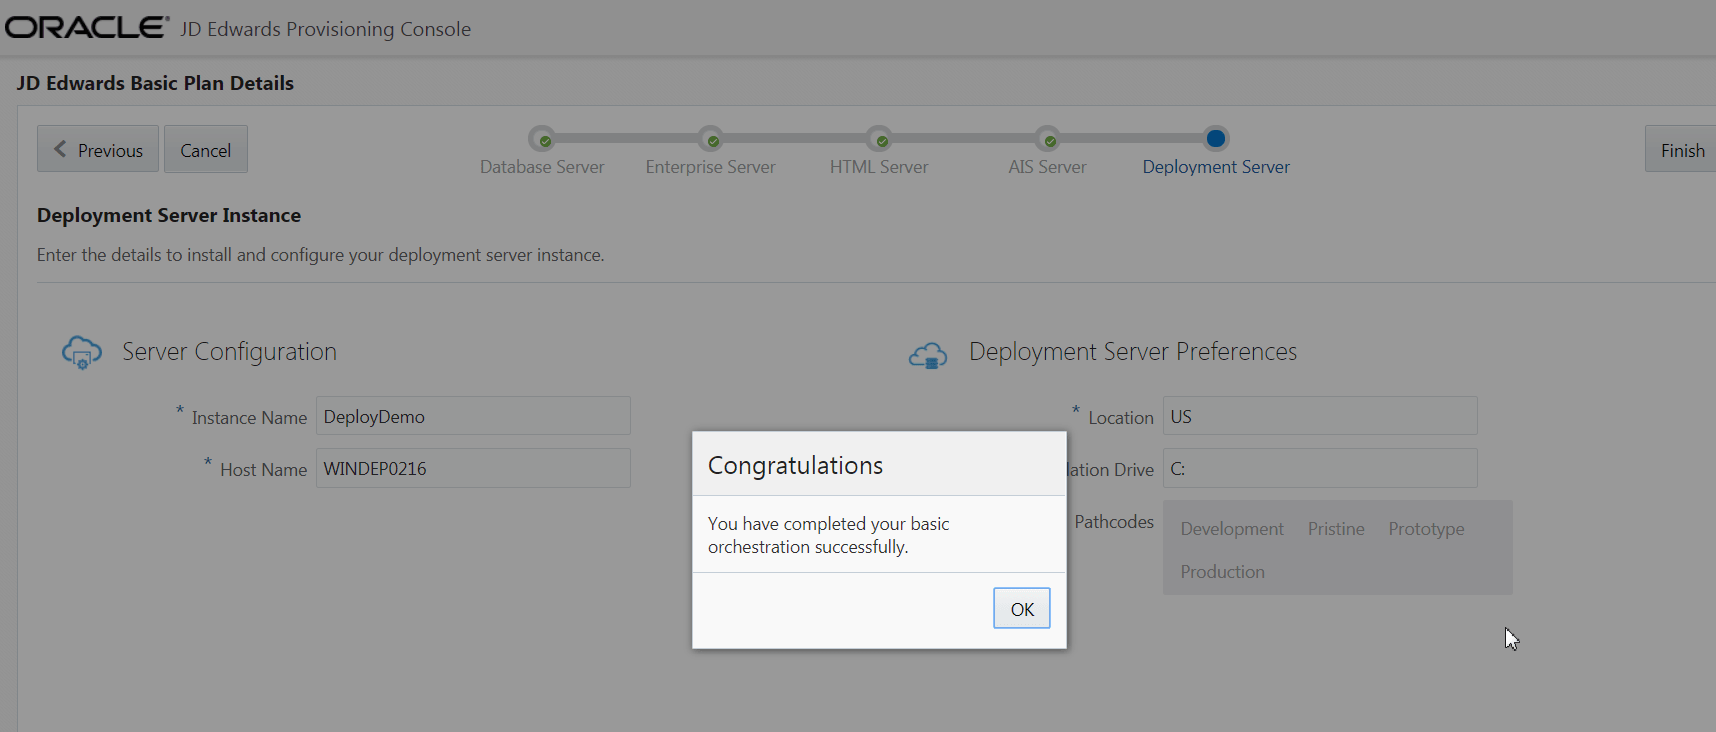
- Click OK in the success message window.
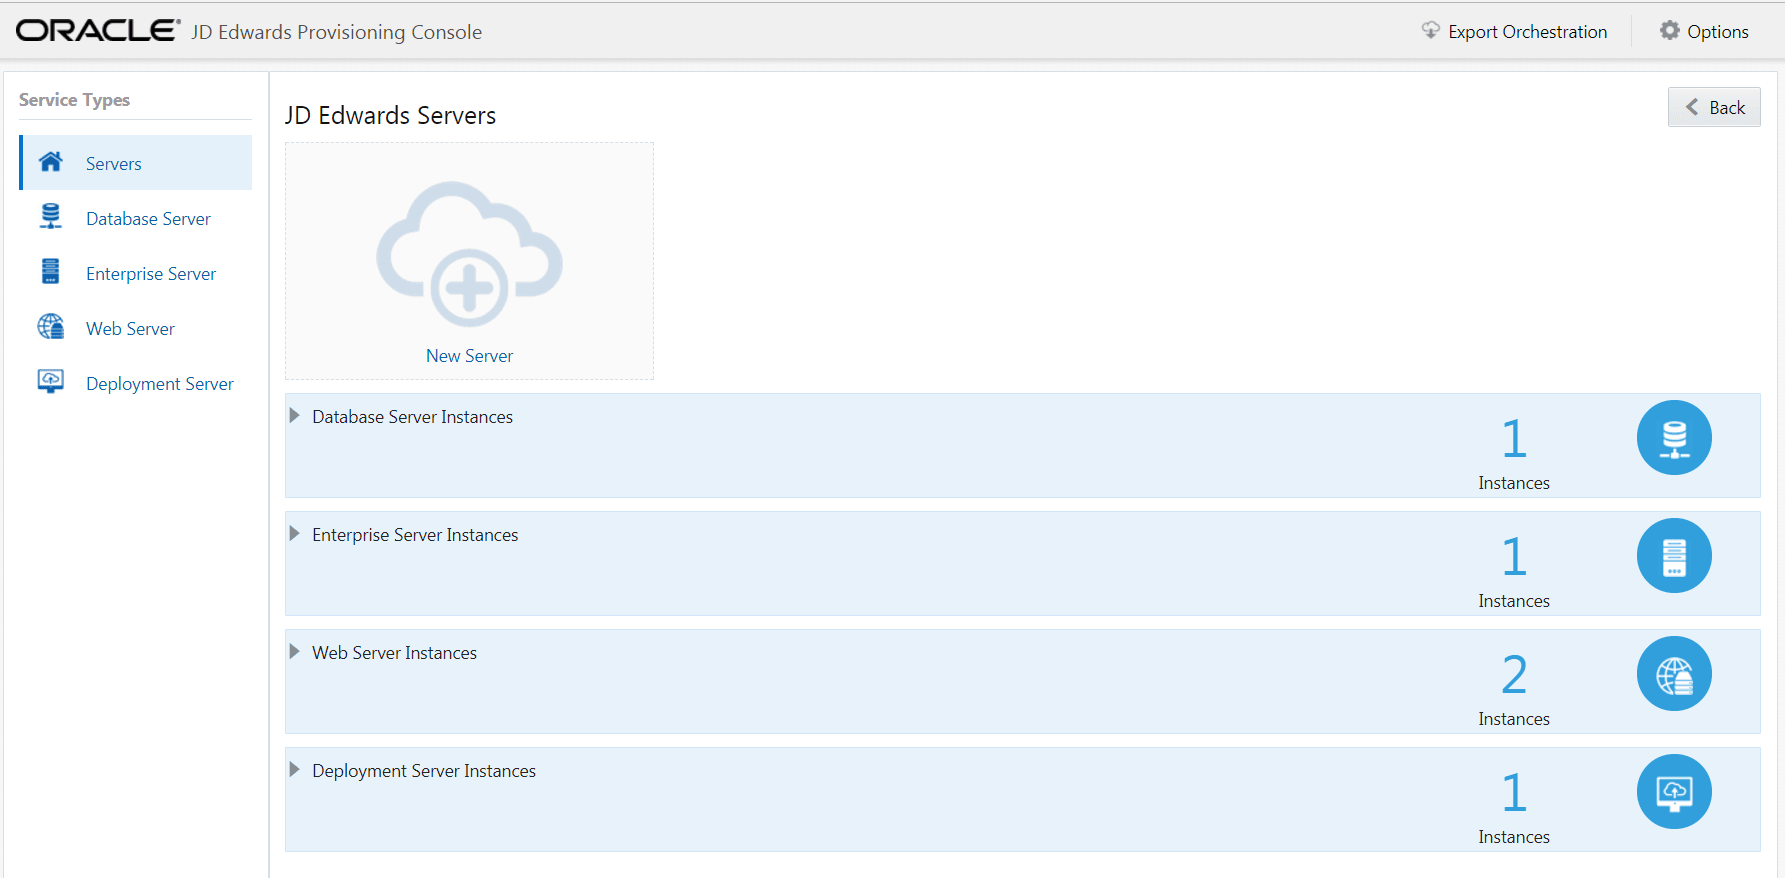
- The summary window is displayed. In the summary window, you can see that one instance is created for each of the servers. Click the Back button to proceed to deploy your services by following the steps described in the section "Deploying an Orchestration"of this Learning Path.