Configuring the JDBC Driver in Oracle Business Intelligence Publisher
To configure the JDBC Driver in Oracle BI Publisher:
Start the Oracle BI Publisher server.
Sign in to Oracle BI Publisher Enterprise Console.
Click the Administration tab.
Under the Data Sources section, select JDBC Connection.
The Data Sources form appears, with the JDBC tab selected.
Click Add Data Source.
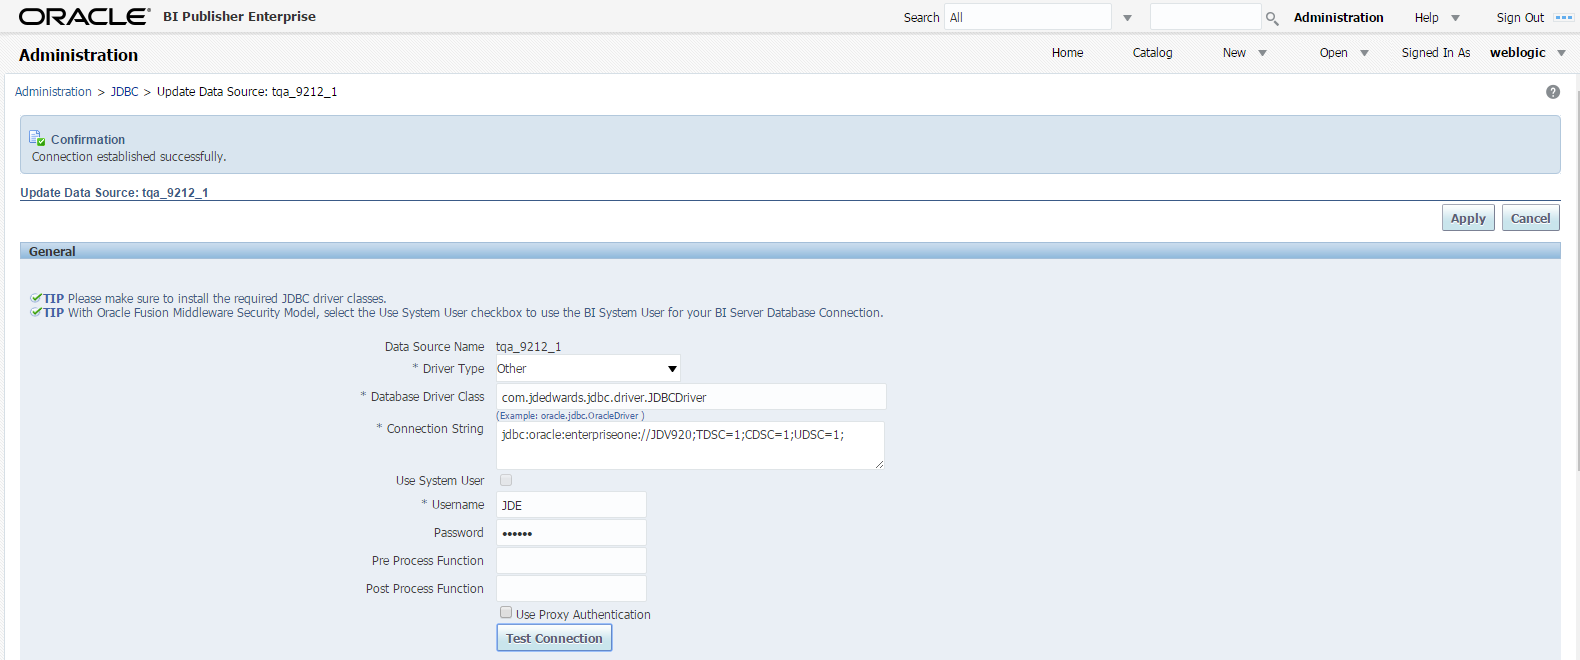
Enter the following values on the Add Data Source form:
Note:When configuring the JDBC Driver with the Use Proxy Authentication option, it is required that you use the EnterpriseOne bootstrap user and password (as found in the jdbj.ini) for the BI data-source user.
Field
Value
Data Source Name
<user defined>
Example: E1_DAD
Driver Type
Other
Database Driver Class
com.jdedwards.jdbc.driver.JDBCDriver
Connection String
jdbc:oracle:enterpriseone://<JD Edwards environment>;
Example: jdbc: oracle:enterpriseone://JDV920;
Note: You can append information to the end of the connection string that defines the JD Edwards EnterpriseOne role that will be used when connecting to the database, for example: enterpriseone.role = *ALL. If the role is not defined in the connection string, the role that is defined as the Bootstrap Role will be used. Locate the Bootstrap Role by using Server Manager.
Note: You can append information to the end of the connection string to display table, column, or UDC descriptions if desired. TDSC=1 displays the table name description, CDSC=1 displays the column description, and UDSC=1 displays the UDC description.
Example of connection string without display options:
jdbc:oracle:enterpriseone://JDV920;
Example of connection string with display options:
jdbc:oracle:enterpriseone://JDV920;TDSC=1;CDSC=1;UDSC=1;
User Name
Enter the JD Edwards EnterpriseOne user ID that you will connect to the database with.
Note: The user name is case-sensitive.
Password
Enter the password for the user ID.
Note: The password is case-sensitive.
Use Proxy Authentication
Selected or Cleared
Note:Using proxy authentication assumes that the user IDs in Oracle BI Publisher and JD Edwards EnterpriseOne are the same, either by duplication or by using Lightweight Directory Access Protocol (LDAP).
This example shows the completed form:
Click Apply.
The new JDBC data source should appear in the Data Sources list.
This example shows the completed form:
