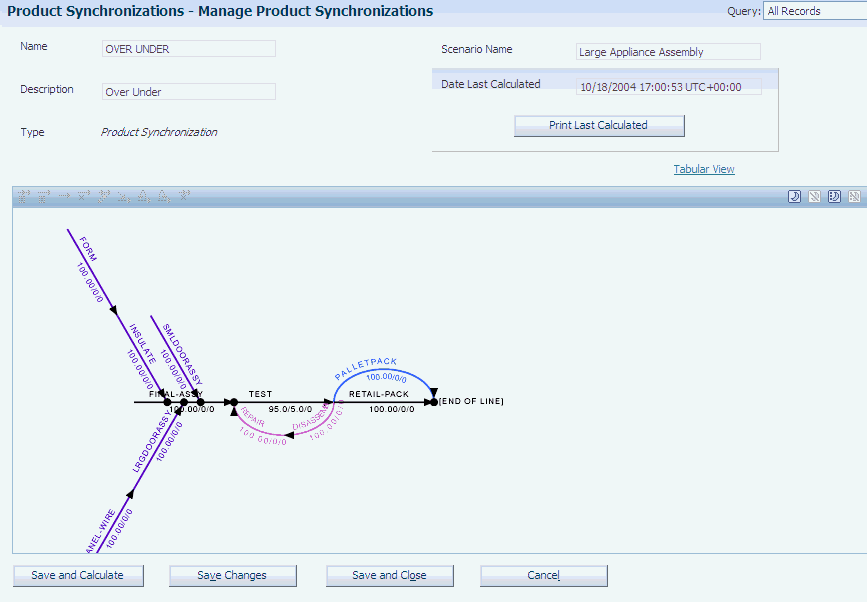
Creating a Graphical Product Synchronization
Access the Manage Product Synchronizations form.

When you access the forms for creating feeder, option, and rework paths, the program offers the same fields and functions.
- View Path Properties
Click to view path name, description, and path type.
- View Process Properties
Click to view process name, description, and sequence number on the path. You can also review process attributes, such as consumed quantity, yield, rework, and scrap percent.
- Insert Process
Click to open the Select Process name form. Select the process that you want to insert into the product synchronization.
- Remove Process
Select a process and click this button to remove the process. If you have set the processing option to prevent process deletion, this button is disabled for processes on attached paths.
You can delete processes from the main path, even if you have set the processing option to prevent process deletion. However, you cannot delete main line processes if you have attached other paths to these processes.
- Edit Process
Click to access the Edit Process Properties form. You can change the consumed quantity and the scrap percent value.
- Attach Feeder
Select a process to which the system enables you to attach a feeder path, and click this button. Select the feeder path that you want to attach from the Attach Feeder Path form.
- Attach Rework
Select a process to which the system enables you to attach a rework path, and click this button. Select a rework path from the Attach Rework Path form, and enter the rework percentage and number of rework loops.
- Attach Option
Select a process to which the system enables you to attach an option path, and click this button. Select an option path from the Attach Option Path form, and enter the design and planned percent values.
- Remove Path
Click to remove a selected path from the product synchronization.
- Enable Dim Mode
Click to enable you to dim selected paths in the product synchronization. After clicking this button, select a path, and the system lowers the display intensity of the path, as well as its child paths. Disable this mode to return to the normal product-synchronization mode that enables you to select, insert, attach, or remove processes or paths.
- Un-Dim Mode
Click to enable you to return selected paths in the product synchronization to their original intensity. After clicking this button, select a path, and the system returns the selected path, its child, and its parent paths to their original intensity.
Important: The system does not undim sibling paths. For example, if a parent path and its two child paths are dimmed and you select one child, the system undims this child path and the parent path, but not the other child path.Disable this mode to return to the normal product-synchronization mode that enables you to select, insert, attach, or remove processes or paths.
- Dim All Paths
Click to dim all paths except the main path. You can insert or remove processes and paths. If you attach a path to a dimmed path, the path that you attach is also dimmed.
- Un-Dim All Paths
Select to undim all paths that were previously dimmed.
- Save and Close
Click to save the product synchronization. Clicking this button also saves the dim path settings. To save the dim path settings, the program calls the
Set PSYNC View Tablesystem function to pass in the name of the Graphical Product Synch Properties table (FF30L705) and save the dim path settings to the Graphical Product Synch Properties table.- Tabular View
Click if you want to review and edit the product synchronization in a table. The system prompts you to save the graphical view before switching to the tabular view. When you switch back to the graphical view, you are prompted to save again.
Note: Ensure that you add the end-of-line process before you switch to the tabular view. If you do not include an end-of-line process, the system does not save the product synchronization when you switch to the tabular view.