 Invoking
an Orchestration from an EnterpriseOne Event
Invoking
an Orchestration from an EnterpriseOne Event Before You Begin
This 45-minute OBE shows you how to configure EnterpriseOne to invoke an orchestration automatically from an EnterpriseOne event. Invoking orchestrations from EnterpriseOne gives you the ability to provide valuable process automation directly from EnterpriseOne business processes.
In this scenario, when a user enters an occupational health and safety incident in EnterpriseOne, you want the system to send a message with details about the incident to each person associated with the incident. To accomplish this, you will create an orchestration that retrieves details about the incident from EnterpriseOne and sends a message with the details to persons associated with the incident. On the Incident People (F54HS02) table associated with the EnterpriseOne Incident Master (P54HS00) application, you will configure a table trigger on the insert event to invoke the B98ORCH business function, which you will configure to invoke the aforementioned orchestration.
Background
Business analysts use the Orchestrator Studio to create orchestrations that include components that can perform a variety of tasks in EnterpriseOne. Some of these components, which you will create in this tutorial, include: a data request to retrieve data from EnterpriseOne; a custom service request that uses Groovy to manipulate data retrieved from EnterpriseOne; and a message request that sends messages to the EnterpriseOne Work Center or external email systems (if EnterpriseOne is configured with an SMTP server).
Starting with EnterpriseOne Tools 9.2.3, EnterpriseOne provides the B98ORCH business function, which developers can configure to invoke an orchestration or notification automatically from the following events in EnterpriseOne:
- Table trigger
- Button on a form
- Change in the status of an event
- UBE
What Do You Need?
- Orchestrator Studio 7.0.0.0 or higher.
- A minimum of EnterpriseOne Tools 9.2.3 deployed in a JD Edwards EnterpriseOne test environment with an EnterpriseOne Application Interface Services (AIS) Server.
- An EnterpriseOne development client where you can modify table event rules and configure B98ORCH.
 Creating
the "NewIncidentPerson" Orchestration
Creating
the "NewIncidentPerson" Orchestration
Create an orchestration for sending a message to individuals added to a health and safety incident. In subsequent tasks, you will create and add the following components (orchestration steps) to this orchestration: data request, custom service request, and message request.
- Access the Orchestrator Studio and click the Orchestrations icon.
- Click New Orchestration.
- Complete these fields:
- Orchestration =
NewIncidentPerson - Enter Short Description =
Send
                        incident details to individuals added to an incident.
- Orchestration =
- Click the Product Code drop-down list and select a customer product code, 55-59.
- In the grid, expand Orchestration
Inputs and enter these inputs:
Input Value Type IncidentNumberStringAddressNumberStringPersonDescriptionString - Click Save.
 Creating
the "GetIncidentDetails" Data Request
Creating
the "GetIncidentDetails" Data Request
Add a data request to the orchestration to fetch key incident information from the Incident Master (F54HS01) table to include in the message.
- In the NewIncidentPerson orchestration, click the Add Step (+), select Service Request for “Enter Type of Step,” and click OK (+).
- In the new Service Request row, click the Edit icon (pencil) and select Data Request.
- On the Data Request design page, complete these fields:
- Name =
GetIncidentDetails - Enter Short Description =
Get
                        incident details to include in a message to person
                        involved in an incident.
- Name =
- Click the Product Code drop-down list and select a customer product code, 55 – 59.
- In the Table/View Name field, enter
F54HS01and click Load. - In the grid, click the Filter
icon next to the Incident Number field to add it to the
Conditions area on the right.
This adds a condition for the data request to filter on Incident Number.
- Click the Return icon next to the
following fields in the grid to specify the data you want
returned by the data request:
- Incident Description
- Incident Date
- Incident Time
- In the Return Fields and Variable Names area, enter a
variable for each return field so that these values can be
passed to other steps in the orchestration. You can simply use
the field names for the variable names:
- Incident Description =
Incident Description - Incident Date =
Incident Date - Incident Time =
Incident Time
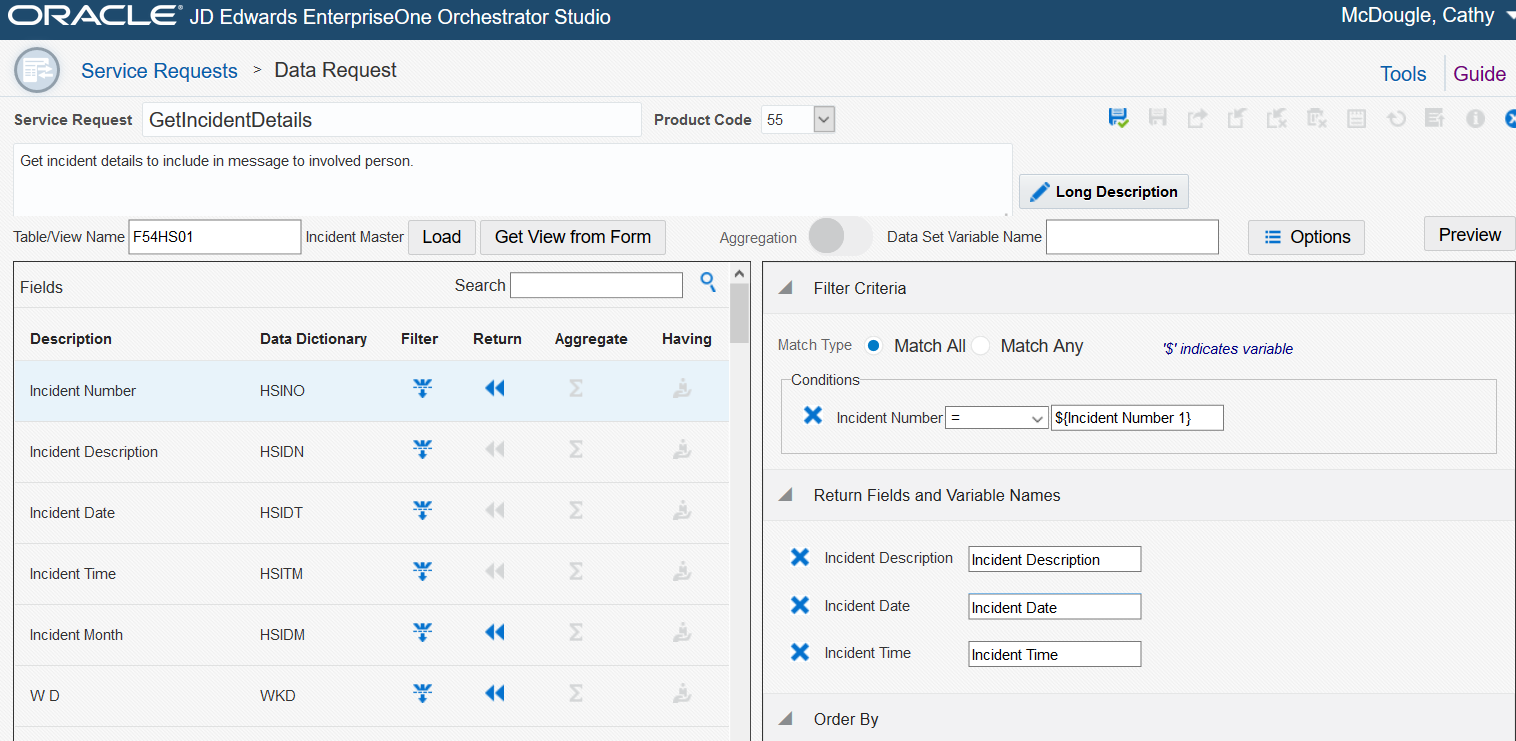
GetIncidentDetails Data Request - Incident Description =
- Save the data request, and then click Close to return to the orchestration.
- In the Service Request row, click the down arrow and select GetIncidentDetails.
- In the Transformations area, click the Available Values drop-down list and select IncidentNumber to map this orchestration input to the ${Incident Number 1} service request input.
- Save the Orchestration.
At this point, the orchestration should look like this:
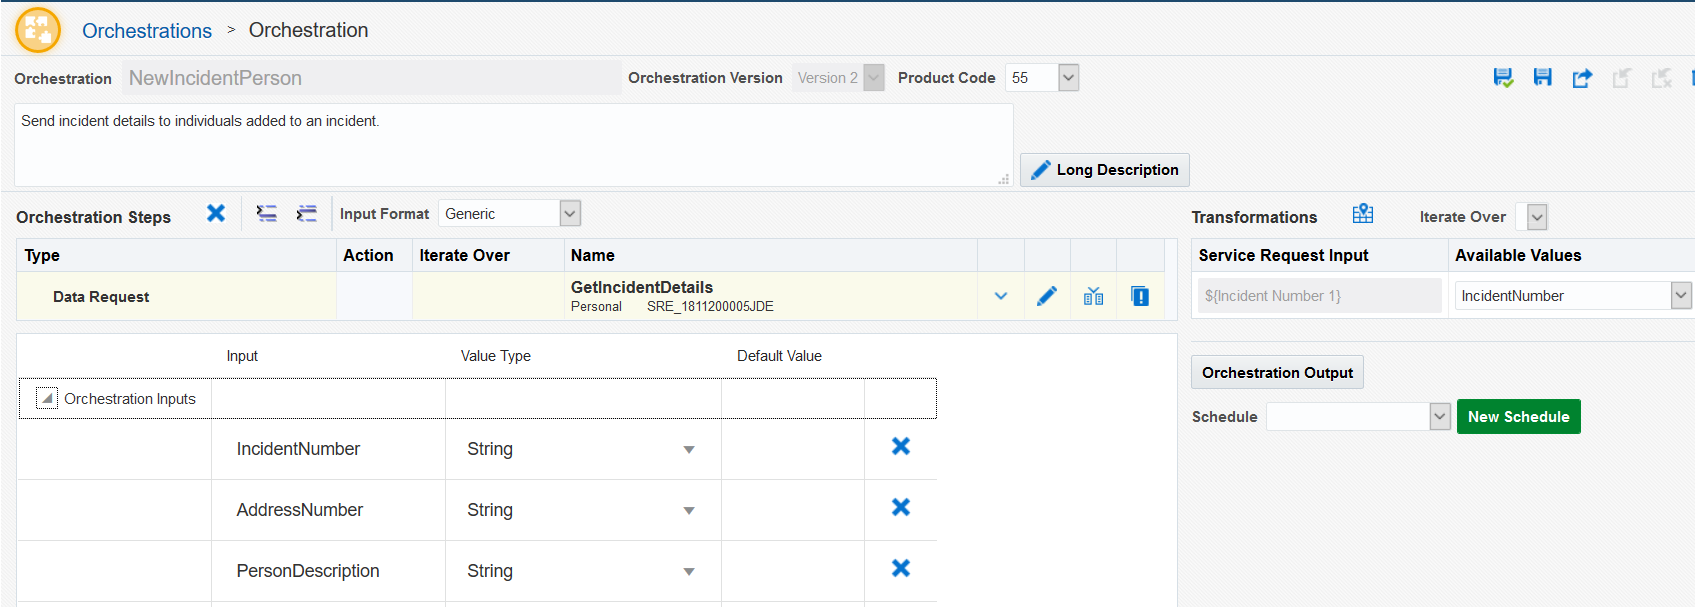
NewIncidentPerson Orchestration with Data Request
 Creating
a Custom Service Request (with Groovy) to Format the Date and
Time
Creating
a Custom Service Request (with Groovy) to Format the Date and
Time
The data request returns the date and time in a format that is not desirable to include in a message. In this task, you will create a custom service request that uses Groovy to convert the date and time to an appropriate format for the message.
- Click the Insert Step After icon to add a step to the orchestration, select Service Request, and click OK (+).
- In the new Service Request row, click the Edit icon (pencil), and then select Custom.
- On the Service Request design page, complete these fields:
- Name =
FormatIncidentDateTime - Enter Short Description
=
Format the incident date and time to include it
                        in the message.
- Name =
- Click the Product Code drop-down list and select a customer product code, 55 – 59.
- If the Groovy option is not selected, select it.
- In the Input grid below the code area, add these inputs:
DateTime
- In the Output grid, add the following outputs and associated
variable name values:
Output Variable Name outDateoutDateoutTimeoutTime - Click this Groovy
script to open it and copy and paste the code into the
code area.
The comments in the code describe the processing.
- Save the service request.
- In the Test Values column in the Input grid, enter the
following test values:
- Date =
20181105 - Time =
150834
- Date =
- Click Test and
verify the Test Output column contains these formatted values:
Mon, Nov 5, 2018and15:08:34.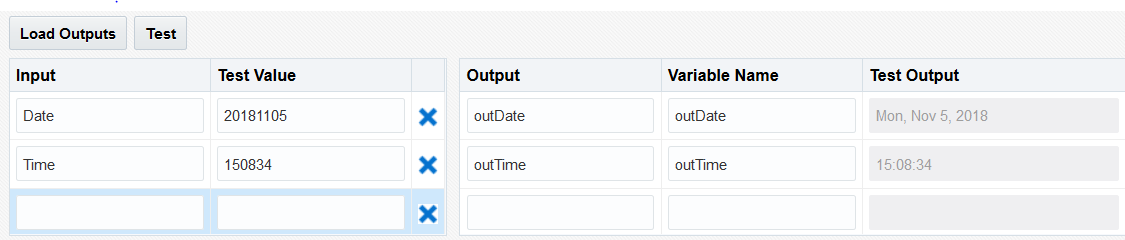
Data Format Conversion Test - Save the service request, and then click Close to return to the orchestration.
- In the new Service Request row, click the down arrow and select FormatIncidentDateTime.
- In the Transformations section, map the custom service
request inputs to the orchestration inputs:
Custom Input Available Values (orchestration inputs) Date Incident Date Time Incident Time - Save the orchestration.
 Creating
the "InvolvedPersonMessage" Message Request
Creating
the "InvolvedPersonMessage" Message Request
Create the message that will be sent to the person involved in the incident.
- With the Custom row selected, click Insert Step After icon, select Service Request, and then click OK (+).
- In the new Service Request row, click the Edit icon (pencil) and select Message.
- On the Message design page, complete these fields:
- Service Request =
InvolvedPersonMessage - Enter Short Description
=
Message sent to person involved in an incident. - In the To field, select Address Book, and then enter the following variable in the Address Number field:
- Enter the following in the subject field:
- In the body, create the following message, which includes variables for including information from the incident.
- Save the message request and then click Close to return to the orchestration.
- In the Server Request row, click the down arrow and select InvolvedPersonMessage.
- In the Transformations area, map the following orchestration
inputs to the message request (service request) inputs:
Service Request Input Available Values ${IncidentNumber}IncidentNumber ${PersonDescription}PersonDescription ${IncidentDescription}Incident Description ${IncidentDate}outDate ${IncidentTime}outTime ${MsgAddressNo}AddressNumber - Save the orchestration.
${MsgAdddressNo}
Involved in Incident: ${IncidentNumber}
Dear ${PersonDescription},
 You have been added to incident Number
                    ${IncidentNumber} - ${IncidentDescription}, as an involved
                    party.
 The incident occurred on ${IncidentDate} at
                    ${IncidentTime}.

                    We will be in contact with you to request more information
                    about the incident.
 Thank you

                    - The Health and Safety Team.
 Testing
the NewIncidentPerson Orchestration
Testing
the NewIncidentPerson Orchestration
Use the Orchestrator Client to test the orchestration. Because you have not yet configured the event in EnterpriseOne to call this orchestration (which you will do later in this OBE), for the test you need to supply the following inputs to the orchestration: incident number, address number, and description of the person.
Before you test the orchestration, if you do not have an incident with a person associated with it in your test environment, then use P54HS00 to create an incident and add an involved person to it. Make sure that you have a way to access the message sent to the involved person. The message can be sent to the EnterpriseOne Work Center or an external email system if the involved person’s address number has an email address associated with it (with a messaging indicator of 1). If an email address is used, your environment must be set up with an SMTP server to send emails from EnterpriseOne.
- In the Orchestrator Studio, click the Tools link and then click the Orchestrator Client icon.
- Use your EnterpriseOne credentials to sign in.
- In the Orchestrator Client, click the Orchestrator Name drop-down list and select NewIncidentPerson.
- For the inputs, enter the appropriate values for the
incident that you created.
As an example, the response shown below shows the results of entering the following values for the inputs:
- IncidentNumber =
218 - AddressNumber =
7 - PersonDescription =
Curie, Marie
- IncidentNumber =
- Click Run.
The Output area in the Orchestrator Client should display a response similar to this:
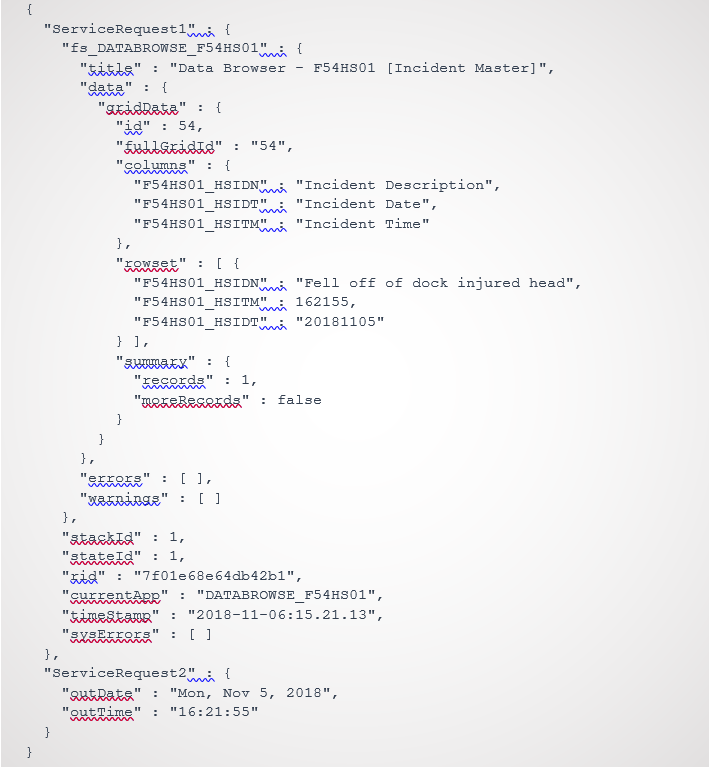
Orchestration Response - Access either the Work Center or email account of the person
associated with the incident. The message should look similar
to the following message, containing values associated with
the incident you created:
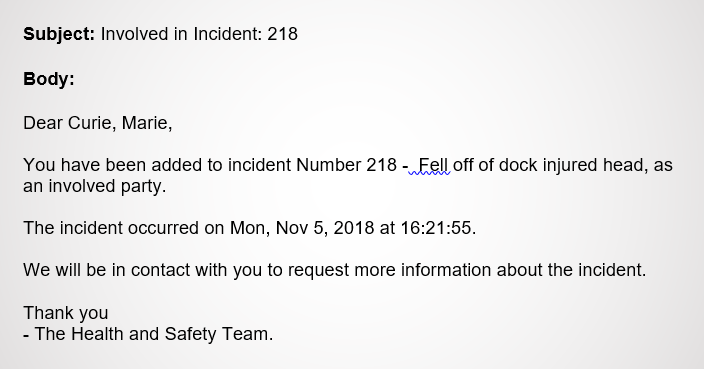
Message Sent to Involved Person After verifying the orchestration produced the desired results, proceed to the next task to configure EnterpriseOne to invoke this orchestration automatically when a person is added to a health and safety incident.
 Configuring
B98ORCH to Invoke the Orchestration
Configuring
B98ORCH to Invoke the Orchestration
The F54HS02 table stores persons associated with an incident. In this task, you will edit the After Record is Inserted event in the table event rules for this table. When B98ORCH is called from table event rules, it in turn makes a REST call to the Orchestrator on the AIS Server. When running locally, the REST call will be executed by the local development client (local Enterprise Server). The Enterprise Server or development client must be configured with an AIS Server for this call to succeed, which requires the following configuration in the jde.ini:
     [FORMSERVICE]

                      AISHost=myaisserver.com

                      AISMaxConcurrentCalls=5

                      AISPort=8123

                      AISProtocol=https
Important: The AIS Server must be using the same security server as the EnterpriseOne web client because the security token generated when the user signs in to EnterpriseOne is passed to this AIS Server.
Remember that if the involved person has an external email associated with their address number in EnterpriseOne, the Enterprise Server must be configured with an SMTP server to deliver the email to an external email system.
- Sign in to the EnterpriseOne development client and launch Object Management Workbench (OMW).
- Find the F54HS02 – Incident People table and add it to a project.
- Check out F54HS02.
- To edit the object, select the Design Tools tab, and then click Start Table Trigger Design Aid.
- Select the After Record is Inserted event.
- B98ORCH only accepts strings as inputs, so create the
following two variables to convert non-string values to
strings using DD item TSTRING:
evt_szIncidentNumber_TSTRING

evt_szAddressNumber_TSTRING - Create the following two assignment statements, with
conversions, for Address Number and Incident Number to be
assigned to the two string variables:
VA evt_szAddressNumber_TSTRING = [TK Address Number]

VA evt_szIncidentNumber_TSTRING = [TK Incident Number] - Add the function call to B98ORCH, mapping the parameters as
shown in the following image:
Note: This call uses the provided name-value pairs to send the three input values to the orchestration. The names are provided as literal strings and the values are from the table column values (or variables that were set with table column values).

Parameter Mappings for the Call to B98ORCH - Save the changes to Event Rules Design, and then check in the changes to the project.
- Build and test the package in your test environment before testing invoking the orchestration from the event.
 Testing
Invoking the NewIncidentPerson Orchestration from an
EnterpriseOne Event
Testing
Invoking the NewIncidentPerson Orchestration from an
EnterpriseOne Event
Add a person to an incident in P54HS00 to test invoking the NewIncidentPerson orchestration automatically from the event. Make sure you have access to the involved person’s Work Center or external email system.
- Access P54HS00 in EnterpriseOne.
- Add an incident and a person, or simply add a person to an existing incident.
- Access the person’s Work Center or external email system and
verify that the involved person received a message about the
incident.
If the message was received, then congratulations! You properly configured an event in EnterpriseOne to invoke an orchestration.
 Want
to Learn More?
Want
to Learn More?
- “Creating Orchestrations with Orchestrator Studio” in the JD Edwards EnterpriseOne Tools Orchestrator Guide
- “Creating Table Event Rules” in the JD Edwards EnterpriseOne Tools Table Design Guide
- "Configuring the B98ORCH Business Function to Invoke an Orchestration or Notification" in the JD Edwards EnterpriseOne Tools APIs and Business Functions Guide