 Creating
an Orchestration with Multiple Components
Creating
an Orchestration with Multiple Components  Before You Begin
This Oracle By Example (OBE) shows you how to create a multifaceted orchestration that retrieves and evaluates customer data from EnterpriseOne and invokes another orchestration if certain criteria is met.
Background
This OBE employs the following scenario to show you how to create a complex orchestration.
You need an orchestration that contains a condition to determine if a hold should be placed on a customer’s credit, and if so, invokes the Credit Hold orchestration (created in the “Creating a Simple Orchestration in the JD Edwards Orchestrator Studio” OBE). To do so, you will perform the following tasks:
- Create a data request to retrieve a customer’s credit limit
- Create a data request to retrieve a total sum of outstanding customer order amounts
- Create a rule with a condition for placing a hold on a customer’s credit
- Create a connector service request to invoke the Credit Hold orchestration
- Add the data requests, rule, and connector to a new “Customer Credit Check” orchestration
- Test the orchestration in the Orchestrator Client
What Do You Need?
- Before performing the steps in this OBE, you must create a Credit Hold orchestration following the steps in the “Creating a Simple Orchestration in the JD Edwards Orchestrator Studio” OBE.
- Orchestrator Studio 5.1.0 or higher deployed in a JD Edwards
EnterpriseOne test environment with a minimum of EnterpriseOne
Tools 9.2.1.4.
-OR- - The latest JD Edwards EnterpriseOne Trial Edition.
 Creating
a Data Request to Retrieve a Customer's Credit Limit
Creating
a Data Request to Retrieve a Customer's Credit Limit
- Sign in to the Orchestrator Studio.
- On the Orchestrator Studio Home page, click the Service Requests icon.
- On the Service Requests page, click Create Service Request and then Data Request from the drop-down list.
- On the Data Request page, complete the following fields:
Service Request =Get Customer Credit Limit
Enter Short Description =Retrieve customer credit limit
- Click the Product Code drop-down list and select 55 for a customer product code.
- In the Table/View Name field, enter
V03012Fand click the Load button to load the fields from this business view.
This business view contains the F0101 and F03012 tables for the Customer Master program. - Set up a condition to fetch a customer’s credit limit:
- In the Fields
grid, click the Filter
 icon next to Address Number [F0101].
The field appears in the Conditions box in the Filter Criteria area on the right. - In the Filter Criteria area on the right, make sure Match All is selected for the Match Type.
- Make sure the equals (=) operand is selected and leave the variable that appears in the field by default. The orchestration uses this variable to pass the address book number of the customer to EnterpriseOne.
- In the Fields
grid, click the Filter
- To define the field values that you want the data request to
return:
- In the Fields
grid on the left, click the Return
 icon next to the following fields:
Credit Limit [F03012]
Alpha Name [F0101] (Scroll down in the grid to find this field.)
This places the fields in the Return Fields and Variable Names section on the right. - In the Return
Fields and Variable Names section, enter the following
variables for the return fields. Later, you will use these
variables to map these return values to another step in
the orchestration:
Credit Limit [F03012] =Credit Limit
Alpha Name [F0101] =Name
- In the Fields
grid on the left, click the Return
- Click Save.
 Creating
a Data Request to Retrieve a Total Sum of Customer Order Amounts
Creating
a Data Request to Retrieve a Total Sum of Customer Order Amounts
- In the upper left corner of the Orchestrator Studio, click
the
 icon to return to the Service Requests page.
 - On the Service Requests page, click Create Service Request and then Data Request from the drop-down list.
- On the Data Request page, complete the following fields:
Service Request =Order Totals
Enter Short Description =Calculate total sum of order amounts - Click the Product Code drop-down list and select 55 for a customer product code.
- In the Table/View Name field, enter
F4201and click the Load button.
This is the Sales Order table that contains customer order amounts. - Click and slide the Aggregation toggle to the right to enable it.
- Set up a condition to retrieve order amounts by customer
over a specified period of time:
- In the Fields
grid, click the Filter
icon next to the following fields:
Address Number
Order Date
The fields appear in the Conditions box on the right in the Filter Criteria area.
- In the Conditions box, for Address Number, make sure that = is the operand
- In the adjacent
field, change the ${Address Number 1} variable to
Customerfor the variable name, so it looks like this:
Address Number - For Order Date,
select > (greater than) for the
operand and then replace the variable name in the adjacent
field with
01/01/2016, so it looks like this:
Order Date
- In the Fields
grid, click the Filter
- To specify the aggregate or the total sum of order amounts
that you want returned:
- In the Fields grid
on the left, scroll down to the Order Amount row and click
the Aggregate
 icon.
icon. - In the pop-up that appears on the right side of the page, select Sum.
- In the Aggregations and Variable Names area on the right, click the Include Count check box.
- In the field
adjacent to Order Amount: Sum, enter
Total Order
                        Amount
for the variable name.
The variable enables you to map the total sum amount returned from this data request to another orchestration step.
- In the Fields grid
on the left, scroll down to the Order Amount row and click
the Aggregate
- Click Save.
 Creating
a Rule with a Condition for Placing a Hold on a Customer’s
Credit
Creating
a Rule with a Condition for Placing a Hold on a Customer’s
Credit
Create a rule with condition for order amounts that are greater than a customer’s credit limit.
- In the upper left corner of the Studio, click the icon twice to access the slideout menu,
and then click the Rules icon.
- On the Rules page, click New Rule.
- In the area on the right, complete the following fields for
the new rule:
Rule =Over Credit Limit
Enter Short Description> =Condition for open order amount greater than credit limit - Click the Product Code drop-down list and select 55 for a customer product code.
- To enter a condition for open order amounts that exceed the
credit limit:
- In the first row in the grid, in the Rule Type column, select Numeric from the drop-down list.
- In the Value 1
column, enter
OpenOrderAmtas a variable for this input. - In the Operator column, select > (greater than symbol).
- In the Value 2
column, enter
CreditLimitas a variable for this input.
- Click Save.
 Creating
a Connector Service Request to Invoke the Credit Hold
Orchestration
Creating
a Connector Service Request to Invoke the Credit Hold
Orchestration
-
In this task, create a connector service request to invoke the
Credit Hold orchestration that you created in the “Creating a
Simple Orchestration in the JD Edwards Orchestrator Studio” OBE.
If the condition in the rule is met, the orchestration uses this
connector service request to invoke the Credit Hold
orchestration to place a hold on a customer’s credit.
- In the upper left corner, click the
icon and from the slideout menu, and then click the Service
Requests icon.
- On the Service Requests page, click Create Service Request, and then click Connector.
- Complete the following fields:
Service Request =Credit Hold Connect
Enter Short Description =Connect to Credit Hold orchestration - Click the Product Code drop-down list and select 55 for a customer product code.
- Click in the Connection field, and under
the Orchestrator Node select the Local Orchestrations
connection.
The URL to the location of the orchestrations appears next to the field. - Click in the Orchestration field and
select Credit Hold.
The input defined in the Credit Hold orchestration appears in the grid, mapped to the variable for the connector input.

Orchestration Input - Click Save.
 Adding
the Data Requests, Rule, and Connector to a New “Customer Credit
Check” Orchestration
Adding
the Data Requests, Rule, and Connector to a New “Customer Credit
Check” Orchestration
In this task, you will:
- Create a “Customer Credit Check” orchestration with Customer Number as an input.
- Add the data requests, rule, and connector components as steps in the orchestration.
- Map the orchestration input to the inputs defined in the orchestration steps.
- In the upper left corner of the Orchestrator Studio, click
the icon twice and then
click the Orchestrations icon in the side
panel.
- On the Orchestrations page, click New Orchestration.
- Complete the following fields:
Orchestration =Customer Credit Check
Enter Short Description =Check customer credit limit and if exceeded, place a credit hold on customer - Click the Product Code drop-down list and select 55 for a customer product code.
- In the first row of the Input / Value Type grid, enter
Customer
                    Number
in the Input column and then in the Value Type drop-down list, select Numeric. - Add the “Get Customer Credit Limit” data request as the
first step in the orchestration:
- Next to Orchestration Steps, click Add Step.
- In the Enter Type
of Step pop-up, select Service Request
from the drop-down list, and then click OK.
The Service Request step appears in the grid.

Service Request - At the end of the Service Request row, click the down arrow and select Get Customer Credit Limit from the drop-down list.
- Add the “Order Totals” data request as the next step in the
orchestration:
- Select the first Service Request row, and then click Insert Step After.
- In the Enter Type of Step pop-up, click the drop-down list and select Service Request, and then click OK.
- At the end of the new Service Request row, click the down arrow and select Order Totals from the drop-down list.
- Add the “Over Credit Limit” rule as the next orchestration
step:
- Select the last row in the Orchestration Steps grid, and then click Insert Step After.
- In the Enter Type of Step pop-up, click the drop-down list and select Rule, and then click OK.
- At the end of the new Rule row, click the down arrow and select Over Credit Limit from the drop-down list.
- Expand the Rule
step and in the next row, select True in
the Action column.
This specifies that if the condition in the rule in the preceding step is met or is “true,” then the orchestration will invoke the next step in the orchestration.
- Add the “Credit Hold Connect” connector as the final
orchestration step:
- Select the last row in the Orchestration Steps grid, and then click Insert Step After.
- In the Enter Type of Step pop-up, select Service Request from the drop-down list, and then click OK.
- At the end of the
new Service Request row, click the down arrow and select Credit
Hold Connect from the drop-down list.
At this point, the orchestration steps and inputs should look like this: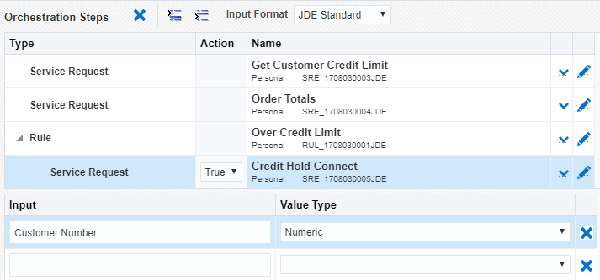 Orchestration
Steps
Orchestration
Steps
- Click Save.
Notice that the Orchestrator Studio adds additional inputs to the grid. The inputs are return values defined with variables in the orchestration steps. - Map orchestration inputs to the inputs defined in each
orchestration step:
- Select the Get Customer Credit Limit step in the Orchestration Steps grid.
- In the Transformations grid on the right, next to the ${Address Number 1} input, click the Orchestration Input drop-down list and select Customer Number.
- Select the Order Totals step in the grid.
- In the Transformations grid, next to the ${Customer} input, click the Orchestration Input drop-down list and select Customer Number.
- Select the Over Credit Limit step in the grid.
- In the
Transformations grid, map the rule inputs to the following
orchestration inputs:
Rule Input Orchestration Input OpenOrderAmt Total Order Amount CreditLimit Credit Limit
- Select the Credit Hold Connect step in the grid. You might have to expand the Rule step to see it.
- In the
Transformations grid, map
${Customer}to the Customer Number orchestration input
- Click Save.
 Testing
the Customer Credit Check Orchestration in the Orchestrator
Client
Testing
the Customer Credit Check Orchestration in the Orchestrator
Client
Before you test the orchestration, you must set the customer’s credit limit to $25.
To set the customer’s credit limit:
- Access EnterpriseOne and enter
P01012in the Fast Path to access Work With Addresses. - Search and select your customer number, and then select A/R from the Row menu.
- Click the Credit tab and in the Credit
Limit field, enter
25. - If the Credit Message is already set to 7, clear it.
- Click OK.
To test the Customer Credit Check orchestration:
- Access the Orchestrator Client. You might have it open in another tab, or click the Tools link in the upper right corner of the Orchestrator Studio and click the Orchestrator Client icon to access it. You will most likely need to sign in again.
- Click XML Cache Refresh.
- In the Orchestrator Client, click the Orchestration Name drop-down list and select the Customer Credit Check orchestration.
- In the Inputs area, enter a customer number for the Customer
Number input.
Make sure you are using a customer number in the demo data provided with the EnterpriseOne data pack. - Click Run.
Look for the green check mark or a yellow caution symbol to see if the JD Edwards Orchestrator successfully processed the orchestration.
To verify the customer credit hold was applied in EnterpriseOne:
- Access EnterpriseOne and enter
P01012in the Fast Path to access Work With Addresses. - Search and select your customer number, and then select A/R from the Row menu.
- On Work With Addresses, search for and select the customer from the grid and click OK.
- Click the Credit tab and verify that the
Credit Message status is
7 – On Credit Hold per
                    Accounting
.
To verify the “Over Credit Limit” message was sent:
- In EnterpriseOne, access the Work Center program (P012503).
- Expand the Personal In Basket queue, where you should see the “Over Credit Limit” message for your customer.
- Select the message to view it.
- Click the Message Text drop-down list, select Customer Master Revision.jde, and then click the shortcut displayed in the message.
- This
shortcut should take you to the customer’s record in Customer
Master Revisions, where you can click the Credit
tab and see the
7 – On Credit Hold per Accountingstatus.