 Creating
an Orchestration for Adding Multiple Records to EnterpriseOne
Creating
an Orchestration for Adding Multiple Records to EnterpriseOne Before You Begin
This tutorial shows you how to create an orchestration that uses an array input to create multiple inventory items in EnterpriseOne.
Background
In the Orchestrator Studio, you can create an orchestration that uses an array input to pass repeating values to EnterpriseOne. Used in conjunction with the “Iterate Over” feature, you can configure the orchestration to repeatedly invoke a form request to pass a set of data in the array to create multiple records in EnterpriseOne.
What Do You Need?
- Orchestrator Studio 6.1.0.0 or higher deployed in a JD Edwards EnterpriseOne test environment with a minimum of EnterpriseOne Tools 9.2.2.4.
- Access to the Orchestrator Studio and permissions to create orchestration and service request components, which are managed as user defined objects (UDO). See “Setting Up User Access to the Orchestrator Studio” in the JD Edwards EnterpriseOne Tools Orchestrator Studio Guide.
- Access to the Process Recorder in EnterpriseOne, which is enabled through UDO feature security.
 Using
the Process Recorder to Create a Form Request
Using
the Process Recorder to Create a Form Request
In this task, you will use the Process Recorder in EnterpriseOne to create a form request.
- Access the EnterpriseOne web client.
You can access the EnterpriseOne web client from the Tools page in the JD Edwards EnterpriseOne Orchestrator Studio. - Click the drop-down menu next to your user name and select
Record a Process.
If this option is not available, see the “What Do You Need” section in this OBE. - In the Process Recorder, click the Start button.
- Using Fast Path or the Navigator menus, access the Item Master (P4101) application, version ZJDE0002.
- On Work With Item Master Browse, click Add.
- On Item Master Revisions, complete the following required fields:
- Item Number = Enter a unique item.
- Description =Enter a description.
- Stocking Type = Enter a valid code.
You may enter data in additional optional fields, which makes these fields available as additional inputs to the form request. - Press OK.
For version ZJDE0002, the Additional System Information screen displays. For this example, no data is required. - Click OK to proceed.
- On Item/Branch Plant Info, enter a valid Branch/Plant.
- On Primary Location, no data is required. Click OK
to proceed.
The Item Master Revisions screen is displayed with the Previous Item Number. - In the Process Recorder, click Stop.
- Complete these fields:
- Name =
Add Item. - Description =
Add a new item. - Product Code = Select a customer product code, 55 – 59.
- Before clicking save, you can click any controls that contain values that you want the form request to return. For this example, click the Previous Item Number field, which the Process Recorder adds to the Return Controls box.
- Click Save.
EnterpriseOne saves the recording as a service request UDO. - Close the Process Recorder.
 Creating
the Add Items Orchestration
Creating
the Add Items Orchestration
Add the new form request to a new orchestration called “Add Items.”
- Access the Orchestrator Studio.
- Click the Orchestration icon and then on the Orchestrations page, click the New Orchestration button.
- On the Orchestration design page, complete these fields:
- Orchestration =
Add Items - Enter Short Description =
Add multiple inventory items. - Click the Product Code drop-down list and select a customer product code, 55 - 59.
- Change the Input Format to Generic.
The generic JSON input format is simpler to produce, especially when an orchestration includes an array as an input, as in this example. Later in this exercise, you will use the JSON to test this orchestration in the Orchestrator Client. - Add a step to the orchestration: click Add Step (+), select Service Request, and then click OK (+).
- At the end of the Service Request row, click the down arrow and select the new Add Item form request that you created in the previous task using the Process Recorder.
- Expand the Orchestration Inputs section located below the Orchestration Steps grid.
- In a row in that section, add an input called Item
List and set the Type to Array.
The Orchestrator Studio displays indented rows after the array, so you can define the inputs for the array. - Add the following inputs for the Item List array:
ItemDescriptionStocking TypeBranch- If not already selected, select the Add Item step in the Orchestration Steps grid, and then in the Transformations area, select Item List from the Iterate Over drop-down list.
- In the Transformation grid, use the Available Values
drop-down list to map the orchestration inputs to the form
request (service request) inputs:
Service Request Input Available Values Product No Item Description Description Stocking Type Stocking Type Branch/Plant Branch - For the P4101_Version input, which is a variable to give the
orchestration designer the option to pass in a specific
version, enter
ZJDE0002in the Default Value column. - Click Save.
The orchestration should look like this: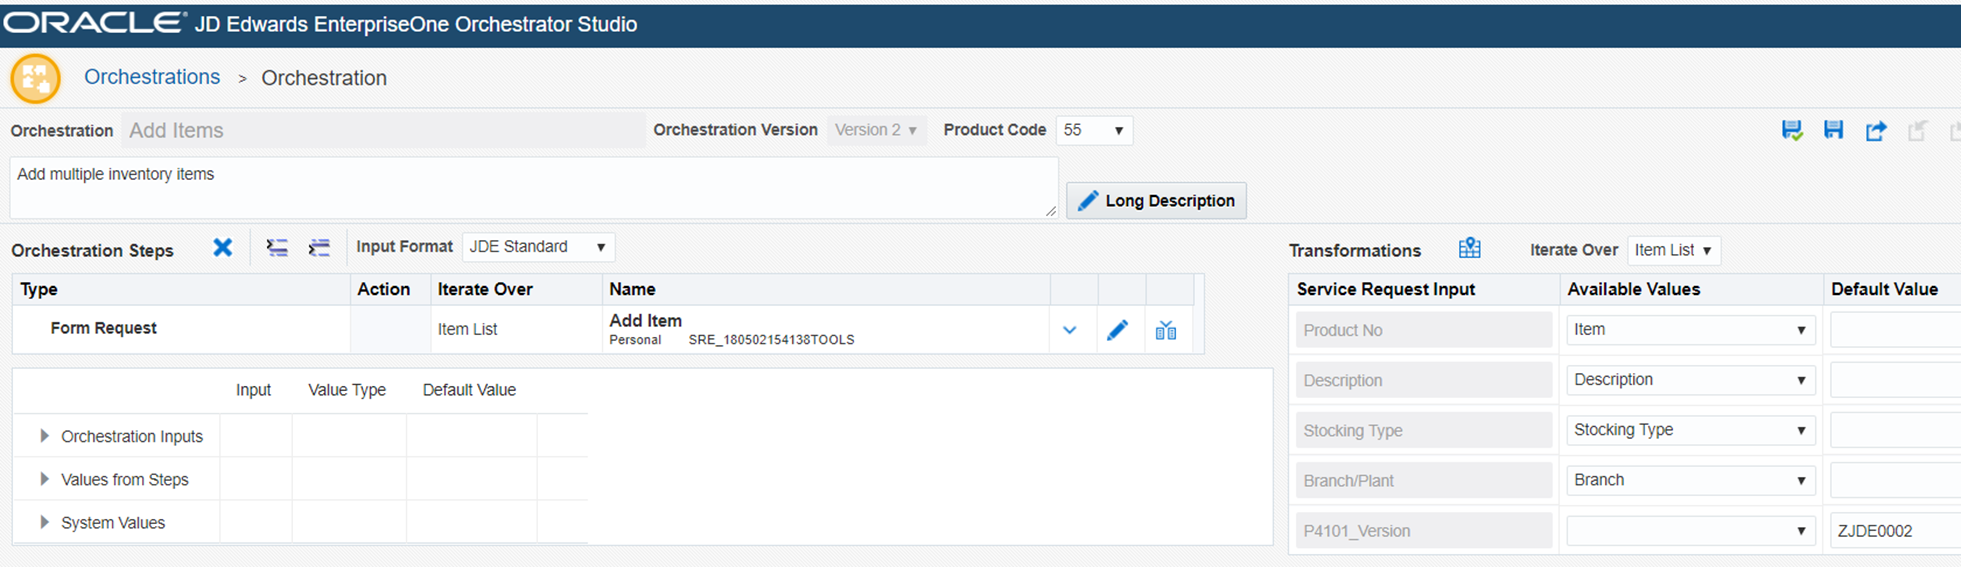
Add Items Orchestration - Click the Orchestration Output button.
- Click Add All.
This adds the Previous Item Number column, which was the last control selected when you recorded the form request in the Process Recorder. - Change the Output column to Item Number.
You have to enter a name for this column because this column is initially hidden in the form, so therefore no description is available. - Click Close to return to the Orchestration design page.
- Click Save.
 Testing
the Add Items Orchestration
Testing
the Add Items Orchestration
- In the Orchestrator Studio, access the Tools page and then click the Orchestrator Client icon.
- Sign in to the Orchestrator Client with the same credentials used to access the Orchestrator Studio.
- Click XML Cache Refresh.
- In the Orchestrator Name drop-down list, select Add Items.
- Enter valid data for all of the inputs and click Run.
This initial run will not add an item since the Add Item step is run only for rows inside an Item List array. - Copy the JSON code in the Input section, select the JSON Input check box, and then paste the JSON in the box below.
- Wrap the message in an Item List array, as shown in the
following example, which will add two items:
{ "Item List": [ { "Stocking Type" : "S", "Branch" : "30", "Description" : "test 1", "Item" : "Item 1" }, { "Stocking Type" : "S", "Branch" : "30", "Description" : "test 2", "Item" : "Item 2" } ] } - Click Run.
If successful, the Output section displays a green check mark and a response in JSON.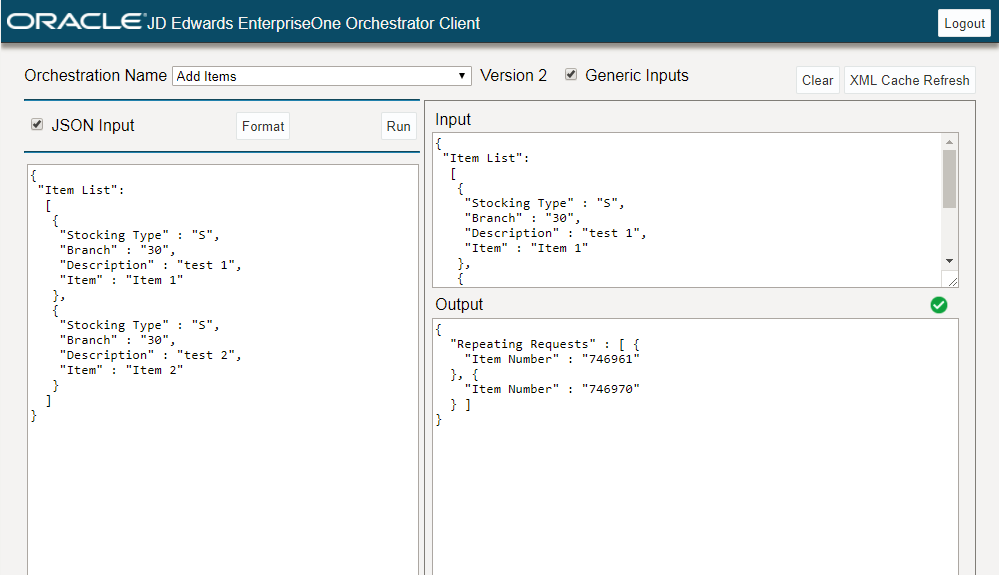
Output Section