Creating
an Orchestration to Stop an Instance of Server
Creating
an Orchestration to Stop an Instance of Server Before You Begin
This 30-minute tutorial shows you how to create an orchestration to stop an instance of server.
Background
You will create an orchestration with an Open API connector to call a REST service that retrieves the Server Manager information. You will add the service request and rules to the orchestration, and then map the orchestration input to the input defined in the service requests. Last, you will test the orchestration to verify that it returns the requested data.
In this orchestration, you will only provide the required inputs to the orchestration, and the rest of the tasks are performed automatically.
The orchestration for stopping an instance of server involves creating and adding the following steps:
- Open API connection to list all the API calls that can be performed on Server Manager
- Service Request to retrieve the state of an instance
- Service Request to stop an instance of the server
- Rule to check if an instance of the server is running
In the Orchestrator Studio, you can configure a connector service request to invoke a REST service. The Connector design page in the Orchestrator Studio provides a test feature that enables you to test the connector and view the JSON response of the REST service call.
What Do You Need?
- Orchestrator Studio 7.3 or higher deployed in a JD Edwards EnterpriseOne test environment with a minimum of EnterpriseOne Tools 9.2.3.4.
- An AIS Server version 9.2.3.0 or higher is running and accessible (based on network configuration) to your Orchestrator Studio.
- An instance of server running on the Server Manager Console 9.2.3.4 or higher to which you want to make a connection.
 Creating
a Connection to the Server Manager Console
Creating
a Connection to the Server Manager Console
A connector service request requires a connection, which will list all the REST services (API calls) that can be invoked via the Server Manager Console.
In this task, you will create an OpenAPI connection to list all the REST services on the Server Manager.
- On the Orchestrator Studio Home page, click the Tools link.
- On the Tools page, click the Connections icon.
- Click the New Connection button.
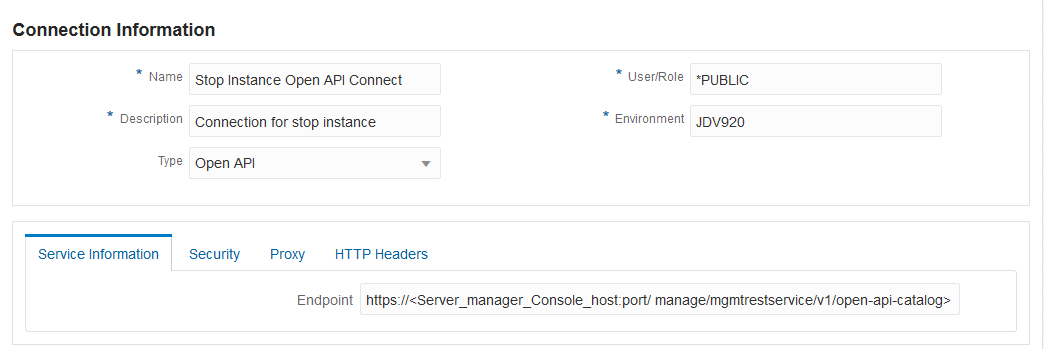
- On Connection Information, complete these fields:
- Name =
Stop Instance Open API Connect - Description =
Connection for stop instance - Type = Select Open API from the drop-down list.
- User/Role. Enter the user authorized to access the connection. The user can be an EnterpriseOne user, role, or *PUBLIC.
- Environment. Enter the environment where the connections reside.
- On the Service Information tab, in the Endpoint field, enter the URL for accessing the Open API documentation, through which you can access the Server Manager REST services. For example:
- On the Security tab, select Basic Authentication
and then complete these fields to enable access to the Server
Manager Console:
User = Enter an EnterpriseOne user authorized to access the Server Manager Console.
Password = Enter the password for the EnterpriseOne user.
- Enter proxy information on the Proxy tab if necessary for your network configuration.
- Save the record. The Open API connection should look like this:
https://server_manager_console_host:port/manage/mgmtrestservice/v1/open-api-catalog
 Creating
the Connector Service Request to Retrieve the State of an
Instance
Creating
the Connector Service Request to Retrieve the State of an
Instance
In this task, you will create a connector service request that retrieves the state of the managed instance within Server Manager Console.
- On the Orchestrator Studio Home page, click the Service Requests icon.
- On the Service Requests page, click the Create Service Request button and select Connector.
- On the Connector page, complete the following fields:
- Service Request =
Instance State SR - Enter Short Description =
State of an instance in the Server Manager. - Click the Product Code drop-down list and select 55 for a customer product code.
- Click the Connection field, and under the Open_API category, select the Stop Instance Open API Connect connection, which you created in the previous task.
- Click the API drop-down list and select /instancestate.
- Click the HTTP Method drop-down list and select GET. As soon as you select the HTTP Method value, the API Description and API Summary fields are displayed with corresponding values for the selected API. Also, the Pathing and Parameters sections are automatically filled with the appropriate values.
- To limit the output to a few returned values, enter the following output values in the Output section:
- Save the service request.
- To test the service call, click the Test button and make sure you receive the expected output. The Instance State SR service request should look like this:
| Output | Variable Name |
|---|---|
| instanceState | instanceState |

 Creating
the Connector Service Request to Stop an Instance
Creating
the Connector Service Request to Stop an Instance
In this task, you will create a connector service request to stop an instance within the Server Manage Console.
- On the Orchestrator Studio Home page, click the Service Requests icon.
- On the Service Requests page, click the Create Service Request button and select Connector.
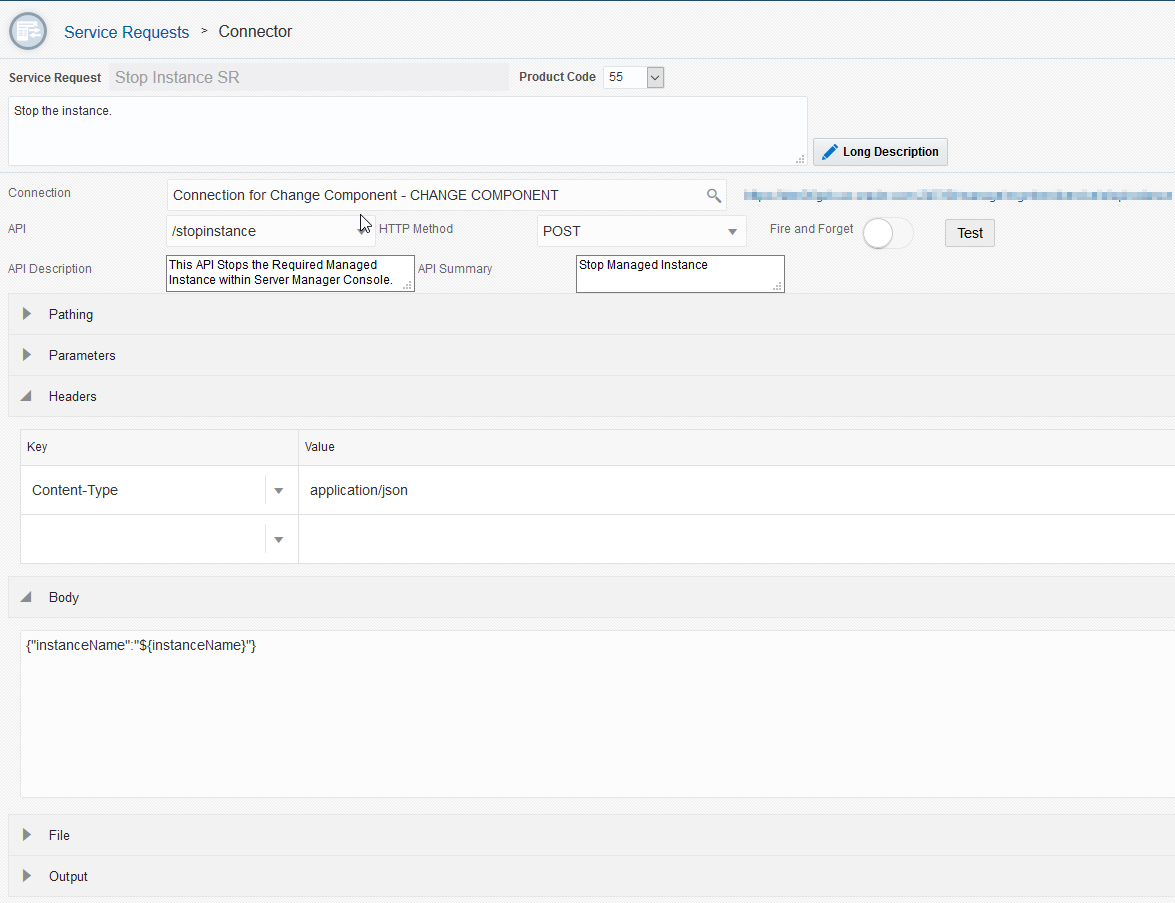
- On the Connector page, complete the following fields:
- Service Request =
Stop Instance SR - Enter Short Description =
Stop the
                      instance
. - Click the Product Code drop-down list and select 55 for a customer product code.
- Click the Connection field, and under the Open_API category, select the Change Component connection, which you created in the previous task.
- Click the API drop-down list and select /stopinstance.
- Click the HTTP Method drop-down list and select POST. As soon as you select the HTTP Method value, the API Description and API Summary fields are displayed with corresponding values for the selected API. Also, the Pathing and Parameters sections are automatically filled with the appropriate values.
- Save the service request. The Stop Instance SR service request should look like this:
 Creating
a Rule to Check if an Instance is Running
Creating
a Rule to Check if an Instance is Running
In this task, you will create a rule to check if an instance is running.
- On the Orchestrator Studio Home page, click the Rules icon.
- On the Rules, click the New Rule button.
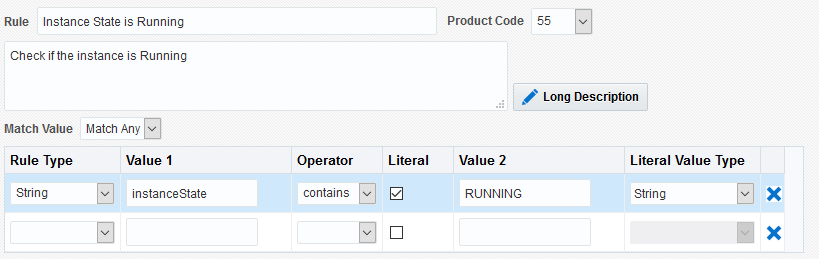
- On the Rules design page, complete the following fields:
- Rule =
Instance State is Running - Enter Short Description =
Check
                      if the instance is running
. - Click the Product Code drop-down list and select 55 for a customer product code.
- Select the Match Value drop-down menu and select Match Any.
- In the first row in the grid, complete the following columns to add a condition:
- Rule Type. Click the drop-down menu and select String.
- Value 1. Enter instanceState for the input name.
- Operator. In the drop-down menu, select contains from the list of operands.
- Literal. Click this check box to indicate a literal value.
- Value 2. Enter RUNNING as the value.
- Literal Value Type. Click this drop-down menu and select the format of the literal value as String.
- Click the Save button. The Instance State is Running rule should look like this:
 Creating
an Orchestration to Stop an Instance
Creating
an Orchestration to Stop an Instance
In this task, you will create an orchestration to stop an instance of a server in the Server Manager Console.
This task involves adding a service request (Instance State) created in the previous tasks to the orchestration, adding a rule (Instance is Running) to check if the instance is running, and adding a service request (Stop Instance) to stop the instance of the server. Lastly, you will map the orchestration input to the input defined in the service requests.
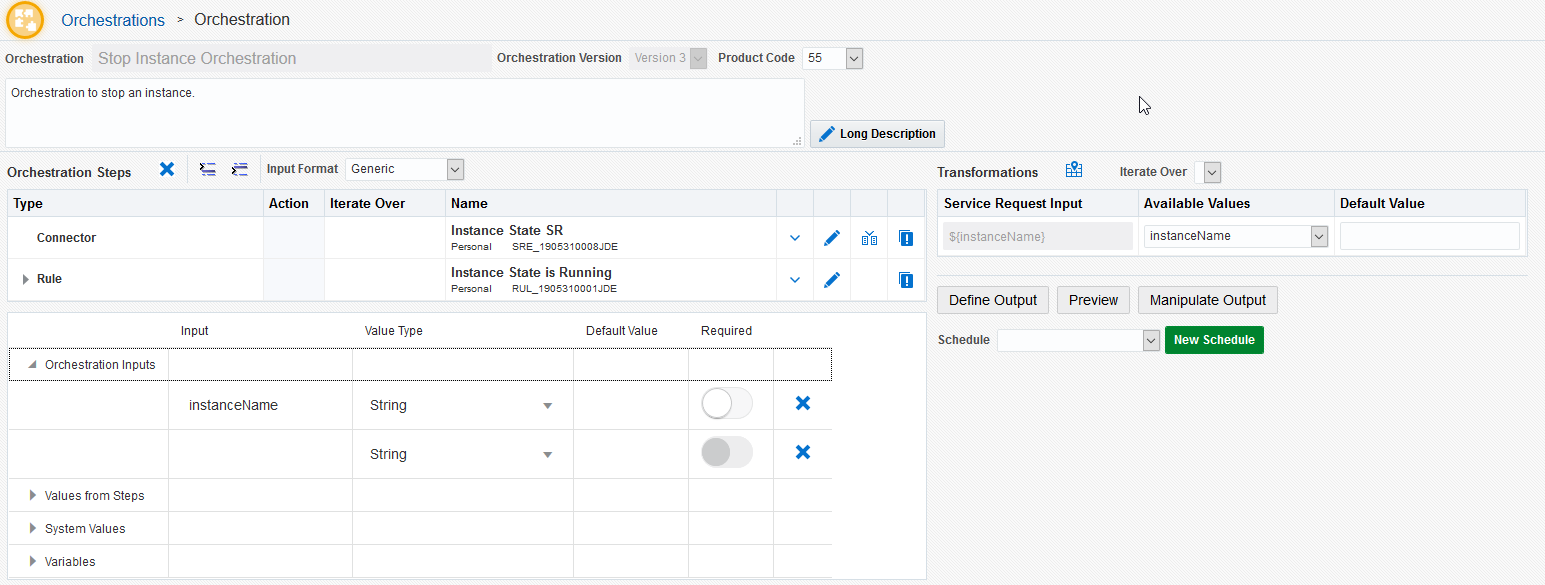
- Navigate to the Orchestrations page and click the New Orchestration button.
- On the Orchestration design page, complete these fields:
- Orchestration =
Stop Instance Orchestration - Enter Short Description =
Orchestration to stop an instance - Click the Product Code drop-down list and select 55 for a customer product code.
- In the Orchestration Steps area, click the Add Step button (+), select Service Request, and then click OK to add a service request to the steps.
- At the end of the row with the Connector service request, click the down arrow and select Instance State SR from the drop-down list.
- Click the Insert Step After icon, select Rule, and then click OK to add a rule to the steps.
- At the end of the row with the rule, click the down arrow and select Instance State is Running from the drop-down list.
- In the step that is added, select True in the Action column, then in the Enter Type of Step field that pops up, select Service Request from the drop-down list and click OK.
- At the end of the row with the service request, click the down arrow and select Stop Instance SR from the drop-down list.
- Enter the orchestration input:
- Expand the Orchestration Inputs section.
- In the first row, enter
instanceNamein the Input column and in the Value Type drop-down list, select String. - Select the Instance State SR Connector step.
In the Transformations grid,notice that the ${
instanceName}input, which is the input to this connector service request, is displayed in the first row. To map the orchestration input to this service request input, click the Available Values drop-down list and select instanceName. - Select the Instance State is Running Rule step. In the Transformations grid, notice that the ${
- Select the Stop Instance SR Connector step.
In the Transformations grid, notice that the ${instanceName} input, which is the input to this connector service request, is displayed in the first row. To map the orchestration input to this service request input, click the Available Values drop-down list and select instanceName. - Save the Orchestration. The orchestration should look like this:
instanceState}
input, which is the input to this rule, is displayed in the
first row. To map the orchestration input to this rule input,
click the Available Values drop-down list and
select instanceState.
 Testing
the Orchestration
Testing
the Orchestration
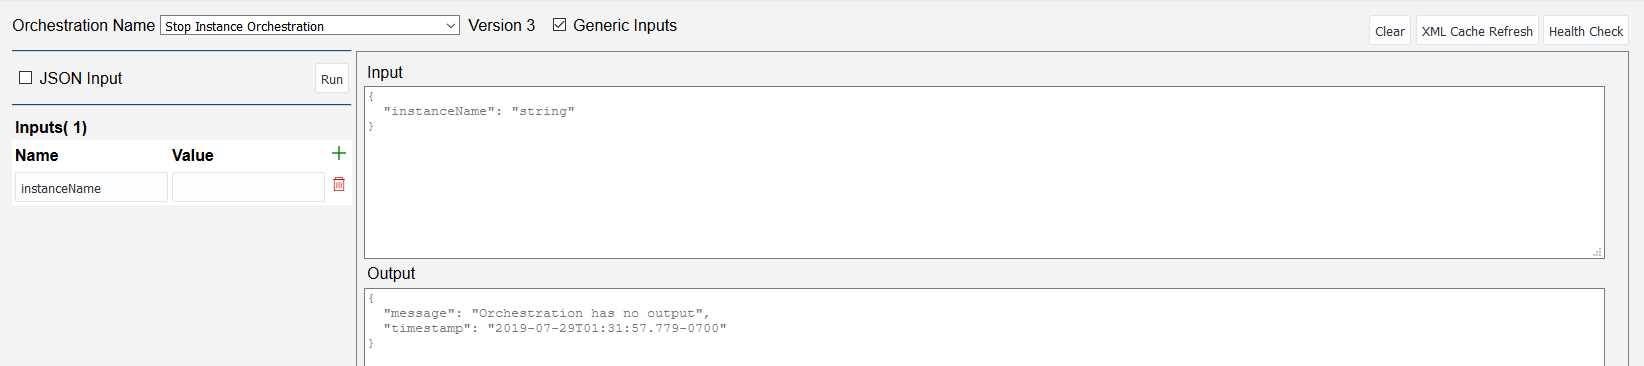
Use the Orchestrator Client to test the orchestration and verify that it returns the output as defined in the orchestration.
- In the Orchestrator Studio, click the Tools link to access the Tools page, and then click the Orchestrator Client icon.
- Sign in with the same credentials that you used to access the Orchestrator Studio.
- In Orchestrator Client, select Stop Instance Orchestration from the Orchestration Name drop-down list. The Orchestrator Client for the Stop Instance Orchestration should look like this:
- In the Inputs area, enter values for the input: instanceName
- Click Run. The output should show results for the inputs that you entered.