Microsoft Windows
To install the Server Manager Agent on Microsoft Windows target machines:
Log on to the machine onto which you are installing the Server Manager Management Agent.
Change to the directory in which you extracted the Server Manager Agent installer as described in the subsection of this chapter entitled: Distribute and Unzip the Management Agent Installer Application.
Depending on your Tools release, launch the OUI installer according to these notes:
-
JDK/JRE:
-
For Tools Release 9.2.2.0 and later: A 64-bit JDK or JRE, version 1.8 or later must be installed before starting the Server Manager Agent installer.
-
For Tools Releases prior to 9.2.2.0: A JDK is included in the installer. Therefore, a separate JDK is not required.
-
Redistributables:
-
For Tools Release 9.2.9 and Later: No Microsoft Visual Studio Redistributables are required prior to running the Server Manager Agent installer. However, you may need to install Microsoft Visual Studio Redistributables for EnterpriseOne to run. Refer to the JD Edwards EnterpriseOne Certifications for more information.
-
For Tools Release 9.2.3.3 and Later: Microsoft Visual Studio 2017 and 2013 64-bit Redistributables must be installed prior to running the Server Manager Agent installer.
-
For Tools Releases prior to 9.2.3.3: Microsoft Visual Studio 2010 32-bit Redistributables must be installed prior to running the Server Manager Agent installer.
-
-
For Tools Release 9.2.3.3 and later: You must specify the location of the JDK or JRE on the command line. If the location is not specified, the installer will fail immediately.
-
For Tools Release 9.2.2.0 up to but not including 9.2.3.3: You can specify the location of the JDK or JRE on the command line. If the location is not specified, you will be prompted for it.
-
For Tools Releases prior to 9.2.2.0: Because a JDK is included in the installer, you will not be prompted for one.
To specify the location of a JDK or JRE on the command line:
Open a Windows Command window with Run as administrator.
Change directory (cd) to the directory in which you unzipped the installer. For example, if you followed the recommendation in Distribute and Unzip the Management Agent Installer Application the command would be:
cd
                        C:\SM_Agent\Disk1\install
Use this command to run
setup.exefollowed by the argument-jreLocand the directory to the JDK or JRE:setup.exe -jreLoc C:\PROGRA~1\Java\JRE18~1.0_1Note:Regarding the above command:
Include a space after the
-jreLocargument.The path to the JDK or JRE must be of the Windows short form, which is 8 + 3 format.
The specified JDK or JRE directory must contain this directory and executable:
bin\java.exe
To skip specifying the location of a JDK or JRE on the command line:
Do one of the following:
Follow the instructions above to run from a Windows Command window but without the
-jreLocargument.In Windows Explorer, right-click on
setup.exein the directory in which you unzipped the installer and select Run As Administrator. For example, if you followed the recommendation in Distribute and Unzip the Management Agent Installer Application the file will be located in this directory:C:\SM_Agent\Disk1\install\setup.exe
This process opens a Microsoft Windows command window as shown in the below example.

Tools Release 9.2.2.0 up to but not including 9.2.3.3. If you did not specify the
location of a JDK or JRE using the -jreLoc argument, the installer
prompts you to specify the location of that at a command prompt.
For the 9.2.2.0 and greater, the installer will fail if the JDK/JRE is not at least Version 1.8. Upon failure it displays the following error:
After the installer validates existence of the JDK in the specified location, the OUI installer user interface appears. All further installer behavior remains the same as previous Tools Releases.

On Welcome, click the Next button.

On Specify Home Details, complete these fields:
Name:
Enter a name for the Management Agent. The default name is:
EOne_Management_Agent
Path:
The installer automatically detects the root drive location on the Microsoft Windows machine and by default appends this value:
jde_homeNote:Although jde_home is the default and recommended setting, you can specify any value to replace the default value.
The directory that you specify cannot already exist.

On Welcome to the Wizard for JD Edwards Server Manager Management Agent, click the Next button.

On Select Agent Target's Bitness, select the bitness of the targets that the Server Manager Agent will monitor and click the Next button.
Note:These considerations apply to bitness:
Each Server Manager Agent can manage only a single bitness of target objects. That is, it cannot manage multiple objects if the objects are a mixture of 32-bit and 64-bit bitness.
If the target being managed is a JD Edwards EnterpriseOne Enterprise Server or Deployment Server, select the bitness of the EnterpriseOne server.
If the target is not an EnterpriseOne server, you can select either 64-bit or 32-bit.
If more than one target is to be managed and the targets are of different bitnesses, you must install a Server Manager Agent for each bitness.
If 64 is selected, then this 64-bit JDK Home screen will appear:

If 32 is selected, then this 32-bit JDK Home screen will appear:

On Specify JDK Home Location and in the JDK Home field, enter or browse to the location of your Java Development Kit (JDK). In order to proceed, you cannot leave this value blank and you must specify an existing valid location. If you accepted the default path when you installed the JDK, it will be in a directory under this path:
c:\Program
                        Files\Java\jdk<version>
(64-bit JDK)c:\Program Files (x86)\jdk<version>(32-bit JDK)Note:These considerations apply to the JDK:
The JRE/JDK that you specified at the start of this installation was used to run the OUI installer. For Tools Release 9.2.2.0 and greater, it should have been a 64-bit JRE/JDK 1.8 or higher.
This prompt is for a JDK that the Server Manager Agent will use. You can use the same JDK specified at the start of the installation as long as it is the proper bitness and version.
- With Tools Release 9.2.26.2, if you want to use Server Management Agent with Oracle WebLogic Server 14.1.2.0, the path to Oracle JDK 17 must be provided.
The installer validates the specified location and copies the JDK to a location where it can be used by the runtime processes of JD Edwards EnterpriseOne.
Enter the appropriate JDK path and click the Next button. This JDK is a prerequisite to installing JD Edwards Enterprise and must meet the supported version as specified by the Oracle certifications.
Caution:If the JDK Home field is left blank and the Next button is selected, the following error will occur.

If a path to a non-existent JDK is entered in the JDK Home field and the Next button is selected, the following error will occur.

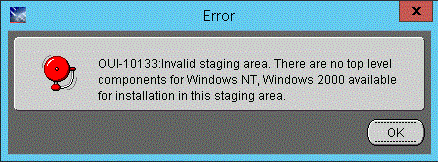
If a 64-bit target was selected and a 32-bit JDK directory was entered, the following error will occur.

If a 32-bit target was selected and a 32-bit JDK directory was entered, the following error will occur.

After the JDK location is validated, the Server Manager Management Agent screen is displayed.

On Server Manager Management Agent, complete these fields and click Next:
Management console machine
You must specify the host name of an existing Management Console machine.
The installer verifies the connection to the Management Console during the install. The Management Console machine must be started and the Management Console must be running in order to run the installer. In some cases, depending on your machine, operating systems, or network, you might need to fully qualify your machine name. For example, instead of specifying only
dnrramuvm2you might need to specifydnrramuvm2.mlab.jdedwards.com.Tip:You can determine the name of your Management Console from the information supplied on the Management Agent Installers screen. For navigation, refer to Step 2 in the section entitled: Obtain the Management Agent Installer Application. You can also view the
readme.txtfile in the root directory of the Management Console.-
Management console HTTP port
You must specify a valid port of an existing Management Console machine.
The installer verifies the port connection to the Management Console. The machine must be started and the Management Console must be running in order to run the installer.
Tip: You can determine the port of your Management Console from the information supplied on the Management Agent Installers screen. For navigation, refer to Step 2 in the section entitled: Obtain the Management Agent Installer Application.

-
Management console using SSL
You must specify whether Management Console is using SSL.
The installer verifies connection to the Management Console. The machine must be started, and the Management Console must be running in order to run the installer.Tip: You can determine whether SSL is used by your Management Console from the information supplied on the Management Agent Installers screen. For navigation, refer to Step 2 in the section entitled: Obtain the Management Agent Installer Application.
-
Specify if the Management Console is using Secure JMX.
Click the Next button to verify the machine and port values.

On Summary, review the information and click the Install button to begin the installation.

The Management Agent installer displays a panel showing the ongoing status of the installation.

When the installation finishes, the End of Installation screen is displayed.
Caution:Examine the Installer Logs. This screen also displays the location of the install log. Even though the screen indicates that the installation was successful, you should always check the logs before you attempt to run the Agent. The file name starts with "installActions" and includes a time stamp; it is located in
C:\oraInventory\logsdirectory. For example:CC:\Program Files\Oracle\Inventory\logs\installActions2018-11-09_01-21-51PM.logClick the Exit button.

On the Exit dialog, click the Yes button to confirm you want to exit the Management Agent installer.

After a successful installation, the Management Agent automatically starts and connects to the Server Manager Management Console. The resulting newly installed Managed Home can be viewed in the Management Dashboard of the Management Console.