Entering Data Server Information
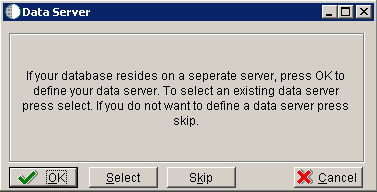
On Data Server, choose one of these options:
OK
If your database resides on a separate server, choose click OK to continue entering unique Data Server information.
Select
Click this option to select an existing Data Server.
Skip
Click this option if you do not want to define a Data Server. Continue with the Planner using the environment selection in Step 6 of this task.
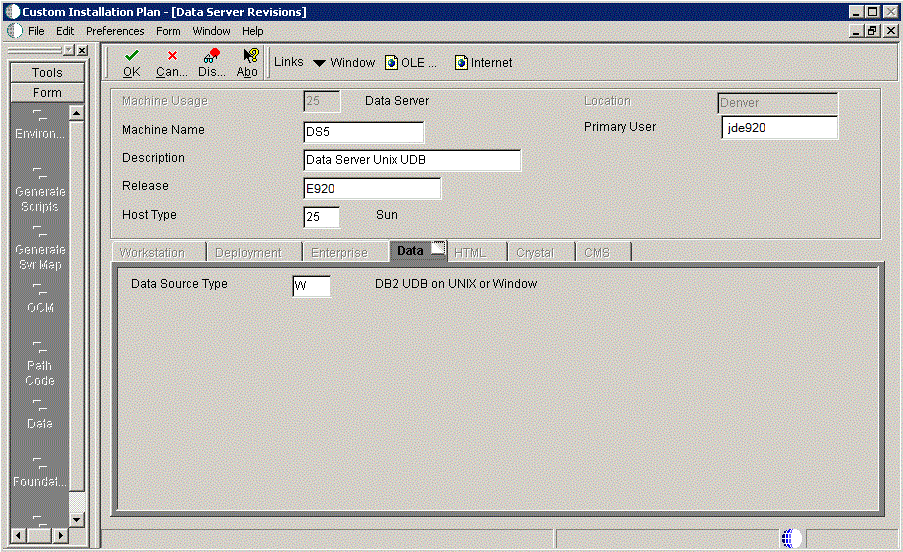
On Data Server Revisions, complete these fields:
Field
Description
Machine Usage
The default value of 25 indicates that this is a Database Server.
Machine Name
Enter the name of your Database Server. The name is case sensitive, should not exceed 15 characters, and should not contain any special characters.
This name is not case-sensitive in the Installation Planner. Therefore, regardless of underlying UNIX operating system considerations, you cannot name multiple Database Servers with the same name but with different cases. For example, you cannot name multiple Database Servers ORACLE and oracle.
Description
Enter a description of the Database Server machine.
Release
Enter the release number you are installing, for example, E920.
Host Type
Select the type of Database Server that you are adding to the plan. Values are:
10 — IBM i
25 — Sun Solaris
30 — RS\6000
35 — Linux
50 — Microsoft Windows (Intel)
80— Client - Microsoft Windows
90 — Client - Microsoft Windows
Location
The Installation Planner populates this field by default, based on previous selections.
Primary User
The user to whom an email is sent once a package is deployed. The default for Primary User is jde920.
This is also the UNIX user ID that is used to install Release 9.2 on the Enterprise Server. For example, JDE.
On the Data tab, complete the following field:
Field
Description
Data Source Type
Choose the type of data source. For example:
W - DB2 for Linux, Windows, and UNIX
Click OK.
To add another Data Server, click Yes and repeat steps 1 through 4 to define another Data Server.
On Data Source, click OK to continue entering unique shared data source information, or click Take Defaults to select the default data for the shared data sources.
On Location, select Yes to add another location, or click No to continue with Installation Planner.