Running the Platform Pack Installer
ALTER DATABASE SET DEFAULT SMALLFILE TABLESPACE;If you are installing the Enterprise Server and the Database Server on different machines, you cannot run the installer on the Enterprise Server and install the Database Server remotely. You must copy the installer images to the Database Server and run the installer on that machine. For the Enterprise Server only, you will need the image for disk1. For a Database Server, you will need the disk1 image plus the database disk images.
On the Linux
platform, you must install the Korn Shell (ksh) scripting language because all the
database install scripts use this language. If ksh is not installed in the
/bin directory, you must create a link to the install location
within the /bin directory. For example, if your ksh is installed in
/usr/local/bin, run this command:
ln -s
                    /usr/local/bin/ksh /bin/ksh
Prior to running the Platform Pack Installer, ensure your DB2 for Linux, Windows, and UNIX account on the Enterprise Server has proper rights as described in Ensuring Proper Rights are Assigned to the Enterprise Server Account for
Beginning with Tools Release 9.2, you must have a supported JRE already installed on the target Enterprise Server for which you are installing JD Edwards EnterpriseOne system code. The Platform Pack installer prompts for the location of the preinstalled JRE and upon execution copies the JRE to the location where it is accessible by the runtime of JD Edwards EnterpriseOne. The Platform Pack installer determines whether the JRE Home Location is valid and whether the JRE is a supported version. This JRE must be a 32-bit version.
To run the JD Edwards EnterpriseOne Platform Pack Installer:
Create a folder into which you will copy the .zip file of the Platform Pack image. In addition to the Platform Pack image, you will copy one .zip file image of the DB2 for Linux, UNIX, and Windows database database into this same directory. The directory can be any name but cannot contain spaces or special characters in the directory path. For example, the folder might be named:
/u01/UnixPPackCaution:Do not extract the database files into a directory other than the same base directory for the Platform Pack installation. You cannot end up with a functional installation with a structure such as:
/u01/UnixPPack/udb/udbExtract the two zip files within the root of the folder created above. Using the example in this guide, a correctly extracted structure is:
 Note:
Note:The byte counts in this example will likely not match those of your unzipped files.
In the above extracted structure, locate and execute the
runInstallerfile under the/installsubdirectory.Caution:You must sign on as the DB2 for Linux, UNIX, and Windows database instance owner in order to run the
runInstallerfile. You cannot run a OUI installer as root.The installer requires that you are signed on as the DB2 for Linux, UNIX, and Windows database database user, even if you are only installing the Logic portion of the Platform Pack.You must install the DB2 for Linux, UNIX, and Windows database database client software and sign on as the owner of that install when running the Platform Pack. The Installer uses information about this account to configure the
enterpriseone.sh. If you sign on as any other user, you will see errors during the install and will need to manually configure the database variables inenterpriseone.sh.Note:The Oracle Universal Installer takes a few minutes to start up.
On Welcome, click the Next button.
On Select Installation Type, choose your installation type:
Full
Choose this setup type if you wish to complete the Platform Pack installation with no further specifications. This installation option is recommended for most users and includes the required logic and database components for the Foundation (System) and the Prototype and Pristine environments.
Custom
This mode is recommended for experienced users, choose this setup type if you wish to complete the Platform Pack installation by specifying the installation of a subset of pre-defined environments.
Database
You should only use this option if you are installing a database intended to match an Oracle VM Template (OVM) for a JD Edwards EnterpriseOne Enterprise Server.
Tip:Database only. If you want to install the database only for a non-OVM configuration, you should use the Custom option and deselect the logic components.
Click the Next button.
On Specify Home Details, complete these fields:
Name
Caution:Do not accept the default value for this field. If any Oracle product is already installed, the installer automatically populates this field with the existing ORACLE_HOME values, which will be incorrect for JD Edwards EnterpriseOne.
Enter a unique name for the JD Edwards EnterpriseOne Platform Pack installation. For example:
JDE_PPack_920_HOME
Caution:Due to Java file and directory naming conventions, the directory name you specify here cannot contain special characters or blank (space) characters.
Path
Caution:Do not accept the default value for this field. If any Oracle product is already installed the installer automatically populates this field with the value corresponding to the home for the ORACLE_HOME of the installed product, which will be incorrect for JD Edwards EnterpriseOne.
Enter the mount point where you want the files installed on your Enterprise Server.
/u01/jdedwardsppack/e920Caution:Make sure to choose a disk or drive with enough space to accommodate required space for the mandatory logic server components and optionally the database components. If desired, later in the installation you can specify to install the database artifacts (such as tablespaces and tables) on a different disk and/or machine.
If you are rerunning the JD Edwards EnterpriseOne Platform Pack Installer, refer to Rerunning the Platform Pack Installer.
Click the Next button.
The Oracle Universal Installer displays a list of available JD Edwards EnterpriseOne product components, as shown in the example below:
 Tip:
Tip:Use the scroll bar to on the right hand side of the screen to view the complete list of available components.
On Available Product Components, select from these choices:
JD Edwards EnterpriseOne Database Server
System Database
Note:This selection includes mandatory system tables. If you do not select this box and the OUI installer does not detect that the component was previously installed, it selects this component automatically. Likewise, if you rerun the JD Edwards EnterpriseOne Platform Pack Installer to add an environment it will check to ensure that this component has already been installed and you will not be given an option to install the environment on a machine, drive, or directory that is different from that which contains the JD Edwards EnterpriseOne System Database.
Production Databases
Prototype Databases
Development Databases
Pristine Databases
JD Edwards EnterpriseOne Enterprise Server
JD Edwards EnterpriseOne Foundation
Note:This selection includes system files. You must choose this feature for all initial installations of the Enterprise Server. If you do not select this feature, the JD Edwards EnterpriseOne Platform Pack Installer automatically selects it for installation.
ES Production
ES Prototype
ES Development
ES Pristine
After you have verified your selection of components, click the Next button.
On Would you like to Install or Upgrade EnterpriseOne?, choose whether you want to install or upgrade JD Edwards EnterpriseOne. The list below describes each run mode.
Install
Install EnterpriseOne
In this mode, the JD Edwards EnterpriseOne Platform Pack Installer checks for the existence of JD Edwards EnterpriseOne business data and control tables; if either exists, the JD Edwards EnterpriseOne Platform Pack Installer aborts. This prevents the inadvertent overwriting of existing critical business data and control tables. If the JD Edwards EnterpriseOne Platform Pack Installer does not detect pre-existing JD Edwards EnterpriseOne data or control tables, the installation process continues normally.
Caution:You should always back up all databases that you want to preserve.
Traditional Upgrade
Traditional Upgrade EnterpriseOne
In this mode, the JD Edwards EnterpriseOne Platform Pack Installer checks for the existence of JD Edwards EnterpriseOne business data and control tables which are prerequisites to an upgrade of JD Edwards EnterpriseOne.
In this Upgrade mode, the installer replaces all objects in the selected pathcodes.
Caution:You should always back up all databases that you want to preserve.
Simplified Upgrade
Simplified Upgrade EnterpriseOne
Note:The Simplified Upgrade is only available when upgrading from JD Edwards EnterpriseOne Applications Releases 9.0 Update 2 or 9.1.
As with the Traditional Upgrade, in this mode the JD Edwards EnterpriseOne Platform Pack Installer checks for the existence of JD Edwards EnterpriseOne business data and control tables which are prerequisites to an upgrade of JD Edwards EnterpriseOne.
The Simplified Upgrade does not deliver Central Objects, except for PS920. The existing Central Objects are preserved and the data sources are configured to point to existing prior release path codes, which can be either from JD Edwards Release 9.0.2 or 9.1. The installer delivers logic objects and path codes for each environment that is selected for the upgrade.
For example, if you run a Simplified Upgrade from DV900 to DV920, the DV900 Central Objects do not match those that are required for Applications Release 9.2. The Central Objects - DV920 points to DV900. The process ensures that an attempt for an object match on these objects does not occur until you run the Spec Merge. The Platform Pack requires the 9.2 table definitions in order to run the TC Workbench (which runs before Spec Merge). Therefore the Platform Pack installs a second spec.ini (Simplified_spec.ini) which points ALL pathcodes to PS920FA
If you choose a Simplified Upgrade, the Platform Pack renames the existing
spec.inito another name (for example,spec.bak) so that it can rename the file for Simplified Upgrade, which isSimplified_spec.ini, tospec.ini. If you build and deploy and new PS920 package before upgrading DV, you will need to update thespec.iniin DV920 to point to the new PS package. For example, PS920FB.If you choose to upgrade the Pristine and Development environments, the installer delivers databases for these path codes:
PS920
PS920CTL
PS920DTA
SY920
OL920
DD920
SVM920
For the database, the JD Edwards EnterpriseOne Platform Pack Installer performs the same as a Traditional Upgrade in terms of delivering the entire database for the Pristine environment. However, unlike the Traditional Upgrade, the Simplified Upgrade does not deliver Central Objects for other environments.
Note:For Simplified Upgrade, for all databases, these users are created by the Platform Pack but they are not used:
DV920
PD920
PY920
Caution:You should always back up all databases that you want to preserve.
Click the Next button.
On Database Options, complete these fields:
Database Type
Use the pulldown to choose DB2 UDB.
Database Server
By default, the JD Edwards EnterpriseOne Platform Pack Installer automatically detects and populates this field with the machine name on which it is running. The JD Edwards EnterpriseOne Platform Pack Installer validates the Database Server name and compares it against the name of the local computer. If these values are different (for example, if you manually change the value of this field), the JD Edwards EnterpriseOne Platform Pack Installer assumes the Database Server is either a clustered or remote server. If you have selected to install databases, and the database server name that you entered cannot be validated, a warning dialog is displayed with resolution instructions. Refer to the section of this chapter entitled: Warning - Database Server Name Does Not Match.
For additional details on all Platform Pack error conditions, refer to the section of this chapter entitled: Troubleshooting Platform Pack Installation.
Caution:If you are installing the Enterprise Server and the Database Server on different machines, you cannot run the installer on the Enterprise Server and install the Database Server remotely. You must copy the installer images to the Database Server and run the installer on that machine. For the Enterprise Server only, you will need the image for disk1. For a Database Server, you will need the disk1 image plus the database disk images.
Secure Password
Caution:In order to ensure data security, Oracle strongly recommends that you change this to a secure password.
If you wish to change the default password that the JD Edwards EnterpriseOne installer uses to connect to your DB2 for Linux, Windows, and UNIX database, you can enter a value for Secure Password that conforms with the security policy of your operating system. The maximum length of the password is 10 characters and cannot contain any of these special characters: @% / \.
Caution:The non-encrypted value for the Secure Password is stored in the UDB_set.sh file. This password is used to load the database components. Oracle strongly recommends that you erase this value once the database scripts have run successfully.
Note: If you subsequently add an additional database component, you must set the value in the set script back to the Secure Password before running the scripts or the OUI installer (which calls the scripts) for the additional components.
Note:If you do not change the default value (DEFAULT), the system creates a password for each user where the password is the same as their user ID. For example, if a user ID is JDE, then by default the system creates a corresponding password of JDE for that user.
Caution:When you change the default password in the Platform Pack installation for your Enterprise Server, you must also manually change the
[DSPWD]section in thejde.inion the Deployment Server and specify the new secure password that you are using. If you fail to synchronize these database password settings, the various Installation Workbenches will not be able to connect to the database.For additional details on working with the
[DSPWD]section of thejde.inifile, refer to the section of this chapter entitled: Working with Database Security.Confirm Password
Re-enter the password.
Click the Next button.
The installer displays the Password Strength panel if you have chosen a weak password.
Caution:The installer program does not force you to change your password for a weak value. However it is highly recommended that you change your password. Use of mixed case, numerics and special characters raise complexity.
Click the Back button to go back and change the password or click the Next button to continue.
On Administrator and End User Roles, specify the roles that the installer will create and assign to the JDE users in the database:
Admin Role
The default value is JDEADMIN.
End User Role
The default value is JDEUSER.
Caution:For your Production systems, Oracle highly recommends that you change these default values for roles.
On Warning, Test data will be laid down for PS and DV Environments, the following warning is displayed:
Demonstration data is included as part of this product which is not intended to be used in production systems. Care must be taken that systems/processes/servers containing the demonstration data are not exposed to untrusted environments where an attacker might be able to use their knowledge of the data to launch an attack against the systems/processes/servers.
Click the Next button.

On DB2 UDB Database Information, complete these fields:
Caution:You should always consult with a DBA for the proper location of the tablespaces on your machine. Do not create the tablespaces in a location with a child relationship to the JD Edwards EnterpriseOne installation directory. For example, the installation directory might be:
/u01/JDEdwardsPPack/E920
c:\JDEdwardsPPack\E920
This practice avoids a potential problem that could occur as a result of actions against the parent directory adversely impacting the child directory.
Instance Name
The default value for this field is blank. You should manually enter the name of your DB2 for Linux, Windows, and UNIX instance. The JD Edwards EnterpriseOne Platform Pack Installer validates the value you enter in this field. The JD Edwards EnterpriseOne Platform Pack Installer will not allow you to continue if the value cannot be validated.
Number of IO Servers
Enter the number of physical disk drives on the database server.
Does Server Use Raid?
Use the radio buttons to indicate Yes or No.
Tablespace Directory
Enter a path where you want the JD Edwards EnterpriseOne Platform Pack Installer to create your DB2 for Linux, Windows, and UNIX databases. For example:
/u01/jdedwardsppack/UDB/Tablesc:\jdedwardsppack\UDB\TablesIndex Directory
Enter a path where you want the JD Edwards EnterpriseOne Platform Pack Installer to create your DB2 for Linux, Windows, and UNIX indexes. For example:
/u01/jdedwardsppack/UDBIndexesc:\jdedwardsppack\UDB\IndexesLob Directory
Enter a path where you want the JD Edwards EnterpriseOne Platform Pack Installer to create your DB2 for Linux, Windows, and UNIX LOBs (large objects). For example:
/u01/jdedwardsppack/UDB/LOBc:\jdedwardsppack\UDB\LOBLog Directory
Enter a path where you want the JD Edwards EnterpriseOne Platform Pack Installer to create your DB2 for Linux, Windows, and UNIX logs. For example:
/u01/jdedwardsppack/UDB/Logsc:\jdedwardsppack\UDB\LogsTemp Directory
Enter a path where you want the JD Edwards EnterpriseOne Platform Pack Installer to create your DB2 for Linux, Windows, and UNIX temp directory. For example:
/u01/jdedwardsppack/UDB/Tempc:\jdedwardsppack\UDB\TempRun Scripts Option
The default value is Run Scripts Automatically.
Optionally, you can use the pulldown to choose Run Scripts Manually. If you choose this option, refer to a later section in the chapter entitled: Manually Running the Database Creation Scripts.
Click the Next button.
On Creating DB2 UDB database owners, before proceeding you must sign on as root and run this script to create accounts for all the DB2 UDB database owners:
addUDBacct.shTypically the above script is found in this location:
/u01/91PPack/scriptsCaution:If you do not run the script as described in this step, the DB2 UDB database creation scripts that are executed by the installer will fail.
After you have successfully run the DB2 UDB account and owner creation scripts, return to the Creating DB2 UDB database owners screen and click the Next button.
Caution:If you receive a Development Environment Warning, refer to this Troubleshooting section Development Environment Warning.
On Specify JRE Home Location, enter or browse to the location of your 32-bit Java Runtime Environment (JRE). In order to proceed, you cannot leave this value blank and you must specify an existing valid location and the JRE in that location must be a 32-bit version. If you accepted the default value for installation path when you installed the Java Runtime Environment, the location will be in a directory under:
/usr/java/jdk<version>/jreor
/usr/lib/jvm/java<version>/jreThe installer validates the specified location and copies the JRE to a location where it can be used by the runtime processes of JD Edwards EnterpriseOne.
Caution:This JRE is a prerequisite to installing JD Edwards EnterpriseOne. Because JD Edwards EnterpriseOne running on an Enterprise Server as a 32-bit application, the pre-installed JRE for use by JD Edwards EnterpriseOne on the Enterprise Server must be a 32-bit version. Refer to the Oracle Certifications for JD Edwards EnterpriseOne Enterprise Servers for additional details and supported vendors and releases of JREs for your platform and operating system.
Click the Next button.
On Summary, in the top half of the screen, review your selections and in the bottom half of the screen review the NOTES, which detail the disk space requirements for OUI support files and also for the Platform Pack being installed on this machine.
Click the Install button.
As the installer runs it displays the Install progress, as shown in the following example.
When the installation completes, the following Running scripts as root dialog is displayed.
On Running scripts as root, the dialog instructs you to perform these actions outside the installer:
Sign on as root.
Navigate to the
SharedScriptssubdirectory of the JD Edwards install directory. For example:/u01/jdedwardsppack/e920/SharedScriptsRun this script to complete setting up the system accounts:
addacct.shThis script also locks down permissions to this directory:
/u01/jdedwardsppack/e920When the scripts have completed successfully, click the OK button to exit the dialog and return to the OUI Platform Pack installer End of Installation screen.
For UNIX with DB2 for Linux, UNIX, and Windows, if you are re-running the Platform Pack to add a pathcode, the following screen is displayed:
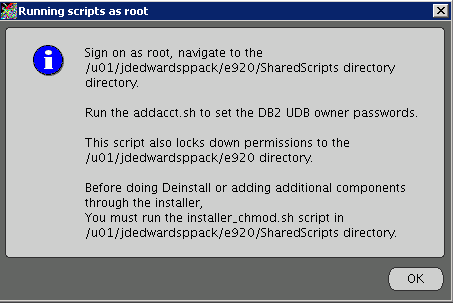
On Running scripts as root, the dialog instructs you to perform these actions outside the installer:
Sign on as root.
Navigate to the
SharedScriptssubdirectory of the JD Edwards install directory. For example:/u01/jdedwardsppack/e920/SharedScriptsRun this script to set up the DB2 for Linux, UNIX, and Windows owner passwords:
addacct.shThis script also locks down permissions to this directory:
/u01/jdedwardsppack/e920When the scripts have completed successfully, click the OK button to exit the dialog and return to the OUI Platform Pack installer End of Installation screen.
On End of Installation, verify the installation of the EnterpriseOne Platform Pack was successful.
Review the Please remember ... portion for the installer log file location. The log file name is specified with the date and stamp when the installer ran. For example:
/u01/app/oraInventory/logs/installActions2015-05-10-11-16-47PM.logClick the Exit button to exit OUI.
On Exit, click the Yes button.