Running the JD Edwards EnterpriseOne Deployment Server Installer
Before you run the Deployment Server installer, you must have already installed a supported JRE on the Deployment Server. This JRE is required for the runtime of JD Edwards EnterpriseOne on the Deployment Server. Refer to the section of this guide entitled: Prerequisites.
Use the procedure in this section to install the JD Edwards EnterpriseOne Deployment Server.
Log on to the Deployment Server as a user with Administrator rights.
Caution:Ensure that the Administrator account name that you use does not contain any special characters such as ampersands, asterisks, or underscores.
Locate the disk 1, which is either a physical disc or disc image directory, for the Deployment Server installation DVD.
Tip:Refer to the preceding Tip: Installation Methods for a list of various installation methods.
Caution:Microsoft Windows 2012. For Microsoft Windows 2012, if you are using a physical DVD and the installation starts automatically, you must cancel this process and start the installation manually.
Caution:Microsoft Windows 2012. For Microsoft Windows 2012, you must right-click on the executable and select Run as Administrator from the drop-down.
From disk1, execute the
InstallManager.exefile from the root folder. For example:\Disk1\InstallManager.exe
On JD Edwards Install Manager, select this link:
EnterpriseOne E920 Deployment Server
After the OUI installer is launched, a command window is briefly displayed and then it is closed and the Welcome screen is displayed.
On Welcome, select the Next button.

On Select Installation Type, select the appropriate radio button for these installation types:
Full
The Full selection installs the Deployment Client (Planner), Development, Prototype, Pristine and Production pathcodes and also installs JD Edwards EnterpriseOne files on the local machine. This selection is recommended for the general user.
Custom
The Custom selection lets you choose the specific environments you want to install on the deployment server. The deployment client (Planner) is always installed on the local machine. You may choose to install JD Edwards EnterpriseOne Files and environments on a remote machine. In that case, first you need to setup a mapped drive as described in the section of this guide entitled: Understanding EnterpriseOne Files Location. This selection is only recommended for an expert user.
After you have selected an installation type, select the Next button.

On Specify Home Details, you must specify an Oracle Home path and a name for that path.
Tip:For more information about Oracle Homes and recommendations for naming the Oracle Homes for the JD Edwards EnterpriseOne Deployment Server, see the section in this guide entitled: Understanding Destination Paths.
Each Oracle product that is installed on a machine has what is termed an Oracle Home path. This path contains all the files for each Oracle product. This path has a user-specified name as well.
On Specify Home Details, complete these fields:
Field
Description
Name
Enter a name for the Oracle Home for the JD Edwards EnterpriseOne Deployment Server. For example:
JDE_DEP920_HOME_1
Tip: Although the default path provided by the OUI installer includes the suffixed "
_1" string, Oracle recommends you remove that suffix string and make the path simply:JDE_DEP920_HOME
Path
The path you enter here is for the Oracle Home path where the E1 Deployment Server will be installed. For example, the path might be:
C:\JDEdwards\E920Do not specify the same Oracle Home name or path into which you installed the local database; however, you can specify a path that is a subdirectory of the database's Parent Oracle Home.
For local installation, you must use the default value. For remote installation, this value must be the letter designation of the mapped drive. For additional details, refer to the section of this chapter entitled: Understanding Destination Paths.
Select the Next button.
The installer checks the specified target drive to ensure there is sufficient disk space to complete the installation. If the installer detects insufficient disk space it displays the following error:
If you receive the above error, you must click the OK button and restart the installation to a target drive with sufficient disk space.
Select the Next button.
Tip:If you chose Full installation on the preceding screen (Select Installation Type), you can skip directly to Step 18 located later in this task to complete the Deployment Server installation.
If you chose Custom installation on the preceding screen (Select Installation Type), proceed with the following steps.
 Note:
Note:The Available Product Components screen and subsequent screens until the Summary are displayed if you chose Custom installation on Select Installation Type in Step 7.
On Available Product Components, EnterpriseOne Deployment Server, enable the checkboxes to select these features components you want to install:
EnterpriseOne Deployment Client
The selection for EnterpriseOne Deployment Client is mandatory in order to select other components. If you do not select this component, you cannot select any other components. This installs the planner pathcode and databases on the local machine. You will be given an option to install other components on a remote share.
EnterpriseOne Files
The selection for EnterpriseOne Files includes mandatory system files. If you do not select this component you cannot select any other environment components. Likewise, if you re-run the JD Edwards EnterpriseOne Deployment Server Installer to add an environment it will check to ensure that these files are already installed and you will not be given an option to install the environment on a machine, drive, or directory that is different from that which contains the JD Edwards EnterpriseOne files.
Development Environment
Prototype Environment
Pristine Environment
Production Environment
Tip:You can use the Select All button to select all components.
On Specify EnterpriseOne Files Location, you can accept the default local value or enter a mapped network drive.
The installer provides a default value which is your Oracle Home path. For example:
C:\JDEdwards\E920If you prefer to install JD EnterpriseOne Files to a remote Deployment Server, you can specify a mapped drive. For example:
Z:\The following screen shot shows an example of how to properly specify a previously defined mapped drive.
For more on the proper use of mapped drives and network drives, refer to the following Caution.
Caution:You cannot enter a network path such as:
\\machine_name\network_shareIf you enter a network path instead of a mapped drive, the installer will give an error.
When you click Browse to select the drive, if the mapped remote drive is not listed, perform these steps:
Start a Command Prompt session by right clicking and selecting Run as Administrator.
This command prompt opens on the Microsoft 2012 Server with Administrator:cmd in the header.
In the command window, type this command:
net use z:
                                    \\<MachineName>\<SharedPath>
where
z:is the drive on which you mapped drive exists.
Select the Next button.
On Choose E1Local User Password, you can specify a secure password to be used for the E1Local Database Users on the Deployment Server. This unique password will be used for all database accounts created by the Deployment Server installer.
The default password is the same as the user name of the database account. For example, if the user name of the local database account is JDE, the default password is JDE.
If you do not specify a E1Local user password, by default the installer will use this value: DEFAULT. You cannot leave this field blank.
If you change the password, make sure you sign into JD Edwards EnterpriseOne as JDE with the new changed password. You must also make sure to match this new JDE password on the Enterprise Server and/or Database Server for use during the Platform Pack installation.
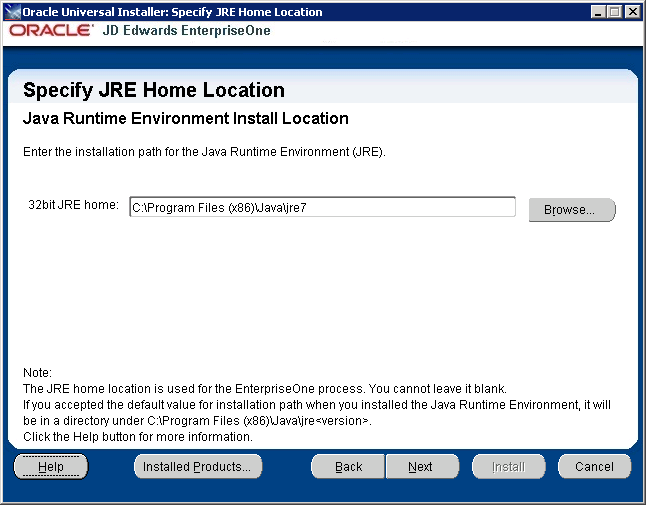
On Specify JRE Home Location, enter the installation path for the Java Run Time Environment. You must either enter a path or click the Browse button to select a path to the root directory of a JRE installation, which is usually the directory containing the
\binand\libdirectories for the JRE.Note:The JRE Home Location is required for use by JD Edwards EnterpriseOne processes. You cannot leave it blank. If you accepted the default value for the installation path when you installed the Java Runtime Environment, it will be in this directory:
c:\Program Files
                            (x86)\Java\jre<version>
For additional information, click the Help button on this screen.
Caution:Ensure the JRE version level you specify here is supported by the Oracle Certification for the Deployment Server running JD Edwards EnterpriseOne Release 9.2 and greater.
Also for JD Edwards Release 9.2, only 32-bit versions of the JRE are supported. The installer verifies the bitness of the JRE you specify here.
Select the Next button.
The installer validates the specified location for the JRE. If the location is invalid (as indicated by the presence or absence of the expected
JVM.dll), the following error message is displayed:
If you received an error indicating an invalid JRE location, click the OK button and specify a valid value.
If the value you selected for the JRE location is valid, the installer proceeds and display the Summary screen. Below is a sample Summary from a Custom installation type.
On Summary, verify the list of items to be installed is correct.
If there is insufficient disk space to complete the installation on the Deployment Server target machine, an error message is displayed.
Click the Install button.
The JD Edwards EnterpriseOne Deployment Server Installer displays a panel showing the ongoing status of the installation.
When the installation of the Deployment Server finishes, the End of Installation screen is displayed.
Caution:Examine the Installer Logs. Even though the screen indicates that the installation was successful, you should always check the logs before you attempt to run the Deployment Server. The file is named
log.txtand is located in the Deployment Server installation directory. For example:C:\Program Files (x86)\Oracle\Inventory\logs\InstallActions\ installActionsyyyy-mm-dd_hh-mm-ssPM.logFor additional details on log file names and location, refer to the section of this chapter entitled: Oracle Database Installer Logs.
On End of Installation, select the Exit button.