Defining Node Parameters
Access the Node Definitions page (.)
This example illustrates the fields and controls on the Nodes - Node Definitions page for the default local node. You can find definitions for the fields and controls later on this page.
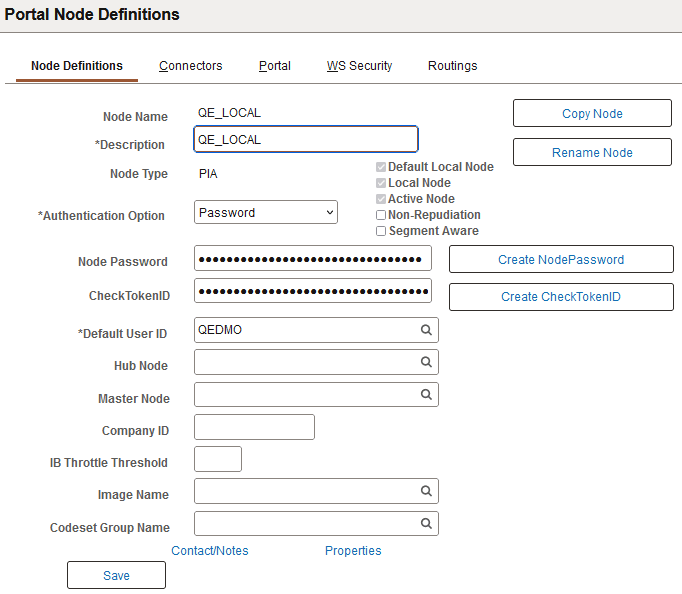
The previous example shows the node definition for the node QE_LOCAL, the default local node.
When the definition is for an External type node, additional fields appear on the page.
This example illustrates the fields and controls on the Nodes - Node Definitions page for an external node. You can find definitions for the fields and controls later on this page.
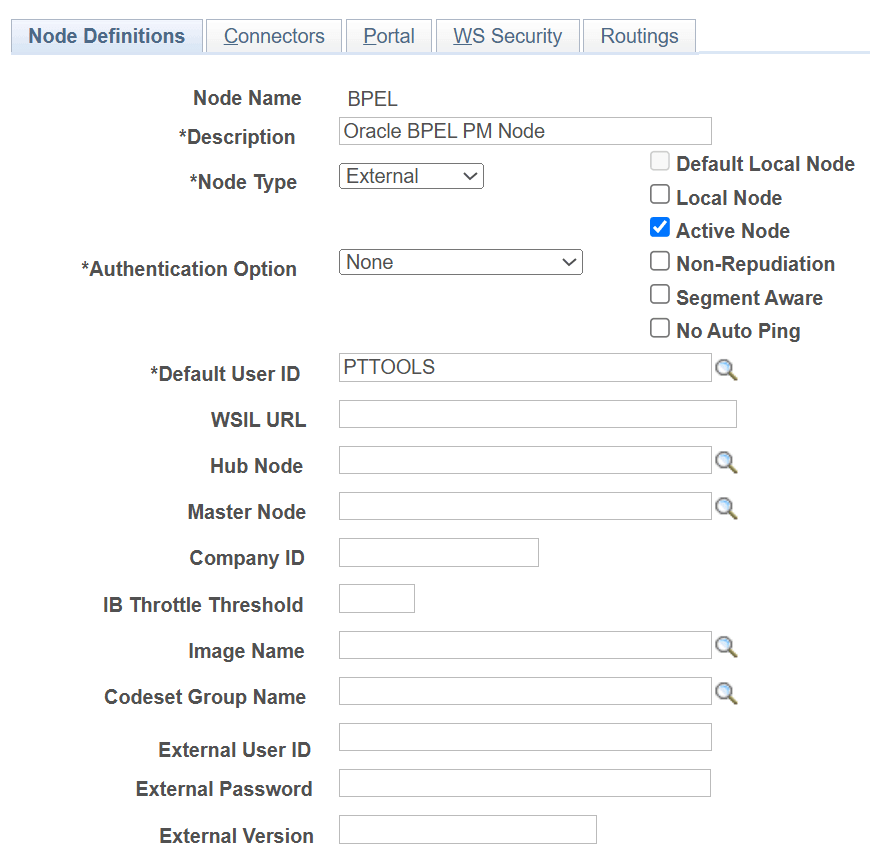
The previous example shows the node definition for the node EXTERNAL_TEST_NODE, an External type node.
| Field or Control | Description |
|---|---|
|
Description |
Enter a descriptive name for the node. |
|
Node Type |
Select from: PIA: Designates the node as a PeopleSoft database that uses PeopleSoft Integration Broker. This is the default for a new node. External: Designates the node as an entity that doesn’t use PeopleSoft Integration Broker. ICType: A portal-specific setting that PeopleSoft Integration Broker doesn’t use. |
|
Authentication Option |
Select from:
|
|
Default Local Node |
Indicates whether the current node represents the database to which you are assigned. |
|
Local Node |
Indicates that the current node is either a portal node or the default local node. You cannot change this setting for the default local node. |
|
Active Node |
Select to make the current node definition active, so it can be used by PeopleSoft Integration Broker. Clear the box to inactivate the node. Note the following points about inactivating a node:
|
|
Non-Repudiation |
Select to activate nonrepudiation for the current node. Note that to activate nonrepudiation for the current node you must also activate nonrepudiation in the service operation definition for which you want this feature. |
|
Segment Aware |
Select this check box to configure the node to handle message segments. |
|
No Auto Ping |
Select this check box to disable automatic pinging for the node. |
|
Node Password |
Displays when the Authentication Option is Password. Enter a node password. The limit for this field is 88 characters. |
|
Confirm Password |
Reenter the node password you entered in the Password field. |
|
Create NodePassword |
The Create NodePassword button appears only on the definition for the default local node. Oracle recommends that customers use strong, complex passwords and make use of the maximum number of characters. This button provides a convenient method to fulfill the requirements for a more secure password.
|
|
Create CheckTokenID |
This control appears only when the Authentication Option type is Password or Certificate. Click the button to create a system-generated check tokenID for use in conjunction with single signon among PeopleSoft systems. When you click the button, the system populates the Check TokenID field with the generated value. See Security Administration: Implementing PeopleSoft-Only Single Signon for more information about check token IDs. |
|
Check TokenID |
This field appears only when the Authentication Option type is Password or Certificate. This field contains the check token ID value generated after clicking the Create CheckTokenID button. This ID is used in conjunction with single signon among PeopleSoft systems. Alternatively, you can create a custom ID up to 256 characters. Note: Copy the value in the field before saving the page. You must provide this value to other PeopleSoft partners/nodes participating in single signon, as they must define this value on their database on the remote node definition that represents your database. After you save the page, the field becomes masked. See Security Administration: Implementing PeopleSoft-Only Single Signon for more information about check token IDs. |
|
Default User ID |
On inbound integrations, this is the user ID that the sender must specify to invoke a service operation, unless you have set up an external user ID for this purpose. On outbound integrations, this is the default user ID sent with the service operation. |
|
WSIL URL |
This field appears only when working with an External node type. This field is used in conjunction with using introspection to create routing definitions. Enter the WSIL URL for the target system to include in the routing definition. |
|
Hub Node |
Select the name of a node that will serve as a “gatekeeper” for the current node. You can select any existing PeopleSoft Pure Internet Architecture node for this purpose. Not all node types are appropriate as hub nodes. Nodes of type ICType are portal-specific, and aren’t used by PeopleSoft Integration Broker. A node of type External typically isn’t an Integration Broker system, so it might not be usable as a hub node unless you’ve explicitly configured it to be compatible with Integration Broker. |
|
Master Node |
This field is for information only. If the current node is used as a hub, you can indicate the target node with which it’s associated. If the current node represents a subordinate database, you can indicate the primary database. |
|
Company ID |
Enter the name of the company or organization associated with the current node. |
|
IB Throttle Threshold |
Set this parameter on a remote node definition to limit the number of requests sent to the node per dispatch. The setting is in minutes. For slow-processing systems, this option can help to prevent saturating the targeting system with requests. This parameter is used only for asynchronous integrations. |
|
Image Name |
Select an image from the system database. Any application that uses images can use the selected image to represent the current node. |
|
Code Set Group Name |
Select the codeset group to which you want the current node to belong. Transform programs invoked by service operations use this association to search for message data requiring translation. |
|
Copy Node |
The Copy Node button displays after you have saved the initial node definition. Click to define a new node with the same properties as the current node. The Default Local check box is cleared for all new nodes. Note: If you copy a local node, the new node will be local as well. You must clear the Local Node check box to use it with PeopleSoft Integration Broker. |
|
Rename Node |
The Rename Node button displays after you have saved the initial node definition. You can rename only the default local node. Additional information about deleting nodes is contained elsewhere in this topic. |
|
Delete Node |
The Delete Node button displays after you have saved the initial node definition. You cannot delete the default local node. Additional information about deleting nodes is contained elsewhere in this topic. |
|
External ID |
This field appears only when working with an External node type. This field is used for outbound integrations in conjunction with implementing WS-security. See the Specifying External User IDs and Password section in the Implementing Web Services Security topic. |
|
External Password |
This field appears only when working with an External node type. This field is used for outbound integrations in conjunction with implementing WS-security. See the Specifying External User IDs and Password section in the Implementing Web Services Security topic. |
|
External Version |
This field appears only when working with an External node type. This field is currently not used. |