Understanding Input Information for Integration Broker Projects
This section discusses the options you can define when working with Integration Broker MIME and Integration Broker XML project types.
Header Information Tab
Use the Header Information tab to create service operation headers. This table describes the controls on the tab:
| Field or Control | Description |
|---|---|
|
Requesting Node |
Identifies the name of the node that is making the request. |
|
Ext Operation Name |
Identifies the service operation and version. This matches the External Operation on the routing definition parameters page. |
|
Operation Type |
Identifies the operation type. Values are:
|
|
App Serv Domain |
(Optional.) Identifies the application server and domain that will receive the service operation. |
|
Password |
(Optional.) Identifies the password as entered in the node definition, if password authentication is used. |
|
Originating Node |
(Optional.) Identifies the name of the node that started the process. |
|
Originating Process |
(Optional.) Identifies the name of the process where the publish event originated. For example, a service operation published from the Inventory definitions page would have a process name of INVENTORY DEFIN. |
|
Originating User |
(Optional.) Identifies the user ID login from where the service operation was initially generated. |
|
Queue |
(Optional.) Identifies the name of the queue expecting the service operation. |
|
Sub Queue |
(Optional.) Identifies subprocesses for the queue. |
|
Visited Nodes (Integration Broker MIME project type only) |
(Optional.) Identifies nodes through which the service operation has passed. Separate the values by semicolons. Visited nodes enable you to mimic visited node information populated when sending PeopleSoft service operations through PeopleSoft Integration Broker. |
|
Destination Node |
(Optional.) Identifies destination node for the service operation. |
|
Final Destination Node |
(Optional.) Identifies the final destination node. Use this option when working with a hub configuration. |
|
Transaction ID |
(Optional.) Identifies a transaction ID for this service operation. |
|
External Message ID |
(Optional.) A unique ID to eliminate duplicate service operations from being delivered to PeopleSoft Integration Broker. The maximum length is 70 characters. |
|
Conversation ID |
(Optional.) Identifies a conversation ID for this service operation. |
Headers Cont. Tab
You can work with the following controls on this tab.
Note:
This tab appears only when you are working with Integration Broker MIME projects.
| Field or Control | Description |
|---|---|
|
Cookies |
(Optional.) Identifies cookies that the server might require. Use semicolons to separate multiple cookies. |
|
Gather Statistics |
Select this check box to gather statistics about system performance when posting service operations using Send Master. |
Input File Tab
Use this tab to add input files. You can also use this tab to apply nonrepudiation, and base64 encoding and compression. This section describes the controls featured on this tab. Controls that appear on this tab that are not described in this section are documented earlier in the Send Master product documentation.
See Navigating in Send Master.
This table describes the controls on the Input File tab:
| Field or Control | Description |
|---|---|
|
Base 64 Encode/ Compress |
(Optional.) Select this check box to apply base64 encoding and compression to the service operation. |
|
Non-repudiation |
(Optional.) Select this check box to apply nonrepudiation to the service operation. |
Connector Tab
This tab appears only when you are working with the Integration Broker MIME project type.
This example illustrates the fields and controls on the Connector tab. You can find definitions for the fields and controls later on this page.
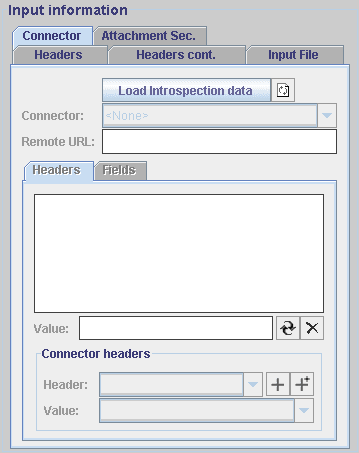
The Connector tab enables you to perform connector introspection on the integration gateway so you can select from all target connectors loaded on the integration gateway. No fields or controls are active on this tab until you enter connector data and select a target connector.
After you select a target connector, you can select specific target connector properties to use and define those property values. In addition, you can specify and define headers and fields that a selected connector needs to be able to pass information and invoke service operation requests.
Note:
Header properties with which you work on this tab correspond to properties with the property IDHeaders in PeopleSoft Pure Internet Architecture. Field properties with which you work on this tab correspond to any property ID other than Header in PeopleSoft Pure Internet Architecture.
This table describes the controls on the Connector tab:
| Field or Control | Description |
|---|---|
|
|
Click the Load Introspection Data button to load all target connectors that are currently installed on the integration gateway. |
|
|
Click the Refresh button to apply and make available in Send Master any changes that you make to target connector properties on the integration gateway. |
|
Connector |
Select a connector from the drop-down list. The default is <None>. You must first click the Load Introspection Data button for any connectors to appear in the list. |
|
Remote URL |
Enter a URL to redirect service operations to a different URL that is specified in the Server URL field in the Project Definitions section. |
|
Headers Box |
This area displays the headers, and the current values assigned to them, that you have selected for the target connector. |
|
Fields Box |
This area displays the fields, and the current values assigned to them, that you have selected for the target connector. |
|
Value |
Enter the value for the selected header or field. |
|
|
Click the Update Selected Header/Field Value in List button to apply the value in the Value field to the selected field or header in the Headers box or the Fields box. |
|
|
Click the Delete button to delete the header or field that is selected in the Headers box or the Fields box. |
|
Value |
Default header and field values appear in this field. Enter the desired value for the selected header or field in the Headers box or the Fields box. |
|
|
Click the Add Selected Header/Field and Value button to add the header in the Header field and its default value to the Headers box, or to add the field in the Field field and its default value to the Fields box. |
|
|
Click the Add All Required Headers/Fields and Their Default Values button to add all of the required headers or fields for the selected target connector and their default values to the Headers box or the Fields box. |
|
Header |
Use the Header drop-down list to select a value from all defined headers for the selected target connector. When you select a header from the list, its default value, if one exists, appears in the Value field. The Header drop-down list appears only when you work with the Headers subtab. |
|
Field |
Use the Field drop-down list to select a value from all defined fields for the selected target connector. When you select a field from the list, its default value, if one exists, appears in the Value field. The Field drop-down list appears only when you work with the Fields subtab. |
|
Value |
The Value field displays the default value, if one exists, for any selected header or field. Use the drop-down list to view and select header and field values. After you select a value in the list, click the Add Header button or the Add Field button to change the value in the value text box, or reenter the value that you want to apply in the box. |



Attachment Sec tab
Use this tab to test attachments. This table describes the controls on the Attachment Sec tab:
| Field or Control | Description |
|---|---|
|
Content ID |
Identifies the content ID for the attachment. |
|
Content Url |
Identifies the content URL for the attachment. |
|
Content Encoding |
Identifies the encoding used in the attachment. |
|
Content Base |
Identifies the base property for the attachment. |
|
Content Location |
Identifies the content location for the attachment. |
|
Content Disposition |
Identifies the disposition of the attachment. |
|
Content Language |
Identifies the language for the attachment. |
|
Content Disposition |
Identifies the disposition of the attachment. |