Configuring OGL
Use the OGL Configuration page (PTOGLCONFIG) to identify or create your custom OGL Application Class, OGL Roles and to enable OGL system wide.
Select PeopleTools, then Portal, and then OGL Configuration.
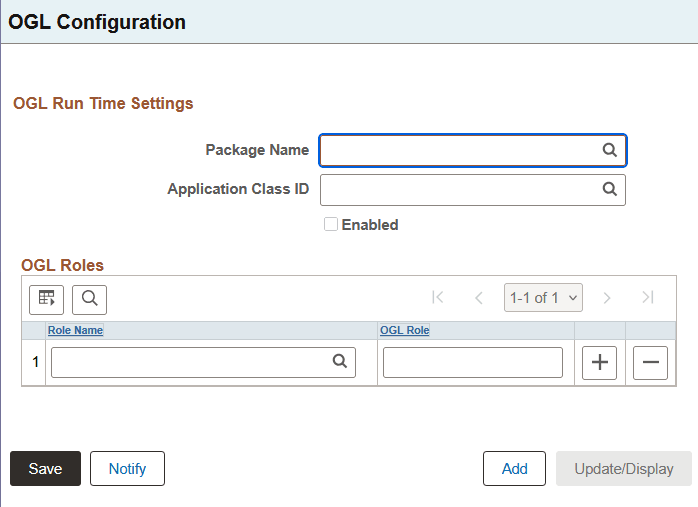
This example illustrates the fields and controls on the OGL Configuration page.
| Field or Control | Description |
|---|---|
|
Package Name |
Select the name of your OGL application package. Note: You can apply custom JavaScript modifications, such as passing additional parameters, to your custom Application Package in Application Designer without it being classified a customization. |
|
Application Class ID |
Select the name of your OGL application class. Note. You can apply custom JavaScript modifications, such as passing additional parameters, to your custom Application Class in Application Designer without it being classified a customization. |
|
Enabled |
Select this check box to enable OGL on the system. |
|
Role Name |
Select PeopleSoft roles that will have access to selected guides. |
|
OGL Role |
Enter a name for an OGL role that is associated with the PeopleSoft role. |
To enable OGL:
- On the OGL Configuration page, specify your custom OGL application package and application class.
If there are no values shown when you search for a Package, you must create one, as described next.
- Select the Enabled check box.
- Enter OGL roles as needed.
- Click Save.
You see a message confirming that OGL has been enabled.
- After you have configured and enabled OGL, test to ensure that is working on both classic and fluid pages:
- Refresh the OGL configuration page to ensure that the OGL widget is now displayed on the page.
- Navigate to a fluid page such as the homepage to ensure that the OGL widget is now displayed on that page.
Note:
By default, the Help Center widget is not displayed when there are no guides to be displayed for the specified OGL appId. You can change this setting in the OGL Editor. Go to Settings, Help Panel.
For more information on moving the OGL widget, see
If no values are found when you search for a package you must create a package and application class. To create a new OGL package and application class:
- On the OGL Configuration page, click Add.
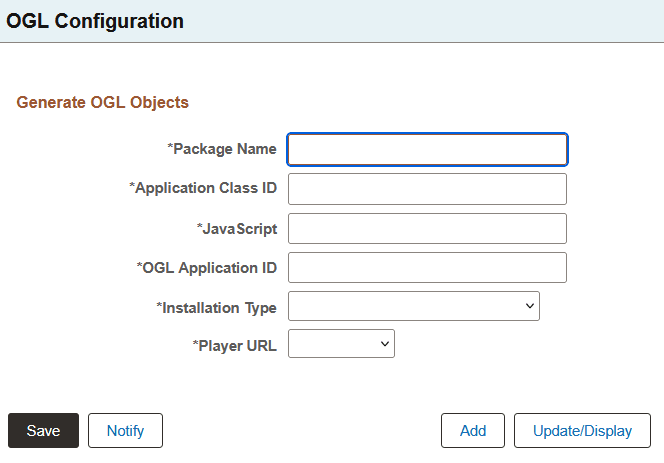
This example illustrates the OGL Configuration - Generate OGL Objects page.
Field or Control Description Package Name
Specify the name of the OGL Application Package to create.
The name must be all uppercase letters or underscores, with no spaces.
Application Class ID
Specify the name of your OGL Application Class to create.
The name must be all uppercase letters or underscores, with no spaces.
JavaScript
Specify the name of your OGL JavaScript to create.
OGL Application ID
Specify the OGL Application ID.
Note: In a clustered environment, you may have a separate application ID for each system in the cluster.
Installation Type
Select one of these installation types: - Development
- Production
Player URL
Select one of the following URLs from the drop-down list:
- APAC (Asia Pacific region)
https://guidedlearning-apac.oracle.com/player/latest/static/js/iridizeLoader.min.js
- EMEA (Europe, the Middle East, and Africa region)
https://guidedlearning-emea.oracle.com/player/latest/static/js/iridizeLoader.min.js
- NAMER (North America region)
https://guidedlearning.oracle.com/player/latest/static/js/iridizeLoader.min.js
- Enter the values; all fields are required.
- Click Save.
- To exit without saving, click Update/Display to return to the initial display.